The Financial Projection module is used to create an estimate or forecast of the company's future financial performance. Unlike a Budget, which is a target or limit, a Projection is a realistic estimate of revenue and expenses that are likely to occur. This module often uses historical data as a reference to create more accurate forecasts.
1. Main View (Financial Projection List)
When you open the module, you will see the main page containing a list of all Financial Projection documents that have been created.
View Explanation This page is the dashboard for managing and monitoring all projection documents.
Filters: You can search for specific documents using various criteria:
By FPCode (Financial Projection Code).
By a date range using Start Date and End Date.
By Document Status Filter and Approval Status Filter.
Projection List: The table below will display all documents matching the filters. The table currently shows "...No Data Available..." because no documents have been created in the selected date range.
Main Columns: The important columns that will be displayed include FPCode, Date, Memo, Cost Center, Amount, Status, and Approval.
Button Functions
New: The button to create a new Financial Projection document.
2. Steps to Create a New Financial Projection
The following is a guide to creating a Financial Projection document.
Step 1: Click the "New" Button
From the main view, click the New button
located in the bottom-left section to open a new submission form.
Step 2: Fill in the Header Information (General Information)
Once the form opens, fill in the general information in the upper section:
Journal Date: Fill in with the date the projection is created. By default, it will be filled with today's date (July 28, 2025).
Memo: Provide a clear description of the projection's content, for example: "HORECA Sales Revenue & Expense Projection - Semester 2 2025".
Cost Center: Select the department whose performance is being projected.
Financial Projection Period: Select the projection period year, for example, 2025.
Data Upload: You can attach a supporting file if available.
Step 3: Fill in the Projection Details In the table section below, detail each projection item one by one. This is the most critical part of the process.
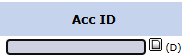
Account ID: Enter the revenue or expense account code to be projected. The Account Name will appear automatically.
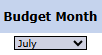
Financial Projection Month: Select the month being projected (e.g., July).
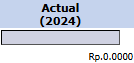
Actual (2024): This column will display the actual data from the previous year (2024). Use this number as your primary reference.
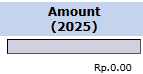
Amount (2025): Enter your projection figure for the current year (2025) in this column. You can increase or decrease it from the 2024 actual figure based on targets or market conditions.
Description: Provide specific notes if there are certain assumptions made in creating the projection.
To add a new row, click the + icon.
Step 4: Saving and Confirmation Use the buttons in the bottom-left section to finish:
Save: To save the projection as a draft. You can still edit it later.
Confirm: To finalize and submit the document. Once confirmed, the document will enter the approval workflow.
Back: To cancel and return to the main page.
Tips & Important Notes
Use the Actual (2024) column as a baseline or reference when creating the projection for the Amount (2025) to make your estimate more accurate and realistic.
Remember, a Financial Projection is different from a Budget. A Projection is a forecast of what is likely to happen, whereas a Budget is a target or limit that must be achieved or not exceeded.
After pressing Confirm, this document will most likely go to a "Financial Projection Inbox" to be reviewed by a superior, following a workflow similar to the Budget Plan.


No comments to display
No comments to display