The Set Budget Plan module is used to record or establish the final and official version of an approved budget. While the "Budget Plan" module is used by departments to submit proposals, this "Master Budget" module is used by the Finance or Budgeting team to formalize that data within the system. The data entered here will become the primary reference for Budget vs. Actual comparison reports.
Difference from the "Budget Plan" Module
Although their interfaces are identical, the roles of these two modules are different:
Budget Plan: Serves as a proposal or draft submission from each department.
Set Budget Plan: Serves as the established, final master budget that has been approved by all levels of management
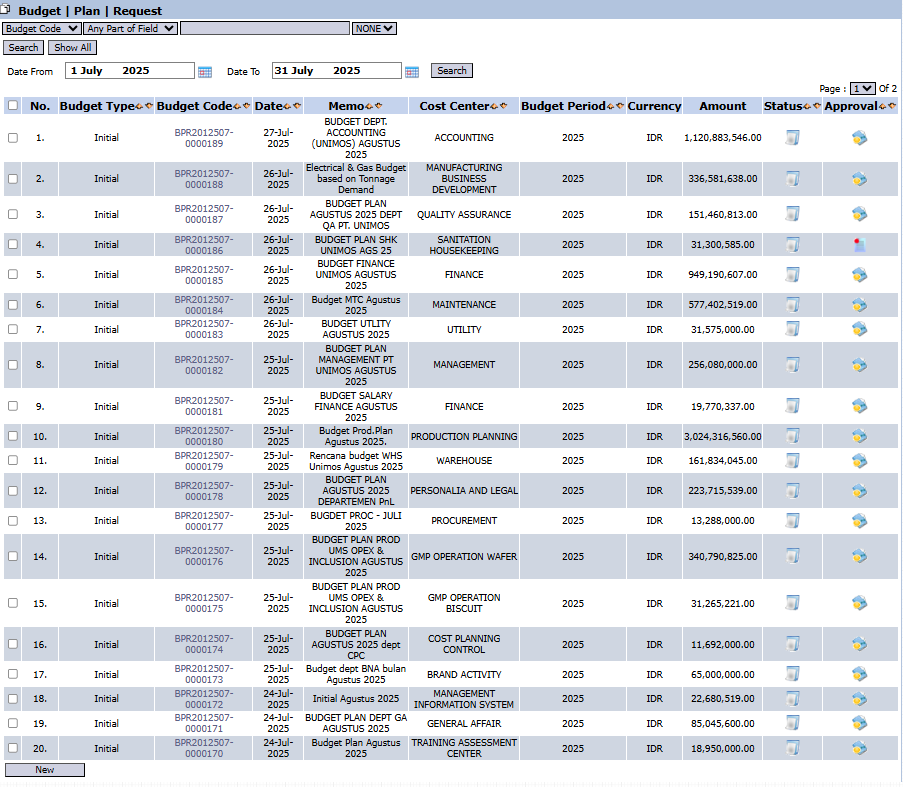
1. Main View (Master Budget List)
The main view of this module contains a list of all official Budget documents that have been established.
View Explanation
This page is the central data hub for all final budgets.
Filter & Search: You can search for specific documents using the Start Date and End Date range.
Budget List: The table below displays all formalized budget documents. Columns such as Budget Code, Memo, Cost Center, Amount, Status, and Approval provide a summary for each entry.
Button Functions
New: Used to create a new Master Budget entry.
2. Steps to Create a Master Budget
This process is typically performed by the Finance or Budget Controller team after all Budget Plan proposals have been approved.
Step 1: Click the "New" Button
From the main view, click the New
button located in the bottom-left section to open the budget entry form.
Step 2: Fill in the Header Information (General Information)
Fill in the general information at the top of the form, referencing the approved Budget Plan data:
Journal Date: Enter the date when this budget is officially established.
Memo: Provide a clear description, for example: "Final Budget for IT Dept. Year 2025".
Cost Center: Select the department whose budget is being established.
Budget Period: Select the budget period year, for example, 2025.
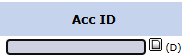
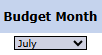
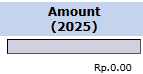
Step 3: Fill in the Budget Details
In the details table, enter each approved budget item:
Account ID: Enter the expense account code (e.g., account for Salary, Electricity, Office Supplies).
Budget Month: Select the allocation month for that cost item (e.g., July).
Amount (2025): Enter the final, approved budget amount.
Description: Provide additional notes if any.
Use the + icon to add more budget detail rows.
Step 4: Saving and Confirmation
Use the buttons in the bottom-left section to complete the process:
Save: To save the budget entry as a draft. Useful if the data needs to be entered in stages.
Confirm: To finalize and officially establish the budget in the system. Once confirmed, this data will become the reference for reports.
Tips & Important Notes
This module is generally operated by the Finance, Accounting, or Cost Planning Control department.
The data entered here must reference the Budget Plan documents that have been fully approved via the Budget Plan Inbox module.
Ensure the selected Budget Period and Cost Center are correct, as this data will be the primary reference for all future Budget vs. Actual comparison reports.


No comments to display
No comments to display