The Introduction Letter module is used to create, manage, and print official introduction letters addressed to new or prospective customers. This module uses a template system to speed up the process of creating letters that are standardized yet can still be personalized.
1. Main View (Introduction Letter List)
The main page of this module displays a list of all Introduction Letters that have been created.
View Explanation & Filters
This page is for viewing and managing all existing introduction letters.
Filters: You can search for a specific letter by Introduction Number or a Date From and Date To range.
Letter List: The table below will display all letters that match the filters, with columns such as Introduction Number, Customer, Introduction Date, and Status.
Button Functions
New: The primary button to create a new Introduction Letter.
Delete: To delete a selected letter.
Print: To print a selected letter.
2. Steps to Create an Introduction Letter
Step 1: Create a New Letter
From the Main View, click the New button to open the Create Introduction Letter form.
Step 2: Fill in Recipient Details
On the form that appears, fill in the information about the letter's recipient:
Letter Date: Select the date of the letter.
Customer: Select the intended customer. The system will likely fill in the Address automatically.
Contact Person: Select the contact person at the customer's company who will receive this letter.
Step 3: Edit the Letter Content (If Needed)
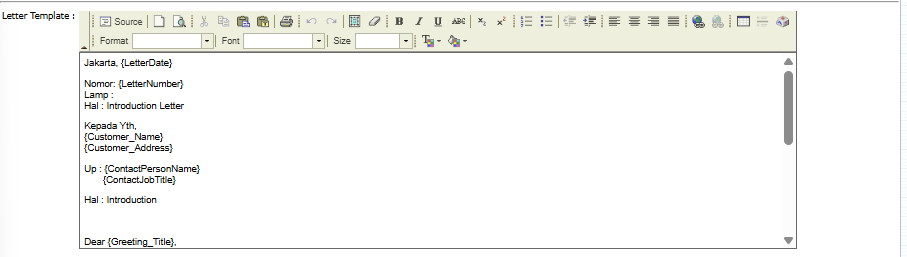
Notice the Letter Template 1 section. The system will automatically populate the letter template with the customer data you selected, replacing placeholders like {Customer_Name} and {ContactPersonName}.
You can use the available rich text editor to make changes or additions to the letter's content if needed.
Step 4: Save and Confirm
After all data is filled in and the letter content is correct, use the buttons in the bottom-left section:
Save: To save the letter as a draft.
Confirm: To finalize the letter.
Back: To return to the main page without saving.
Tips & Important Notes
This module is very useful for maintaining a standard of formal communication when first interacting with important customers.
To ensure the letter template can be populated automatically and correctly, make sure the customer and contact person master data is complete and accurate.
After a letter is Confirmed, you can print it from the main page using the Print button to then be signed and sent.


No comments to display
No comments to display