The Debit Note module within Accounts Payable is used to create and manage Debit Note documents that record a reduction in the company's liability or debt to a supplier (vendor). The most common reasons for issuing a Debit Note here are for a Purchase Return (returning goods to a supplier) or for a claim on damaged or non-conforming goods.
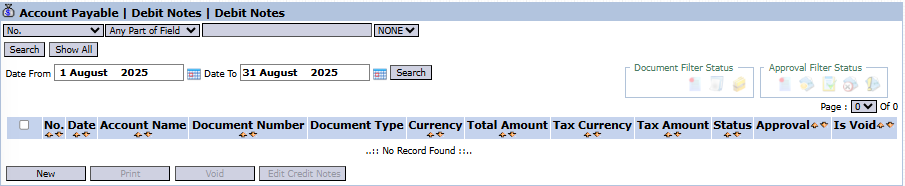
1. Main View (Debit Note List)
The main page of this module displays a list of all Debit Notes that have been created for vendors.
View Explanation & Filters
This page is for viewing and managing all existing Debit Notes.
Filters: You can search for a specific Debit Note by its document number (No.) or a date range (Date From / Date To).
Debit Note List: The table below will display all documents that match the filters, with columns such as Document Number, Account Name (Vendor Name), Total Amount, Status, and Approval.
Button Functions
New: The primary button to create a new Debit Note.
Print: To print a selected Debit Note.
Void: To cancel a Debit Note that has already been issued.
2. Steps to Create a Debit Note
Step 1: Create a New Debit Note
From the Main View, click the New button to open the New Debit Notes form.
Step 2: Fill in Header Information
On the form that appears, fill in the general information:
Vendor: Select the name of the supplier (vendor) related to this Debit Note (e.g., ABADI JAYA MAKMUR).
Date: Enter the document date (e.g., August 11, 2025).
Memo: Provide a clear explanation for the reason the Debit Note is being created (e.g., "Return of damaged goods as per delivery order No. XXX").
Related document / File Upload: You can link another document or upload a supporting evidence file.
Step 3: Fill in Journal Details
In the detail table at the bottom, you must enter the accounting journal entry for this transaction:
Click the [+] icon to add a row.
Enter the appropriate journal entry. For a purchase return, the typical entry is:
Debit the vendor's Accounts Payable account to reduce the liability.
Credit the Purchase Return or Inventory account.
Fill in the Amount column, and allocate it to a CostCenter if necessary.
Step 4: Save and Confirm
After all data and the journal entry have been filled in correctly, use the buttons in the bottom-left section:
Save: To save the Debit Note as a draft.
Confirm: To finalize the document and send it into the approval workflow.
Cancel: To cancel the entry.
Tips & Important Notes
A Debit Note in the Accounts Payable module is used to reduce the amount of debt you owe to a vendor.
Ensure the journal entry in the detail table is correct and balanced before it is confirmed.
A confirmed Debit Note will go to the Debit Note Inbox to be approved, after which it can be used to reduce a vendor invoice payment.


No comments to display
No comments to display