The Sales Order (SO) module is the center of the sales process. Its purpose is to create an official internal document that confirms an order from a customer. An approved SO becomes the instruction for the Warehouse department to prepare and ship the goods, and subsequently becomes the basis for creating the Sales Invoice.
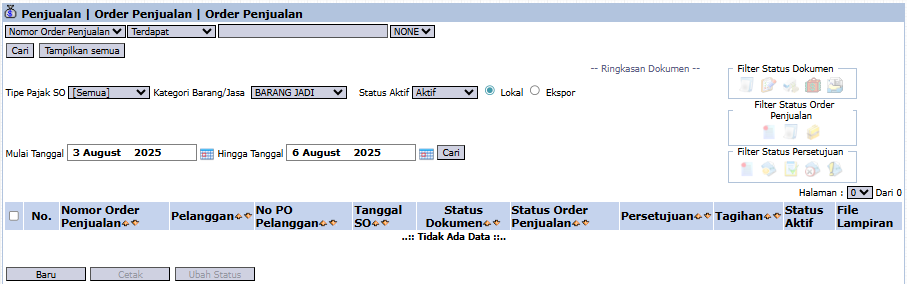
1. Main View (Sales Order List)
The main page of this module displays a list of all Sales Orders that have been created.
View Explanation & Filters
This page is for viewing and managing all SOs.
Filters: You can search for a specific SO by Sales Order Number, SO Type, Goods/Services Category, Status, or a date range.
SO List: The table below displays all SOs that match the filters, with columns such as Sales Order Number, Customer, Customer's PO No. (Customer's Purchase Order Number), SO Date, and various statuses.
Button Functions
New: The primary button to create a new Sales Order.
Print: To print the details of a selected SO.
Change Status: To change the status of a selected SO.
2. Steps to Create a Sales Order
Step 1: Create a New Sales Order
From the Main View, click the New button to open the new SO creation form.
Step 2: Fill in Header Information
At the top of the form, fill in the general order information:
Source document: It is highly recommended to select a Source document such as an existing Quotation or Sales Contract. This will automatically pull the customer, product, and pricing data to reduce errors.
Customer: If not pulling from a source document, select the Customer manually.
Reference Information: Fill in important dates such as SO Date, Due Date, and Customer PO Date. You can also upload the PO file from the customer.
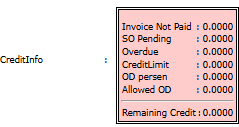
Credit Info: Pay attention to the CreditInfo box on the right side, which displays the customer's credit limit information. The system may reject the transaction if it exceeds the existing limit.
Step 3: Detail the Order Items
In the List of Goods/Services detail table, enter or verify all the items being ordered:
Fill in the Item/Service Code, Qty (Quantity), Unit Price, and Discount (%) if any.
Step 4: Add Miscellaneous Charges (If Any)
If there are other costs outside of the item price (e.g., shipping or insurance), use the Add MiscellaneousCharge section below the item list to add them.
Step 5: Save and Confirm
After all data is filled in, use the buttons in the bottom-left section:
Save: To save the SO as a draft.
Confirm: To finalize and send the SO into the approval workflow.
Cancel: To cancel the entry.
Tips & Important Notes
Creating an SO from a Source document like a Quotation or Sales Contract is the best practice to ensure consistency in prices and terms.
An approved SO is the official instruction for the Warehouse department to process the shipment of goods.
An SO that has been Confirmed will go to the Sales Order Inbox to be approved by a manager before it can be processed further.


No comments to display
No comments to display