The Customer Category module is a tool for managing master data that has two primary functions:
Classification: To create and manage a hierarchical structure for grouping customers based on their type or market segment (e.g., Modern Trade, General Trade, Outlet, Private Label).
Accounting Integration: To link each customer category to specific accounts in the General Ledger. This setup automates the journaling process for every transaction related to customers within that category.
1. Main View (Category Structure)
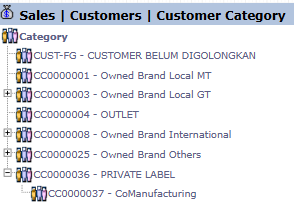
The main page of this module displays all created customer categories in a tree view format.
View Explanation
Hierarchical Structure: This view shows the parent-child relationship between categories. For example, the "CoManufacturing" category (CC0000037) is under the "PRIVATE LABEL" category (CC0000036).
Navigation: You can click the [+] or [-] icons to expand or collapse a category branch. To edit a category, double-click on its name.
2. Steps to Manage a Customer Category
When you create a new category or edit an existing one, you will see a detail form.
Step 1: Fill in Basic Category Information
At the top of the form, fill in the basic details of the category:
Category Code: The unique code for the category, for example, "CC0000037".
Category Name: The descriptive name for the category, for example, "CoManufacturing".
Step 2: Set Up Account Linking (GL Linking - Important!)
This section is a crucial accounting setup for journal automation. You must define the default General Ledger account for each type of receivable transaction, per currency.
Account for Tracking Receivables that will be invoice (A/R To Be Invoiced): Define the account for recording receivables that have not yet been billed (e.g., from goods that have been shipped but not yet invoiced).
Account for Tracking Receivables (A/R): Define the main Accounts Receivable account for this category.
Account for Tracking Customer Deposit: Define the account for recording deposits from customers.
Account for Tracking Customer Down Payment: Define the account for recording Sales Down Payments.
Step 3: Save the Settings
Use the buttons in the bottom-left section to save your changes:
Update: Saves the changes for this category setting only.
Update ALL MASTER CUSTOMER: Saves the changes and applies them to all existing customer data under this category.
Delete: To delete the category.
Tips & Important Notes
The Customer Linked Accounts settings must be done very carefully and in coordination with the Accounting team to ensure all transactions are posted to the correct General Ledger accounts.
A good category structure will greatly simplify the process of sales reporting and customer analysis by segment.
Use the Update ALL MASTER CUSTOMER button with caution, as it will change the accounting links for all existing customers within that category.


No comments to display
No comments to display