
DATA CENTER
Checklist Module Guide
Module Location:
Access Requisition > Checklist > Data Center
-
Data Center Checklist Main View
The Data Center Checklist menu is used to record and monitor the results of periodic inspections of the data center’s condition through the Access Requisition system. In addition to performing checklists, this page provides settings for inspection components-such as Checkpoints, Sub-Checkpoints, and Checkpoint Areas-as well as configurations for the relationships between checkpoints. Users can also view checklist details, copy checklist data, and generate reports from saved data.
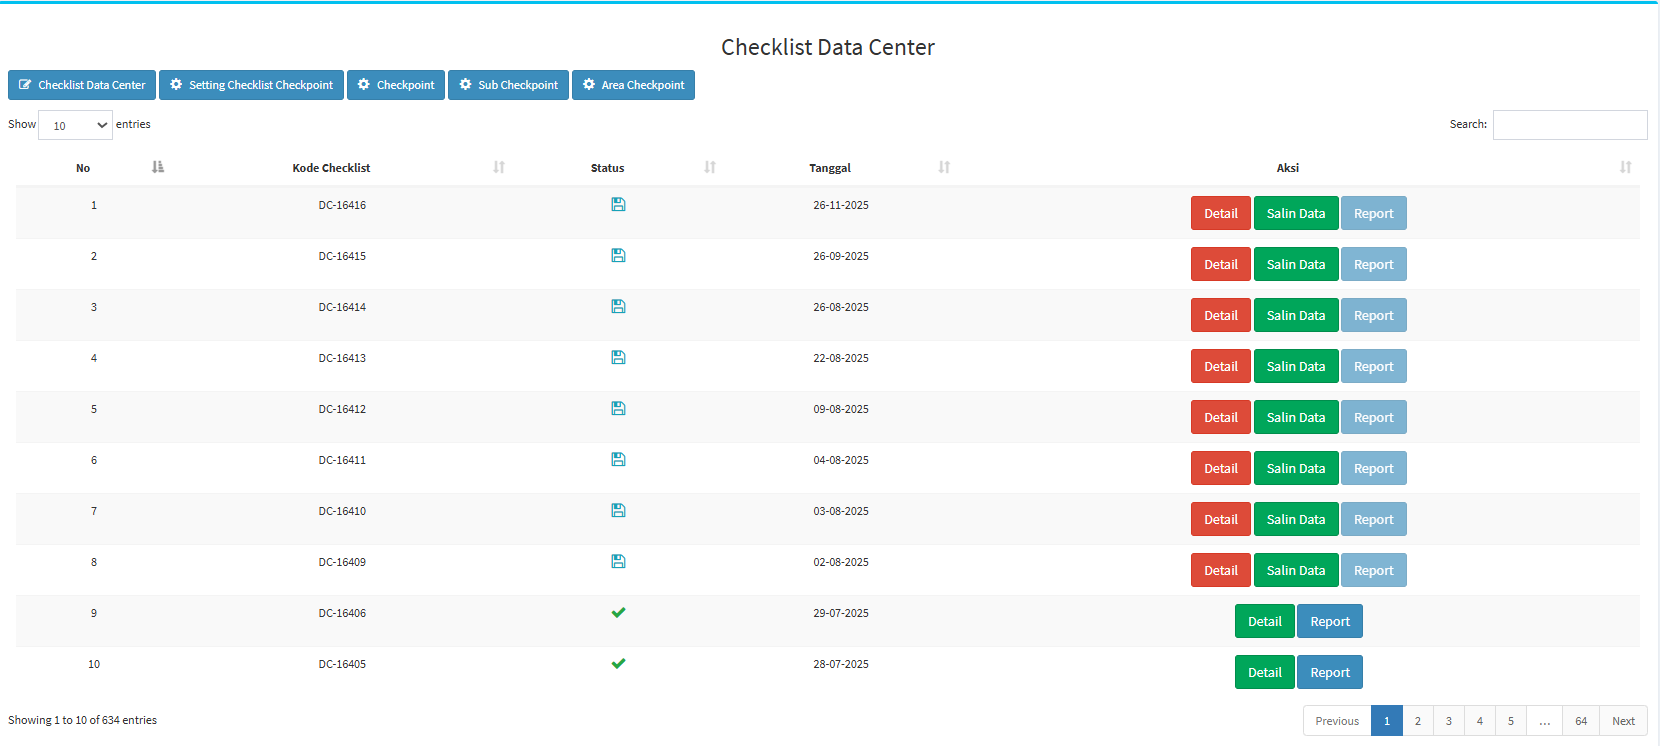
Data Center Checklist List
The main page features a table displaying the Data Center checklists that have been recorded in the system.
Table Description
| Coloum | Description |
|---|---|
| No |
Displays the sequential number of the data. |
| Checklist Code |
Displays the identification code for the Data Center checklist. |
| Status |
Displays the checklist status as an icon.
|
| Date |
Displays the date the checklist was created or executed. |
| Action |
Displays the actions that can be taken on the checklist. |
At the top of the page, there are also several key features:
| Feature | Description |
|---|---|
| Data Center Checklist |
Used to create or run a Data Center checklist. |
| Checklist Checkpoint Setting |
Used to configure the relationships between Checkpoints, Sub-Checkpoints, and Checkpoint Areas used in the checklist. |
| Checkpoint | Used to add and manage master Checkpoints. |
| Sub Checkpoint | Used to add and manage Sub-Checkpoints for each Checkpoint. |
| Area Checkpoint | Used to add and manage areas used in a Checkpoint. |
| Show Entries | Used to specify the number of records displayed in the table. |
| Search | Used to search for specific checklist data. |
-
Data Center Checklist List
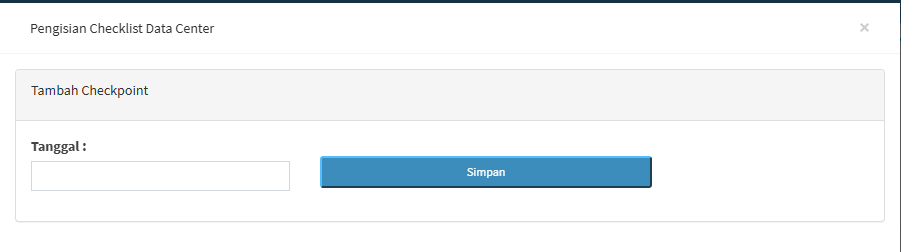
On this page, you can create a new Data Center checklist by clicking the “Data Center Checklist” button. The system will display the Data Center Checklist form. On the initial screen, you’ll see the “Add Checkpoint” section with a date field.
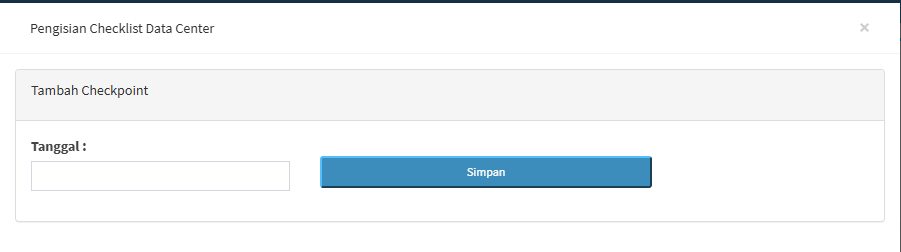
-
Step 1 – Set the date
Fill in the Date field with the date the Data Center checklist will be performed. Make sure the selected date matches the time of the inspection.
-
Step 2 - Click Save
After the date has been set, click the Save button.
Field / button Description Date Used to set the date for the Data Center checklist. Save Used to save or continue creating the checklist based on the selected date. X Used to close the form.
-
-
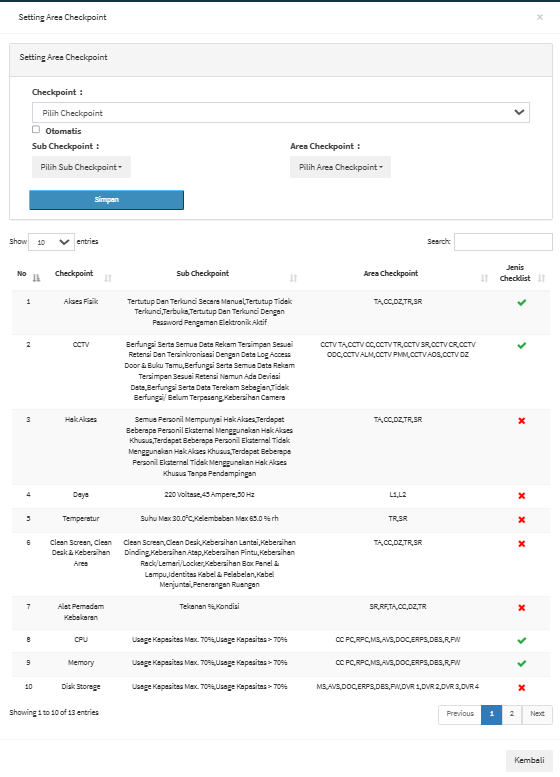
Data Center Checklist Settings
The Checkpoint Settings menu is used to configure the items to be used in the Data Center checklist.
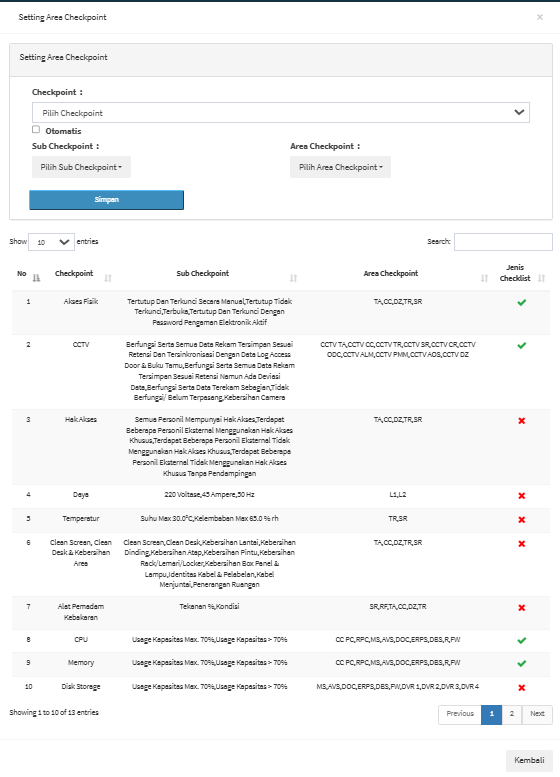
This section contains the following fields:
Field Description Checkpoint Used to specify the Checkpoint to be configured.
Automatic
Used to enable automatic configuration when needed.
Sub Checkpoint Used to select the Sub-Checkpoint associated with the Checkpoint.
Area Checkpoint Used to select the Checkpoint Area related to the inspection.
Save Used to save the configuration.
At the bottom of the page is a table of the configurations that have been created.
Coloum Description No Sequence number of the configuration.
Checkpoint Displays the Checkpoint being used.
Sub Checkpoint Displays the related Sub-Checkpoints.
Area Checkpoint Displays the areas used in the inspection. Checklist Type Displays the conditions or types of checklist configurations in the form of indicators.
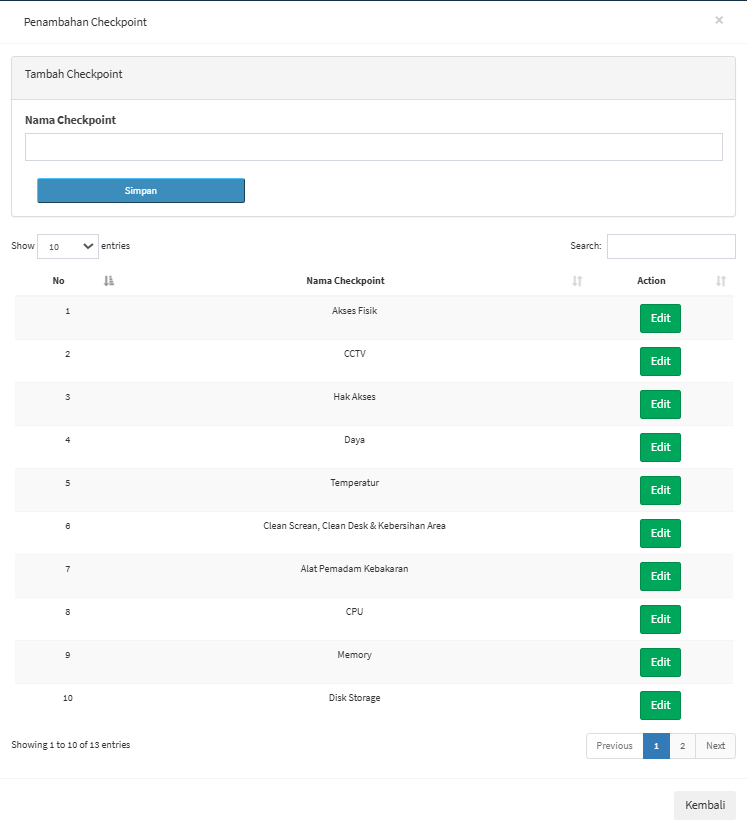
Examples of Checkpoints visible in the system include: Physical Access, CCTV, Access Rights, Power, Temperature, Clean Screen/Clean Desk & Area Cleanliness, Fire Extinguishers, CPU, Memory, and Disk Storage. -
Checkpoint
The Checkpoint menu is used to create and manage the main categories of inspections used in the Data Center Checklist process. Checkpoints serve as the foundation or main groups of inspection items. Each Checkpoint can have several Sub-Checkpoints as detailed inspection items and can be applied to one or more Checkpoint Areas.
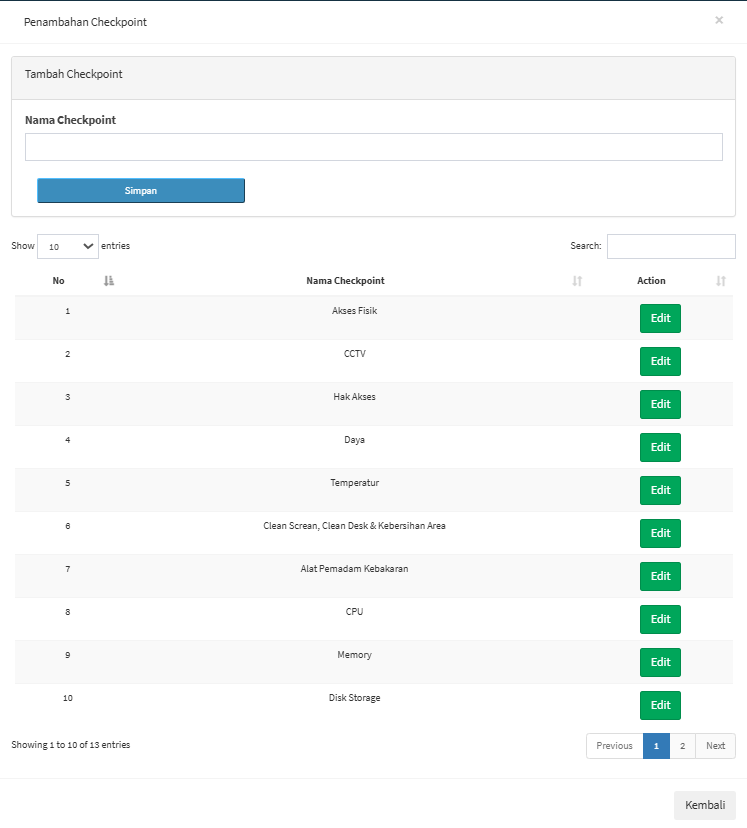
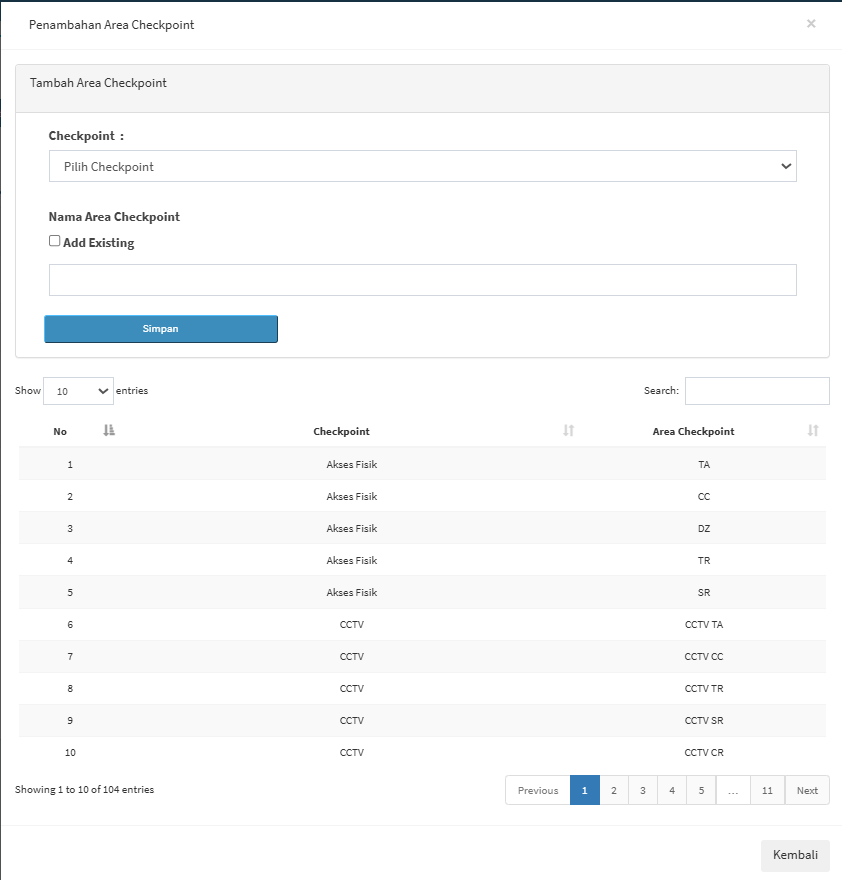
Adding a Checkpoint Area
This page contains a form for adding a new Checkpoint and a table displaying existing Checkpoin
Field Description Checkpoint Used to select the Checkpoint to which a Checkpoint Area will be assigned. Add Existing Used if you want to use existing area data. Checkpoint Area Name
Used to enter the name or code of the inspection area.
Save Used to save the Checkpoint Area.
Field Descriptions
Field / Button Keterangan Checkpoint Name Used to enter the name of the main Data Center inspection category.
Save Used to save the new Checkpoint to the system.
Back Used to return to the previous page.
-
Sub Checkpoint
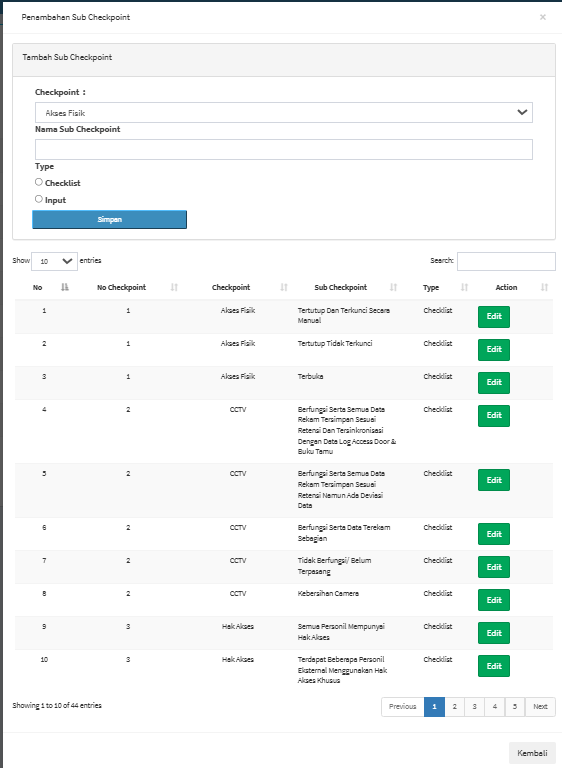
The Sub-Checkpoint menu is used to create and manage the inspection details of a checkpoint in the Data Center Checklist. If a checkpoint is the main inspection category, then a sub-checkpoint is a more specific point or condition inspected within that category.
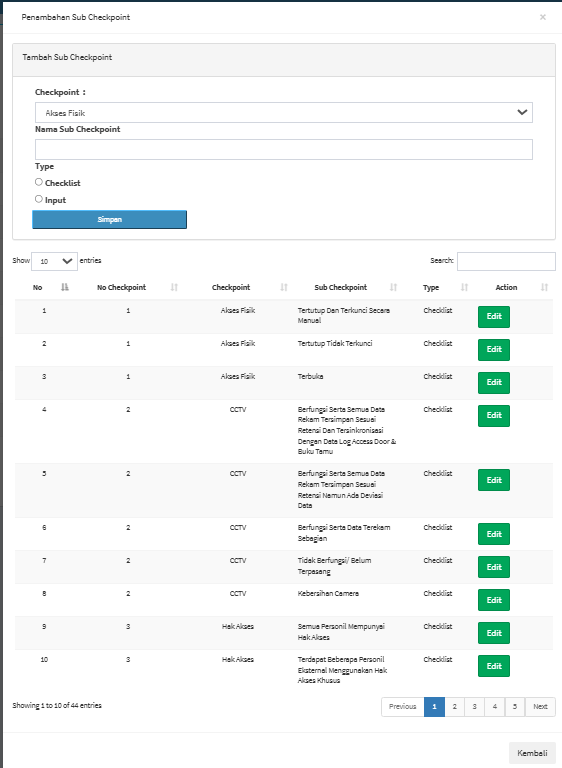
Adding a Sub-Checkpoint
On this page, you can create a new sub-checkpoint by filling in the following information:
Field Description Checkpoint Used to specify the parent Checkpoint of the Sub-Checkpoint. Sub Checkpoint Name Used to enter the name or description of the inspection. Type – Checklist Used if the Sub-Checkpoint consists of a list of conditions. Type – Input Used if the Sub-Checkpoint requires data input from the user. Save Used to save the Sub-Checkpoint. Example of Sub-Checkpoints
For example, under the Physical Access Checkpoint, there are Sub-Checkpoints such as:
-
Closed and manually locked.
-
Closed but not locked.
-
Open.
Meanwhile, under the CCTV Checkpoint, Sub-Checkpoints may include conditions regarding camera functionality, data retention, time synchronization, or camera cleanliness. With this structure, a single Checkpoint can have multiple inspection items.List of Sub-Checkpoints
The table contains the following information:
Coloum Description No Data sequence number.
Checkpoint No Displays the checkpoint number or ID. Checkpoint Displays the parent checkpoint. Sub Checkpoint Displays inspection details. Type Displays the sub-checkpoint type, such as Checklist or Input. Action Displays the action taken on the data. Edit Used to modify sub-checkpoint data. -
-
Area Checkpoint
The Checkpoint Area menu is used to specify the area or location associated with a checkpoint. The system will display the page for adding a checkpoint area.
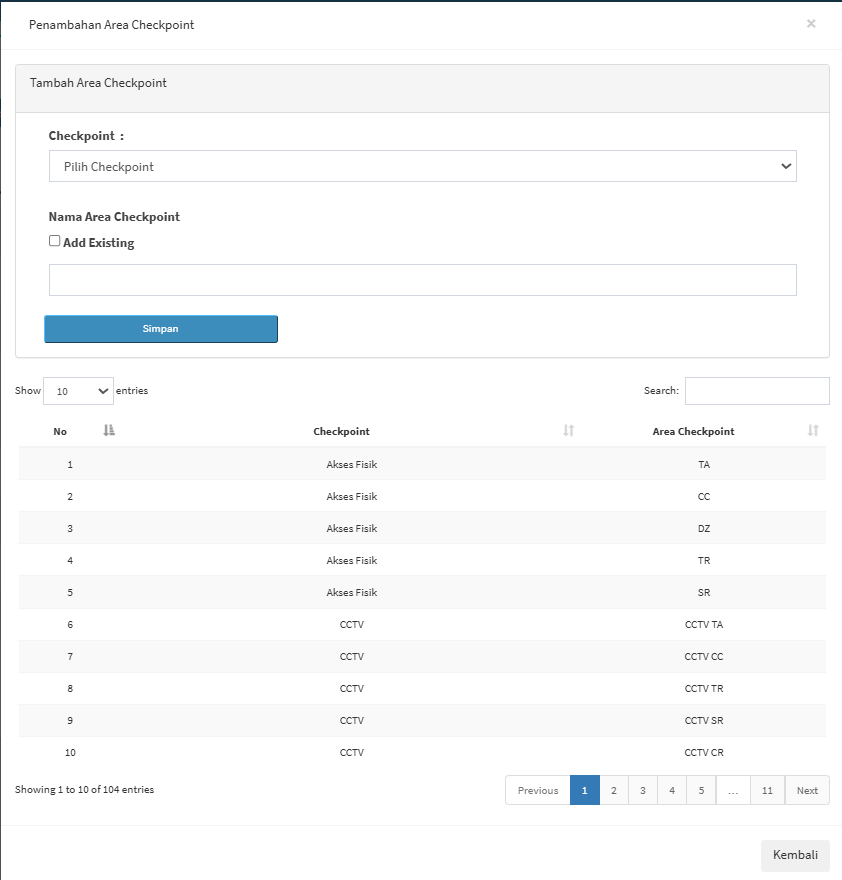
Adding a Sub-Checkpoint
To create a new sub-checkpoint, fill in the following information:
Field
Description
Checkpoint
Used to specify the parent checkpoint of the sub-checkpoint.
Sub Checkpoint Name
Used to enter the name or description of the inspection.
Type – Checklist
Used if the Sub-Checkpoint consists of a list of conditions or a checklist.
Type – Input
Used if the Sub-Checkpoint requires data input from the user.
Save
Used to save the Sub-Checkpoint.
Examples of Sub-Checkpoints
For example, the Physical Access Checkpoint includes sub-checkpoints such as:
-
Closed and manually locked.
-
Closed but unlocked.
-
Open.
Meanwhile, in the CCTV Checkpoint, sub-checkpoints may include conditions related to camera functionality, data retention, time synchronization, and camera cleanliness.
With this structure, a single checkpoint can have multiple inspection items. Relationship Between Checkpoints, Sub-Checkpoints, and Checkpoint Areas. In the Data Center Checklist, these three components have interrelated functionsComponent
Function
Checkpoint
Defines the main category being inspected.
Sub-Checkpoint
Defines the details or inspection items of a Checkpoint.
Area Checkpoint
Defines the location or area where the inspection is conducted.
Checkpoint Setting Checklist
Links Checkpoints, Sub-Checkpoints, and Checkpoint Areas so they can be used in the checklist.
-
Tips & Important Notes
-
Make sure checkpoints are created according to the required inspection categories.
-
Use sub-checkpoints to describe inspection items in greater detail.
-
Select the Checklist or Input type based on the required data format.
-
Ensure that the Checkpoint Area matches the inspection location.
-
Use the Checklist Checkpoint Settings to link Checkpoints, Sub-Checkpoints, and Checkpoint Areas before using them in a checklist.
-
Double-check the date before saving the Data Center Checklist.
-
Use Details to view saved checklist data.
-
Use Copy Data only for checklists that contain data you wish to reuse.
-
Use Report to open checklist reports.
-
Use Search to find data more quickly.
-
Use Edit to update Checkpoint or Sub-Checkpoint masters as needed.
- Avoid creating masters with the same name if that data already exists in the system.
No comments to display
No comments to display