
CCTV
Checklist Module Guide
Module Location:
Access Requisition > Checklist > CCTV
-
CCTV Checklist Main Screen
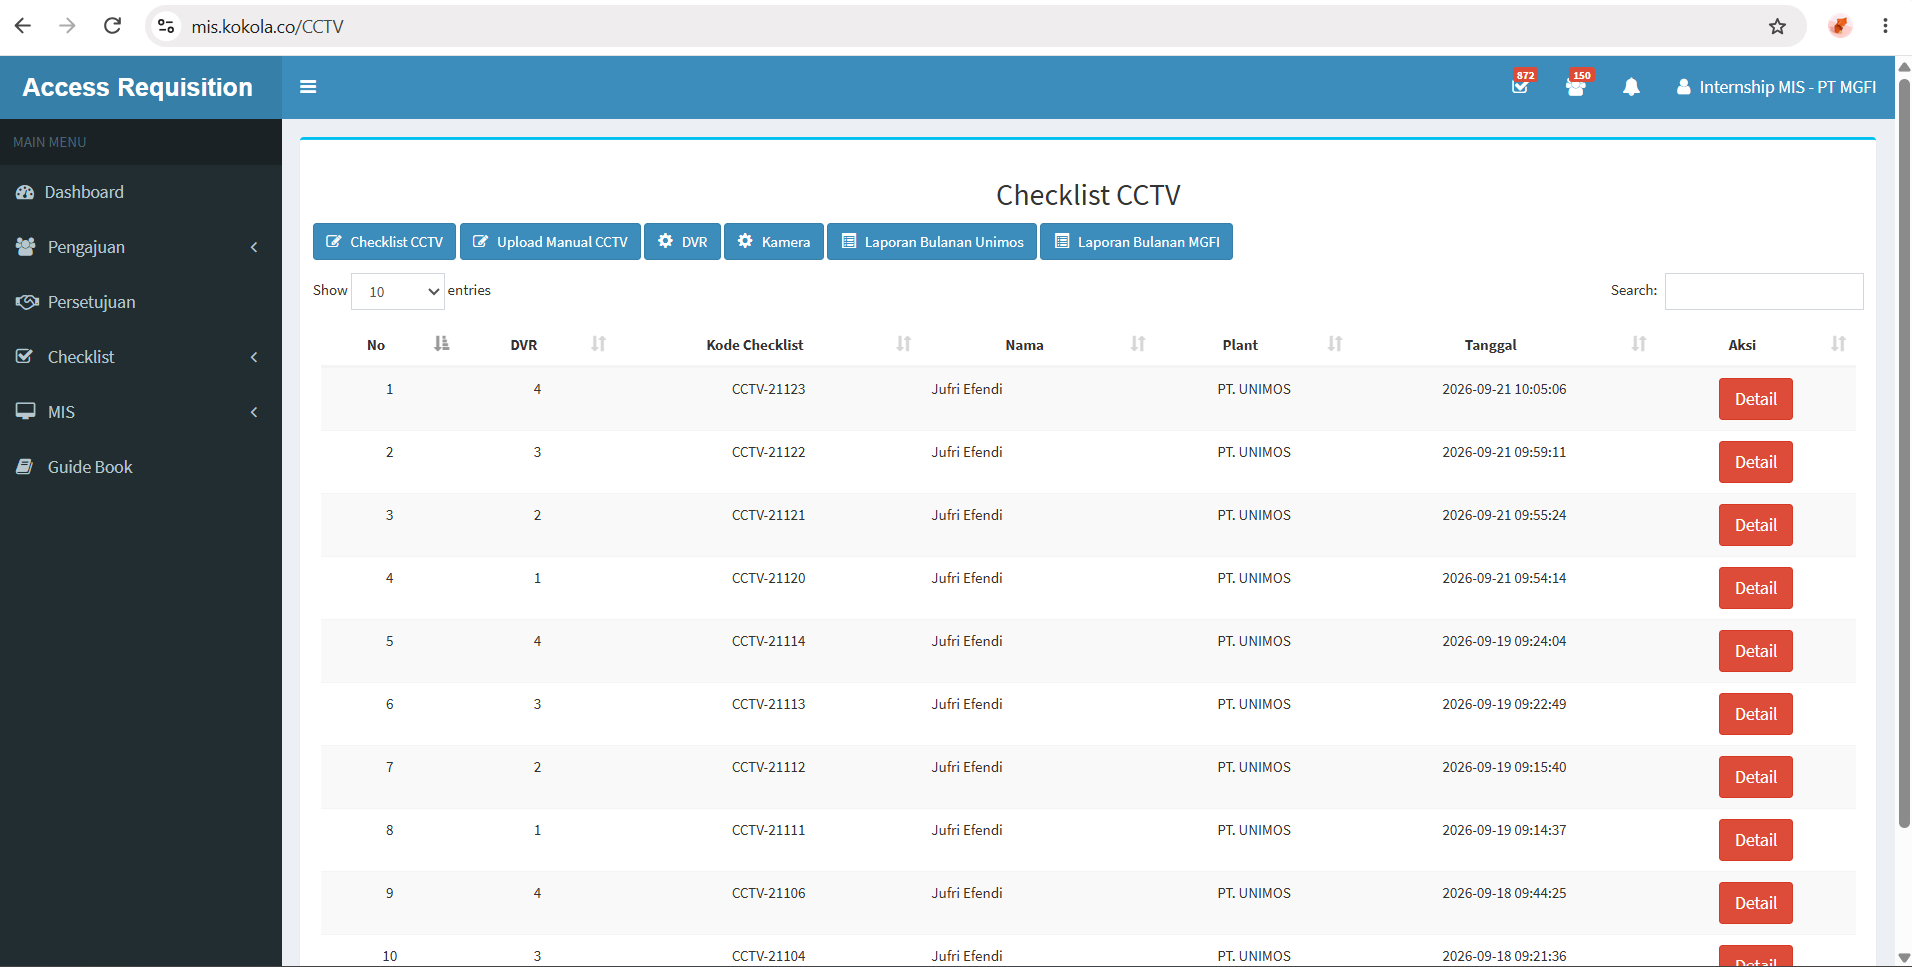
The CCTV Checklist menu is used to periodically record and monitor the condition of CCTV devices through the Access Requisition system.
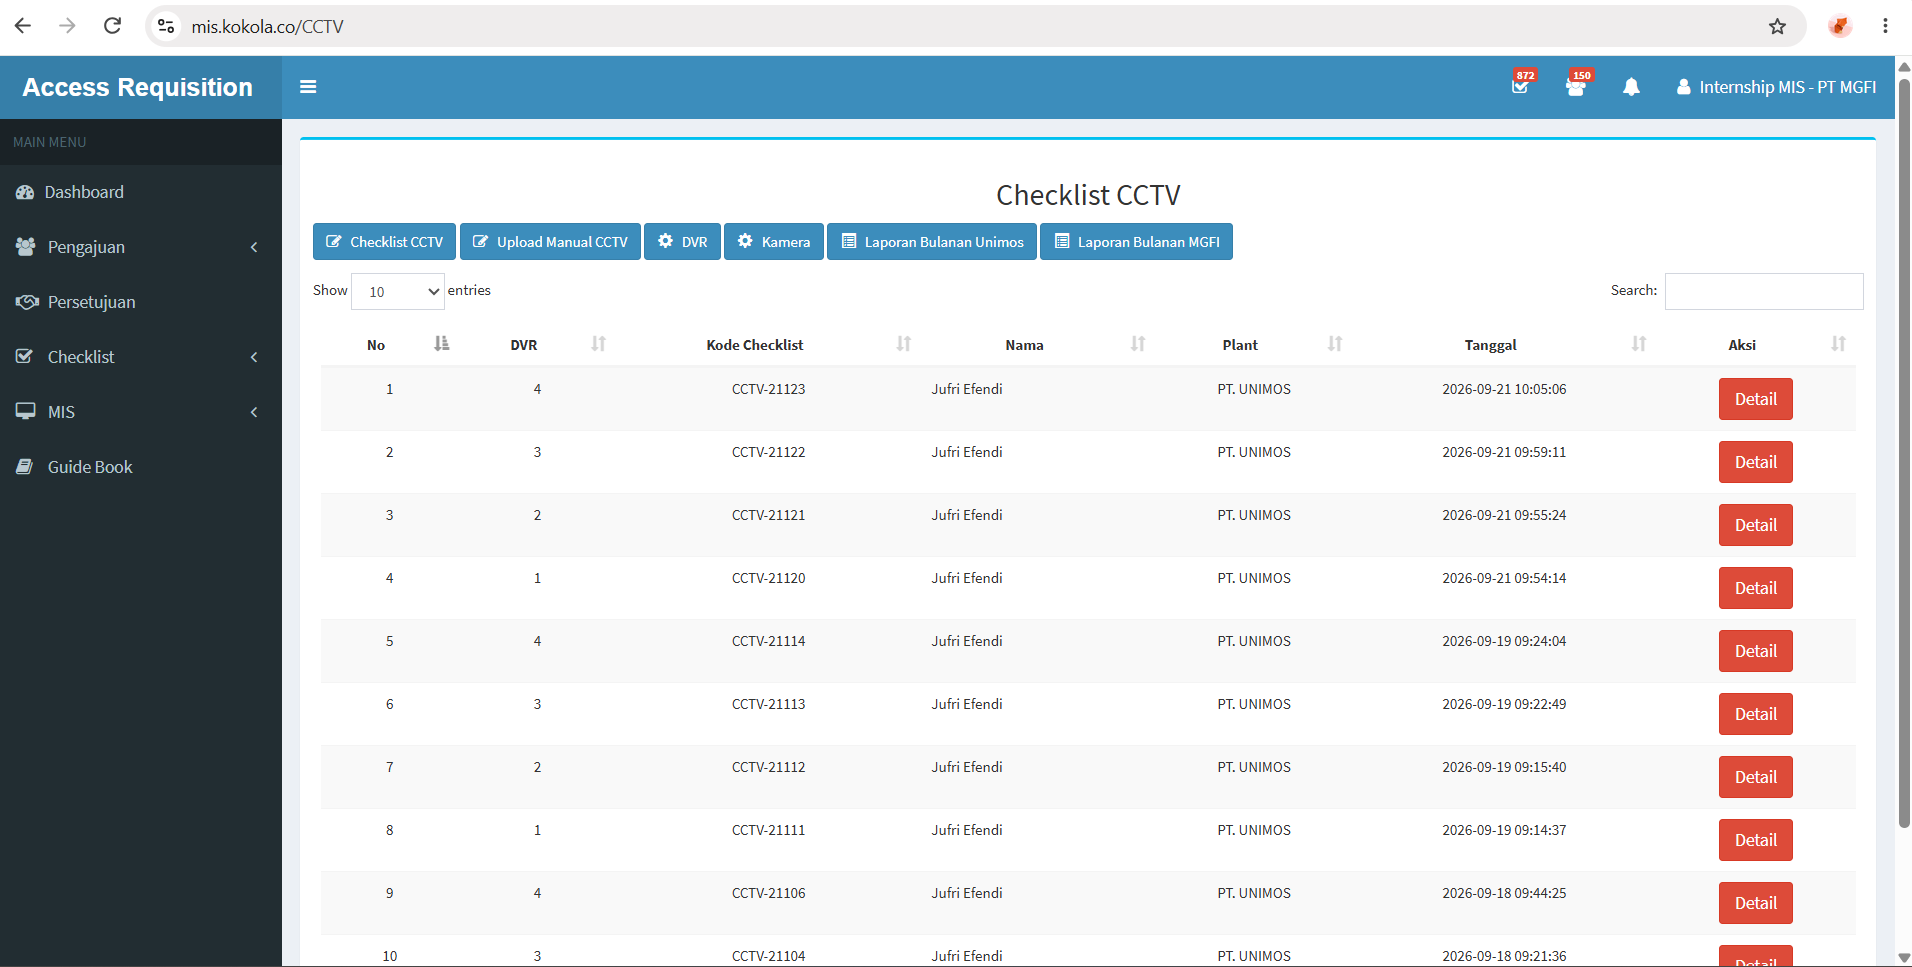
The main page contains several functions used to perform checklists and manage CCTV devices, namely:
Feature
Description
CCTV Checklist
Used to fill out the CCTV condition checklist.
Manual CCTV Upload
Used to access the CCTV data/manual upload function available in the system.
DVR
Used to manage DVR data.
Camera
Used to manage CCTV camera data.
Unimos Monthly Report
Used to view the monthly CCTV checklist report for the PT. UNIMOS plant.
MGFI Monthly Report
Used to view the monthly CCTV checklist report for the PT. MGFI plant.
CCTV Checklist Table Description
The CCTV Checklist Table displays the following information:
Coloum
Description No
Displays the sequential number of the checklist entry.
DVR
Displays the number or ID of the DVR being checked.
Checklist Code
Displays the unique code for the CCTV checklist.
Name
Displays the name of the user who performed the checklist.
Plant
Displays the plant or company where the CCTV device is located.
Date
Displays the date and time the checklist was performed.
Action
Displays the actions that can be taken on the checklist data.
Detail
Used to view the details of the completed CCTV checklist.
-
Filling Out the CCTV Checklist
-
Step 1 – Click “CCTV Checklist”
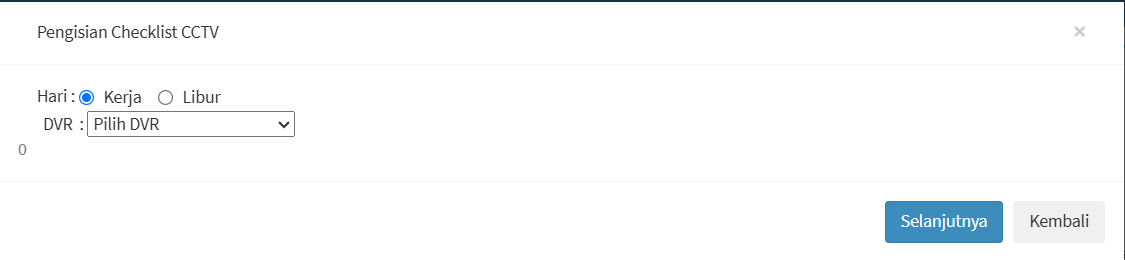
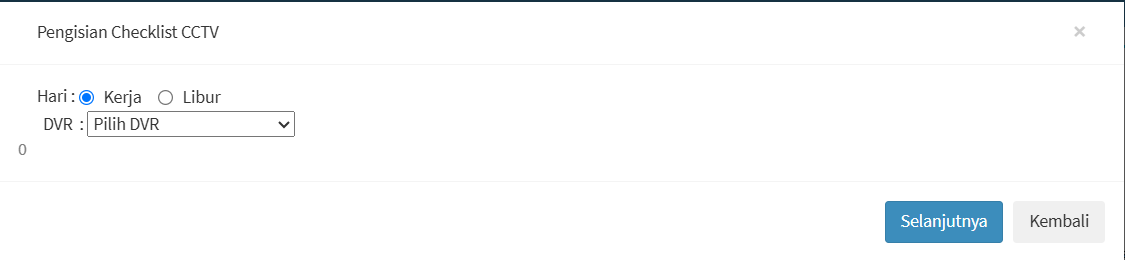
On the main page, click the “CCTV Checklist” button. The system will display the CCTV Checklist Form.image.png
-
Step 2 – Select the Day Type
In the “Day” section, select the day type when the checklist is performed. The available options are:
Option
description
Work day
Used when the checklist is performed on a workday.
Holiday
Used when the checklist is completed on a holiday.
-
Step 3 – Select a DVR
In the DVR field, select the DVR to be inspected. The field will display the DVRs available in the system. Ensure the selected DVR matches the device and location to be inspected.
-
Step 4 - Click Next
After selecting the day type and DVR, click the Next button to continue filling out the checklist. The form includes the following buttons:
Button Description Next Used to proceed to the next step in filling out the CCTV checklist.
Back Used to return to the previous step or cancel the process.
X Used to close the form.
-
-
DVR Management
The DVR menu is used to add and manage DVR data used in the CCTV Checklist system. To open this page, click the DVR button on the CCTV Checklist page. The system will display the Add DVR form.
- Adding a DVR
In the Add DVR section, fill in the information for the DVR you want to register.
Field Description DVR No Used to enter the DVR number or ID.
Area Used to specify the area where the DVR is located.
IP Address Used to enter the DVR’s IP address.
Port Used to enter the port used by the DVR.
DVR Username Used to enter the DVR username. DVR Password Used to enter the DVR password DVR ID Used to enter the DVR ID. Get DVR ID Used to retrieve the DVR ID via a system function. Status Used to specify whether the DVR status is Active or Inactive. Save Used to save the entered DVR data. - DVR List
At the bottom of the page is a table listing the DVRs available in the system. The information displayed includes:
Coloum Description No Sequential number of the DVR data.
DVR Name or identifier of the DVR
Plant The plant where the DVR is used.
Status Displays the DVR status, such as Active or Inactive. Action Displays the actions that can be performed on the DVR data. Edit Used to modify the saved DVR information.
- Adding a DVR
-
Camera Management
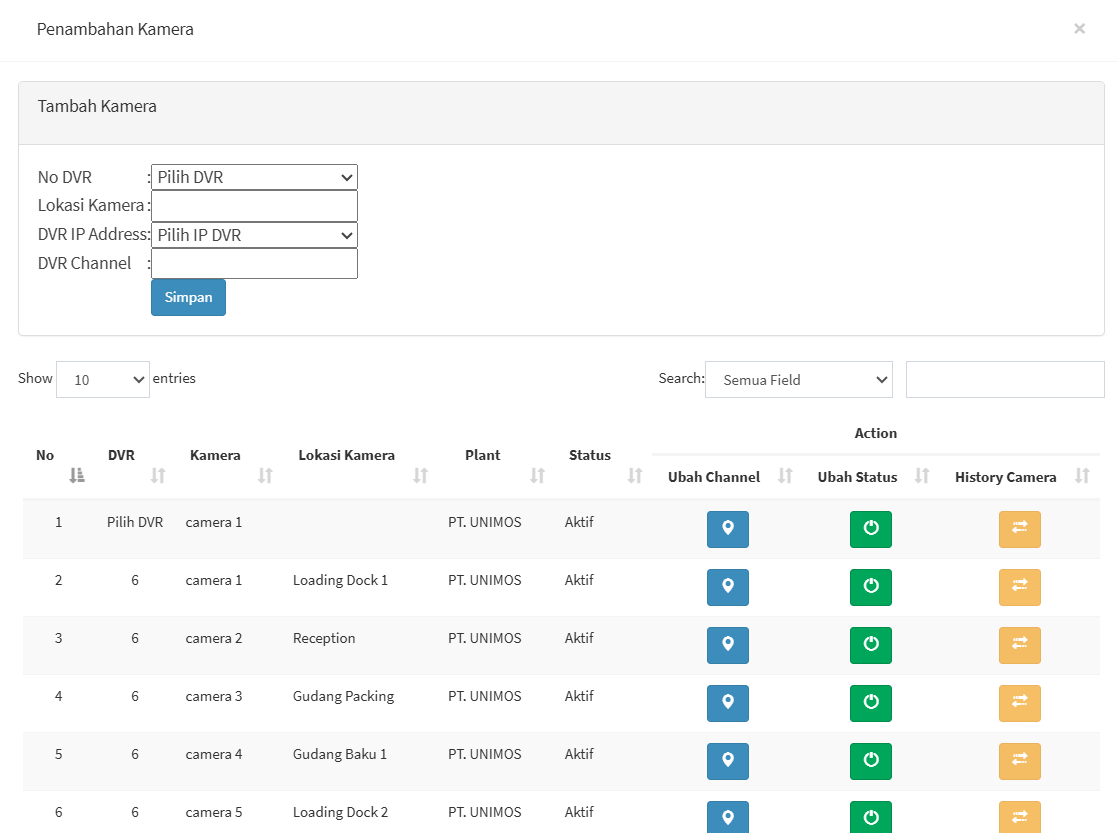
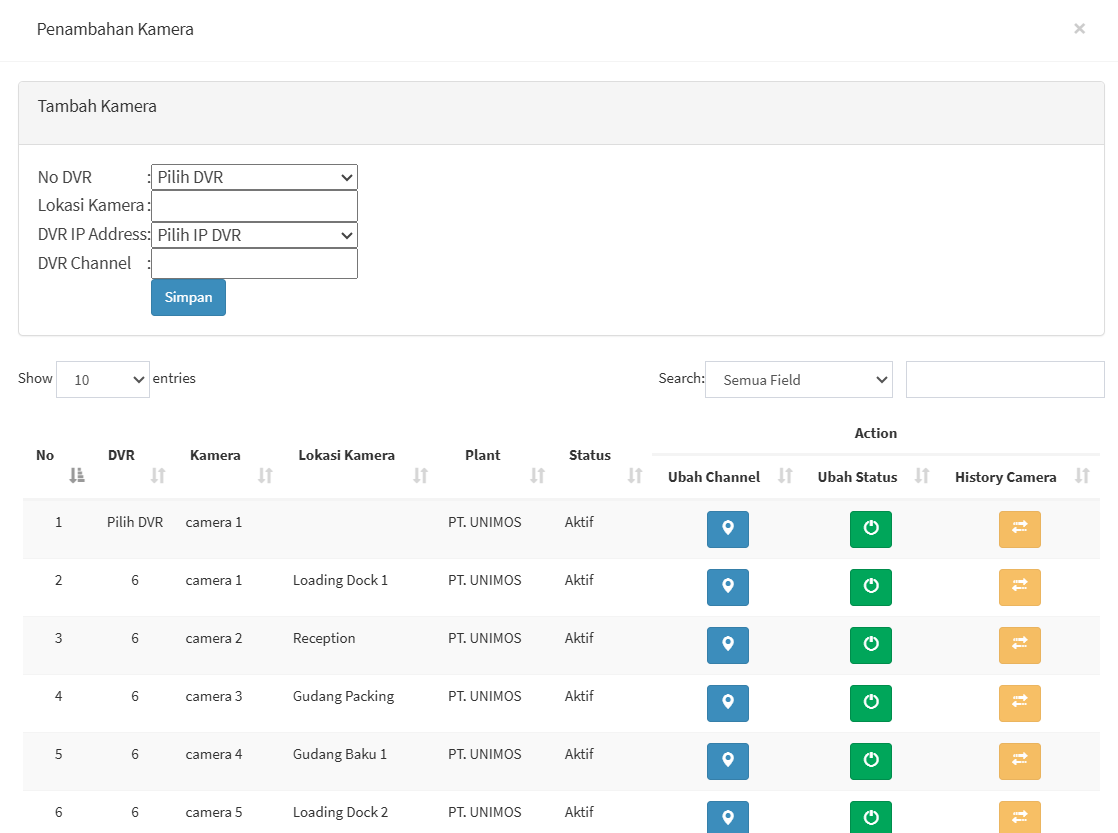
The Camera menu is used to add and manage CCTV cameras connected to the DVR. Click the camera button on the CCTV checklist main page. The system will display the camera addition page.
- Adding a Camera
In the Add Camera section, fill in the following information:
Field
Description
DVR No
Used to select the DVR to which the camera is connected.
Camera Location
Used to enter the camera’s installation location.
DVR IP Address
Used to select the IP address of the DVR being used.
DVR Channel
Used to enter the DVR channel used by the camer
Save
Used to save the camera data.
Used to enter the DVR channel used by the camera.
- Camera List
At the bottom of the page is a list of CCTV cameras that have been registered in the system. The information displayed includes:
Coloum
Description
No
The camera’s serial number.
DVR
The DVR to which the camera is connected.
Camera
Camera name or number.
Camera Location
Displays the camera’s installation location.
Plant
Displays the plant where the camera is used.
Status
Displays the camera’s status.
Action
Displays the actions that can be performed on the camera.
- Adding a Camera
-
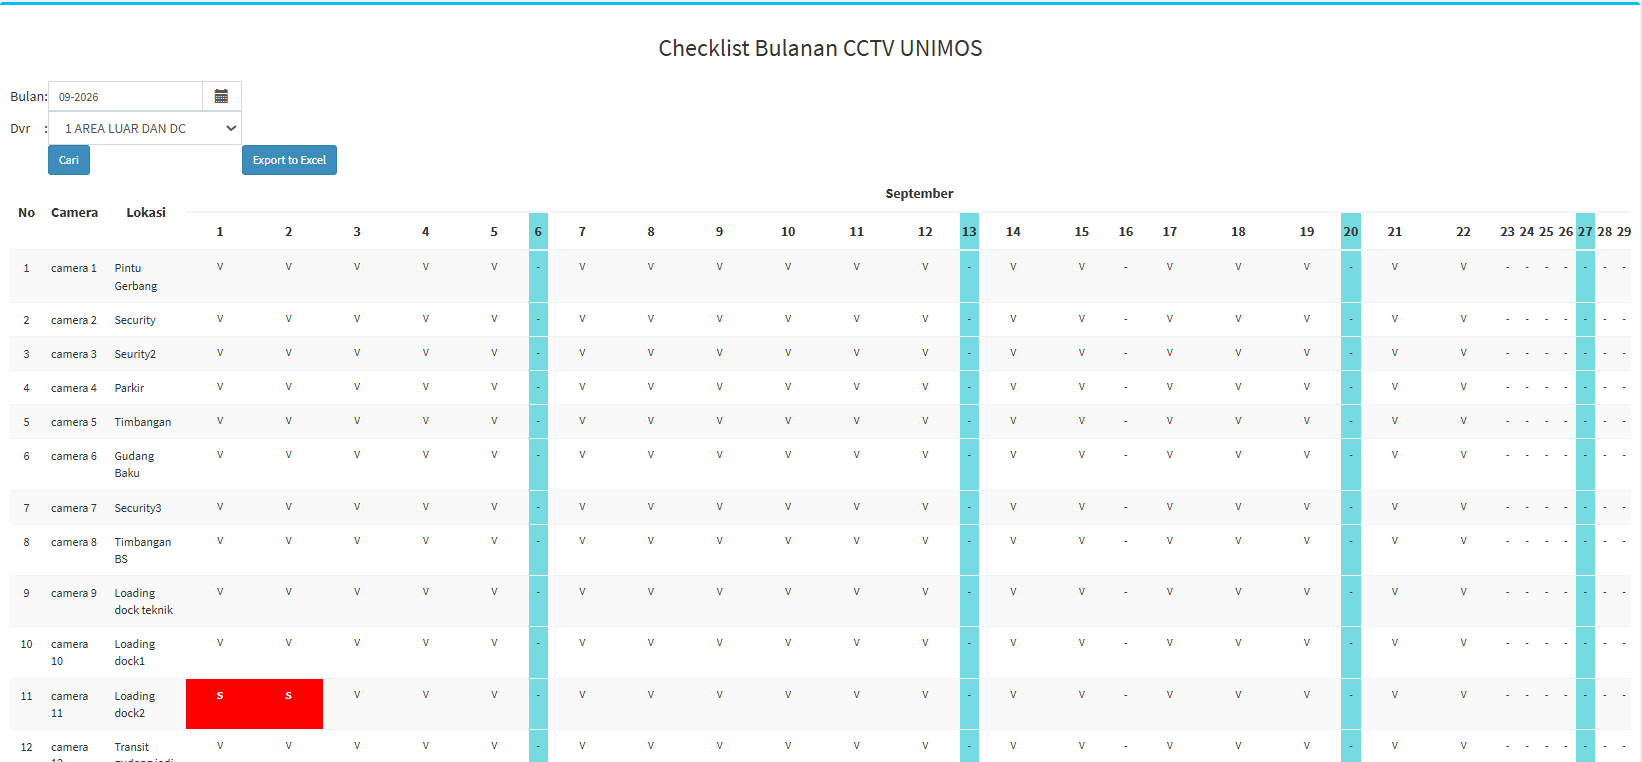
Unimos Monthly Report
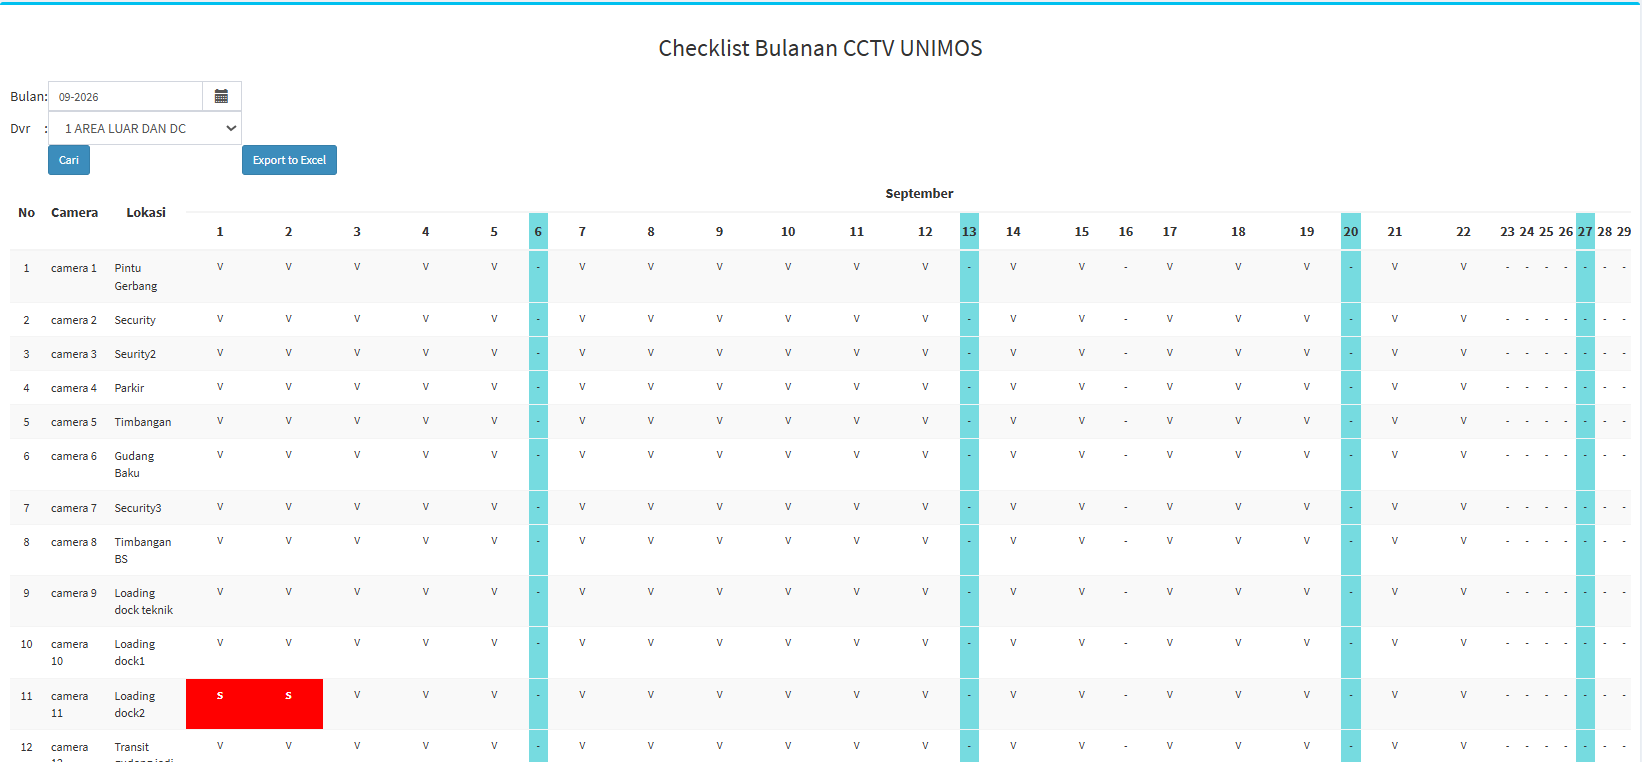
The Unimos Monthly Report menu is used to view the results of the monthly CCTV checklist at the PT. UNIMOS plant. Click the Unimos Monthly Report button on the CCTV Checklist page. The system will display the Unimos Monthly CCTV Checklist page.
-
Viewing the Report
At the top of the page, there are several options:
Field / Button
Description
Month
Used to select the month for which you want to view the checklist report.
DVR
Used to select the DVR to be included in the report.
Search
Used to display the report based on the selected Month and DVR.
Export to Excel
Used to export the checklist report to an Excel file.
-
CCTV Checklist Status
The monthly report includes several codes to indicate the camera’s status.
Code
Description
V
Visible: The camera is displaying an image.
S
Signal Lost: The camera has lost its signal.
C
Camera Lost: The camera is not detected or has lost its connection.
N
Not Recorded: Camera footage is unavailable or was not recorded.
In addition to the camera status codes, the report also includes special markers for:
-
Sundays
-
Holidays
These markers help users distinguish between workdays and Sundays or holidays in the monthly report. -
-
-
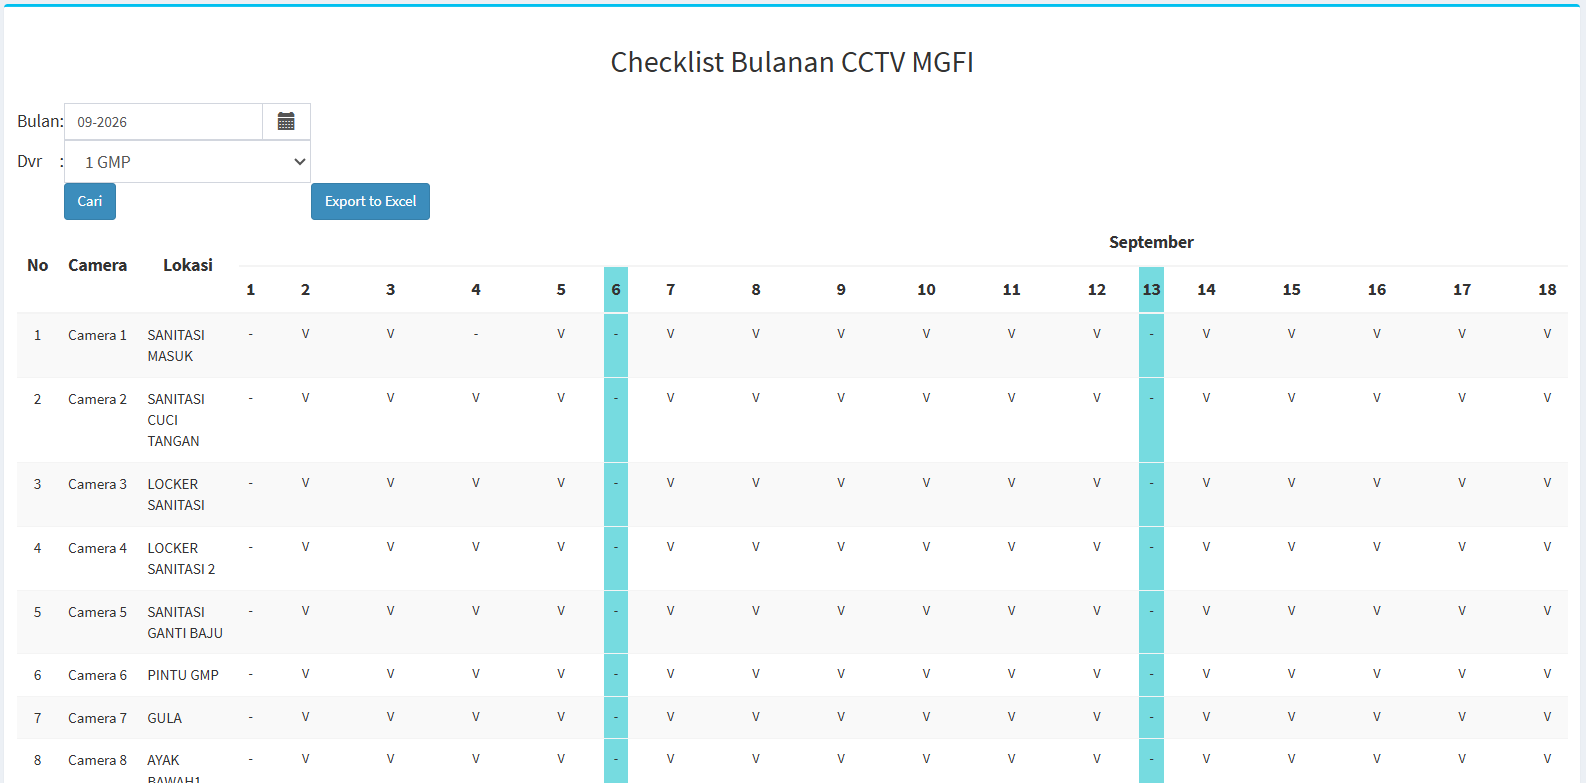
MGFI Monthly Report
The MGFI Monthly Report menu is used to view the monthly CCTV checklist report for the PT. MGFI plant. Click the MGFI Monthly Report button. The system will display the MGFI Monthly CCTV Checklist page. This page also includes an Export to Excel button for exporting the report.
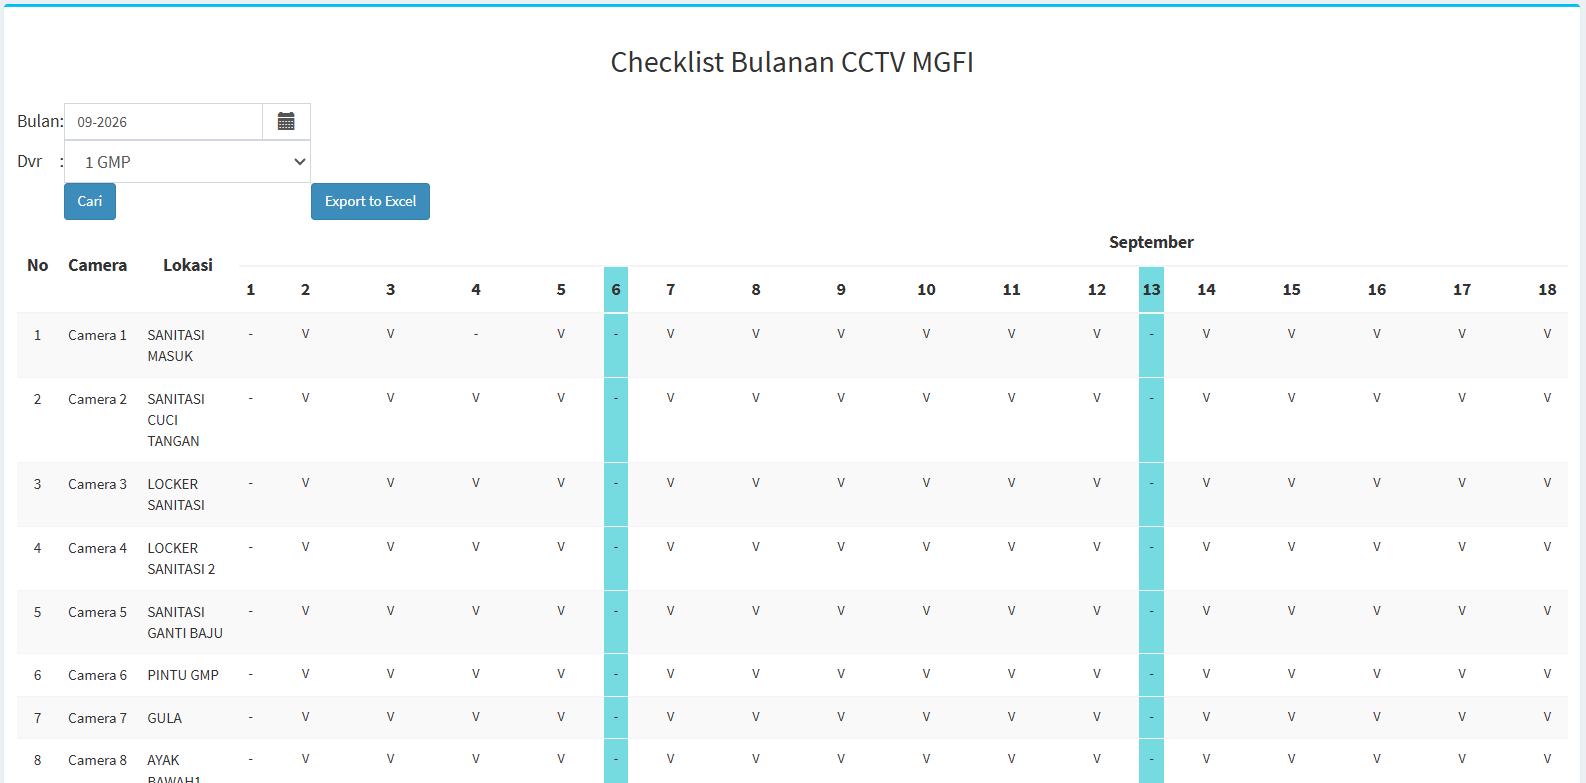
Reading the MGFI Monthly
Report In the report table, the main information displayed includes:Coloum
Description
No
Camera serial number.
Camera
Displays the camera name or number.
Location
Displays the camera installation location.
Date 1–31
Displays the camera checklist results for each date in the selected month.
-
Tips & Important Notes
-
Make sure the selected DVR matches the location of the device being inspected.
-
Select “Work” or “Off” depending on the day’s status when the checklist is completed.
-
Ensure that DVR information such as IP Address, Port, Username, Password, and DVR ID is entered according to the device’s configuration.
-
Ensure that the Camera Location and DVR Channel match the actual installation conditions.
-
Use the “Active” or “Inactive” status according to the device’s current status.
-
Use “Camera History” if you need to view the history of camera changes.
-
Use “Monthly Report” to monitor the status of cameras on a day-to-day basis.
-
Pay attention to the codes V, S, C, and N in the report to determine the status of each camera.
-
Use “Export to Excel” if the report needs to be saved or processed further.
-
Use the “Search” and “Show Entries” features to facilitate searching and managing large amounts of data.
No comments to display
No comments to display