
APPLICATION ACCESS
Access Requisition Module Guide
Module Location:
Access Requisition > Requisition > Application Access
The Application Access Request feature is used to submit requests for access to applications available on the company’s system. Users can specify the applications for which access is requested and the users who require that access. Available applications are grouped by type such as ERP and non-ERP so users can select applications based on their needs.
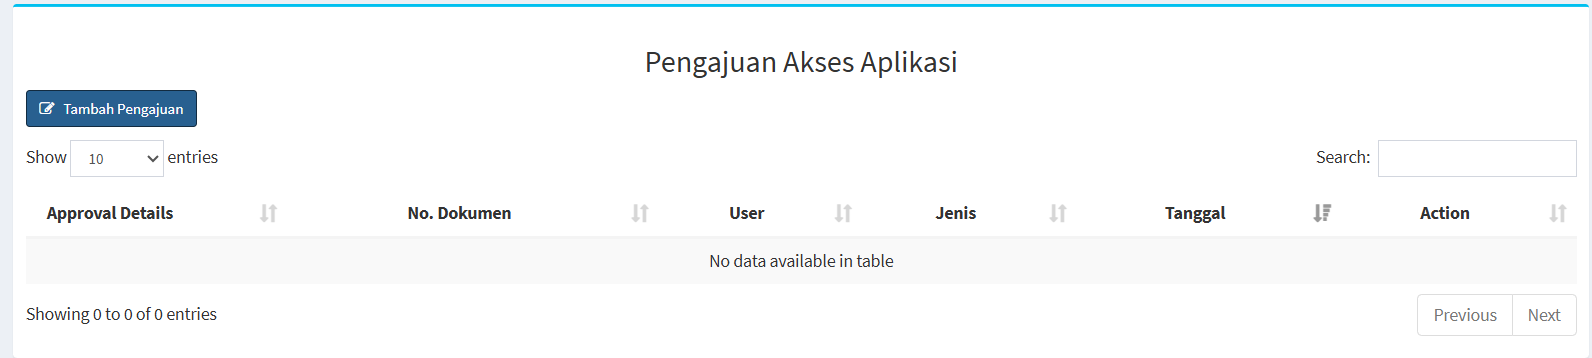
The main page features an “Add Request” button, a table listing requests, a search feature, and settings to adjust the number of records displayed.
-
Column Descriptions:
Section Description Add Request
Used to create a new application access request.
Show Entries Used to set the number of records displayed in the table.
Search Used to search for specific request data.
Approval Details Displays information regarding the approval process or details of the request.
Dokumen No. Displays the document number of the application access request.
User Displays the user associated with the application access request. Type Displays the type of application requested. Date Displays the date the request was created or recorded in the system. Action Displays the actions that can be performed on the request data. Previous / Next Used to navigate to the previous or next page of data. -
Application Access Requests
Here are the steps to submit an application access request:
-
First, click the “Add Request” button. Once clicked, the application access request form will appear.
-
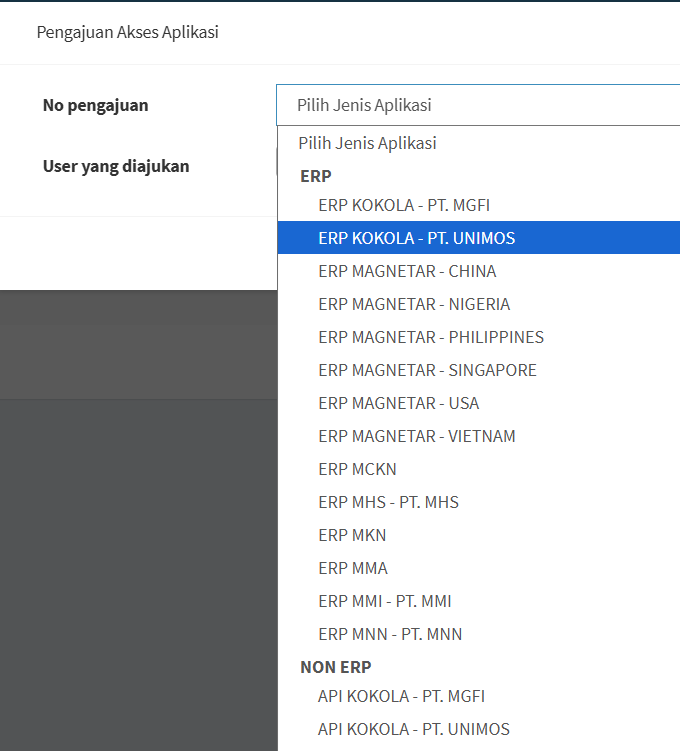
On the request form, open the “Application Type” dropdown menu. The system will display a list of available applications, grouped by application category. This view contains two main groups, namely:
Type
Description
ERP
Berisi pilihan aplikasi ERP yang tersedia pada beberapa perusahaan atau unit.
NON ERP
Berisi pilihan aplikasi selain ERP yang tersedia pada sistem.
-
In the “Requested User” field, select the user who needs access to the application. Make sure the user matches the request you are creating.
- Make sure all fields are filled out before clicking the “OK” button.
No comments to display
No comments to display