soAPP - English
- Sales Forecast
- Sales Order
- PAF (Promo Authorization Form)
- Collection
- Sales Performance
- Tracking
- AGP
- Settings
Sales Forecast
Sales Forecast
Sales Forecast Module Guide
Module Location:
Sales Forecast > sales forecast
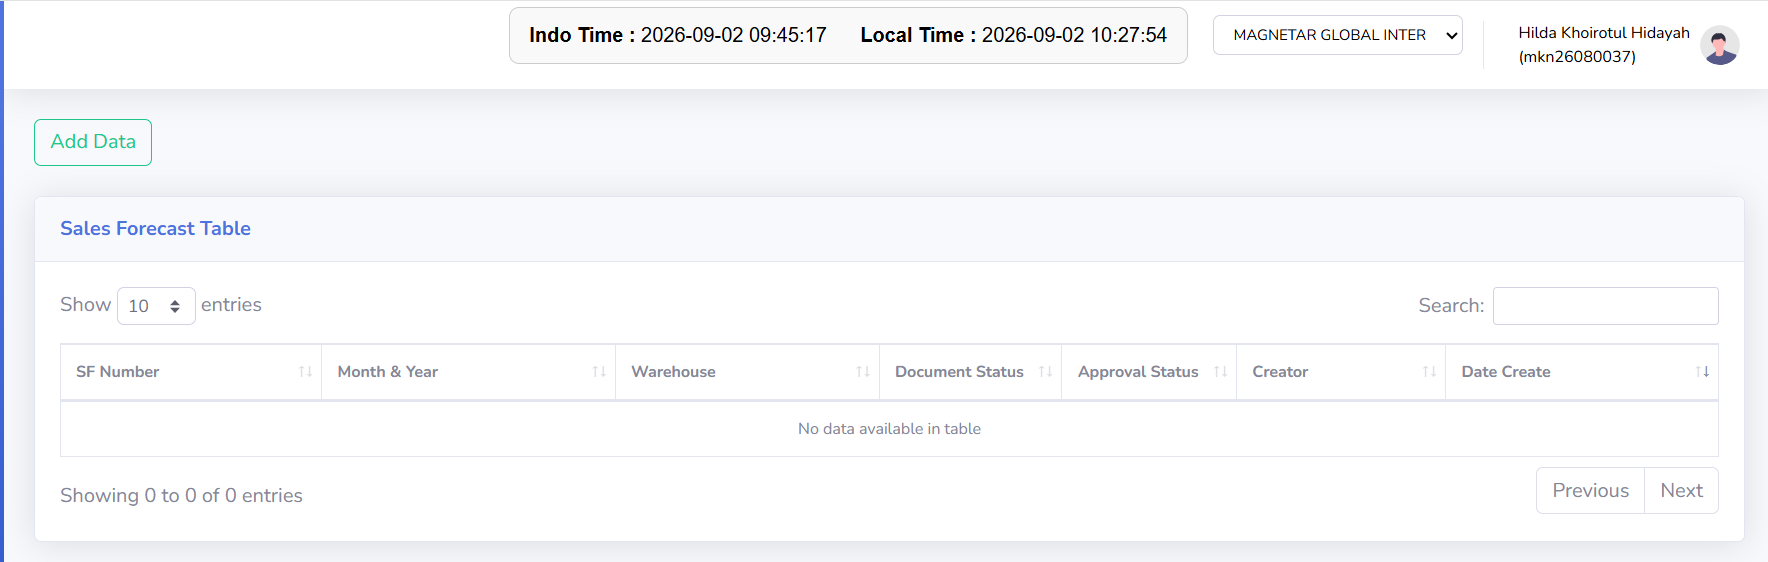
The Sales Forecast module is used to create and manage sales forecasts based on the selected period and warehouse. The Sales Forecast serves as sales planning data that can later be used as a reference in the sales process. Each Sales Forecast created will have a document number (SF Number), period information, warehouse, document status, approval status, document creator, and creation date. In addition to creating Sales Forecasts, the module also provides Sales Forecast details to add or modify forecast data and monitor the approval process through the Sales Forecast Inbox menu.
-
Home Page View
The Sales Forecast home page displays all sales forecast data created for the currently active company.

View Description
This page is used to view a list of sales forecasts, create new sales forecasts, search for data, and view sales forecast details by SF Number.
-
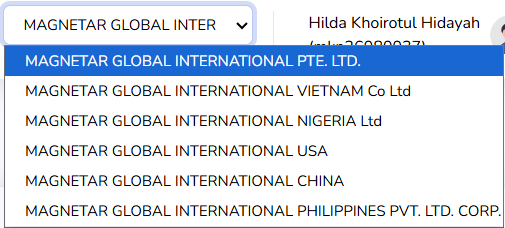
Current Company: Displays the currently active company. The company can be changed using the dropdown at the top of the page. The Sales Forecast data displayed will adjust according to the selected company.
-
Show Entries: Sets the number of records displayed in the table per page.
-
Search: Used to search for Sales Forecast data in the table.
-
Previous / Next: Used to navigate between pages when the amount of data exceeds the limit displayed per page.
-
-
Steps to Create a New Sales Forecast:
The following is the workflow for creating a sales forecast, from adding data to filling in the forecast details.
-
Verify the Current Company: Before creating a sales forecast, ensure that the Current Company matches the company to be processed.

-
Adding a New Sales Forecast
From the Sales Forecast main page, click the Add Data button located in the upper-left corner.

After clicking the “Add Data” button, the system will check the Sales Forecast approval configuration. If the check is successful, the Sales Forecast creation form will appear. If the check fails, the data entry process cannot continue, and the system will display an informational message.
-
Filling Out the Sales Forecast Form: Fill in all required information on the Add Sales Forecast form. Ensure that the selected information matches the Sales Forecast you are creating.
-
Once all data has been entered:
-
Double-check the data you have entered.
-
Click the Submit/Save button as indicated on the form.
-
The system will validate the entered data.
-
If all data is valid, the Sales Forecast will be saved.
-
The successfully saved data will appear in the Sales Forecast Table
-
-
-
Tips & Important Notes
-
Make sure the Current Company matches the company to be processed before creating a Sales Forecast.
-
Make sure the selected period matches the Sales Forecast period you are creating.
-
Make sure the selected Warehouse matches the warehouse used in sales planning.
-
Double-check the data before saving the Sales Forecast.
-
Use the SF Number to view the details of a Sales Forecast you have created.
-
Ensure that the Sales Forecast details have been filled out according to the sales forecast requirements.
-
Check the Document Status to determine the status of the Sales Forecast document.
-
Check the Approval Status to track the progress of the Sales Forecast approval process.
-
Use the Sales Forecast Inbox to view and process Sales Forecasts that require approval.
-
If the Add Data process cannot continue and the system displays an information message, check the Sales Forecast approval configuration.
-
Use Search to find specific Sales Forecast data more quickly.
-
Use Show Entries to set the number of records displayed in the table.
-
Use Previous / Next to navigate between pages if there is a large amount of data.
-
Ensure the Sales Forecast data is correct before proceeding with the approval process.
-
Sales Forecast Inbox
Sales Forecast Module Guide
Module Location:
Sales Forecast > Sales Forecast Inbox
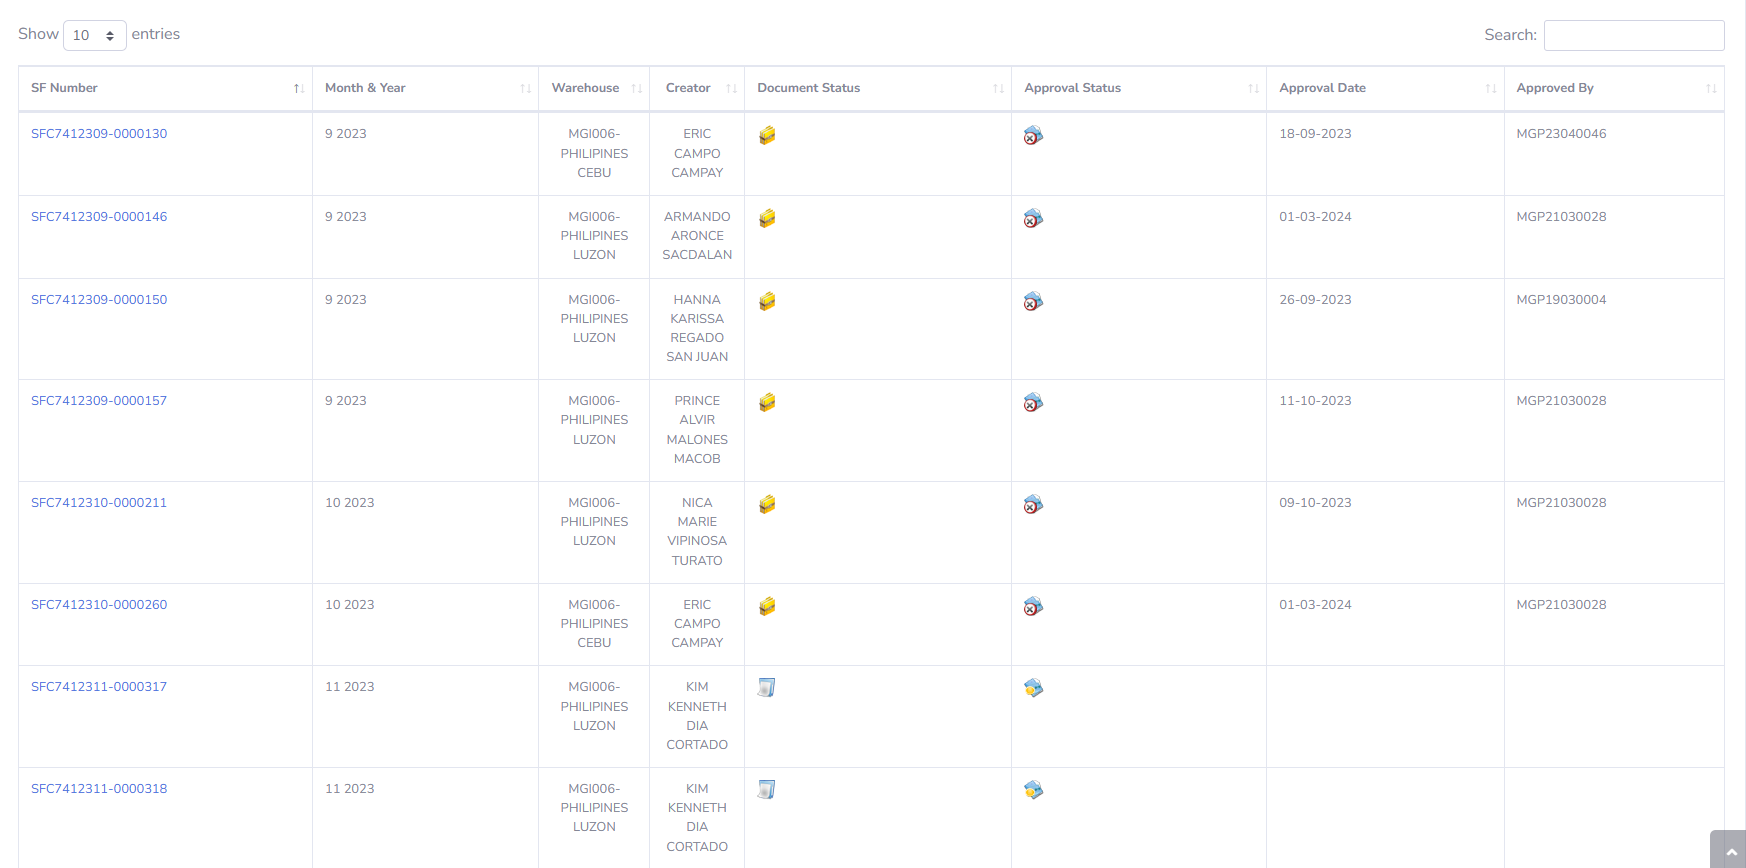
The Sales Forecast Inbox module is used to display and monitor the list of sales forecasts that have entered the approval process. This page helps users view Sales Forecast documents requiring approval and access information regarding the approval process that has been completed. Each entry displayed in the Sales Forecast Inbox contains information such as the SF Number, Sales Forecast period, warehouse, document creator, document status, approval status, approval date, and the approver. By clicking the SF Number, users can open the Sales Forecast details to view information about documents that are pending or have completed the approval process.
-
View Description
The Sales Forecast main page displays all Sales Forecast data created for the currently active company. This page is used to view a list of sales forecasts, create new sales forecasts, search for sales forecast data, and open document details using the SF Number.

-
Screen Description
This page is used to monitor Sales Forecast documents requiring approval and to view information on approvals that have already been granted. The columns available on the Sales Forecast Inbox include:
-
SF Number: The Sales Forecast document number. Click the number to open the document details.
-
Month & Year: Displays the month and year of the Sales Forecast period.
-
Warehouse: Displays the warehouse used.
-
Creator: Displays the name of the person who created the Sales Forecast.
-
Document Status: Displays the status of the Sales Forecast document. Possible document statuses include:
-
Confirmed: Indicates that the Sales Forecast document has been approved.

-
Closed: Indicates that the Sales Forecast document has been closed

-
-
Approval Status: Displays the approval status of the Sales Forecast. The approval statuses that can be displayed include:
-
Awaiting: Indicates that the Sales Forecast is still awaiting approval

-
Rejected: Indicates that the Sales Forecast has been rejected during the approval process;

-
-
Approval Date: Displays the date the approval was granted.
-
Approved By: Displays information about the person who approved it
-
-
Tips & Important Notes
-
Make sure the “Current Company” is set correctly so that the Sales Forecast Inbox data displayed matches the company to be processed.
-
Check the “Approval Status” to see which Sales Forecasts are still awaiting approval or have been rejected.
-
Check the “Document Status” to see the status of the Sales Forecast document currently being processed.
-
Click the SF Number to view the Sales Forecast details before initiating or reviewing the approval process.
-
Check the period, warehouse, creator, and forecast details before initiating the approval process.
-
A Sales Forecast with the “Awaiting” status indicates that the document is still in the approval process.
-
A Sales Forecast with the “Rejected” status indicates that the document has been rejected during the approval process and may require review or correction in accordance with applicable regulations.
-
The “Approval Date” and “Approved By” fields can be used to determine when the approval process took place and who approved it.
-
If the data you are looking for is not found, make sure the Current Company is correct and use the search feature if available.
-
Ensure that the approval process is carried out in accordance with the authority and approval workflow defined in the system.
-
Sales Order
Sales Order Module Guide
Module Location:
soApp > Sales Order
-
Main Page View
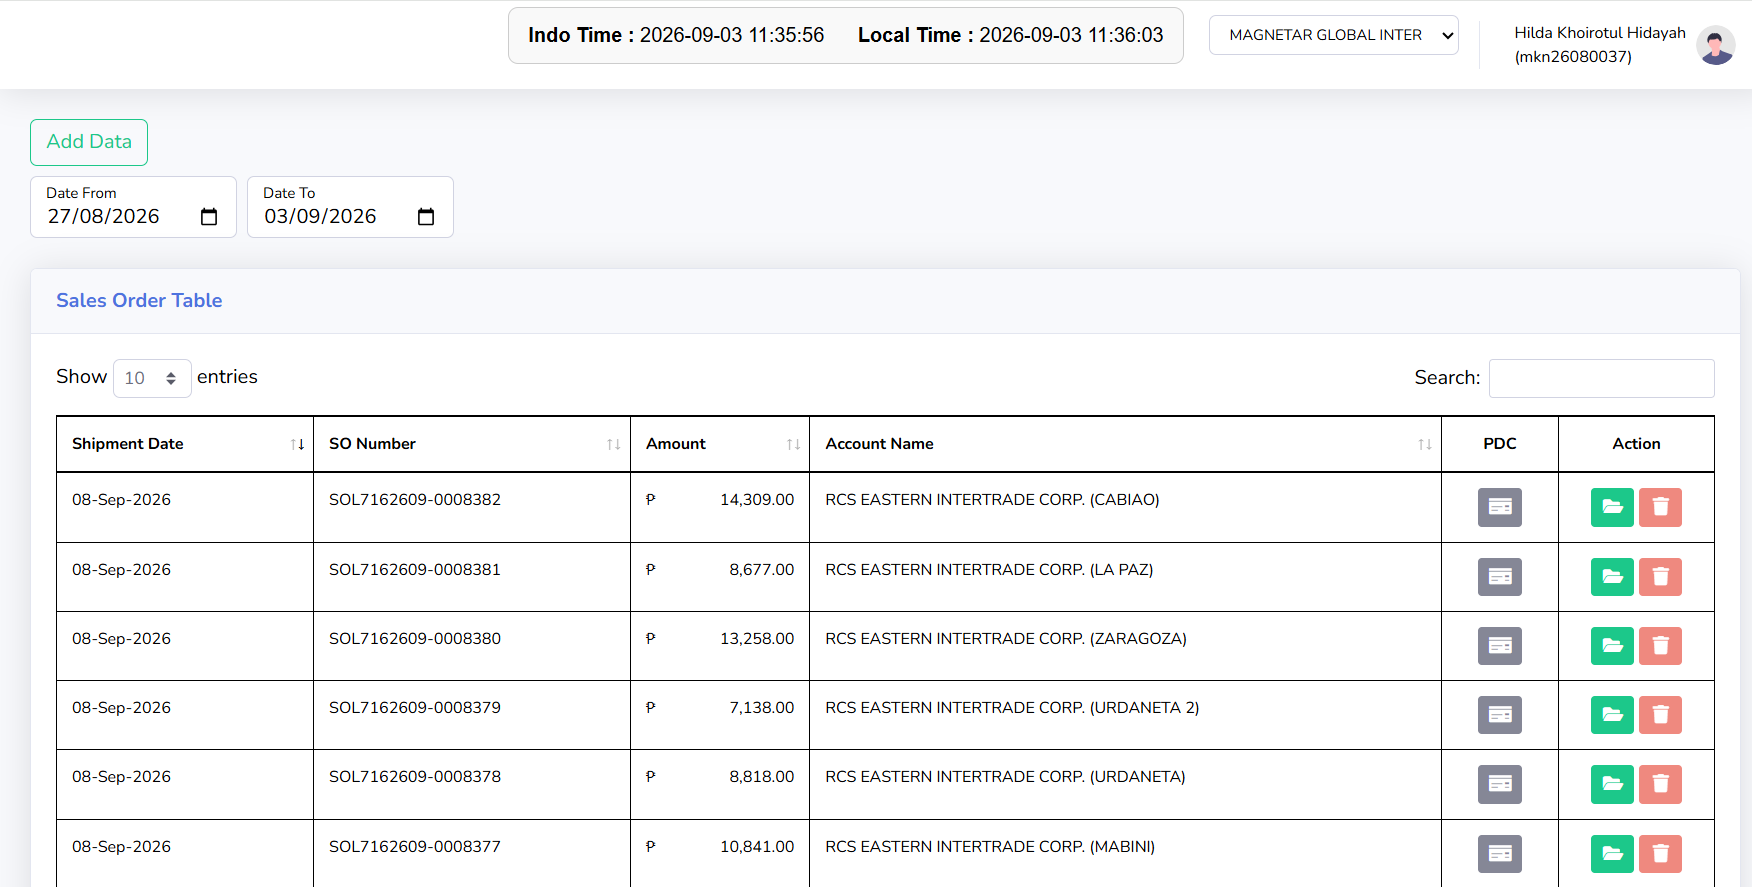
The Sales Order main page displays all Sales Order data based on the selected company and date range. This page is used to view and search for Sales Order data, create new Sales Orders, monitor Sales Order shipping status, and view the PDC status related to Sales Orders. The data displayed in the table will adjust based on the Company, Date From, and Date To selected by the user.

-
Screen Overview
At the top of the page are the Company selector, the Add Data button, date filters, and the Sales Order Table.
-
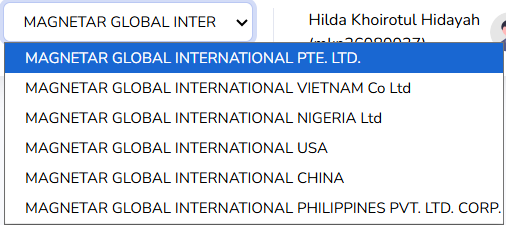
Company:
The Company dropdown is located in the upper-right corner of the page and is used to select the company to be processed. The Sales Order data displayed will adjust according to the selected company.

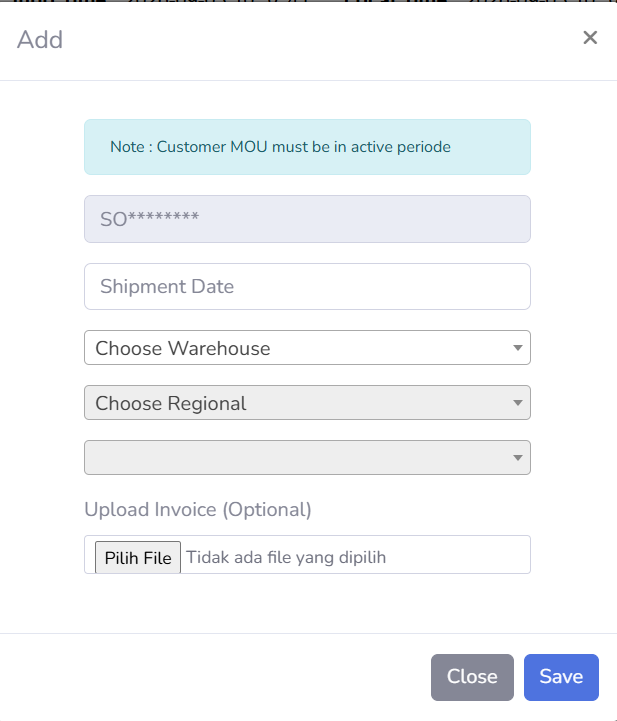
- Add data
The Add Data button is used to create a new Sales Order. Click the Add Data button to open the Sales Order creation form.

- Date Filter
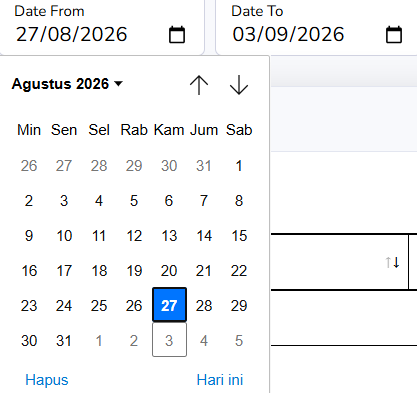
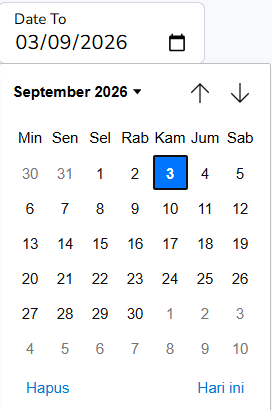
The “Date From” and “Date To” filters are used to specify the Sales Order period to be displayed in the table.
-
Date From: Specifies the start date of the search.
-
Date To: specifies the end date of the search
Once the date range is specified, the table will display Sales Orders that fall within that range.


-
- Show Entries
Show Entries is used to specify the number of Sales Order records displayed per page. For example, if you select 10 entries, a maximum of 10 records will be displayed on a single page of the table.
- Search
The Search field is used to search for specific data in the Sales Order Table. Enter an appropriate keyword to narrow down the displayed results.

- Previous dan Next
The Previous and Next buttons are used to navigate between pages when the number of Sales Orders exceeds the limit for a single page.
-
-
Sales Order Table
The Sales Order Table displays sales order information based on the selected company and date range. The available columns include:
-
Shipment Date: Displays the shipment date recorded on the sales order.
-
SO Number: Displays the sales order number, which serves as the identifier for each sales order document.
-
Amount: Displays the value or total amount of the transaction on the sales order.
-
Account Name: Displays the name of the account or customer associated with the sales order.
-
PDC: Displays the PDC status of the sales order.
- Action: Displays the actions that can be taken on the sales order based on the document’s status.
-
-
Sales Order Status Descriptions
At the bottom of the Sales Order Table, there is a color legend used to indicate the status of a Sales Order.
-
SO has been sent
Indicates that the Sales Order has been sent. This status is marked with a green icon.

-
SO not yet sent
Indicates that the Sales Order has not yet been sent. This status is marked with a blue icon.

-
SO has been canceled
Indicates that the Sales Order has been canceled. This status is marked with a red icon.

-
-
PDC Status Information
In addition to the Sales Order status, this page also displays PDC status information. Available PDC statuses include:
-
PDC Has Been Picked
Indicates that the PDC has been picked. This status is marked with a green icon.

-
PDC Has Been Uploaded
Indicates that the PDC has been uploaded to the system. This status is marked with a blue icon.

-
PDC Has Been Rejected
Indicates that the PDC has been rejected. This status is marked with a red icon.

-
-
Tips & Important Notes
-
Make sure the Company is correct before creating or searching for a Sales Order.
-
Use “Date From” and “Date To” to display Sales Orders based on a specific period.
-
Make sure the Shipment Date is correct before continuing the process.
-
Ensure that the Sales Forecast for the selected warehouse, period, and region is available before creating a Sales Order.
-
Double-check the customer and all Sales Order information before saving or submitting.
-
Pay attention to the icon colors in the table to determine the Sales Order status.
-
Check the PDC status to determine the status of the PDC document associated with the Sales Order.
-
Use the Search function to find specific Sales Orders more quickly.
-



PAF (Promo Authorization Form)
Promo Authorization
Promo Authorization Module Guide
Module Location
PAF > Promo Authorization
-
Main Page View
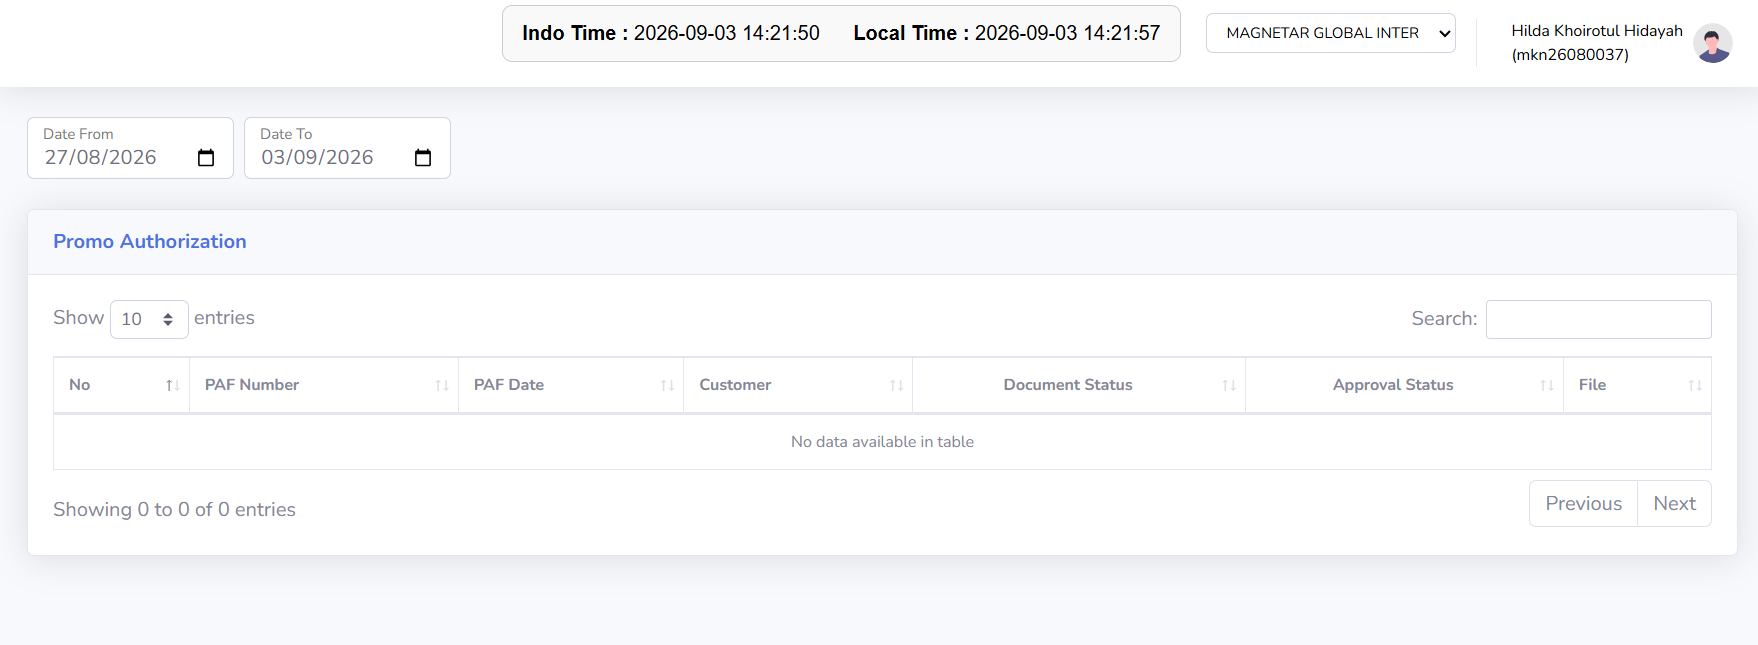
The Promo Authorization main page displays all PAF documents created for the currently active company. This page is used to view and search for Promo Authorization documents based on a specific period, open document details, and monitor document status and the PAF approval process. The data displayed in the table will adjust according to the company and date range selected by the user.

-
Screen Description
The Promo Authorization page contains several sections designed to help users view and search for PAF documents.
-
Current Company: Displays the currently active company. The Promo Authorization data displayed will correspond to the selected company.
-
Add Data: Used to create a new Promo Authorization document.
-
Date From: Used to specify the start date of the document search period.
-
Date To: Used to specify the end date of the document search period.
-
Show Entries: Used to specify the number of records displayed per page.
-
Search: Used to search for Promo Authorization documents based on specific keywords.
- Previous / Next: Used to navigate between pages if the number of records exceeds the page limit.
-
-
Promo Authorization Table
The Promo Authorization Table displays a list of PAF documents based on the selected company and period. The information displayed may include:
-
PAF Number: Displays the Promo Authorization document number. Click the number to view the document details.
-
PAF Date: Displays the date of the Promo Authorization document.
-
Customer: Displays the customer associated with the promotional program.
-
Document Status: Displays the current status of the Promo Authorization document.
-
Approval Status: Displays the status of the Promo Authorization document’s approval process.
-
Created By: Displays the user who created the document, if available.
-
Created Date: Displays the document’s creation date, if available.
-
-
Tips & Important Notes
-
Make sure the Current Company is correct before creating or searching for a Promo Authorization document.
-
Use Date From and Date To to narrow down the range of documents displayed.
-
Use Search to find a specific PAF more quickly.
-
Use the PAF Number to open and view the details of a Promo Authorization document.
-
Check the Document Status to see the document’s current status.
-
Check the Approval Status to track the progress of the document’s approval process.
-
Make sure the customer and promo period are correct before proceeding with the document.
-
Double-check all PAF information before the document is confirmed or forwarded to the approval process.
-
Avoid creating duplicate Promo Authorization documents if a document for that promo program already exists.
-
Make sure the required supporting documents are available before the PAF is forwarded to the next step.
-
Promo Authorization Inbox
Module Location:
PAF > Promo Authorization Inbox
-
Main Page View
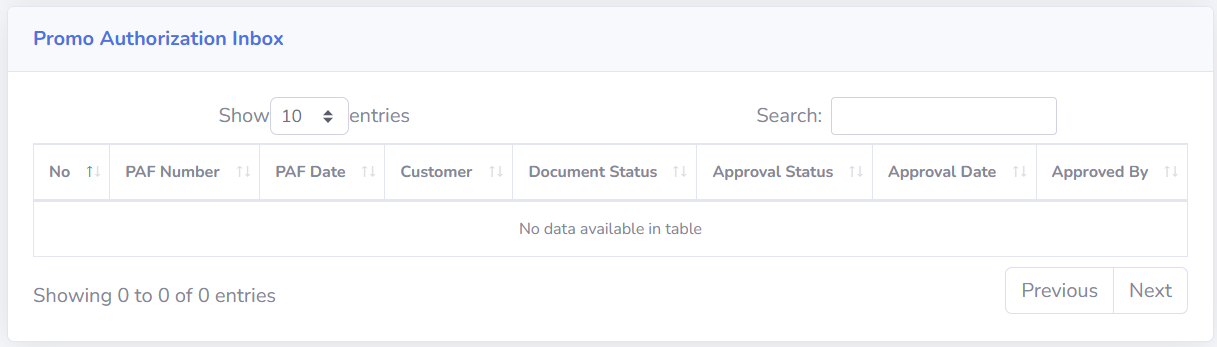
The Promo Authorization Inbox main page displays a list of PAF documents related to the approval process. This page is used to monitor Promo Authorization documents requiring approval, view the results of the approval process, and open document details for review before Approving, Revising, or Rejecting them. The information displayed helps users stay informed about the current status of each PAF document in the approval workflow.
-
Screen Description
The columns available in the Promo Authorization Inbox include:
-
No: Displays the sequential number of the data in the table.
-
PAF Number: Displays the Promo Authorization document number. Click PAF Number to open the PAF details page.
-
PAF Date: Displays the date of the Promo Authorization document.
-
Customer: Displays the name of the customer associated with the PAF document.
-
Document Status: Displays the current status of the Promo Authorization document.
-
Approval Status: Displays the status of the Promo Authorization document approval process.
-
Approval Date: Displays the date the approval process was conducted.
-
Approved By: Displays information about the party who performed the approval process.
-
-
Approval Process
Once the Promo Authorization details have been accessed via the PAF Number, users can take actions based on the document’s conditions and their access rights. Available actions include:
-
Approve: Used to approve the Promo Authorization document
- Revise: Used if the document needs to be corrected or completed before it can be approved.
- Reject: Used to reject the Promo Authorization document.
If you select Revise or Reject, clearly state the reason in the notes so that the relevant parties can understand why the document is being revised or rejected.
-
-
Tips & Important Notes
-
Ensure that the Current Company is correct so that the Promo Authorization Inbox data displayed matches the company to be processed.
-
Click the PAF Number to open and review the document details before proceeding with the approval process.
Review the customer, promo period, forecast value, total cost, ratio, and supporting documents before approving the PAF.
-
Check the Document Status to determine the status of the Promo Authorization document.
-
Check the “Approval Status” to track the progress of the document approval process.
-
The “Approval Date” information can be used to determine when the approval process took place.
-
The “Approved By” information can be used to identify the person who performed the approval.
-
Ensure that the actions “Approve,” “Revise,” or “Reject” are taken in accordance with the document’s status and the user’s authority.
-
If you select “Revise,” provide notes explaining which parts need to be corrected or completed.
-
If you select “Reject,” provide a clear reason for the rejection so that the document creator can understand it.
Carefully review all information before approving, as the approval action may affect subsequent document processes.
-
Promo authorization Form
PAF (Promo Authorization Form) Module Guide
Module Location:
PAF > Promo Authorization Form
-
Promo Authorization Form View
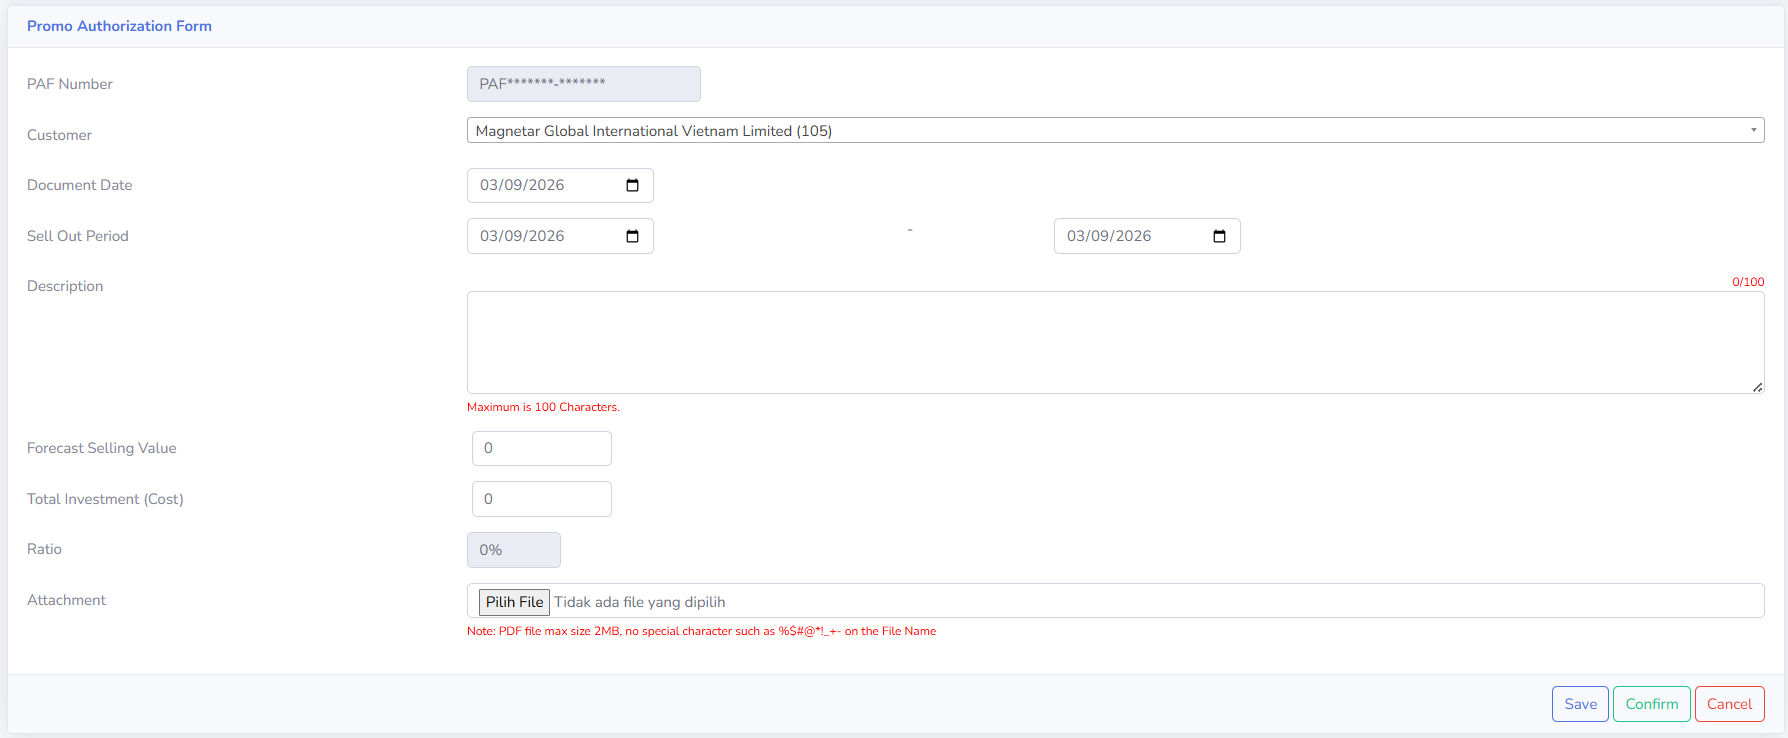
The Promo Authorization Form page appears when a user creates a new PAF document or opens a document that can still be edited. This page is used to fill in all the information required for a promotional program submission before the document is saved, confirmed, and forwarded to the approval process. Ensure that all information on the form has been filled out correctly and in accordance with the submitted promotional program before continuing the process.

-
Form Explanation
- PAF Number
Displays the identification number of the Promo Authorization document. The PAF Number is provided or generated by the system as the unique identifier for each document. -
Customer
Used to select the customer associated with the promotional program to be submitted - Document Date
Used to specify the date of the Promo Authorization document.
-
Sell-Out Period
Used to specify the duration of the promotional program.
This period consists of the start date and end date of the promotional program.
- Description
Used to add a brief description of the promotional program.
The description can be up to 100 characters long.
- Forecast Selling Value
Used to enter the estimated target sales value during the promotional program period. - Total Investment
Used to enter the total cost or investment allocated for the promotional program. -
Ratio
Displays the percentage ratio based on the Forecast Selling Value and Total Investment (Cost). Check the Ratio value to ensure the comparison between the estimated sales value and the program cost is appropriate.
-
Attachment
Used to attach supporting documents related to the promotional program. Attachment requirements:
-
Files must be in PDF format.
-
Maximum file size is 2 MB.
-
Please avoid using special charcters in files names
-
- PAF Number
-
Buttons on the Form
- Save
Used to save Promo Authorization data. Use Save if the document still needs to be completed or reviewed before proceeding to the next step.
- Confirm
Used to confirm the Promo Authorization document after all information has been reviewed. Make sure all data is correct before clicking Confirm.
- Cancel
Used to cancel the process of filling out or changing data on the form
- Save
-
Tips & Important Notes
-
Pastikan Customer yang dipilih sudah sesuai sebelum mengisi data lainnya.
-
Periksa kembali Document Date agar tanggal dokumen Promo Authorization tercatat dengan benar.
-
Pastikan tanggal awal dan tanggal akhir pada Sell Out Period sesuai dengan periode berlangsungnya program promo.
-
Isi Description secara singkat, jelas, dan maksimal 100 karakter.
-
Pastikan nilai Forecast Selling Value telah sesuai dengan estimasi penjualan yang ditargetkan selama program promo.
-
Pastikan Total Investment (Cost) telah sesuai dengan biaya atau investasi yang direncanakan.
-
Periksa nilai Ratio sebelum menyimpan atau mengonfirmasi dokumen.
-
Pastikan dokumen pendukung telah dilampirkan apabila diperlukan.
-
Attachment harus menggunakan format PDF dengan ukuran maksimal 2 MB.
-
Hindari penggunaan karakter khusus pada nama file attachment untuk mengurangi kemungkinan kendala saat proses upload.
-
Gunakan Save apabila data masih perlu disimpan atau dilengkapi terlebih dahulu.
-
Gunakan Confirm setelah seluruh informasi dan dokumen pendukung telah diperiksa.
-
Periksa kembali customer, periode promo, nilai penjualan, biaya, ratio, dan attachment sebelum melakukan Confirm.
-
Setelah dokumen dikonfirmasi, pantau Document Status dan Approval Status untuk mengetahui perkembangan proses dokumen.
-
Collection
Sales Performance
Tracking
Tracking Module Guide
Module Location:
soApp > Tracking
The Tracking Module is used to monitor the status of Sales Orders and view product details for each order. The information displayed includes the customer, Sales Order number, order status, estimated shipping date, total value, total quantity, and item details for the Sales Order.
-
Tracking Main Screen
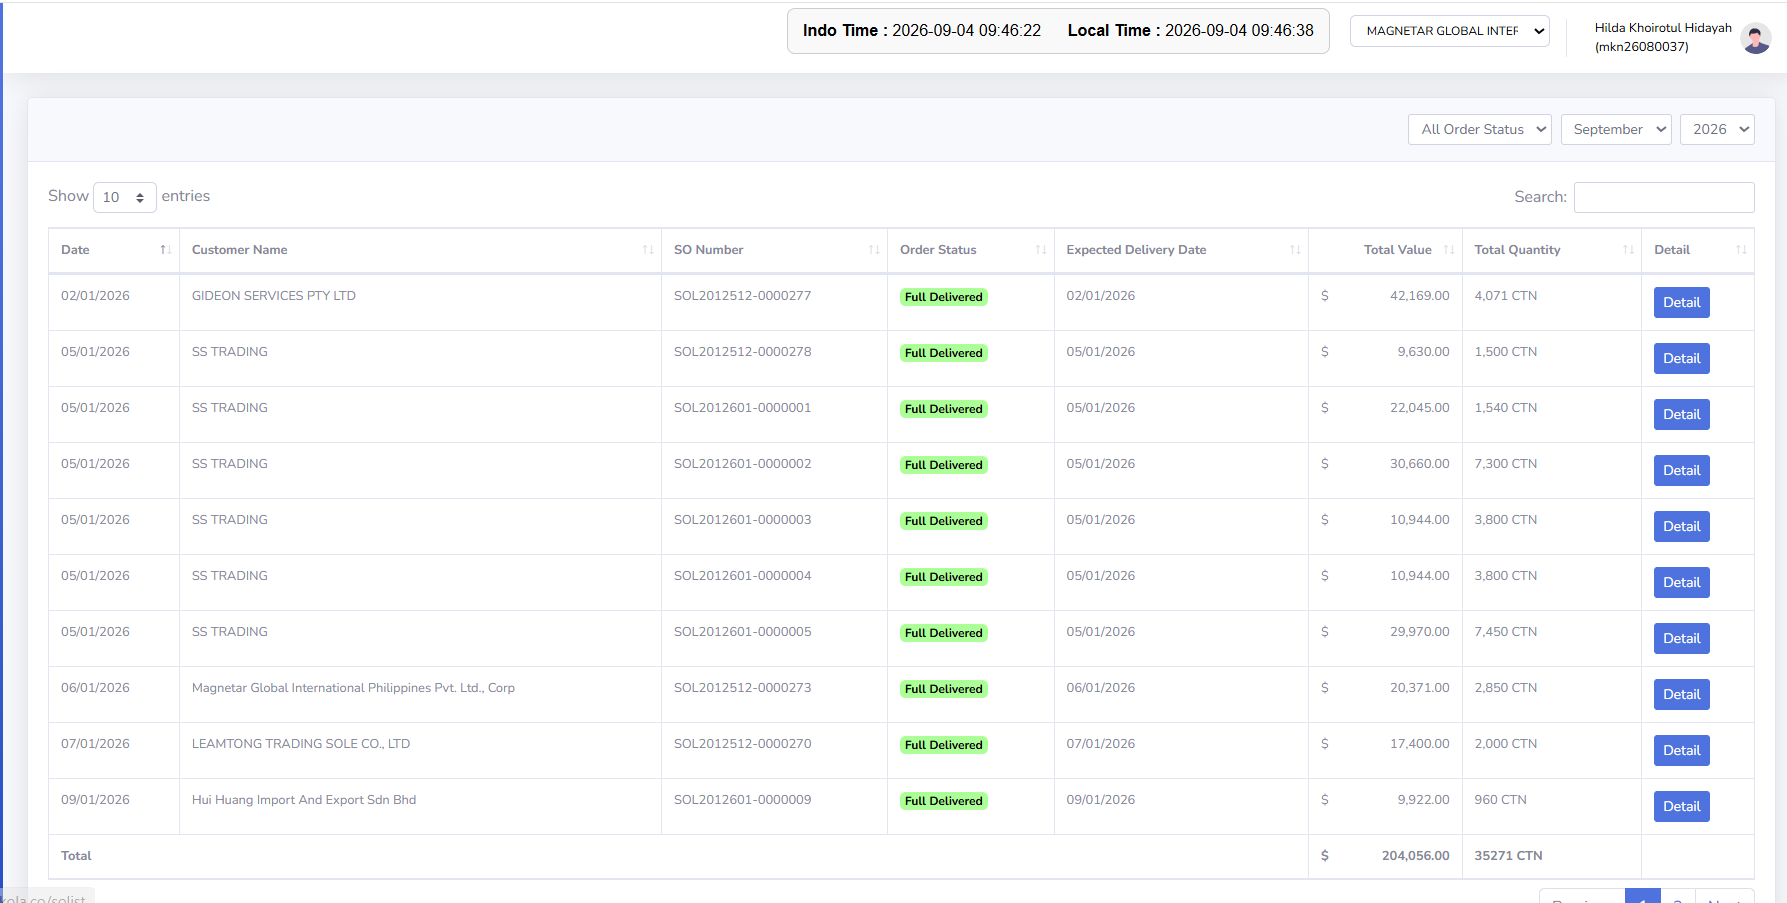
The main Tracking page displays a list of Sales Orders along with their status and shipping information. This page is used to search for and monitor Sales Orders based on Order Status, month, and year. Each Sales Order is displayed in a table format so that the order status, shipping date, transaction value, and quantity can be viewed at a glance.

- filter tracking
In the upper-right corner of the page, there are several filters to narrow down the displayed data.
-
Order Status: The Order Status filter is used to display Sales Orders based on a specific status.
-
Month: The Month filter is used to select the month for the Sales Order data to be displayed.
- Year: The Year filter is used to specify the year of the Sales Orders to be displayed.
-
- filter tracking
-
Table Explanation
Date displays the date recorded on the Sales Order. Customer Name Customer Name displays the name of the customer associated with the Sales Order. So Number SO Number displays the Sales Order number as the identifier for each order. Order Status Order Status displays the current status of the Sales Order. Expected Delivery Date Expected Delivery Date displays the planned or expected delivery date for the Sales Order. Total value
Total Value displays the total transaction value of the Sales Order. The value is displayed in the currency corresponding to the currently active company.Total Quantity
Total Quantity displays the total quantity of products included in the Sales Order. In the screenshot, the quantity is displayed in CTN units.Details The Detail button is used to open the Sales Order details. Click the Detail button to view the list of items, quantities, and values for the selected order.
-
Tips & Important Notes
-
Use the Order Status, Month, and Year filters to narrow down the Sales Order data you want to monitor.
-
Check the Order Status to see the current status of the Sales Order’s shipping process.
-
Check the Expected Delivery Date to see the scheduled delivery date.
-
Check the Total Value and Total Quantity to see the value and quantity of products for each order.
-
Click Details to view the product details included in the Sales Order.
-
Use Search to find specific Sales Orders or customers more quickly.
-
Check the Total row to view the total quantity and value of the displayed data.
-
AGP
AGP (Achievement, Growth & Progress) Module Guide
Module Location:
soApp > AGP
The Achievement, Growth & Progress (AGP) module is used to monitor sales achievements and growth over a given period. The information displayed includes a comparison of Sales Targets and Sales Achievements, MTD and YTD achievement percentages, and sales growth based on Value and Quantity.
-
Tampilan Utama AGP
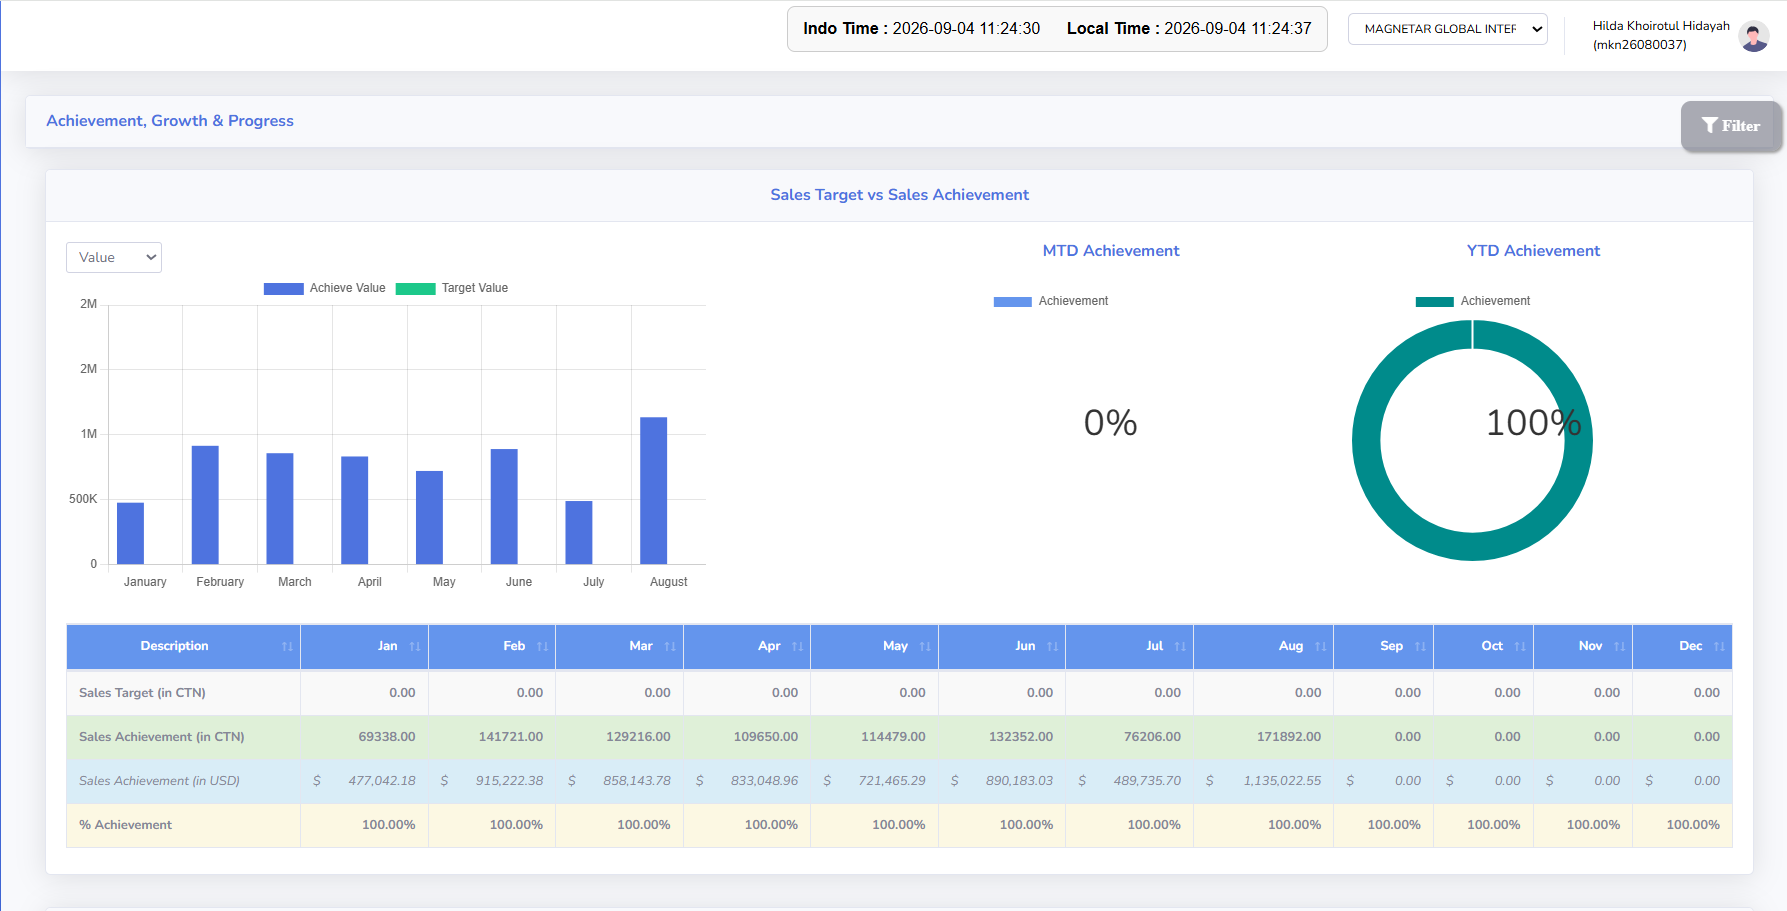
The Achievement, Growth & Progress (AGP) page displays sales performance information in the form of charts, percentages, and tables. In general, the AGP page is divided into two main sections:
- Sales target vs Sales Achievement
Sales Target vs. Sales Achievement is used to compare sales targets with recorded sales achievements. The information is displayed in the following formats:
-
Sales Target and Sales Achievement Charts, showing a comparison between sales target values and actual sales results for each month.
-
MTD Achievement, showing the percentage of sales achieved for the current month.
- YTD Achievement, showing the cumulative sales achievement percentage for the current year.
-
A table of monthly sales achievements, showing details of sales targets and achievements from January through December.

-
- Sales Growth
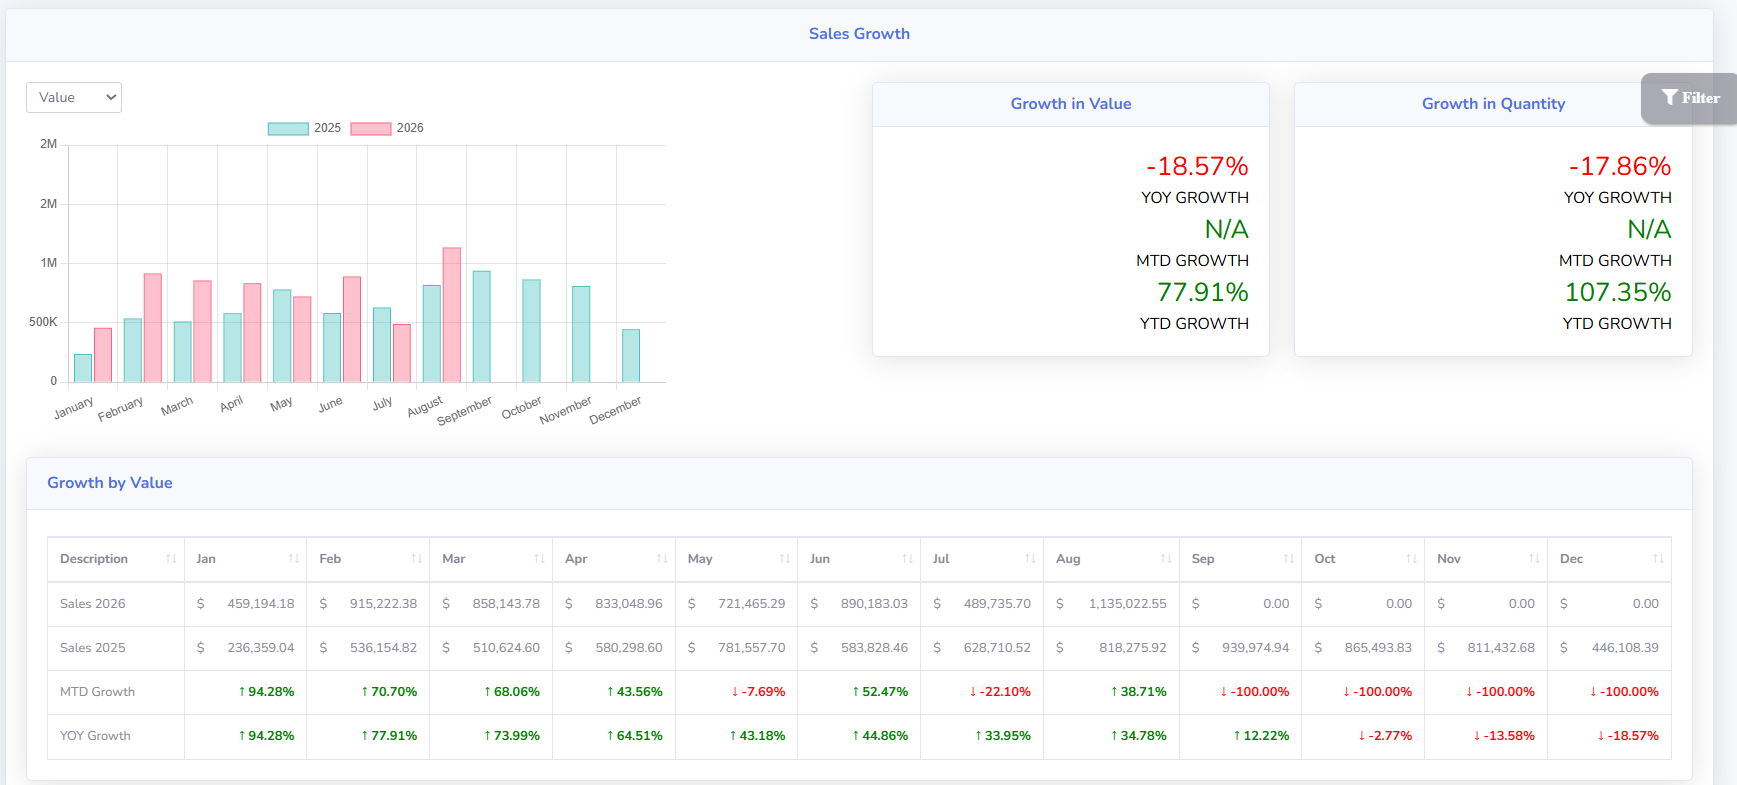
Sales Growth is used to track sales trends and growth by comparing data from two annual periods. The Sales Growth chart displays a comparison of monthly sales between the current year and the comparison year. The information is presented in the following format:
-
Growth in Value Chart
Growth in Value displays the percentage growth in sales based on sales value. This section includes three indicators:
-
YOY GROWTH: YoY (Year-over-Year) is used to compare the performance of a given period with the corresponding period in the previous year.
-
MTD GROWTH: Displays growth based on the current month being calculated.
-
YTD GROWTH: Displays the cumulative growth percentage from the beginning of the year up to the period currently being calculated.

-
-
-
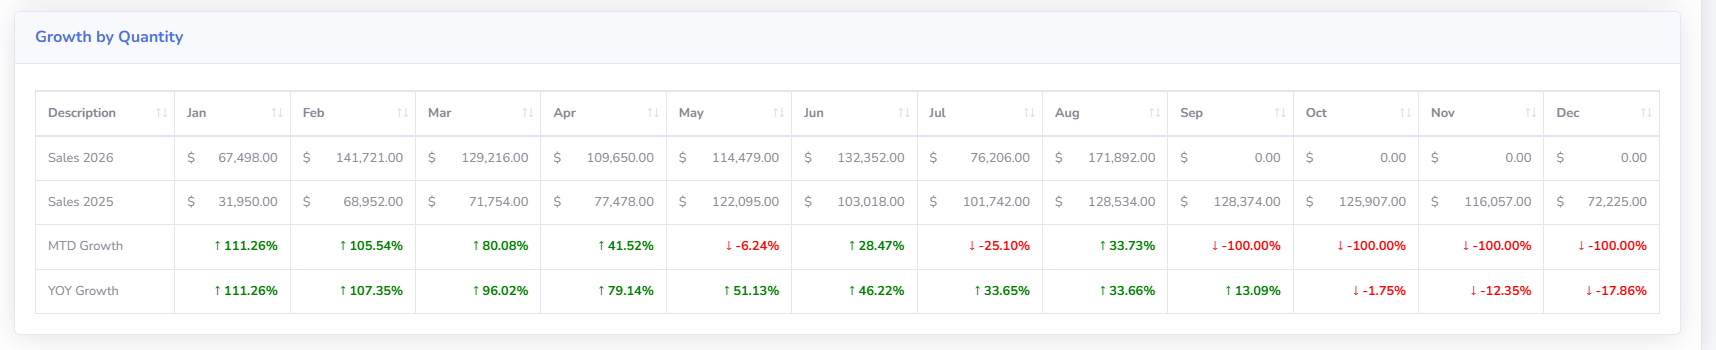
Growth in Quantity Chart
Growth in Quantity shows the percentage growth in sales based on the quantity of products. Just like Growth in Value, this section displays:
-
YOY Growth
- MTD Growth
-
YTD Growth
-
-
The difference is:
“Growth in Value” = based on sales value
“Growth in Quantity” chart = based on the number of products sold

- Sales target vs Sales Achievement
-
Tips & Important Notes
-
Use the Filter to display data based on the desired region and time period.
-
Compare Sales Target with Sales Achievement to track progress toward sales targets.
-
Check the MTD Achievement to see performance for the current month.
-
Check the YTD Achievement to see cumulative performance for the current year.
-
Use Growth in Value to view growth based on sales value.
-
Use Growth in Quantity to view growth based on product quantity.
-
Pay attention to the green and red indicators in the Growth table to identify increases or decreases.
-
Compare data from the current year and the previous year to see sales trends.
-
Settings
PDF Account Settings
Settings Module Guide
Module Location:
soApp > Settings > PDF Account Settings
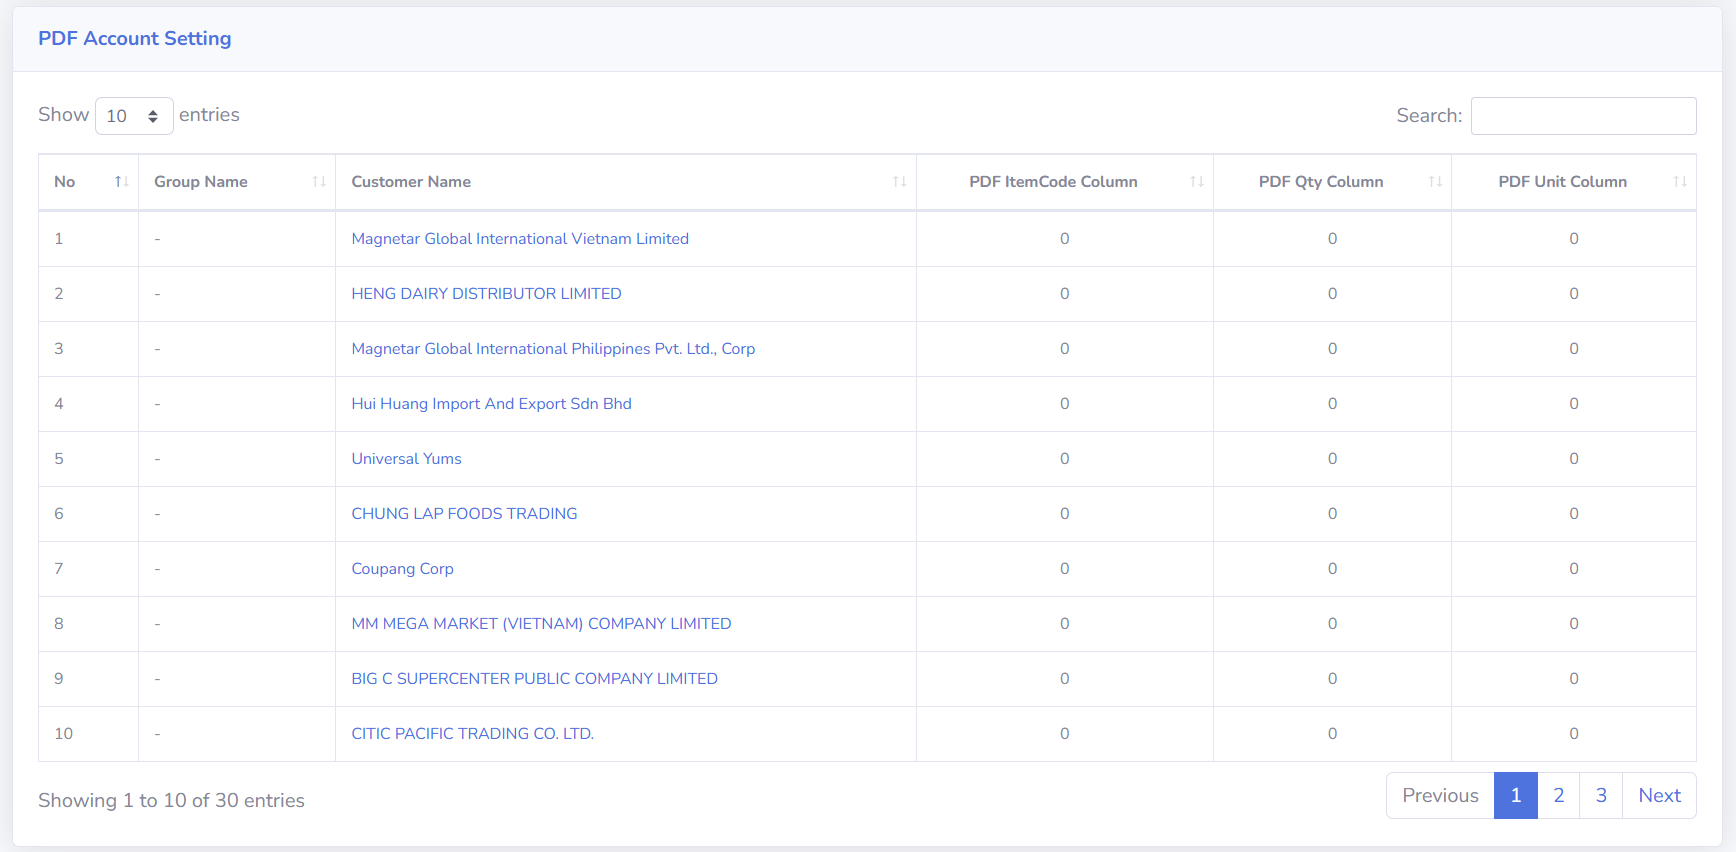
The PDF Account Settings module is used to configure columns in PDF documents based on the customer. Available settings include the Item Code, Quantity, and Unit columns, allowing PDF configurations to be tailored to each customer’s document format.
-
PDF Account Settings Main View
The PDF Account Settings page displays a list of customers along with their predefined PDF column configurations. Each customer can have different PDF column settings. Configuration information is displayed in a table format.

-
Column Descriptions
No Displays the sequential number of the data in the table.
Group Name Displays the customer’s group name if the customer belongs to a specific group.
If there is no Group Name, the system may display a “-”.
Customer Name Displays the name of the customer for whom a PDF configuration has been set up.
Click Customer Name to open the customer settings details page.
PDF ItemCode Column Displays the column configuration used to read or specify the Item Code in the customer’s PDF document.
PDF Qty Column Displays the column configuration used to read or specify the Quantity in the customer’s PDF document.
PDF Unit Column Displays the column configuration used to read or specify the Unit in the customer’s PDF document.
-
Tips & Important Notes
-
Make sure the selected customer is correct before making any configuration changes.
-
Double-check the Item Code, Qty, and Unit settings before saving your changes.
-
Use the Search function to find a specific customer more quickly.
-
Matrix Item
Settings Module Guide
Module Location:
soApp > Settings > Matrix Item
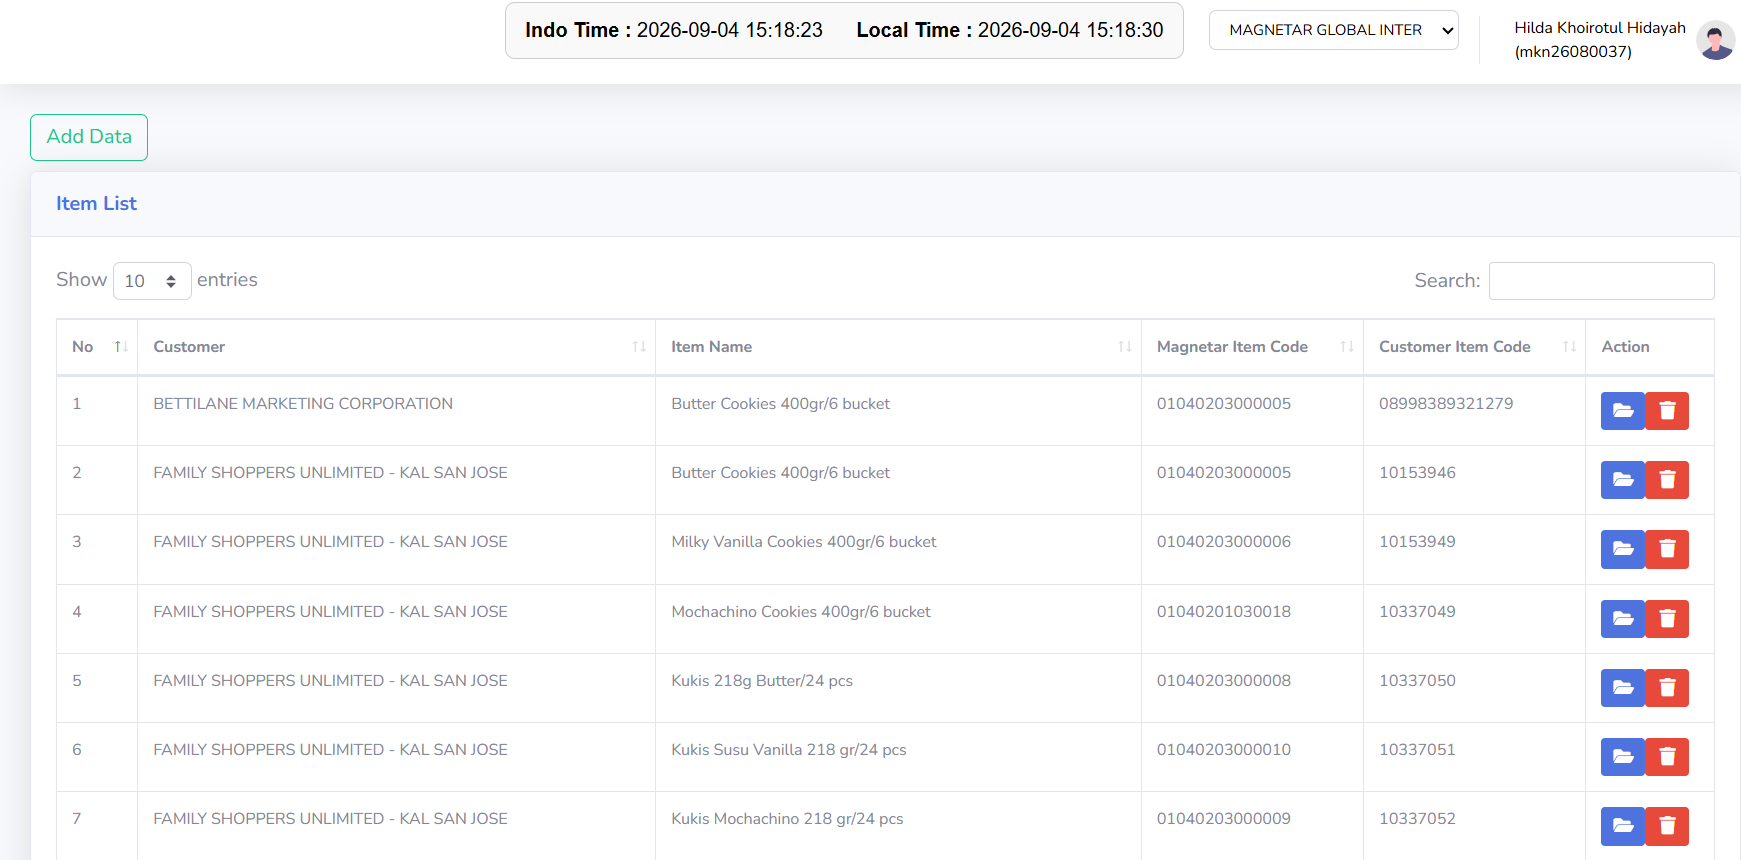
The Item List module is used to manage the relationship between items owned by the company and the item codes used by customers. The information stored includes the customer, item name, Magnetar Item Code, and Customer Item Code. This is important because the same product can have a company-internal code and a different code in the customer’s system.
-
Matrix List page view

The Item List page displays a list of items along with their internal codes and customer item codes. At the top, there is an Add Data button for adding new item mappings.
-
Coloum Description
No Displays the sequential number of the data in the table.
Customer Displays the name of the customer using that item.
Item Name Displays the name or description of the product.
Magnetar Item Code Displays the internal item code used in the Magnetar/KOKOLA system.
Customer Item Code Displays the item code used by the customer for that product.
-
Tips & Important Notes
-
Make sure the selected customer is correct before adding or changing an item mapping.
-
Make sure the selected Item Name matches the product used by the customer.
-
Double-check the Magnetar Item Code to ensure it matches the internal item code used in the system.
-
Ensure the Customer Item Code matches the item code used by the customer for that product.
-
Avoid creating duplicate mappings for customers and items that have already been registered.
-
Double-check all information before saving the data to avoid item mapping errors.
-
Be aware of the difference between the Magnetar Item Code and the Customer Item Code, as a single product may use different codes in the internal system and the customer’s system.
-
If an item code mismatch occurs during a transaction, first check the mapping data in the Item Matrix.
-
Use “Add Data” only to add new item mappings that are not yet available.
-
Ensure that changes to item mappings are made carefully, as this data may be used as a reference in transactions involving the customer.
-
If a customer uses a new item code or experiences a code change, ensure that the Customer Item Code data is updated according to the latest information.
-
Double-check the customer, item, and both item codes after the data has been successfully saved.
-