# Sales Module

# Customer Entry

### **Module Guide: Customer Entry**

#### **Module Location**

#### Sales &gt; Customer &gt; Customer Entry

#### **Module Objective**

#### The **Customer Entry** module serves as the center for managing customer **master data**. This is where all new customer data is registered, and existing customer data can be viewed and managed. The accuracy of the data in this module is crucial as it will be used throughout all other modules related to customers (Accounts Receivable, CRM, etc.).

### **1. Main View (Customer/MOU List)**

#### The main page of this module displays a list of all customers or MOUs (Memorandum of Understanding) that have been recorded in the system.

![image.png](https://manual.kokola.co/uploads/images/gallery/2025-08/scaled-1680-/qwNimage.png)

#### **View Explanation &amp; Filters**

#### This page is for viewing and managing all customer master data.

- #### **Filters**: You can search for specific data by **MOU Number**, **Goods/Services Category**, **Status**, or a **Start Date** and **End Date** range.
- #### **Customer List**: The table below will display all data that matches the filters. The columns include important information such as **MOU Number**, **Customer Name**, **Territory**, **Credit Limit**, and **Document Status**.

#### **Button Functions**

- #### **New**: The primary button to create or input new customer data.
- #### **Print**: To print the details of selected customer data.
- #### **Change Status**: To change the status of selected customer data (e.g., from prospect to active).

### **2. Steps to Input a New Customer**

#### **Step 1: System Configuration Prerequisite (Important!)**

#### Before you can input a new customer, the system requires a **Document Type** setting. If you click **New** and see the message **"You haven't set CustomerEntry as Document Type yet!"**, it means this configuration has not been done.

#### **Action**: Please contact the **MIS (Management Information System) department** to perform this setup first.

#### **Step 2: Create a New Customer**

#### After the configuration in Step 1 is complete, click the **New** button on the Main View to open the customer registration form.

#### **Step 3: Fill in Customer Details**

#### On the form that appears (not shown in the image), fill in all the necessary customer master data. Based on the existing columns, this data will include:

- #### **General information**: Customer Name, Address, Territory, etc.
- #### **Sales information**: Products of interest, Sales target.
- #### **Financial information**: Bank Guarantee, Credit Limit.

#### **Step 4: Save the Data**

#### Click the "Save" or "Confirm" button to save the new customer data into the system. The new data will then appear in the Main View.

### **Tips &amp; Important Notes**

- #### This module is the **single source of master data** for all customers. Ensure the data input here (especially name, address, and Tax ID Number/NPWP) is correct and accurate.
- #### The **Credit Limit** column will be an important reference for the system to control sales transactions so they do not exceed the granted credit ceiling.
- #### The **Change Status** button is likely used to manage the customer lifecycle within the system.

# Customer Inbox

### **Module Guide: Customer Inbox (Memorandum of Understanding Inbox)**

#### **Module Location**

#### Sales &gt; Customer &gt; Customer Entry &gt; Customer Inbox

#### **Module Objective**

#### The **Customer Inbox (Memorandum of Understanding Inbox)** module serves as the approval center for new customer data or MOUs that have been input. This module is used by a superior or manager who is authorized to conduct a final review and provide approval before the customer data becomes active and can be used for transactions.

### **1. Main View (MOU List)**

#### The main page of this module is an "inbox" that displays all customer data or MOUs requiring your action.

![image.png](https://manual.kokola.co/uploads/images/gallery/2025-08/scaled-1680-/F8Aimage.png)

#### **View Explanation &amp; Filters**

#### This page provides a summary of all customer data that is awaiting approval.

- #### **Filters**: You can search for specific data by **MOU Number**, **Goods/Services Category**, **Status**, or a **Start Date** and **End Date** range.
- #### **Request List**: The table below will display all data awaiting action. The table currently shows "...No Data Available...".

#### **Column Explanation**

- #### **MOU Number**: The unique number of the customer registration document or MOU.
- #### **Customer Name**: The name of the submitted customer.
- #### **Credit Limit**: The proposed credit limit value for the customer, which needs to be reviewed carefully.
- #### **Document Status / Approval Status**: These columns indicate the status of the approval process.

### **2. Approval Process Steps**

#### The following is the standard workflow for an approver.

#### **Step 1: Access the Inbox**

#### Open the **Customer Inbox** module to see the list of new customer registrations or MOUs that require approval.

#### **Step 2: Review Customer/MOU Details**

#### Click on one of the rows in the table to open its detail view. In the detail view, you can check all the information that has been input, such as the completeness of the customer data, the **Credit Limit** value, **Bank Guarantee**, and other important information.

#### **Step 3: Provide Approval**

#### After you open and review the customer registration details in Step 2, you will find the buttons to grant approval (e.g., **"Approve"** or **"Reject"** buttons) **within that detail page**. Click the appropriate button to complete the review process.

### **3. Workflow &amp; Integrated Business Process**

1. #### **Submission**: A user (e.g., a sales admin staff) creates new customer data in the **Customer Input** module and saves it.
2. #### **Entering the Queue**: The newly created customer data automatically enters the queue in this **Customer Inbox** module.
3. #### **Review &amp; Approval**: A manager or approver opens this module, reviews, and provides approval.
4. #### **Customer Activation**: After approval, the customer data becomes fully active in the system and is ready to be used for creating sales transactions.

### **Tips &amp; Important Notes**

- #### This module is an important **control point** to ensure all new customer data and their credit terms have been validated by management before transactions begin.
- #### Pay close attention to the **Credit Limit** and **Bank Guarantee** columns during the review to manage the company's financial risk.

# Customer Category

### **Module Guide: Customer Category**

#### **Module Location**

#### Sales &gt; Customer &gt; Customer Category

#### **Module Objective**

#### The **Customer Category** module is a tool for managing master data that has two primary functions:

1. #### **Classification**: To create and manage a hierarchical structure for grouping customers based on their type or market segment (e.g., Modern Trade, General Trade, Outlet, Private Label).
2. #### **Accounting Integration**: To link each customer category to specific accounts in the General Ledger. This setup automates the journaling process for every transaction related to customers within that category.

### **1. Main View (Category Structure)**

#### The main page of this module displays all created customer categories in a **tree view** format.

![image.png](https://manual.kokola.co/uploads/images/gallery/2025-08/scaled-1680-/5BQimage.png)

#### **View Explanation**

- #### **Hierarchical Structure**: This view shows the parent-child relationship between categories. For example, the "CoManufacturing" category (CC0000037) is under the "PRIVATE LABEL" category (CC0000036).
- #### **Navigation**: You can click the **\[+\]** or **\[-\]** icons to expand or collapse a category branch. To edit a category, **double-click** on its name.

### **2. Steps to Manage a Customer Category**

#### When you create a new category or edit an existing one, you will see a detail form.

#### **Step 1: Fill in Basic Category Information**

#### At the top of the form, fill in the basic details of the category:

- #### **Category Code**: The unique code for the category, for example, "CC0000037". ![image.png](https://manual.kokola.co/uploads/images/gallery/2025-08/scaled-1680-/8qeimage.png)
- #### **Category Name**: The descriptive name for the category, for example, "CoManufacturing". ![image.png](https://manual.kokola.co/uploads/images/gallery/2025-08/scaled-1680-/uzNimage.png)

#### **Step 2: Set Up Account Linking (GL Linking - Important!)**

#### This section is a crucial accounting setup for journal automation. You must define the default General Ledger account for each type of receivable transaction, per currency.

- #### **Account for Tracking Receivables that will be invoice (A/R To Be Invoiced)**: Define the account for recording receivables that have not yet been billed (e.g., from goods that have been shipped but not yet invoiced).
- #### **Account for Tracking Receivables (A/R)**: Define the main Accounts Receivable account for this category.
- #### **Account for Tracking Customer Deposit**: Define the account for recording deposits from customers.
- #### **Account for Tracking Customer Down Payment**: Define the account for recording Sales Down Payments.

#### **Step 3: Save the Settings**

#### Use the buttons in the bottom-left section to save your changes:

- #### **Update**: Saves the changes for this category setting only. ![image.png](https://manual.kokola.co/uploads/images/gallery/2025-08/scaled-1680-/sOaimage.png)
- #### **Update ALL MASTER CUSTOMER**: Saves the changes and applies them to all existing customer data under this category. ![image.png](https://manual.kokola.co/uploads/images/gallery/2025-08/scaled-1680-/jHcimage.png)
- #### **Delete**: To delete the category. ![image.png](https://manual.kokola.co/uploads/images/gallery/2025-08/scaled-1680-/bF4image.png)

### **Tips &amp; Important Notes**

- #### The **Customer Linked Accounts** settings must be done very carefully and in coordination with the **Accounting team** to ensure all transactions are posted to the correct General Ledger accounts.
- #### A good category structure will greatly simplify the process of sales reporting and customer analysis by segment.
- #### Use the **Update ALL MASTER CUSTOMER** button with caution, as it will change the accounting links for all existing customers within that category.

# Customer Group

### **Module Guide: Customer Group**

#### **Module Location**

#### Sales &gt; Customer &gt; Customer Group

#### **Module Objective**

#### The **Customer Group** module is used to create and manage simpler or more specific customer groupings. Unlike Customer Category, which has a hierarchical structure and complex accounting links, Customer Group is typically used for more flexible reporting or promotional setup purposes.

### **1. Main View (Customer Group List)**

#### The main page of this module displays a list of all Customer Groups that have been created.

![image.png](https://manual.kokola.co/uploads/images/gallery/2025-08/scaled-1680-/iJVimage.png)

#### **View Explanation**

#### This page is for viewing and managing all existing groups.

- #### **Filter**: You can search for a specific group using the search bar based on the **Group Code**.
- #### **Group List**: The table below displays a summary of each group, with columns for **Group Code** and **Group Name**. There is one example of a group named "Lokal 1".

#### **Button Functions**

- #### **New**: The primary button to create a new Customer Group.

### **2. Steps to Create a New Customer Group**

#### **Step 1: Create a New Group**

#### From the Main View, click the **New** button to open the **Add Customer Group** form. ![image.png](https://manual.kokola.co/uploads/images/gallery/2025-08/scaled-1680-/3Ldimage.png)

#### **Step 2: Fill in Group Details**

#### On the form that appears, fill in the required details:

- #### **Group Code**: Enter a unique code for your customer group. ![image.png](https://manual.kokola.co/uploads/images/gallery/2025-08/scaled-1680-/Yh3image.png)
- #### **Group Name**: Enter a descriptive name for the group. ![image.png](https://manual.kokola.co/uploads/images/gallery/2025-08/scaled-1680-/XuAimage.png)

#### **Step 3: Save the New Group**

#### Click the **Save** button to save the new group. The group will now appear in the Main View. ![image.png](https://manual.kokola.co/uploads/images/gallery/2025-08/scaled-1680-/ogfimage.png)

### **Tips &amp; Important Notes**

- #### Use Customer Groups for more dynamic segmentation. For example, you can create a **"VIP Customers"** group or an **"Exhibition Area Customers"** group for specific promotional programs.
- #### This grouping can be used as a filter in various sales reports to analyze the performance of specific customer segments.

# Customer

### **Module Guide: Customer**

#### **Module Location**

#### Sales &gt; Customer &gt; Customer

#### **Module Objective**

#### The **Customer** module is the master data hub for all of the company's customers. This is where you can create new customer data, view, edit, and manage their complete information, ranging from address and contact details to tax information and sales terms. Accurate data in this module is crucial for the smooth operation of the entire sales, delivery, and billing process.

### **1. Main View (Customer List)**

#### The main page of this module displays a list of all customers registered in the system.

![image.png](https://manual.kokola.co/uploads/images/gallery/2025-08/scaled-1680-/RzRimage.png)

#### **View Explanation &amp; Filters**

#### This page is for viewing and managing all customer master data.

- #### **Filters**: You can search for a specific customer using the search bar at the top or filter the list by **Item Category** and **Status**.
- #### **Customer List**: The table below displays a summary of each customer, with columns such as **Customer Code**, **Customer Name**, **Address**, **City**, **Phone**, and the responsible **Sales Person**.

#### **Button Functions**

- #### **New**: The primary button to create new customer data.
- #### **Delete**: To delete selected customer data.
- #### **Print**: To print the details of selected customer data.
- #### **Export To MS Excel**: To download the customer list into an Excel format.
- #### **Change Status**: To change the status of a selected customer (e.g., from active to inactive).

### **2. Steps to Manage Customer Data**

#### The following is the complete workflow for registering a new customer.

#### **Step 1: Create a New Customer**

#### From the Main View, click the **New** button to open the **New Customer** form.   
![image.png](https://manual.kokola.co/uploads/images/gallery/2025-08/scaled-1680-/2Bmimage.png)

#### **Step 2: Fill in Main Customer Details**

#### Fill in all the relevant information on the form that appears. Fields marked with `(*)` are mandatory.

- #### **General Information**: Fill in the **Customer Code** (if not automatic), **Name** (Customer Name), and select the appropriate **Customer Category**.   
    ![image.png](https://manual.kokola.co/uploads/images/gallery/2025-08/scaled-1680-/8MSimage.png)
- #### **Tax &amp; Bank Information**: Complete important data such as **Tax File Number**, **NPWP** (Tax ID Number), **Bank Account**, and **Account Name**.   
    ![image.png](https://manual.kokola.co/uploads/images/gallery/2025-08/scaled-1680-/la7image.png)  
      
    ![image.png](https://manual.kokola.co/uploads/images/gallery/2025-08/scaled-1680-/Yt4image.png)
- #### **Contact Information**: Enter the **Email Address**, **Website**, **Address**, **City**, and **Phone**.  
    ![image.png](https://manual.kokola.co/uploads/images/gallery/2025-08/scaled-1680-/ZFcimage.png)
- #### **Sales Information**: Set terms such as **Default Price Group** and **Allowed Tolerance Difference**.  
    ![image.png](https://manual.kokola.co/uploads/images/gallery/2025-08/scaled-1680-/WDyimage.png)

#### **Step 3: Add a Contact Person**

#### Every customer company has a contact person. To add them:

1. #### While filling out the new customer form, click the **Add Contact** button at the bottom to open the **Add Contact** form.  
    ![image.png](https://manual.kokola.co/uploads/images/gallery/2025-08/scaled-1680-/X52image.png)
2. #### Fill in the contact person's details such as **First Name**, **Last Name**, **Job Title**, and **Email Address**.  
    ![image.png](https://manual.kokola.co/uploads/images/gallery/2025-08/scaled-1680-/DsQimage.png)
3. #### **Important**: Check the **Billing PIC** (Person In Charge) box if this person is responsible for billing matters. ![image.png](https://manual.kokola.co/uploads/images/gallery/2025-08/scaled-1680-/Oc1image.png)
4. #### Click **Save** to save the contact and return to the main customer form.  
    
    
    #### ![image.png](https://manual.kokola.co/uploads/images/gallery/2025-08/scaled-1680-/qFVimage.png)

#### **Step 4: Save the Customer Data**

#### After all the data on the main customer form and for the contact person has been filled in, click the 'Save' or 'Confirm' button at the bottom of the main form to register the new customer into the system.

### **Tips &amp; Important Notes**

- #### Ensure you fill in the **Customer Category** correctly as this will affect the default accounting settings for that customer.
- #### Filling in the contact person data, especially marking the **Billing PIC**, will greatly simplify the communication and collection process for the AR team.
- #### The **Change Status** button on the main page is used to change a customer's status, for example, from 'Potential' to 'Active' or vice versa.

# Sales

### **Module Guide: Sales (Salesman List)**

#### **Module Location**

#### Sales &gt; Customer &gt; Sales

#### **Module Objective**

#### The **Sales (Salesman List)** module serves as the master data hub for managing all salespeople in the company. The list created and managed here will be used throughout all other modules (such as CRM and Sales) to assign the person responsible for customers, sales opportunities, and transactions.

### **1. Main View (Salesman List)**

#### The main page of this module displays a list of all employees who have been designated as salesmen.

![image.png](https://manual.kokola.co/uploads/images/gallery/2025-08/scaled-1680-/7utimage.png)

#### **View Explanation &amp; Filters**

#### This page is for viewing and managing all salesman data.

- #### **Filter**: You can search for a specific salesman using the search bar based on **Employee ID** or filter the list by **Employee Status** (for example, to only display those who are "Active").
- #### **Salesman List**: The table below displays all salesmen that match the filters.

#### **Column Explanation**

- #### **Employee ID**: The Employee ID Number of the salesman.
- #### **Employee Name**: The full name of the salesman.
- #### **Setting Reg Salesman**: This column likely indicates the status of advanced settings for the salesman. A red cross icon (X) could mean that other settings (such as region or target settings) have not yet been completed.

#### **Button/Link Functions**

- #### **New Employee**: A link to add a new employee to the salesman list.

### **2. Steps to Add a New Salesman**

#### **Step 1: Open the Entry Form**

#### From the Main View, click the **New Employee** link to open the **Salesman | Add** form. ![image.png](https://manual.kokola.co/uploads/images/gallery/2025-08/scaled-1680-/fisimage.png)

#### **Step 2: Fill in Employee and Access Details**

#### On the **Salesman | Add** form, fill in all the necessary information. Fields marked with `*` are mandatory.

- #### **Login Information:**
    
    
    - #### **User Name**: The username for logging into the system.
    - #### **Status**: Select the user status, **Active** or **In Active**.  
        ![image.png](https://manual.kokola.co/uploads/images/gallery/2025-08/scaled-1680-/r7Pimage.png)
- #### **Personal Data:**
    
    
    - #### **Employee ID, First Name, Last Name, Gender, Email Address**, and other personal data.  
        ![image.png](https://manual.kokola.co/uploads/images/gallery/2025-08/scaled-1680-/g1Limage.png)  
        ![image.png](https://manual.kokola.co/uploads/images/gallery/2025-08/scaled-1680-/Rcyimage.png)  
        [![image.png](https://manual.kokola.co/uploads/images/gallery/2025-08/scaled-1680-/73Himage.png)](https://manual.kokola.co/uploads/images/gallery/2025-08/73Himage.png)
- #### **Employment Information:**
    
    
    - #### **Employee Status**: The employment status, for example, "Permanent". ![image.png](https://manual.kokola.co/uploads/images/gallery/2025-08/scaled-1680-/Qalimage.png)
    - #### **Hire Date** and **Effective Date**. ![image.png](https://manual.kokola.co/uploads/images/gallery/2025-08/scaled-1680-/DgQimage.png)
- #### **Sales Settings (Important):**
    
    
    - #### **Is Person Sales**: Ensure you set this field to **'Yes'**. This is the key setting that marks this employee as a salesman. 
        
        #### ![image.png](https://manual.kokola.co/uploads/images/gallery/2025-08/scaled-1680-/EuOimage.png)
    - #### **Leader Name**: Assign the superior or leader of the salesman.   
        ![image.png](https://manual.kokola.co/uploads/images/gallery/2025-08/scaled-1680-/RHuimage.png)

#### **Step 3: Save the Data**

#### After all data has been filled in correctly, click the **Save** button in the bottom-left section to save the new salesman data. 

#### ![image.png](https://manual.kokola.co/uploads/images/gallery/2025-08/scaled-1680-/4Ftimage.png)

### **Tips &amp; Important Notes**

- #### The salesman data set up here will appear as the choices for **"Account Officer"** or **"Sales Person"** in other modules like CRM Opportunity and Sales Order.
- #### Ensure you always keep the **Employee Status** up-to-date to prevent them from being incorrectly selected in transactions.

# Distributor

### **Module Guide: Distributor**

#### **Module Location**

#### Sales &gt; Customer &gt; Distributor

#### **Module Objective**

#### The **Distributor** module is a highly comprehensive master data hub, specifically designed to manage all information related to distributor partners. This module not only records basic data but also covers operational capacity, business requirements, and all complex **trading terms** such as discounts and rebates.

### **Steps to Manage Distributor Data**

#### To register or edit distributor data, you will go through several detailed sections or tabs.

#### **Step 1: Fill in Distributor Data**

#### This section records the basic legal and contact information of the distributor.

- #### **Basic Information**: Fill in the **Document ID**, **Customer Code**, **Customer (Distributor Name)**, **Address**, **Regional**, and other contact details.   
    ![image.png](https://manual.kokola.co/uploads/images/gallery/2025-08/scaled-1680-/MPkimage.png)
- #### **Legal Documents**: Upload important documents such as **NPWP** (Tax ID Number), **SPPKP** (Taxable Entrepreneur Confirmation Letter), **SIUP** (Business Trading Permit), **AKTE PENDIRIAN** (Deed of Establishment), and **TDP** (Company Registration Certificate) using the available **Upload** buttons.  
    ![image.png](https://manual.kokola.co/uploads/images/gallery/2025-08/scaled-1680-/wyfimage.png)

#### **Step 2: Fill in Distributor Condition**

#### This section documents the operational capacity and market reach of the distributor.

- #### **Operational Capacity**: Enter data such as **Number Of Branches**, **Number Of Warehouse**, **Number Of Armada (Fleet)**, and **Number Of Salesman**.  
    ![image.png](https://manual.kokola.co/uploads/images/gallery/2025-08/scaled-1680-/3FUimage.png)  
    ![image.png](https://manual.kokola.co/uploads/images/gallery/2025-08/scaled-1680-/lBNimage.png)
- #### **Other Business Information**: Complete data such as **Sales Target**, information on **Cooperation with Other Principals**, and **Distribution Area**.  
    ![image.png](https://manual.kokola.co/uploads/images/gallery/2025-08/scaled-1680-/VKDimage.png)  
    ![image.png](https://manual.kokola.co/uploads/images/gallery/2025-08/scaled-1680-/UdWimage.png)

#### **Step 3: Fill in Business Condition**

#### This section defines the financial requirements and formal agreements with the distributor.

- #### **Agreement**: Enter details such as **MOU Number**, **MOU Valid Date**, **Regional**, and **Product**.  
    ![image.png](https://manual.kokola.co/uploads/images/gallery/2025-08/scaled-1680-/smAimage.png)
- #### **Financial &amp; Credit**: Set up information for **Bank Guarantee**, **Credit Limit**, **Limit Over Due**, and **Payment Term**.  
    ![image.png](https://manual.kokola.co/uploads/images/gallery/2025-08/scaled-1680-/hU2image.png)  
    ![image.png](https://manual.kokola.co/uploads/images/gallery/2025-08/scaled-1680-/lgyimage.png)

#### **Step 4: Set Up Trading Terms**

#### This is the most detailed section that governs all commercial schemes with the distributor.

- #### **Discounts &amp; Rebates**: For each type of program (e.g., **Disc Regular, Fixed Rebate, Opening New Store, Promo Fund, Return**), fill in the percentage column **(%)** as well as the start period (**p.awal**) and end period (**p.akhir**) for the program's validity.  
    ![image.png](https://manual.kokola.co/uploads/images/gallery/2025-08/scaled-1680-/keJimage.png)  
    ![image.png](https://manual.kokola.co/uploads/images/gallery/2025-08/scaled-1680-/u6wimage.png)  
    ![image.png](https://manual.kokola.co/uploads/images/gallery/2025-08/scaled-1680-/IGTimage.png)

#### **Step 5: Save and the Approval Process**

#### After all data in all sections has been completely filled in:

1. #### Review all the information that has been input.
2. #### Click the **Save** button to save the new distributor data or existing changes. ![image.png](https://manual.kokola.co/uploads/images/gallery/2025-08/scaled-1680-/gPNimage.png)
3. #### The saved document will then go through the internal approval workflow shown at the bottom of the form (Submit by DBDL, Approve by LEAD, etc.).

### **Tips &amp; Important Notes**

- #### This module is the **single source of truth** for all commercial agreements with distributors. Ensure all data, especially in the **Trading Term** section, is filled in accurately.
- #### The discount and rebate settings here will likely be **automatically applied** to every sales transaction made by that distributor.
- #### The comprehensive data entry required for this module necessitates **coordination between various teams**, such as the Sales, Finance, and Legal teams.

# Sales Regional

### **Module Guide: Sales Region**

#### **Module Location**

#### Sales &gt; Sales Region

#### **Module Objective**

#### The **Sales Region** module is a tool for managing master data related to sales regions or territories. Its purpose is to define geographical sales areas, and to view and group customers based on their region. This setup is crucial as a basis for reports and sales analysis per region.

### **1. Main View (Sales Region List)**

#### The main page of this module displays a list of all created sales regions along with the customers that belong to them.

![image.png](https://manual.kokola.co/uploads/images/gallery/2025-08/scaled-1680-/BAhimage.png)

#### **View Explanation**

#### This page is the center for viewing and managing all sales region data.

- #### **Filter**: You can search for a specific region using the search bar based on the **Regional Code**.
- #### **Region List**: The table below displays all existing sales regions.

#### **Column Explanation**

- #### **Regional Code**: The unique code for each sales region (e.g., SA0104, SA0207).
- #### **Regional Description**: The name or description of the region (e.g., Madiun, Banyuwangi, Malang).
- #### **Customer**: A list of customers who are included in that sales region.

#### **Button Functions**

- #### **New**: The primary button to create new Sales Region data.
- #### **Delete**: To delete a selected sales region data.

### **2. Steps to Manage a Sales Region**

#### **Step 1: Create a New Region**

#### From the Main View, click the **New** button to open the new region creation form. 

#### ![image.png](https://manual.kokola.co/uploads/images/gallery/2025-08/scaled-1680-/TCCimage.png)

#### **Step 2: Fill in Region Details**

#### On the form that appears (not shown in the image), you will be asked to fill in the **Regional Code** (a unique code for the region) and the **Regional Description** (the name of the region, e.g., Surabaya, Malang, Central Jakarta). ![image.png](https://manual.kokola.co/uploads/images/gallery/2025-08/scaled-1680-/dFzimage.png)

#### **Step 3: Add Customers to the Region**

#### After the region is defined, you will be able to associate or add customers to that region. This process ensures every customer is mapped correctly. ![image.png](https://manual.kokola.co/uploads/images/gallery/2025-08/scaled-1680-/lQ6image.png)

#### **Step 4: Save the New Region**

#### Save the data to create the new sales region. The data will then appear in the Main View. 

#### ![image.png](https://manual.kokola.co/uploads/images/gallery/2025-08/scaled-1680-/ILpimage.png)

### **Tips &amp; Important Notes**

- #### These Sales Region settings are important master data for all sales reports that are analyzed by geographical area.
- #### Ensure every new customer is allocated to the correct sales region to make the sales data per region accurate.
- #### The information **"(Salesman Not Setting)"** that might appear in the Regional Code column could indicate that no specific salesperson has been assigned to handle that region or customer.

# Sales Free Item

### **Module Guide: Free Item Program**

#### **Module Location**

#### Sales &gt; Sales Trade Agreement &gt; Sales Free Item

#### **Module Objective**

#### The **Sales** **Free Item** module is a tool for creating and managing promotional programs in the form of a "free gift" (e.g., Buy X, Get Y Free). The settings created here will be automatically applied by the system at the time of sales order creation if the promotion's terms and conditions are met.

### **1. Main View (Program List)**

#### The main page of this module displays a list of all free item promotion programs that have been created.

![image.png](https://manual.kokola.co/uploads/images/gallery/2025-08/scaled-1680-/941image.png)

#### **View Explanation**

#### This page is for viewing and managing all existing free item promotion programs.

- #### **Filter**: You can search for a specific program using the search bar based on the **Group Code**.
- #### **Program List**: The table below displays a summary of each program, with columns for **Group Code**, **Group Name**, **Last Update**, and **Updated By**.

#### **Button Functions**

- #### **New**: The primary button to create a new free item promotion program.
- #### **Delete**: To delete a selected program.

### **2. Steps to Create a Free Item Program**

#### **Step 1: Create a New Program**

#### From the Main View, click the **New** button to open the **Add Free Item** form.   
![image.png](https://manual.kokola.co/uploads/images/gallery/2025-08/scaled-1680-/uMdimage.png)

#### **Step 2: Fill in General Program Information**

#### Fill in all the general information at the top of the form:

- #### **Group Code &amp; Group Name**: Provide a unique code and a clear name for your promotion program.   
    ![image.png](https://manual.kokola.co/uploads/images/gallery/2025-08/scaled-1680-/DYJimage.png)
- #### **Period**: Define the start and end dates of the promotion period.   
    ![image.png](https://manual.kokola.co/uploads/images/gallery/2025-08/scaled-1680-/WpQimage.png)
- #### **Option Category**: Select the target of this promotion.   
    ![image.png](https://manual.kokola.co/uploads/images/gallery/2025-08/scaled-1680-/uKWimage.png)
    
    
    - #### **Category**: If the program applies to a specific customer category.
    - #### **Customer**: If the program only applies to specific customers.
- #### Move the selected category or customer from the left box to the **Selected Category** box on the right using the **&gt;&gt;** button.

#### **Step 3: Define the Purchase Condition**

#### In the first detail table (under Packet Code), enter the product(s) that the customer must purchase to get the gift. Fill in the **Item Code** (the conditional product's code) and **Qty** (the required quantity).   
![image.png](https://manual.kokola.co/uploads/images/gallery/2025-08/scaled-1680-/RZfimage.png)

#### **Step 4: Define the Free Product**

#### In the second detail table (on the right), enter the product that will be given as the gift. Fill in the **Free Item Code** (the free product's code) and **Free Qty** (the quantity of the free product).   
![image.png](https://manual.kokola.co/uploads/images/gallery/2025-08/scaled-1680-/URHimage.png)

#### **Step 5: Save the Program**

#### After all details are filled in, click the **Save** button in the bottom-left section to save and activate this promotion program. ![image.png](https://manual.kokola.co/uploads/images/gallery/2025-08/scaled-1680-/15Dimage.png)

### **Tips &amp; Important Notes**

- #### This module is a powerful tool for boosting the sales of specific products. Ensure the promotion period and conditions are set correctly before saving.
- #### The **Accumulative** option likely means that the purchase condition can be accumulated from multiple transactions during the promotion period.
- #### Once this program is active, the system will **automatically add the free product** to a Sales Order if the customer and the purchased products meet the conditions you have set.

# Customer Discount

### **Module Guide: Customer Discount**

#### **Module Location**

#### Sales &gt; Sales Trade Agreement &gt; Customer Discount

#### **Module Objective**

#### The **Customer Discount** module is the settings center for creating and managing various discount schemes that apply to specific customer categories. The settings you define here will be automatically applied by the system during sales transactions, such as when creating a Sales Order or Invoice.

### **1. Main View (Customer Category List)**

#### The main page of this module displays a list of all customer categories in the system, along with the status of the discount settings for each category.

![image.png](https://manual.kokola.co/uploads/images/gallery/2025-08/scaled-1680-/BYgimage.png)

#### **View Explanation**

#### This page is the starting point for setting up discounts per customer category.

- #### **Filter**: You can search for a specific category using the search bar based on the **Category Code**.
- #### **Category List**: The table below displays all registered customer categories.
- #### **Already Setup Discount Column**: A status indicating whether a discount scheme has been set up for the category. **"No"** means no discount settings exist yet.

### **2. Steps to Set Up a Discount**

#### **Step 1: Select a Customer Category**

#### From the Main View, select and click on the **Category Name** row for which you want to set up a discount scheme (e.g., 'Owned Brand Local MT'). This action will open the **Edit Customer Discount** form.

#### **Step 2: Add Items for the Discount**

#### On the Edit form, you can set up discounts for each product specifically.

1. #### Click the **\[+\] Multiple Item \[-\]** link to add a new row to the detail table. 
    
    #### ![image.png](https://manual.kokola.co/uploads/images/gallery/2025-08/scaled-1680-/mBhimage.png)
2. #### Repeat this step for every product to be included in the discount scheme.

#### **Step 3: Fill in Discount Details per Item**

#### In each row of the detail table, fill in the following information:

- #### **Item Code**: Enter the code of the product that will be given a discount. ![image.png](https://manual.kokola.co/uploads/images/gallery/2025-08/scaled-1680-/Ir5image.png)
- #### **Start Date / End Date**: Define the validity period of the discount for this product.   
    ![image.png](https://manual.kokola.co/uploads/images/gallery/2025-08/scaled-1680-/wXVimage.png)
- #### **Min Qty**: Fill in the minimum purchase quantity (if any) to get the discount. ![image.png](https://manual.kokola.co/uploads/images/gallery/2025-08/scaled-1680-/2dpimage.png)
- #### **Disc Value / Disc Percentage 1 / Disc Percentage 2**: Fill in one of these columns to define the size of the discount.
    
    
    - #### **Disc Value**: For a nominal price reduction (e.g., 5000).
    - #### **Disc Percentage 1**: For a percentage-based discount (e.g., 10 for 10%).  
        ![image.png](https://manual.kokola.co/uploads/images/gallery/2025-08/scaled-1680-/ZA7image.png)

#### **Step 4: Save the Settings**

#### After all discount details for all items have been set up, click the **Update** button in the bottom-left section to save the discount scheme for that customer category. ![image.png](https://manual.kokola.co/uploads/images/gallery/2025-08/scaled-1680-/YhSimage.png)

### **Tips &amp; Important Notes**

- #### This module allows you to apply different discount schemes to different customer segments (for example, discounts for distributors can be different from those for retail customers).
- #### Use the **Apply All** button at the top to apply a single value (e.g., Min Qty or Disc Percentage 1) to all items in the list simultaneously to speed up the input process.
- #### The discount settings created here will be **automatically calculated** when creating Sales Orders and Sales Invoices for customers in the corresponding category.

# Sales Price Group Setting

### **Module Guide: Sales Price Group Settings**

#### **Module Location**

#### Sales &gt; Sales Trade Agreement &gt; Sales Price Group Settings

#### **Module Objective**

#### The **Sales Price Group Setting** module is used to create and manage various pricing schemes or price lists. This setup allows the company to apply different pricing structures that can be targeted at specific customer categories and for specific products. It is a core component of the company's pricing strategy.

### **1. Main View (Price Group List)**

#### The main page of this module displays a list of all Price Groups that have been created.

![image.png](https://manual.kokola.co/uploads/images/gallery/2025-08/scaled-1680-/RTFimage.png)

#### **View Explanation**

#### This page is for viewing and managing all existing pricing schemes.

- #### **Filter**: You can search for a specific price group using the search bar based on the **Group Code**.
- #### **Group List**: The table below displays a summary of each existing price group, with columns for **Group Code**, **Group Name**,- **Last Update**, and **Updated By**.

#### **Button Functions**

- #### **New**: The primary button to create a new Price Group.
- #### **Delete**: To delete a selected price group.

### **2. Steps to Create a New Price Group**

#### **Step 1: Create a New Price Group**

#### From the Main View, click the **New** button to open the **Add Sales Price Group** form. ![image.png](https://manual.kokola.co/uploads/images/gallery/2025-08/scaled-1680-/Rv2image.png)

#### **Step 2: Fill in Basic Information**

#### Fill in the general information about the price group to be created:

- #### **Group Code &amp; Group Name**: Provide a unique code and a clear name for your price group (e.g., "PRICE-DISTRIBUTOR-EASTJAVA").  
    ![image.png](https://manual.kokola.co/uploads/images/gallery/2025-08/scaled-1680-/SB3image.png)
- #### **Period**: Define the start and end dates for the validity period of this pricing scheme. ![image.png](https://manual.kokola.co/uploads/images/gallery/2025-08/scaled-1680-/lR3image.png)
- #### **Currency &amp; Payment Terms**: Select the applicable currency and payment terms. ![image.png](https://manual.kokola.co/uploads/images/gallery/2025-08/scaled-1680-/CX5image.png)

#### **Step 3: Define Target Customers**

#### In the **Customer Category** section, select which customer categories will receive this pricing scheme. Move the relevant categories from the left box to the **Selected Category** box on the right using the **&gt;&gt;** button.

![image.png](https://manual.kokola.co/uploads/images/gallery/2025-08/scaled-1680-/07Uimage.png)

#### **Step 4: Define Applicable Products**

#### In the **Available Item(s)** section, select which products are included in this pricing scheme. Move the relevant products from the left box to the **Selected Item(s)** box on the right using the **&gt;&gt;** button.

![image.png](https://manual.kokola.co/uploads/images/gallery/2025-08/scaled-1680-/NW9image.png)

#### **Step 5: Save the Price Group**

#### After all settings are complete, click the **Save** button in the bottom-left section to create the price group framework. ![image.png](https://manual.kokola.co/uploads/images/gallery/2025-08/scaled-1680-/2Vkimage.png)

#### **Next Step: Filling in the Prices**

#### After a price group is successfully created, the next step is to fill in the price for each product within it. This process is usually done by clicking on the newly created price group from the Main View to open a specific price entry form.

### **Tips &amp; Important Notes**

- #### This module allows you to have different pricing strategies for different market segments (for example, the price for Modern Trade can be different from the price for General Trade).
- #### Ensure the **Period** is filled in correctly to control the validity period of each pricing scheme.
- #### The price groups created here will later become options in the **customer master data** or when **creating a sales transaction** to determine the price that will be used.

# Sales Price Group Entry

### **Module Guide: Sales Price Group Entry**

#### **Module Location**

#### Sales &gt; Sales Trade Agreement &gt; Sales Price Group Entry

#### **Module Objective**

#### After you have created the framework of a Sales Price Group (defining its name, period, target customers, and product list), you use this **Sales Price Group Entry** module to input the specific price value for each product within that group.

### **1. Main View (Price Entry List)**

#### The main page of this module displays a list of all price entries that have been created for each price group.

![image.png](https://manual.kokola.co/uploads/images/gallery/2025-08/scaled-1680-/1Riimage.png)

#### **View Explanation**

#### This page is for viewing and managing all the price lists that have been filled in.

- #### **Filter**: You can search for a specific price entry by **Group Code**, **Item Category**, or a **Date From** and **Date To** range.
- #### **Price Entry List**: The table below will display all entries that have been made, with columns such as **Group Code**, **Group Name**, **Date**, and **Sales Price Status**.

#### **Button Functions**

- #### **New**: The primary button to create a new price entry.
- #### **Print**: To print the details of a selected price entry.

### **2. Steps to Input Sales Prices**

#### **Step 1: Create a New Price Entry**

#### From the Main View, click the **New** button to open the **Sales Price Group Entry** form. ![image.png](https://manual.kokola.co/uploads/images/gallery/2025-08/scaled-1680-/Zp5image.png)

#### **Step 2: Select the Price Group**

#### On the form that appears, the first and most important step is to select the **Group Code** from the dropdown. This is the name of the price group for which you will be filling in the prices. After you make a selection, details such as **Group Name**, **Period**, **Customer Category**, and **Available Item(s)** will be filled in according to the settings you created in the "Sales Price Group Settings" module.

![image.png](https://manual.kokola.co/uploads/images/gallery/2025-08/scaled-1680-/IjJimage.png)

![image.png](https://manual.kokola.co/uploads/images/gallery/2025-08/scaled-1680-/tCiimage.png)![image.png](https://manual.kokola.co/uploads/images/gallery/2025-08/scaled-1680-/ihKimage.png)![image.png](https://manual.kokola.co/uploads/images/gallery/2025-08/scaled-1680-/1J6image.png)

#### **Step 3: Add Items and Fill in Prices**

#### In the detail table at the bottom, use the **Get Item** button or search for a product in the **or Type In Item Code** column to add products to the table. 

#### ![image.png](https://manual.kokola.co/uploads/images/gallery/2025-08/scaled-1680-/kZuimage.png)

#### In each product row that is added, fill in the following columns:

- #### **Price**: Enter the sales price that applies to this product within the price group being set up.
- #### **Min Qty**: You can also specify a minimum purchase quantity for this price to be applicable.

#### **Step 4: Save the Prices**

#### After all prices for all products have been filled in, use the buttons in the bottom-left section:

- #### **Save**: To save the price list as a draft. ![image.png](https://manual.kokola.co/uploads/images/gallery/2025-08/scaled-1680-/U4yimage.png)
- #### **Confirm**: To finalize and activate this price list. ![image.png](https://manual.kokola.co/uploads/images/gallery/2025-08/scaled-1680-/icEimage.png)
- #### **Cancel**: To cancel the entry. ![image.png](https://manual.kokola.co/uploads/images/gallery/2025-08/scaled-1680-/GAwimage.png)

#### **Workflow &amp; Integrated Business Process**

1. #### **First**: Create the price group framework in the **Sales Price Group Settings** module.
2. #### **Second**: Use this module (**Sales Price Group Entry**) to fill in the specific prices.
3. #### **Result**: The price list activated here will be automatically used by the system when creating a Sales Order for customers who belong to the corresponding category.

### **Tips &amp; Important Notes**

- #### You must create the price group framework first in the **"Sales Price Group Settings"** module before you can fill in the prices in this module.
- #### Ensure the prices input in the **Price** column are correct and in line with company policy before pressing **Confirm**.

# Sales Price Group Inbox

### **Module Guide: Sales Price Group Inbox**

#### **Module Location**

#### Sales &gt; Sales Trade Agreement &gt; Sales Price Group Inbox

#### **Module Objective**

#### The **Sales Price Group Inbox** module serves as the approval center for all new price lists that have been created and submitted through the **Sales Price Group Entry** module. This module is used by a manager or an authorized leader to conduct a final review and provide approval before a new pricing scheme officially takes effect in the system.

### **1. Main View (Request List)**

#### The main page of this module is an "inbox" that displays all price lists requiring your action.

![image.png](https://manual.kokola.co/uploads/images/gallery/2025-08/scaled-1680-/qs3image.png)

#### **View Explanation &amp; Filters**

#### This page provides a summary of all price lists that are awaiting approval.

- #### **Filters**: You can search for a specific request by **Group Code**, **Goods/Services Category**, or a **Start Date** and **End Date** range.
- #### **Request List**: The table below will display all price lists awaiting action. The table currently shows "...No Data Available...".

#### **Column Explanation**

- #### **Group Code**: The unique code of the submitted price group.
- #### **Date**: The date the price entry was submitted.
- #### **Status / Approval**: Icons that indicate the document's status and the approval process status.
- #### **Requester**: The name of the user or employee who submitted the price list.

#### **Button Functions**

- #### **Approve**: The main action button to approve or accept one or more selected price lists.

### **2. Approval Process Steps**

#### The following is the standard workflow for an approver.

#### **Step 1: Access the Inbox**

#### Open the **Sales Price Group Inbox** module to see the list of pricing schemes that require approval.

#### **Step 2: Review Price List Details**

#### Click on one of the rows in the table to open its detail view. In the detail view, you can check all the information that has been input, such as the target customers, the product list, and the set prices.

#### **Step 3: Provide Approval**

#### After you have reviewed and are certain about the submitted price list:

1. #### Return to the main **Inbox** page.
2. #### Check the box in the leftmost column for one or more rows you wish to approve. ![image.png](https://manual.kokola.co/uploads/images/gallery/2025-08/scaled-1680-/A6eimage.png)
3. #### Click the **Approve** button located in the bottom-left section of the page to process the approval. ![image.png](https://manual.kokola.co/uploads/images/gallery/2025-08/scaled-1680-/an9image.png)

### **3. Workflow &amp; Integrated Business Process**

1. #### **Submission**: A user inputs prices in the **Sales Price Group Entry** module and clicks **Confirm**.
2. #### **Entering the Queue**: The confirmed price list automatically enters the queue in this **Sales Price Group Inbox** module.
3. #### **Review &amp; Approval**: A manager or approver opens this module, reviews, and provides approval.
4. #### **Price Activation**: After approval, the pricing scheme becomes active and will be automatically used by the system when creating sales transactions for the corresponding customers and products.

### **Tips &amp; Important Notes**

- #### This module is the final gate before a new pricing scheme becomes effective. Conduct the review carefully.
- #### Before giving approval, be sure to check the validity period, target customers, product list, and the input prices.

# Discount & Free Item Group

### **Module Guide: Discount And Free Item Group**

#### **Module Location**

#### Sales &gt; Sales Trade Agreement &gt; Discount And Free Item Group

#### **Module Objective**

#### The **Discount And Free Item Group** module is a flexible promotional tool. Its purpose is to create a promotional program that combines a percentage discount with a free product gift, which becomes applicable if the total purchase reaches a specific nominal value.

### **1. Main View (Group List)**

#### The main page of this module displays a list of all the promotional programs that have been created.  
![image.png](https://manual.kokola.co/uploads/images/gallery/2025-08/scaled-1680-/MOfimage.png)  


#### **View Explanation**

#### This page is for viewing and managing all existing promotional programs.

- #### **Filter**: You can search for a specific program using the search bar based on the **Group Code**.
- #### **Group List**: The table below will display a summary of each program, with columns for **Group Code**, **Group Name**, **Last Update**, and **Updated By**.

#### **Button Functions**

- #### **New**: The primary button to create a new promotional program.
- #### **Delete**: To delete a selected program.

### **2. Steps to Create a New Program**

#### **Step 1: Create a New Program**

#### From the Main View, click the **New** button to open the **Add Discount And Free Item Group** form. ![image.png](https://manual.kokola.co/uploads/images/gallery/2025-08/scaled-1680-/3VPimage.png)

#### **Step 2: Fill in General Program Information**

#### Fill in all the general information at the top of the form:

- #### **Group Code &amp; Group Name**: Provide a unique code and a clear name for your promotional program.  
    ![image.png](https://manual.kokola.co/uploads/images/gallery/2025-08/scaled-1680-/zhLimage.png)
- #### **Period**: Define the start and end dates of the promotion period (e.g., August 5, 2025).  
    ![image.png](https://manual.kokola.co/uploads/images/gallery/2025-08/scaled-1680-/GGoimage.png)
- #### **Customer Category**: Select the target customers for this promotion by moving the relevant category from the left box to the **Selected Category** box on the right.  
    ![image.png](https://manual.kokola.co/uploads/images/gallery/2025-08/scaled-1680-/giWimage.png)

#### **Step 3: Define the Terms and Conditions**

- #### **Total SO Amount**: Enter the minimum total purchase value on a Sales Order that the customer must reach to get this promotion.  
    ![image.png](https://manual.kokola.co/uploads/images/gallery/2025-08/scaled-1680-/yMzimage.png)
- #### **Discount**: Enter the size of the discount in percentage **(%)** that will be given if the **Total SO Amount** condition is met.  
    ![image.png](https://manual.kokola.co/uploads/images/gallery/2025-08/scaled-1680-/LVmimage.png)

#### **Step 4: Define the Free Product**

#### In the **Free Item** detail table, list the product(s) that will be given as a free gift:

1. #### Click **\[+\] Multiple Item \[-\]** to add a row. ![image.png](https://manual.kokola.co/uploads/images/gallery/2025-08/scaled-1680-/4elimage.png)
2. #### Select the product from the item list that appears (as seen in the List of Item image).
3. #### Fill in the **Qty** column to determine the quantity of the free product to be given. ![image.png](https://manual.kokola.co/uploads/images/gallery/2025-08/scaled-1680-/dwpimage.png)

#### **Step 5: Save the Program**

#### After all details are filled in, click the **Save** button in the bottom-left section to save and activate this promotional program. ![image.png](https://manual.kokola.co/uploads/images/gallery/2025-08/scaled-1680-/e2cimage.png)

### **Tips &amp; Important Notes**

- #### This module is very effective for encouraging customers to increase their transaction value (**upselling**) to reach the **Total SO Amount** threshold.
- #### Ensure you select the correct **Customer Category** so that the promotion only applies to the customer segment you are targeting.
- #### Once this program is active, the system will **automatically apply the discount and add the free product** to a Sales Order if the customer and their total purchase meet the conditions.

# Sales Program Free Item

### **Module Guide: Sales Program Free Item (Free Item Program)**

#### **Module Location**

#### Sales &gt; Sales Trade Agreement &gt; Sales Program Free Item

#### **Module Objective**

#### The **Sales Program Free Item** module is a tool for creating and managing promotional programs in the form of a "free gift" (e.g., Buy 10 of Product A, Get 1 of Product B Free). The settings created here will be automatically applied by the system at the time of sales order creation if the promotion's terms and conditions are met.

### **1. Main View (Program List)**

#### The main page of this module displays a list of all free item promotion programs that have been created.

![image.png](https://manual.kokola.co/uploads/images/gallery/2025-08/scaled-1680-/7akimage.png)

#### **View Explanation**

#### This page is for viewing and managing all existing free item promotion programs.

- #### **Filter**: You can search for a specific program using the search bar based on the **Group Code**.
- #### **Program List**: The table below displays a summary of each program, with columns for **Group Code**, **Group Name**, **Last Update**, and **Updated By**.

#### **Button Functions**

- #### **New**: The primary button to create a new free item promotion program.
- #### **Delete**: To delete a selected program.

### **2. Steps to Create a Free Item Program**

#### **Step 1: Create a New Program**

#### From the Main View, click the **New** button to open the **Add Free Item** form. 

#### ![image.png](https://manual.kokola.co/uploads/images/gallery/2025-08/scaled-1680-/K5Zimage.png)

#### **Step 2: Fill in General Program Information**

#### Fill in all the general information at the top of the form:

- #### **Group Code &amp; Group Name**: Provide a unique code and a clear name for your promotion program. ![image.png](https://manual.kokola.co/uploads/images/gallery/2025-08/scaled-1680-/REOimage.png)
- #### **Period**: Define the start and end dates of the promotion period (e.g., August 5, 2025). ![image.png](https://manual.kokola.co/uploads/images/gallery/2025-08/scaled-1680-/DBTimage.png)
- #### **Category Option**: Select the target of this promotion. ![image.png](https://manual.kokola.co/uploads/images/gallery/2025-08/scaled-1680-/akgimage.png)
    
    
    - #### **Category**: If the program applies to a specific customer category.
    - #### **Customer**: If the program only applies to specific customers.
- #### Move the selected category or customer from the left box to the **Selected Category** box on the right using the **&gt;&gt;** button.

#### **Step 3: Define the Purchase Condition**

#### In the first detail table (under Packet Code), enter the product(s) that the customer must purchase to get the gift. Fill in the **Item/Service Code** (the conditional product's code) and **Qty** (the required quantity). ![image.png](https://manual.kokola.co/uploads/images/gallery/2025-08/scaled-1680-/twGimage.png)

#### **Step 4: Define the Free Product**

#### In the second detail table (on the right), enter the product that will be given as the gift. Fill in the **Free Product Code** and **Free Product Qty**. ![image.png](https://manual.kokola.co/uploads/images/gallery/2025-08/scaled-1680-/xJSimage.png)

#### **Step 5: Save the Program**

#### After all details are filled in, click the **Save** button in the bottom-left section to save and activate this promotion program. ![image.png](https://manual.kokola.co/uploads/images/gallery/2025-08/scaled-1680-/g6uimage.png)

### **Tips &amp; Important Notes**

- #### This module is a powerful tool for boosting the sales of specific products. Ensure the promotion period and conditions are set correctly before saving.
- #### The **Accumulative** option likely means that the purchase condition can be accumulated from multiple transactions during the promotion period.
- #### Once this program is active, the system will **automatically add the free product** to a Sales Order if the customer and the purchased products meet the conditions you have set.

# Introduction Letter

### **Module Guide: Introduction Letter**

#### **Module Location**

#### Sales &gt; Introduction Letter

#### **Module Objective**

#### The **Introduction Letter** module is used to create, manage, and print official introduction letters addressed to new or prospective customers. This module uses a template system to speed up the process of creating letters that are standardized yet can still be personalized.

### **1. Main View (Introduction Letter List)**

#### The main page of this module displays a list of all Introduction Letters that have been created.

![image.png](https://manual.kokola.co/uploads/images/gallery/2025-08/scaled-1680-/6dEimage.png)

#### **View Explanation &amp; Filters**

#### This page is for viewing and managing all existing introduction letters.

<div _ngcontent-ng-c558004504="" class="conversation-container message-actions-hover-boundary ng-star-inserted" id="bkmrk-filters%3A-you-can-sea" style="text-align: justify;"><div _ngcontent-ng-c2925024889=""><div _ngcontent-ng-c957249891="" class="response-container ng-tns-c957249891-82 response-container-with-gpi is-mobile ng-star-inserted response-container-has-multiple-responses" jslog="173900;track:impression,attention"><div _ngcontent-ng-c957249891="" class="presented-response-container ng-tns-c957249891-82"><div _ngcontent-ng-c957249891="" class="response-container-content ng-tns-c957249891-82 is-mobile has-thoughts"><div _ngcontent-ng-c2925024889="" class="response-content ng-tns-c957249891-82"><div _ngcontent-ng-c285899382="" class="markdown markdown-main-panel stronger enable-updated-hr-color" dir="ltr">- #### **Filters**: You can search for a specific letter by **Introduction Number** or a **Date From** and **Date To** range.
- #### **Letter List**: The table below will display all letters that match the filters, with columns such as **Introduction Number**, **Customer**, **Introduction Date**, and **Status**.

</div></div></div></div></div></div></div>#### **Button Functions**

<div _ngcontent-ng-c558004504="" class="conversation-container message-actions-hover-boundary ng-star-inserted" id="bkmrk-new%3A-the-primary-but" style="text-align: justify;"><div _ngcontent-ng-c2925024889=""><div _ngcontent-ng-c957249891="" class="response-container ng-tns-c957249891-82 response-container-with-gpi is-mobile ng-star-inserted response-container-has-multiple-responses" jslog="173900;track:impression,attention"><div _ngcontent-ng-c957249891="" class="presented-response-container ng-tns-c957249891-82"><div _ngcontent-ng-c957249891="" class="response-container-content ng-tns-c957249891-82 is-mobile has-thoughts"><div _ngcontent-ng-c2925024889="" class="response-content ng-tns-c957249891-82"><div _ngcontent-ng-c285899382="" class="markdown markdown-main-panel stronger enable-updated-hr-color" dir="ltr">- #### **New**: The primary button to create a new Introduction Letter.
- #### **Delete**: To delete a selected letter.
- #### **Print**: To print a selected letter.

</div></div></div></div></div></div></div>### **2. Steps to Create an Introduction Letter**

#### **Step 1: Create a New Letter**

#### From the Main View, click the **New** button to open the **Create Introduction Letter** form. ![image.png](https://manual.kokola.co/uploads/images/gallery/2025-08/scaled-1680-/NGhimage.png)

#### **Step 2: Fill in Recipient Details**

#### On the form that appears, fill in the information about the letter's recipient:

<div _ngcontent-ng-c558004504="" class="conversation-container message-actions-hover-boundary ng-star-inserted" id="bkmrk-letter-date%3A-select-" style="text-align: justify;"><div _ngcontent-ng-c2925024889=""><div _ngcontent-ng-c957249891="" class="response-container ng-tns-c957249891-82 response-container-with-gpi is-mobile ng-star-inserted response-container-has-multiple-responses" jslog="173900;track:impression,attention"><div _ngcontent-ng-c957249891="" class="presented-response-container ng-tns-c957249891-82"><div _ngcontent-ng-c957249891="" class="response-container-content ng-tns-c957249891-82 is-mobile has-thoughts"><div _ngcontent-ng-c2925024889="" class="response-content ng-tns-c957249891-82"><div _ngcontent-ng-c285899382="" class="markdown markdown-main-panel stronger enable-updated-hr-color" dir="ltr">- #### **Letter Date**: Select the date of the letter. 
    
    #### ![image.png](https://manual.kokola.co/uploads/images/gallery/2025-08/scaled-1680-/mppimage.png)
- #### **Customer**: Select the intended customer. The system will likely fill in the **Address** automatically. ![image.png](https://manual.kokola.co/uploads/images/gallery/2025-08/scaled-1680-/9mXimage.png)
- #### **Contact Person**: Select the contact person at the customer's company who will receive this letter. ![image.png](https://manual.kokola.co/uploads/images/gallery/2025-08/scaled-1680-/FmNimage.png)

</div></div></div></div></div></div></div>#### **Step 3: Edit the Letter Content (If Needed)**

#### Notice the **Letter Template 1** section. The system will automatically populate the letter template with the customer data you selected, replacing placeholders like `{Customer_Name}` and `{ContactPersonName}`.  
[![image.png](https://manual.kokola.co/uploads/images/gallery/2025-08/scaled-1680-/PMwimage.png)](https://manual.kokola.co/uploads/images/gallery/2025-08/PMwimage.png)

#### You can use the available **rich text editor** to make changes or additions to the letter's content if needed.

#### **Step 4: Save and Confirm**

#### After all data is filled in and the letter content is correct, use the buttons in the bottom-left section:

<div _ngcontent-ng-c558004504="" class="conversation-container message-actions-hover-boundary ng-star-inserted" id="bkmrk-save%3A-to-save-the-le" style="text-align: justify;"><div _ngcontent-ng-c2925024889=""><div _ngcontent-ng-c957249891="" class="response-container ng-tns-c957249891-82 response-container-with-gpi is-mobile ng-star-inserted response-container-has-multiple-responses" jslog="173900;track:impression,attention"><div _ngcontent-ng-c957249891="" class="presented-response-container ng-tns-c957249891-82"><div _ngcontent-ng-c957249891="" class="response-container-content ng-tns-c957249891-82 is-mobile has-thoughts"><div _ngcontent-ng-c2925024889="" class="response-content ng-tns-c957249891-82"><div _ngcontent-ng-c285899382="" class="markdown markdown-main-panel stronger enable-updated-hr-color" dir="ltr">- #### **Save**: To save the letter as a draft. ![image.png](https://manual.kokola.co/uploads/images/gallery/2025-08/scaled-1680-/EiGimage.png)
- #### **Confirm**: To finalize the letter. ![image.png](https://manual.kokola.co/uploads/images/gallery/2025-08/scaled-1680-/w1Timage.png)
- #### **Back**: To return to the main page without saving. ![image.png](https://manual.kokola.co/uploads/images/gallery/2025-08/scaled-1680-/Uzpimage.png)

</div></div></div></div></div></div></div>### **Tips &amp; Important Notes**

<div _ngcontent-ng-c558004504="" class="conversation-container message-actions-hover-boundary ng-star-inserted" id="bkmrk-this-module-is-very-"><div _ngcontent-ng-c2925024889="" style="text-align: justify;"><div _ngcontent-ng-c957249891="" class="response-container ng-tns-c957249891-82 response-container-with-gpi is-mobile ng-star-inserted response-container-has-multiple-responses" jslog="173900;track:impression,attention"><div _ngcontent-ng-c957249891="" class="presented-response-container ng-tns-c957249891-82"><div _ngcontent-ng-c957249891="" class="response-container-content ng-tns-c957249891-82 is-mobile has-thoughts"><div _ngcontent-ng-c2925024889="" class="response-content ng-tns-c957249891-82"><div _ngcontent-ng-c285899382="" class="markdown markdown-main-panel stronger enable-updated-hr-color" dir="ltr" id="bkmrk-this-module-is-very--1">- #### This module is very useful for maintaining a standard of formal communication when first interacting with important customers.
- #### To ensure the letter template can be populated automatically and correctly, make sure the **customer and contact person master data is complete and accurate**.
- #### After a letter is **Confirmed**, you can print it from the main page using the **Print** button to then be signed and sent.

</div><div _ngcontent-ng-c2925024889="" class="response-footer is-mobile gap has-thoughts complete"></div></div></div></div><div _ngcontent-ng-c957249891="" class="response-container-footer ng-tns-c957249891-82"><div _ngcontent-ng-c2785631642="" class="actions-container-v2 ng-tns-c2785631642-86 mobile"><div _ngcontent-ng-c2785631642="" class="spacer ng-tns-c2785631642-86 ng-star-inserted">  
</div></div></div></div></div><div _ngcontent-ng-c558004504="" class="restart-chat-button-scroll-placeholder ng-star-inserted" style="text-align: justify;">  
</div></div>

# Introduction Letter Inbox

### **Module Guide: Introduction Letter Inbox**

#### **Module Location**

#### Sales &gt; Introduction Letter &gt; Introduction Letter Inbox

#### **Module Objective**

#### The **Introduction Letter Inbox** module serves as the approval center for all Introduction Letter documents that have been created and submitted by the sales team. This module is used by a superior or manager to conduct a final review and provide approval before the letter is finalized and sent to the customer.

### **1. Main View (Letter List)**

#### The main page of this module is an "inbox" that displays all Introduction Letters requiring your action.

![image.png](https://manual.kokola.co/uploads/images/gallery/2025-08/scaled-1680-/kSfimage.png)

#### **View Explanation &amp; Filters**

#### This page provides a summary of all introduction letters that are awaiting approval.

- #### **Filters**: You can search for a specific letter by **Introduction Number** or a **Date From** and **Date To** range. You can also filter by **Document Filter Status** and **Approval Filter Status**.
- #### **Request List**: The table below will display all letters awaiting action. The table currently shows "...No Record Found...".

#### **Column Explanation**

- #### **Introduction Number**: The unique number of the submitted Introduction Letter document.
- #### **Customer**: The name of the customer to whom the letter is addressed.
- #### **Introduction Date**: The date the letter was created.
- #### **Introduction Status / Approval**: Icons that indicate the document's status and the approval process status.

**Button Functions**

- #### **Need Approve**: The main action button to process the approval for a selected introduction letter.

### **2. Approval Process Steps**

#### The following is the standard workflow for an approver.

#### **Step 1: Access the Inbox**

#### Open the **Introduction Letter Inbox** module to see the list of letters that require approval.

#### **Step 2: Review Introduction Letter Details**

#### Click on one of the rows in the table to open its detail view. In the detail view, you can read the full content of the letter and check the correctness of the recipient's data.

#### **Step 3: Provide Approval**

#### After you have reviewed and are certain about the submitted letter's content:

1. #### Return to the main **Inbox** page.
2. #### Check the box in the leftmost column for one or more letter rows you wish to approve.
3. #### Click the **Need Approve** button located in the bottom-left section of the page to process the approval. ![image.png](https://manual.kokola.co/uploads/images/gallery/2025-08/scaled-1680-/ztJimage.png)

### **3. Workflow &amp; Integrated Business Process**

1. #### **Submission**: A salesperson creates a letter in the **Introduction Letter** module and clicks **Confirm**.
2. #### **Entering the Queue**: The confirmed letter automatically enters the queue in this **Introduction Letter Inbox** module.
3. #### **Review &amp; Approval**: A manager or approver opens this module, reviews, and provides approval.
4. #### **Finalization**: After approval, the Introduction Letter becomes an official document and is ready to be printed via the **Introduction Letter** module to be sent to the customer.

# Memorandum of Understanding

### **Module Guide: Memorandum of Understanding (MOU)**

#### **Module Location**

#### Sales &gt; Memorandum of Understanding

#### **Module Objective**

#### The **Memorandum of Understanding (MOU)** module is used to create, manage, and track formal cooperation agreement documents with customers, especially for distributors or key clients. This MOU document serves as the master contract that defines all agreed-upon business and commercial terms, such as credit limits, sales targets, and payment terms.

### **1. Main View (MOU List)**

#### The main page of this module displays a list of all MOU documents that have been created.

![image.png](https://manual.kokola.co/uploads/images/gallery/2025-08/scaled-1680-/L5kimage.png)

#### **View Explanation &amp; Filters**

#### This page is for viewing and managing all MOU agreements.

<div _ngcontent-ng-c558004504="" class="conversation-container message-actions-hover-boundary ng-star-inserted" id="bkmrk-filters%3A-you-can-sea" style="text-align: justify;"><div _ngcontent-ng-c2925024889=""><div _ngcontent-ng-c957249891="" class="response-container ng-tns-c957249891-96 response-container-with-gpi is-mobile ng-star-inserted response-container-has-multiple-responses" jslog="173900;track:impression,attention"><div _ngcontent-ng-c957249891="" class="presented-response-container ng-tns-c957249891-96"><div _ngcontent-ng-c957249891="" class="response-container-content ng-tns-c957249891-96 is-mobile has-thoughts"><div _ngcontent-ng-c2925024889="" class="response-content ng-tns-c957249891-96"><div _ngcontent-ng-c285899382="" class="markdown markdown-main-panel stronger enable-updated-hr-color" dir="ltr">- #### **Filters**: You can search for a specific MOU by **MOU Number**, **Item Category**, **Status**, or a date range (**Date From / Date To**).
- #### **MOU List**: The table below displays a summary of each MOU, with important columns such as **MOU Number**, **Customer Name**, **Regional**, **Target**, **Bank Guarantee**, and **Credit Limit**.

</div></div></div></div></div></div></div>#### **Button Functions**

<div _ngcontent-ng-c558004504="" class="conversation-container message-actions-hover-boundary ng-star-inserted" id="bkmrk-new%3A-the-primary-but" style="text-align: justify;"><div _ngcontent-ng-c2925024889=""><div _ngcontent-ng-c957249891="" class="response-container ng-tns-c957249891-96 response-container-with-gpi is-mobile ng-star-inserted response-container-has-multiple-responses" jslog="173900;track:impression,attention"><div _ngcontent-ng-c957249891="" class="presented-response-container ng-tns-c957249891-96"><div _ngcontent-ng-c957249891="" class="response-container-content ng-tns-c957249891-96 is-mobile has-thoughts"><div _ngcontent-ng-c2925024889="" class="response-content ng-tns-c957249891-96"><div _ngcontent-ng-c285899382="" class="markdown markdown-main-panel stronger enable-updated-hr-color" dir="ltr">- #### **New**: The primary button to create a new MOU document.
- #### **Delete**: To delete a selected MOU.
- #### **Print**: To print the details of a selected MOU.

</div></div></div></div></div></div></div>### **2. Steps to Create a New MOU**

#### **Step 1: Create a New MOU**

#### From the Main View, click the **New** button to open the **Add MOU** form. ![image.png](https://manual.kokola.co/uploads/images/gallery/2025-08/scaled-1680-/hD8image.png)

#### **Step 2: Fill in MOU Details**

#### Fill in all the relevant information on the form that appears, which is divided into several sections:

<div _ngcontent-ng-c558004504="" class="conversation-container message-actions-hover-boundary ng-star-inserted" id="bkmrk-basic-information%3A-m" style="text-align: justify;"><div _ngcontent-ng-c2925024889=""><div _ngcontent-ng-c957249891="" class="response-container ng-tns-c957249891-96 response-container-with-gpi is-mobile ng-star-inserted response-container-has-multiple-responses" jslog="173900;track:impression,attention"><div _ngcontent-ng-c957249891="" class="presented-response-container ng-tns-c957249891-96"><div _ngcontent-ng-c957249891="" class="response-container-content ng-tns-c957249891-96 is-mobile has-thoughts"><div _ngcontent-ng-c2925024889="" class="response-content ng-tns-c957249891-96"><div _ngcontent-ng-c285899382="" class="markdown markdown-main-panel stronger enable-updated-hr-color" dir="ltr">- #### **Basic Information**:
    
    
    - #### **MOU Number**, **MOU Due Period**, **Customer**, **Regional**, and **Product  
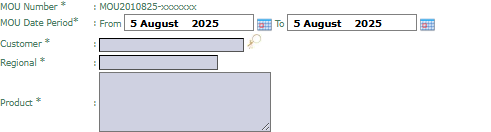
        ![image.png](https://manual.kokola.co/uploads/images/gallery/2025-08/scaled-1680-/cAaimage.png)**.
- #### **Trading Term**:
    
    
    - #### Complete all commercial requirements such as **Discount**, **Payment Term**, **Target**, **Return Allowance**, **Credit Limit**, and **Bank Guarantee**.  

        ![image.png](https://manual.kokola.co/uploads/images/gallery/2025-08/scaled-1680-/vhlimage.png)  
        ![image.png](https://manual.kokola.co/uploads/images/gallery/2025-08/scaled-1680-/mmZimage.png)
- #### **Distributor Conditions**:
    
    
    - #### If the customer is a distributor, fill in their capacity data such as **Number Of Branches**, **Number Of Warehouse**, and **Number Of Salesman**.   



        ![image.png](https://manual.kokola.co/uploads/images/gallery/2025-08/scaled-1680-/l6ximage.png)![image.png](https://manual.kokola.co/uploads/images/gallery/2025-08/scaled-1680-/aDDimage.png)![image.png](https://manual.kokola.co/uploads/images/gallery/2025-08/scaled-1680-/S6bimage.png)

</div></div></div></div></div></div></div>#### **Step 3: Save and Confirm**

#### After all data is filled in, use the buttons in the bottom-left section:

<div _ngcontent-ng-c558004504="" class="conversation-container message-actions-hover-boundary ng-star-inserted" id="bkmrk-save%3A-to-save-the-mo" style="text-align: justify;"><div _ngcontent-ng-c2925024889=""><div _ngcontent-ng-c957249891="" class="response-container ng-tns-c957249891-96 response-container-with-gpi is-mobile ng-star-inserted response-container-has-multiple-responses" jslog="173900;track:impression,attention"><div _ngcontent-ng-c957249891="" class="presented-response-container ng-tns-c957249891-96"><div _ngcontent-ng-c957249891="" class="response-container-content ng-tns-c957249891-96 is-mobile has-thoughts"><div _ngcontent-ng-c2925024889="" class="response-content ng-tns-c957249891-96"><div _ngcontent-ng-c285899382="" class="markdown markdown-main-panel stronger enable-updated-hr-color" dir="ltr">- #### **Save**: To save the MOU as a draft. ![image.png](https://manual.kokola.co/uploads/images/gallery/2025-08/scaled-1680-/QXJimage.png)
- #### **Confirm**: To finalize and send the MOU into the approval workflow. ![image.png](https://manual.kokola.co/uploads/images/gallery/2025-08/scaled-1680-/QnAimage.png)
- #### **Cancel**: To cancel the entry. ![image.png](https://manual.kokola.co/uploads/images/gallery/2025-08/scaled-1680-/AzKimage.png)

</div></div></div></div></div></div></div>### **Tips &amp; Important Notes**

<div _ngcontent-ng-c558004504="" class="conversation-container message-actions-hover-boundary ng-star-inserted" id="bkmrk-the-mou-that-is-crea"><div _ngcontent-ng-c2925024889=""><div _ngcontent-ng-c957249891="" class="response-container ng-tns-c957249891-96 response-container-with-gpi is-mobile ng-star-inserted response-container-has-multiple-responses" jslog="173900;track:impression,attention"><div _ngcontent-ng-c957249891="" class="presented-response-container ng-tns-c957249891-96"><div _ngcontent-ng-c957249891="" class="response-container-content ng-tns-c957249891-96 is-mobile has-thoughts"><div _ngcontent-ng-c2925024889="" class="response-content ng-tns-c957249891-96"><div _ngcontent-ng-c285899382="" class="markdown markdown-main-panel stronger enable-updated-hr-color" dir="ltr" id="bkmrk-the-mou-that-is-crea-1">- #### The MOU that is created and approved here will become the **basis for all transactions** with the related customer.
- #### Ensure all commercial terms such as **Credit Limit** and **Payment Term** are filled in accurately, as the system will likely use this data for automatic transaction validation.
- #### An MOU that has been **Confirmed** will likely go to an **MOU Inbox** for further approval by management.

</div><div _ngcontent-ng-c2925024889="" class="response-footer is-mobile gap has-thoughts complete"></div></div></div></div><div _ngcontent-ng-c957249891="" class="response-container-footer ng-tns-c957249891-96"><div _ngcontent-ng-c2785631642="" class="actions-container-v2 ng-tns-c2785631642-100 mobile"></div></div></div></div></div>

# Memorandum of Understanding Inbox

### **Module Guide: Memorandum of Understanding Inbox (MOU Inbox)**

#### **Module Location**

#### Sales &gt; Memorandum of Understanding &gt; Memorandum of Understanding Inbox

#### **Module Objective**

#### The **Memorandum of Understanding Inbox (MOU Inbox)** module serves as the approval center for all MOU documents that have been created and submitted. This module is used by a superior or manager who is authorized to conduct a final review and provide approval before a cooperation agreement with a customer officially takes effect.

### **1. Main view (MOU List)**

#### The main page of this module is an "inbox" that displays all MOU documents requiring your action.

![image.png](https://manual.kokola.co/uploads/images/gallery/2025-08/scaled-1680-/dnuimage.png)

#### **View Explanation &amp; Filters**

#### This page provides a summary of all MOUs that are awaiting approval.

- #### **Filters**: You can search for a specific MOU by **MOU Number**, **Item Category**, **Status**, or a date range (**Date From / Date To**).
- #### **Request List**: The table below will display all MOUs awaiting action. The table currently shows "...No Record Found...".

#### **Column Explanation**

- #### **MOU Number**: The unique number of the submitted MOU document.
- #### **Customer Name**: The name of the customer associated with the MOU.
- #### **Credit Limit**: The proposed credit limit value within the MOU.
- #### **Document Status / Approval Status**: These columns indicate the status of the approval process.

### **2. Approval Process Steps**

#### The following is the standard workflow for an approver.

#### **Step 1: Access the Inbox**

#### Open the **Memorandum of Understanding Inbox** module to see the list of MOUs that require approval.

#### **Step 2: Review MOU Details**

#### Click on one of the rows in the table to open its detail view. In the detail view, you can check all the information that has been input, such as the commercial terms, credit limit, targets, and other details.

#### **Step 3: Provide Approval**

#### After you open and review the MOU details in Step 2, you will find the buttons to grant approval (e.g., **"Approve"** or **"Reject"** buttons) **within that detail page**. Click the appropriate button to complete the review process.

### **3. Workflow &amp; Integrated Business Process**

1. #### **Submission**: A user (e.g., a sales manager) creates a document in the **Memorandum of Understanding** module and clicks **Confirm**.
2. #### **Entering the Queue**: The confirmed MOU automatically enters the queue in this **Memorandum of Understanding Inbox** module.
3. #### **Review &amp; Approval**: An authorized manager or leader opens this module, reviews, and provides approval from within the detail page.
4. #### **Agreement Activation**: After approval, the MOU becomes an active agreement, and the terms within it will be enforced by the system on subsequent transactions with that customer.

# Sales Program

### **Module Guide: Sales Program**

#### **Module Location**

#### Sales &gt; Sales Program

#### **Module Objective**

#### The **Sales Program** module is used to create a high-level sales program or cooperation agreement with a customer. This document defines various agreed-upon commercial terms, such as targets, discounts, credit limits, and payment terms for a specific period.

#### **Note**: This module has a very similar function and appearance to the **Memorandum of Understanding (MOU)** module.

### **1. Main View (Program List)**

#### The main page of this module displays a list of all Sales Programs that have been created.

![image.png](https://manual.kokola.co/uploads/images/gallery/2025-08/scaled-1680-/2a9image.png)

#### **View Explanation &amp; Filters**

#### This page is for viewing and managing all existing programs.

- #### **Filters**: You can search for a specific program by **MOU Number**, **Item Category**, **Status**, or a date range (**Date From / Date To**).
- #### **Program List**: The table below will display a summary of each program, with columns such as **Program Number**, **Customer Name**, **Target**, and **Credit Limit**.

#### **Button Functions**

- #### **New**: The primary button to create a new Sales Program.
- #### **Print**: To print the details of a selected program.
- #### **Change Status**: To change the status of a selected program.

### **2. Steps to Create a New Sales Program**

#### **Step 1: Create a New Program**

#### From the Main View, click the **New** button to open the new program creation form. ![image.png](https://manual.kokola.co/uploads/images/gallery/2025-08/scaled-1680-/GDkimage.png)

#### **Step 2: Fill in Program Details**

#### Fill in all the relevant information on the form that appears. Fields marked with `(*)` are mandatory.

- #### **Basic Information**:
    
    
    - #### The **MOU Number** will be filled automatically. Fill in the **MOU Date** (Program Date), select the **Customer**, **Regional**, and the **Product** covered by this program.   
        ![image.png](https://manual.kokola.co/uploads/images/gallery/2025-08/scaled-1680-/Q9Simage.png)
- #### **Commercial Terms**:
    
    
    - #### Complete all agreed-upon commercial requirements such as **Discount**, **Payment Term**, **Return**, **Target**, **Bank Guarantee**, and **Credit Limit**.   
        ![image.png](https://manual.kokola.co/uploads/images/gallery/2025-08/scaled-1680-/xrJimage.png)  
          
        ![image.png](https://manual.kokola.co/uploads/images/gallery/2025-08/scaled-1680-/pteimage.png)

#### **Step 3: Save and Confirm**

#### After all data is filled in, use the buttons in the bottom-left section:

- #### **Save**: To save the program as a draft. ![image.png](https://manual.kokola.co/uploads/images/gallery/2025-08/scaled-1680-/bqVimage.png)
- #### **Confirm**: To finalize and send the program into the approval workflow.![image.png](https://manual.kokola.co/uploads/images/gallery/2025-08/scaled-1680-/EnEimage.png)
- #### **Cancel**: To cancel the entry. ![image.png](https://manual.kokola.co/uploads/images/gallery/2025-08/scaled-1680-/hnjimage.png)

### **Tips &amp; Important Notes**

- #### The program created here will become the master agreement that governs the terms of transactions with the selected customer during the program's period.
- #### Ensure all commercial terms such as **Credit Limit** and **Payment Term** are filled in accurately, as the system will likely use this data for automatic validation of sales transactions.
- #### A program that has been **Confirmed** will likely go to a **Sales Program Inbox** for further approval by management.

# RQF Customer

### **Module Guide: Customer RFQ**

#### **Module Location**

#### Sales &gt; Quotation &gt; Customer RFQ

#### **Module Objective**

#### The **Customer RFQ (Request for Quotation)** module is used to record and manage official requests for price quotations received from customers. This module serves as the starting point of the formal sales process, where a customer's request is documented in the system before the company provides an official price offer.

### **1. Main View (Customer RFQ List)**

#### The main page of this module displays a list of all RFQs that have been received from customers and recorded in the system.

![image.png](https://manual.kokola.co/uploads/images/gallery/2025-08/scaled-1680-/WZWimage.png)

#### **View Explanation &amp; Filters**

#### This page is for viewing and managing all incoming RFQs.

- #### **Filters**: You can search for a specific RFQ by **Customer RFQ Code**, **Item Category**, or a date range (**Date From / Date To**).
- #### **RFQ List**: The table below will display all RFQs that match the filters, with columns such as **Customer RFQ Code**, **Customer**, **Customer RFQ Date**, and **Customer RFQ Status**.

#### **Button Functions**

- #### **New**: The primary button to record a new RFQ received from a customer.
- #### **Delete**: To delete a selected RFQ data.
- #### **Print**: To print the details of a selected RFQ.

### **2. Steps to Create a Customer RFQ**

#### **Step 1: Create a New RFQ Record**

#### From the Main View, click the **New** button to open the **Create Customer RFQ** form. ![image.png](https://manual.kokola.co/uploads/images/gallery/2025-08/scaled-1680-/ijmimage.png)

#### **Step 2: Fill in Header Information**

#### On the form that appears, fill in the general information regarding the customer's request:

- #### **Customer**: Select the customer who sent the RFQ.   
    ![image.png](https://manual.kokola.co/uploads/images/gallery/2025-08/scaled-1680-/SN4image.png)
- #### **External RFQ Number**: Enter the RFQ reference number from the document provided by the customer. This is important for matching documents. ![image.png](https://manual.kokola.co/uploads/images/gallery/2025-08/scaled-1680-/DRfimage.png)
- #### **RFQ Date**: Select the date the RFQ was received. ![image.png](https://manual.kokola.co/uploads/images/gallery/2025-08/scaled-1680-/Hx9image.png)
- #### **Sales Person**: Assign the salesperson responsible for handling this request. 
    
    #### ![image.png](https://manual.kokola.co/uploads/images/gallery/2025-08/scaled-1680-/rOwimage.png)

#### **Step 3: Detail the Requested Items**

#### Use the detail table at the bottom to list all the products and quantities requested by the customer:

1. #### Click the **\[+\] Multiple Item \[-\]** link to add or remove rows. 
    
    #### ![image.png](https://manual.kokola.co/uploads/images/gallery/2025-08/scaled-1680-/upZimage.png)
2. #### Fill in the **Item Code** and **Quantity** columns according to the customer's request document.

#### **Step 4: Save the RFQ**

#### After all data is filled in, click the **Save** button in the bottom-left section to save the RFQ record into the system. ![image.png](https://manual.kokola.co/uploads/images/gallery/2025-08/scaled-1680-/txdimage.png)

### **Tips &amp; Important Notes**

- #### Recording a customer's RFQ in this module is a good first step for a **structured and documented** sales process.
- #### The RFQ data saved here will become the basis for creating the official **Quotation** document for the customer in the next module.
- #### Always fill in the **External RFQ Number** field if it is available, to facilitate communication and document matching with the customer.

# Quotation

### **Module Guide: Quotation**

#### **Module Location**

#### Sales &gt; Quotation &gt; Quotation

#### **Module Objective**

#### The **Quotation** module is used to create, manage, and send official price quotation documents to customers. This document is the formal response to a customer's request (recorded in the Customer RFQ module) and contains the details of products, prices, discounts, taxes, and other terms being offered.

### **1. Main View (Quotation List)**

#### The main page of this module displays a list of all quotations that have been created.

![image.png](https://manual.kokola.co/uploads/images/gallery/2025-08/scaled-1680-/4lLimage.png)

#### **View Explanation &amp; Filters**

#### This page is for viewing and managing all existing quotations.

- #### **Filters**: You can search for a specific quotation by **Quotation Number**, **Item Category**, **Status**, or a date range (**Date From / Date To**).
- #### **Quotation List**: The table below will display all quotations that match the filters, with columns such as **Quotation Number**, **Customer**, **Quotation Date**, and **Status of Sales Offering Letter**.

#### **Button Functions**

- #### **New**: The primary button to create a new Quotation.
- #### **Expired**: To change the status of a quotation that has passed its validity period to "Expired".
- #### **Print**: To print a selected quotation document to be sent to the customer.

### **2. Steps to Create a Quotation**

#### **Step 1: Create a New Quotation**

#### From the Main View, click the **New** button to open the **New Quotation** form.   
![image.png](https://manual.kokola.co/uploads/images/gallery/2025-08/scaled-1680-/M8Himage.png)

#### **Step 2: Fill in Header Information**

#### On the form that appears, fill in the general quotation information:

- #### **RFQ Code**: For efficiency, select the **RFQ Code** from the recorded customer request. This will automatically pull the customer data and the list of requested items. ![image.png](https://manual.kokola.co/uploads/images/gallery/2025-08/scaled-1680-/RY4image.png)
- #### **Quotation Date &amp; Due Date**: Set the **Quotation Date** and the **Quotation Expiration Date** (validity period).   
    ![image.png](https://manual.kokola.co/uploads/images/gallery/2025-08/scaled-1680-/2v9image.png)
- #### **Sales Person**: Assign the salesperson responsible for this quotation. 
    
    #### ![image.png](https://manual.kokola.co/uploads/images/gallery/2025-08/scaled-1680-/VKximage.png)

#### **Step 3: Detail the Price and Discount per Item**

#### In the detail table at the bottom, complete the pricing information for each product:

1. #### Fill in the **Unit Price (IDR)** column for each item.
2. #### If there is a discount, fill in the **Disc Value** (for a nominal reduction) or **Discount (%)** (for a percentage reduction) column.
3. #### Select the appropriate tax code, and the system will calculate the tax value in the **Tax 1 (IDR)** column.
4. #### The system will automatically calculate the **Total Amount**, **Total Tax**, and **Grand Total** in the bottom-right corner.

#### **Step 4: Save and Confirm**

#### After all data is filled in, use the buttons in the bottom-left section:

- #### **Save**: To save the quotation as a draft. ![image.png](https://manual.kokola.co/uploads/images/gallery/2025-08/scaled-1680-/h7gimage.png)
- #### **Confirm**: To finalize and send the quotation into the approval workflow. 
    
    #### ![image.png](https://manual.kokola.co/uploads/images/gallery/2025-08/scaled-1680-/Y6simage.png)
- #### **Cancel**: To cancel the entry. ![image.png](https://manual.kokola.co/uploads/images/gallery/2025-08/scaled-1680-/QCLimage.png)

### **Tips &amp; Important Notes**

- #### A quotation that has been approved by the customer will become the basis for creating a **Sales Order**.
- #### Always pay attention to the **Due Date**, as the quotation will be considered invalid after that date. Use the **Expired** button to manually mark quotations that are already expired.
- #### A **Confirmed** quotation will likely go to a **Quotation Inbox** for an approval process by a manager.

# Quotation Inbox

### **Module Guide: Quotation Inbox**

#### **Module Location**

#### Sales &gt; Quotation &gt; Quotation Inbox

#### **Module Objective**

#### The **Quotation Inbox** module serves as the approval center for all **Quotation** documents that have been created and submitted by the sales team. This module is used by a superior or manager to conduct a final review and provide approval before an official price offer can be sent to the customer.

### **1. Main View (Quotation List)**

#### The main page of this module is an "inbox" that displays all quotations requiring your action.

![image.png](https://manual.kokola.co/uploads/images/gallery/2025-08/scaled-1680-/ndpimage.png)

#### **View Explanation &amp; Filters**

#### This page provides a summary of all quotations that are awaiting approval.

- #### **Filters**: You can search for a specific quotation by **Sales Offering Letter Code**, **Item Category**, or a **Date From** and **Date To** range.
- #### **Request List**: The table below will display all quotations awaiting action. The table currently shows "...No Record Found...".

#### **Column Explanation**

- #### **Sales Offering Letter Code**: The unique number of the submitted Quotation document.
- #### **Customer**: The name of the customer who will receive the quotation.
- #### **Requester**: The name of the user or employee who submitted the quotation.
- #### **Status of Sales Offering Letter / Approval**: Icons that indicate the document's status and the approval process status.

#### **Button Functions**

- #### **Approve**: The main action button to approve one or more selected quotations.

### **2. Approval Process Steps**

#### The following is the standard workflow for an approver.

#### **Step 1: Access the Inbox**

#### Open the **Quotation Inbox** module to see the list of quotations that require approval.

#### **Step 2: Review Quotation Details**

#### Click on one of the rows in the table to open its detail view. In the detail view, you can check all the information that has been input, such as the product details, prices, discounts, and other terms.

#### **Step 3: Provide Approval**

#### After you have reviewed and are certain about the submitted quotation:

1. #### Return to the main **Inbox** page.
2. #### Check the box in the leftmost column for one or more quotation rows you wish to approve.
3. #### Click the **Approve** button located in the bottom-left section of the page to process the approval. ![image.png](https://manual.kokola.co/uploads/images/gallery/2025-08/scaled-1680-/Ydeimage.png)

### **3. Workflow &amp; Integrated Business Process**

1. #### **Submission**: A salesperson creates a document in the **Quotation** module and clicks **Confirm**.
2. #### **Entering the Queue**: The confirmed quotation automatically enters the queue in this **Quotation Inbox** module.
3. #### **Review &amp; Approval**: A manager or approver opens this module, reviews, and provides approval.
4. #### **Finalization**: After approval, the Quotation becomes an official document, its status is updated, and it is ready to be printed and sent to the customer, as well as serving as the basis for the creation of a Sales Order.

# Proforma Invoice

### **Module Guide: Proforma Invoice**

#### **Module Location**

#### Sales &gt; Proforma Invoice &gt; Proforma Invoice

#### **Module Objective**

#### The **Proforma Invoice** module is used to create a preliminary or estimated bill that is sent to a customer before the goods are shipped. A Proforma Invoice is **not** a legitimate commercial invoice and is not recorded as a receivable. Its purpose is to serve as a sales commitment letter and it is often used to request a **down payment** from the customer before the sales process proceeds.

### **1. Main View (Proforma Invoice List)**

#### The main page of this module displays a list of all Proforma Invoices that have been created.

![image.png](https://manual.kokola.co/uploads/images/gallery/2025-08/scaled-1680-/I3Cimage.png)

#### **View Explanation &amp; Filters**

#### This page is for viewing and managing all existing Proforma Invoices.

- #### **Filters**: You can search for a specific document by **Proforma Invoice Number**, **Item Category**, **Status**, or a date range (**Date From / Date To**).
- #### **Invoice List**: The table below displays all documents that match the filters, with columns such as **Proforma Invoice Number**, **Customer**, **Proforma Invoice Date**, **Status**, and **Approval**.

#### **Button Functions**

- #### **New**: The primary button to create a new Proforma Invoice.
- #### **Expired**: To change the status of a document that has passed its validity period to "Expired".
- #### **Print**: To print a selected document to be sent to the customer.

### **2. Steps to Create a Proforma Invoice**

#### **Step 1: Create a New Proforma Invoice**

#### From the Main View, click the **New** button to open the **New Proforma Invoice** form. ![image.png](https://manual.kokola.co/uploads/images/gallery/2025-08/scaled-1680-/0apimage.png)

#### **Step 2: Fill in Header Information**

#### On the form that appears, fill in the general information:

- #### **Quotation Number**: You can pull data from an existing quotation by selecting the relevant Quotation Number. This will automatically pull the customer and item data. ![image.png](https://manual.kokola.co/uploads/images/gallery/2025-08/scaled-1680-/aJzimage.png)
- #### **Customer**: Select the customer who will receive the Proforma Invoice. ![image.png](https://manual.kokola.co/uploads/images/gallery/2025-08/scaled-1680-/hfPimage.png)
- #### **Payment Schedule &amp; Expected Delivery Date**: Fill in important details such as the Payment Schedule and the Estimated Delivery Date. ![image.png](https://manual.kokola.co/uploads/images/gallery/2025-08/scaled-1680-/IBnimage.png)![image.png](https://manual.kokola.co/uploads/images/gallery/2025-08/scaled-1680-/eETimage.png)
- #### **Upload File**: You can also upload a PO (Purchase Order) document from the customer as a reference. ![image.png](https://manual.kokola.co/uploads/images/gallery/2025-08/scaled-1680-/HQsimage.png)

#### **Step 3: Detail the Items and Prices**

#### In the detail table at the bottom, ensure all items, quantity (**Qty**), price (**Unit Price**), and **Discount** are in accordance with the agreement. The system will calculate the totals automatically in the bottom-right section.

#### **Step 4: Save and Confirm**

#### After all data is filled in, use the buttons in the bottom-left section:

- #### **Save**: To save the Proforma Invoice as a draft. ![image.png](https://manual.kokola.co/uploads/images/gallery/2025-08/scaled-1680-/Lg2image.png)
- #### **Confirm**: To finalize and send the document into the approval workflow. 
    
    #### ![image.png](https://manual.kokola.co/uploads/images/gallery/2025-08/scaled-1680-/Udhimage.png)
- #### **Cancel**: To cancel the entry. ![image.png](https://manual.kokola.co/uploads/images/gallery/2025-08/scaled-1680-/rCLimage.png)

### **Tips &amp; Important Notes**

- #### Remember, a Proforma Invoice is **not an actual commercial invoice** and is not recorded as a receivable. It is a sales commitment document.
- #### After the customer makes a payment based on this Proforma Invoice, you can proceed by creating the actual **Sales Order** and **Sales Invoice**.
- #### A document that has been **Confirmed** will likely go to a **Proforma Invoice Inbox** for an approval process by a manager.

# Proforma Invoice Inbox

### **Module Guide: Proforma Invoice Inbox**

#### **Module Location**

#### Sales &gt; Proforma Invoice &gt; Proforma Invoice Inbox

#### **Module Objective**

#### The **Proforma Invoice Inbox** module serves as the approval center for all **Proforma Invoice** documents that have been created and submitted. This module is used by a superior or manager to conduct a final review and provide approval before the Proforma Invoice can be sent to the customer.

### **1. Main View (Proforma Invoice List)**

#### The main page of this module is an "inbox" that displays all Proforma Invoices requiring your action.

![image.png](https://manual.kokola.co/uploads/images/gallery/2025-08/scaled-1680-/0bvimage.png)

#### **View Explanation &amp; Filters**

#### This page provides a summary of all Proforma Invoices that are awaiting approval.

- #### **Filters**: You can search for a specific document by **Proforma Invoice Number**, **Item Category**, or a **Date From** and **Date To** range.
- #### **Request List**: The table below will display all documents awaiting action. The table currently shows "...No Record Found...".

#### **Column Explanation**

- #### **Proforma Invoice Number**: The unique number of the submitted Proforma Invoice document.
- #### **Customer**: The name of the customer who will receive the Proforma Invoice.
- #### **Proforma Invoice Date**: The date the document was created.
- #### **Proforma Invoice Status / Approval**: Icons that indicate the document's status and the approval process status.

#### **Button Functions**

- #### **Approve**: The main action button to approve one or more selected Proforma Invoices.

### **2. Approval Process Steps**

#### The following is the standard workflow for an approver.

#### **Step 1: Access the Inbox**

#### Open the **Proforma Invoice Inbox** module to see the list of documents that require approval.

#### **Step 2: Review the Proforma Invoice Details**

#### Click on one of the rows in the table to open its detail view. In the detail view, you can check all the information that has been input, such as the product details, prices, and payment terms.

#### **Step 3: Provide Approval**

#### After you have reviewed and are certain about the submitted Proforma Invoice's content:

1. #### Return to the main **Inbox** page.
2. #### Check the box in the leftmost column for one or more rows you wish to approve.
3. #### Click the **Approve** button located in the bottom-left section of the page to process the approval. ![image.png](https://manual.kokola.co/uploads/images/gallery/2025-08/scaled-1680-/aR7image.png)

### **3. Workflow &amp; Integrated Business Process**

1. #### **Submission**: A salesperson creates a document in the **Proforma Invoice** module and clicks **Confirm**.
2. #### **Entering the Queue**: The confirmed Proforma Invoice automatically enters the queue in this **Proforma Invoice Inbox** module.
3. #### **Review &amp; Approval**: A manager or approver opens this module, reviews, and provides approval.
4. #### **Finalization**: After approval, the Proforma Invoice becomes an official document, its status is updated, and it is ready to be printed and sent to the customer for further payment processing.

# Sales Contract

### **Module Guide: Sales Contract**

#### **Module Location**

#### Sales &gt; Sales Contract &gt; Sales Contract

#### **Module Objective**

#### The **Sales Contract** module is used to create, manage, and track long-term sales agreement documents with customers. Unlike single transactions, this contract defines the agreed-upon terms, products, and prices that will apply to all sales orders during the contract period.

### **1. Main View (Contract List)**

#### The main page of this module displays a list of all Sales Contract documents that have been created.

![image.png](https://manual.kokola.co/uploads/images/gallery/2025-08/scaled-1680-/IZIimage.png)

#### **View Explanation &amp; Filters**

#### This page is for viewing and managing all existing sales contracts.

- #### **Filters**: You can search for a specific contract by **Contract Number**, **Item Category**, **Status**, or a date range (**Date From / Date To**).
- #### **Contract List**: The table below will display all contracts that match the filters, with columns such as **Contract Number**, **Customer Name**, **Contract Start Date**, **End Date**, and **Approval Status**.

#### **Button Functions**

- #### **New**: The primary button to create a new Sales Contract.
- #### **Print**: To print the details of a selected contract.
- #### **Change Status**: To change the status of a selected contract.
- #### **FBill Reminder**: Likely functions to send a billing reminder related to the contract.

### **2. Steps to Create a Sales Contract**

#### **Step 1: Create a New Contract**

#### From the Main View, click the **New** button to open the **Add Sales Contract** form. ![image.png](https://manual.kokola.co/uploads/images/gallery/2025-08/scaled-1680-/Fsmimage.png)

#### **Step 2: Fill in Contract Header Information**

#### On the form that appears, fill in the general information and terms of the contract:

- #### **Basic Information**: Select the **Customer**, and fill in important dates such as **Sales Contract Date**, **Contract Start Date**, and **End Date**.   
    ![image.png](https://manual.kokola.co/uploads/images/gallery/2025-08/scaled-1680-/Z8vimage.png)  
      
    ![image.png](https://manual.kokola.co/uploads/images/gallery/2025-08/scaled-1680-/HlGimage.png)
- #### **Reference**: You can link it to an existing quotation by selecting the **Quotation Number**. ![image.png](https://manual.kokola.co/uploads/images/gallery/2025-08/scaled-1680-/etLimage.png)
- #### **Important Terms**: Fill in key terms such as **Maximum Sales Amount** and the details in **Terms and Condition**.
- #### ![image.png](https://manual.kokola.co/uploads/images/gallery/2025-08/scaled-1680-/ezPimage.png)![image.png](https://manual.kokola.co/uploads/images/gallery/2025-08/scaled-1680-/MMaimage.png)

#### **Step 3: Detail the Contract Items and Prices**

#### In the detail table at the bottom, list all the products included in the contract:

1. #### Fill in the **Item Code** and **Qty** (Quantity) as agreed.
2. #### Fill in the **Unit Price** and **Discount (%)** that have been agreed upon and will remain fixed for the duration of the contract.

#### **Step 4: Save and Confirm**

#### After all data is filled in, use the buttons in the bottom-left section:

- #### **Save**: To save the contract as a draft. ![image.png](https://manual.kokola.co/uploads/images/gallery/2025-08/scaled-1680-/JL9image.png)
- #### **Confirm**: To finalize and send the contract into the approval workflow.   
    ![image.png](https://manual.kokola.co/uploads/images/gallery/2025-08/scaled-1680-/hx6image.png)
- #### **Cancel**: To cancel the entry. ![image.png](https://manual.kokola.co/uploads/images/gallery/2025-08/scaled-1680-/n6kimage.png)

### **Tips &amp; Important Notes**

- #### An active Sales Contract will become the reference for prices and terms for **Sales Orders** created for that customer during the contract period.
- #### Use the **Maximum Sales Amount** field to control that the total sales under this contract do not exceed the agreed-upon value.
- #### A document that has been **Confirmed** will likely go to a **Sales Contract Inbox** for an approval process by management.

# Sales Contract Inbox

### **Module Guide: Sales Contract Inbox**

#### **Module Location**

#### Sales &gt; Sales Contract &gt; Sales Contract Inbox

#### **Module Objective**

#### The **Sales Contract Inbox** module serves as the approval center for all **Sales Contract** documents that have been created and submitted. This module is used by a superior or manager to conduct a final review and provide approval before a contract officially becomes effective and can be used for transactions.

### **1. Main View (Contract List)**

#### The main page of this module is an "inbox" that displays all Sales Contract documents requiring your action.

![image.png](https://manual.kokola.co/uploads/images/gallery/2025-08/scaled-1680-/UtJimage.png)

#### **View Explanation &amp; Filters**

#### This page provides a summary of all contracts that are awaiting approval.

- #### **Filters**: You can search for a specific contract by **Contract Number**, **Item Category**, **Status**, or a date range (**Date From / Date To**).
- #### **Request List**: The table below will display all contracts awaiting action. The table currently shows "...No Record Found...".

#### **Column Explanation**

- #### **Contract Number**: The unique number of the submitted Sales Contract document.
- #### **Customer Name**: The name of the customer associated with the contract.
- #### **Contract Start Date / End Date**: The start and end dates of the contract period.
- #### **Approval Status**: An icon that indicates the status of the approval process.

#### **Button Functions**

- #### **Approve**: The main action button to approve one or more selected contracts.

### **2. Approval Process Steps**

#### The following is the standard workflow for an approver.

#### **Step 1: Access the Inbox**

#### Open the **Sales Contract Inbox** module to see the list of contracts that require approval.

#### **Step 2: Review Contract Details**

#### Click on one of the rows in the table to open its detail view. In the detail view, you can check all the information that has been input, such as the commercial terms, credit limit, product list, prices, and the contract period.

#### **Step 3: Provide Approval**

#### After you have reviewed and are certain about the submitted contract's content:

1. #### Return to the main **Inbox** page.
2. #### Check the box in the leftmost column for one or more contract rows you wish to approve.
3. #### Click the **Approve** button located in the bottom-left section of the page to process the approval. ![image.png](https://manual.kokola.co/uploads/images/gallery/2025-08/scaled-1680-/wUQimage.png)

### **3. Workflow &amp; Integrated Business Process**

1. #### **Submission**: A user (e.g., a sales manager) creates a document in the **Sales Contract** module and clicks **Confirm**.
2. #### **Entering the Queue**: The confirmed contract automatically enters the queue in this **Sales Contract Inbox** module.
3. #### **Review &amp; Approval**: An authorized manager or leader opens this module, reviews, and provides approval.
4. #### **Contract Activation**: After approval, the Sales Contract becomes an active agreement, and the terms within it will be enforced by the system on subsequent transactions with that customer.

# Miscellanous Charge

### **Module Guide: Miscellaneous Charge**

#### **Module Location**

#### Sales &gt; Miscellaneous Charge

#### **Module Objective**

#### The **Miscellaneous Charge** module serves as the master data hub for creating and managing types of additional charges that can be applied in sales transactions. Besides defining the name of the charge, this module is also crucial for setting up the **accounting link (GL Linking)**, which determines the debit and credit accounts that will be used automatically when the charge is recorded.

### **1. Main View (Charge List)**

#### The main page of this module displays a list of all the additional charge types that have been created.

![image.png](https://manual.kokola.co/uploads/images/gallery/2025-08/scaled-1680-/Hj0image.png)

#### **View Explanation**

#### This page is for viewing and managing all existing types of additional charges.

- #### **Filter**: You can search for a specific charge using the search bar based on the **Misc Charge Code**.
- #### **Charge List**: The table below displays a summary of each charge type, with columns for **Misc Charge Code** and **Misc Charge Name**. Existing examples are "INSURANCE COST" and "FREIGHT COST".

#### **Button Functions**

- #### **New**: The primary button to create a new charge type.
- #### **Delete**: To delete a selected charge type.

### **2. Steps to Create a New Charge**

#### **Step 1: Create a New Charge**

#### From the Main View, click the **New** button to open the **Add Miscellaneous Charge** form. 

#### ![image.png](https://manual.kokola.co/uploads/images/gallery/2025-08/scaled-1680-/HgQimage.png)

#### **Step 2: Fill in Charge Details**

#### On the form that appears, fill in the required details:

- #### **Misc Charge Code**: Enter a unique code for this charge (e.g., HANDLINGFEE). ![image.png](https://manual.kokola.co/uploads/images/gallery/2025-08/scaled-1680-/BFRimage.png)
- #### **Misc Charge Name**: Enter a descriptive name for this charge (e.g., HANDLING FEE). ![image.png](https://manual.kokola.co/uploads/images/gallery/2025-08/scaled-1680-/g3iimage.png)

#### **Step 3: Set Up the Account Link (GL Linking)**

#### This is the most crucial step to ensure the integration with accounting functions correctly:

- #### **Debit Type**: Select the account from the dropdown that will be **debited** when this charge is used in a transaction.   
    ![image.png](https://manual.kokola.co/uploads/images/gallery/2025-08/scaled-1680-/FR2image.png)
- #### **Credit Type**: Select the account from the dropdown that will be **credited** when this charge is used.   
    ![image.png](https://manual.kokola.co/uploads/images/gallery/2025-08/scaled-1680-/LYOimage.png)

#### **Step 4: Save the Data**

#### After all data is filled in, click the **Save** button to save the new charge type.   
![image.png](https://manual.kokola.co/uploads/images/gallery/2025-08/scaled-1680-/8u2image.png)

### **Tips &amp; Important Notes**

- #### The **Debit Type** and **Credit Type** settings must be coordinated with the **Accounting team** to ensure the automated journaling that occurs in the system is correct.
- #### The charges you define here will become options that can be added to sales documents like **Sales Invoices** to bill customers for additional costs (e.g., insurance or freight charges).

# Sales Order

### **Module Guide: Sales Order**

#### **Module Location**

#### Sales &gt; Sales Order &gt; Sales Order

#### **Module Objective**

#### The **Sales Order (SO)** module is the center of the sales process. Its purpose is to create an official internal document that confirms an order from a customer. An approved SO becomes the instruction for the Warehouse department to prepare and ship the goods, and subsequently becomes the basis for creating the Sales Invoice.

### **1. Main View (Sales Order List)**

#### The main page of this module displays a list of all Sales Orders that have been created.

![image.png](https://manual.kokola.co/uploads/images/gallery/2025-08/scaled-1680-/6lrimage.png)

#### **View Explanation &amp; Filters**

#### This page is for viewing and managing all SOs.

- #### **Filters**: You can search for a specific SO by **Sales Order Number**, **SO Type**, **Goods/Services Category**, **Status**, or a date range.
- #### **SO List**: The table below displays all SOs that match the filters, with columns such as **Sales Order Number**, **Customer**, **Customer's PO No.** (Customer's Purchase Order Number), **SO Date**, and various statuses.

#### **Button Functions**

- #### **New**: The primary button to create a new Sales Order.
- #### **Print**: To print the details of a selected SO.
- #### **Change Status**: To change the status of a selected SO.

### **2. Steps to Create a Sales Order**

#### **Step 1: Create a New Sales Order**

#### From the Main View, click the **New** button to open the new SO creation form. 

#### ![image.png](https://manual.kokola.co/uploads/images/gallery/2025-08/scaled-1680-/qrcimage.png)

#### **Step 2: Fill in Header Information**

#### At the top of the form, fill in the general order information:

- #### **Source document**: It is highly recommended to select a **Source document** such as an existing **Quotation** or **Sales Contract**. This will automatically pull the customer, product, and pricing data to reduce errors.   
    ![image.png](https://manual.kokola.co/uploads/images/gallery/2025-08/scaled-1680-/eroimage.png)
- #### **Customer**: If not pulling from a source document, select the **Customer** manually.   
    ![image.png](https://manual.kokola.co/uploads/images/gallery/2025-08/scaled-1680-/jrQimage.png)
- #### **Reference Information**: Fill in important dates such as **SO Date**, **Due Date**, and **Customer PO Date**. You can also upload the PO file from the customer. ![image.png](https://manual.kokola.co/uploads/images/gallery/2025-08/scaled-1680-/8bDimage.png) ![image.png](https://manual.kokola.co/uploads/images/gallery/2025-08/scaled-1680-/aeRimage.png)
- #### **Credit Info**: Pay attention to the **CreditInfo** box on the right side, which displays the customer's credit limit information. The system may reject the transaction if it exceeds the existing limit.   
    ![image.png](https://manual.kokola.co/uploads/images/gallery/2025-08/scaled-1680-/h1Vimage.png)

#### **Step 3: Detail the Order Items**

#### In the **List of Goods/Services** detail table, enter or verify all the items being ordered:

- #### Fill in the **Item/Service Code**, **Qty** (Quantity), **Unit Price**, and **Discount (%)** if any.

#### **Step 4: Add Miscellaneous Charges (If Any)**

#### If there are other costs outside of the item price (e.g., shipping or insurance), use the **Add MiscellaneousCharge** section below the item list to add them.

#### **Step 5: Save and Confirm**

#### After all data is filled in, use the buttons in the bottom-left section:

- #### **Save**: To save the SO as a draft. ![image.png](https://manual.kokola.co/uploads/images/gallery/2025-08/scaled-1680-/oELimage.png)
- #### **Confirm**: To finalize and send the SO into the approval workflow. ![image.png](https://manual.kokola.co/uploads/images/gallery/2025-08/scaled-1680-/gh1image.png)
- #### **Cancel**: To cancel the entry. ![image.png](https://manual.kokola.co/uploads/images/gallery/2025-08/scaled-1680-/fJCimage.png)

### **Tips &amp; Important Notes**

- #### Creating an SO from a **Source document** like a Quotation or Sales Contract is the **best practice** to ensure consistency in prices and terms.
- #### An approved SO is the **official instruction** for the Warehouse department to process the shipment of goods.
- #### An SO that has been **Confirmed** will go to the **Sales Order Inbox** to be approved by a manager before it can be processed further.

# Sales Order Inbox

### **Module Guide: Sales Order Inbox**

#### **Module Location**

#### Sales &gt; Sales Order &gt; Sales Order Inbox

#### **Module Objective**

#### The **Sales Order Inbox** module serves as the approval center for all **Sales Order (SO)** documents that have been created and submitted. This module is used by a superior or manager who is authorized to conduct a final review and provide approval before an SO can be processed further by the warehouse department for shipment.

### **1. Main View (Sales Order List)**

#### The main page of this module is an "inbox" that displays all SOs requiring your action.

![image.png](https://manual.kokola.co/uploads/images/gallery/2025-08/scaled-1680-/ZrNimage.png)

#### **View Explanation &amp; Filters**

#### This page provides a summary of all SOs that are awaiting approval.

- #### **Filters**: You can search for a specific SO by **Sales Order Number**, **SO Type**, **Goods/Services Category**, or a date range (**Start Date** and **End Date**).
- #### **Request List**: The table below will display all SOs awaiting action. The table currently shows "...No Data Available...".

#### **Column Explanation**

- #### **Sales Order Number**: The unique number of the submitted SO document.
- #### **Customer**: The name of the customer associated with the SO.
- #### **SO Date**: The date the SO was created.
- #### **Sales Order Status / Approval**: Icons that indicate the document's status and the approval process status.

### **2. Approval Process Steps**

#### The following is the standard workflow for an approver.

#### **Step 1: Access the Inbox**

#### Open the **Sales Order Inbox** module to see the list of SOs that require approval.

#### **Step 2: Review the Sales Order Details**

#### Click on one of the rows in the table to open its detail view. In the detail view, you can check all the information that has been input, such as the product details, prices, discounts, customer credit availability, and other terms.

#### **Step 3: Provide Approval**

#### After you open and review the SO details in Step 2, you will find the buttons to grant approval (e.g., **"Approve"** or **"Reject"** buttons) **within that detail page**. Click the appropriate button to complete the review process.

### **3. Workflow &amp; Integrated Business Process**

1. #### **Submission**: A user (e.g., a sales admin) creates a document in the **Sales Order** module and clicks **Confirm**.
2. #### **Entering the Queue**: The confirmed SO automatically enters the queue in this **Sales Order Inbox** module.
3. #### **Review &amp; Approval**: A manager or approver opens this module, reviews, and provides approval.
4. #### **Warehouse Process**: After approval, the SO becomes the official instruction for the **Warehouse Department** to begin the process of preparing and shipping the goods.

# Shipping Instruction

### **Module Guide: Shipping Instruction**

#### **Module Location**

#### Sales &gt; Shipping Instruction

#### **Module Objective**

#### The **Shipping Instruction** module serves as a bridge between the sales process and the logistics/warehouse process. Its purpose is to create an official command document for the warehouse team to prepare, pick, and ship goods to a customer based on an approved Sales Order (SO).

### **1. Main View (Shipping Instruction List)**

#### The main page of this module displays a list of all Shipping Instructions that have been created.

![Screenshot 2025-08-05 132130.png](https://manual.kokola.co/uploads/images/gallery/2025-08/scaled-1680-/screenshot-2025-08-05-132130.png)

#### **View Explanation &amp; Filters**

#### This page is for viewing and managing all shipping commands.

- #### **Filters**: You can search for a specific instruction by **Document Number**, **Item Category**, **Status**, or a **Date From** and **Date To** range.
- #### **Instruction List**: The table below displays all shipping instructions that match the filters, with columns such as **Document Number**, **Request Date**, **Status (FD, ND, HD)**, **Customer**, and **Expected Delivery Date**.

#### **Button Functions**

- #### **New**: The primary button to create a new Shipping Instruction.
- #### **Change Status**: To change the status of a selected instruction.
- #### **Print**: To print the details of a selected instruction.
- #### **Upload DO**: Likely functions to upload the Delivery Order document that has been signed by the customer as proof of receipt.

### **2. Steps to Create a Shipping Instruction**

#### **Step 1: Create a New Instruction**

#### From the Main View, click the **New** button to open the Shipping Instruction creation form. This form consists of several sections such as **Document Information** and **Detail Sales Order**. ![image.png](https://manual.kokola.co/uploads/images/gallery/2025-08/scaled-1680-/OXDimage.png)

#### **Step 2: Select the Sales Order**

#### On the form that appears, the first step is to select the **Document Source**, which is the number of the approved Sales Order that is ready to be shipped. Once selected, the system will automatically fill in the **Customer** data, **Ship To Address**, and the item details.   
![image.png](https://manual.kokola.co/uploads/images/gallery/2025-08/scaled-1680-/4ncimage.png)

#### **Step 3: Complete Shipping Information**

#### In the **Document Information** section, fill in the necessary logistics details:

- #### **Expected Delivery Date**: The estimated date the goods will arrive at the customer's location. ![image.png](https://manual.kokola.co/uploads/images/gallery/2025-08/scaled-1680-/yZBimage.png)
- #### **Ekspedisi (Shipping Service)**: Select the shipping service or courier that will be used. ![image.png](https://manual.kokola.co/uploads/images/gallery/2025-08/scaled-1680-/sVlimage.png)
- #### **Vehicle**: Enter the type of vehicle being used (e.g., CDD).   
    ![image.png](https://manual.kokola.co/uploads/images/gallery/2025-08/scaled-1680-/4FZimage.png)
- #### **Vehicle Number, Seal Number**: Enter the vehicle number and seal number if any.   
    ![image.png](https://manual.kokola.co/uploads/images/gallery/2025-08/scaled-1680-/O73image.png)

#### **Step 4: Verify Item Details**

#### Move to the **Detail Sales Order** section to double-check the list of items and the quantities (**Quantity** and **Remaining Quantity**) that must be prepared by the warehouse team for shipment.

#### **Step 5: Save the Instruction**

#### After all data is filled in, use the buttons at the bottom:

- #### **Save**: To save the instruction as a draft. ![image.png](https://manual.kokola.co/uploads/images/gallery/2025-08/scaled-1680-/8Y7image.png)
- #### **Save And Completed**: To finalize the instruction and send it to the next workflow (ready to be processed by the warehouse). ![image.png](https://manual.kokola.co/uploads/images/gallery/2025-08/scaled-1680-/ickimage.png)

### **Tips &amp; Important Notes**

- #### This module is the crucial link between the **Sales** and **Warehouse** teams.
- #### To avoid picking and shipping errors, ensure you select the correct **Document Source (Sales Order)**.
- #### The **Upload DO** button on the main page is very useful for archiving the proof of a signed Delivery Order, as evidence that the goods have been received in good condition.

# Billing Statement

### **Module Guide: Customer Statement of Account**

#### **Module Location**

#### Sales &gt; Sales Invoice &gt; Billing Statement

#### **Module Objective**

#### The **Customer Statement of Account** module is used to generate, print, and send a "Statement of Account" or billing letter to customers. This document summarizes a customer's total invoices, total payments, and the remaining outstanding balance as of a specific date. It is a primary communication tool for the collections process.

### **1. Main View (Customer Balance List)**

#### The main page of this module displays a list of all customers along with a summary of their receivable balances.

![image.png](https://manual.kokola.co/uploads/images/gallery/2025-08/scaled-1680-/Wlbimage.png)

#### **View Explanation &amp; Filters**

#### This page is the center for creating and sending statements of account.

- #### **Filters**:
    
    
    - #### **Customer**: Use this search bar to find a specific customer.
    - #### **As of**: This is a key date filter. Select a date to display the customer's receivable balance as of that date (e.g., August 5, 2025), then click **View**.
- #### **Customer List**: The table below displays a list of customers along with their financial summary.

#### **Column Explanation**

- #### **Customer Name**: The name of the customer.
- #### **Billing PIC**: The name and/or email of the contact person (Person-In-Charge) for billing matters.
- #### **Invoice Amount**: The total value of all invoices issued to the customer.
- #### **Paid Amount**: The total value of payments that have been received from the customer.

#### **Button Functions**

- #### **Print This Document**: To print the statement of account for a selected customer.
- #### **Export To MS Excel**: To download the customer balance list into an Excel format.
- #### **Send e-mail**: To send the statement of account via email to the selected customer's billing PIC.

### **2. Steps to Send a Statement of Account**

#### **Step 1: Set the Report Date**

#### Set the report date in the **As of** field and click **View** to display the current list of customer receivable balances. ![image.png](https://manual.kokola.co/uploads/images/gallery/2025-08/scaled-1680-/s92image.png)

#### **Step 2: Select Customer(s)**

#### Find and select one or more customers to whom you want to send a statement by checking the box in the leftmost column of the corresponding row(s).   
![image.png](https://manual.kokola.co/uploads/images/gallery/2025-08/scaled-1680-/dVgimage.png)

#### **Step 3: Print or Send Email**

#### After the customer(s) are selected, use the action buttons in the bottom-left section of the page:

- #### Click **Print This Document** to print a physical billing statement that is ready to be sent. ![image.png](https://manual.kokola.co/uploads/images/gallery/2025-08/scaled-1680-/r95image.png)
- #### Click **Send e-mail** to automatically send the billing statement to the email address listed in the **Billing PIC** column. ![image.png](https://manual.kokola.co/uploads/images/gallery/2025-08/scaled-1680-/Irsimage.png)

### **Tips &amp; Important Notes**

- #### This module is the primary tool for the **Collection** and **Accounts Receivable (AR)** teams to communicate with customers regarding outstanding balances.
- #### To ensure the **Send e-mail** feature functions correctly, make sure the **Billing PIC** data (including the email address) in the customer master data is correct and filled in.
- #### Sending a statement of account routinely (for example, at the beginning of each month) is a good practice to remind customers and maintain healthy **cash flow**.

# Sales Invoice

### **Module Guide: Sales Invoice**

#### **Module Location**

#### Sales &gt; Sales Invoice &gt; Sales Invoice

#### **Module Objective**

#### The **Sales Invoice** module is the final stage in the sales cycle, where you create the official billing document to be sent to the customer. Invoices created here will be automatically recorded as receivables in the Accounts Receivable Module. This system provides two ways to create an invoice: **Regular (based on shipment)** and **Direct**.

### **1. Main View (Sales Invoice List)**

#### The main page of this module displays a list of all Sales Invoices that have been created.

![image.png](https://manual.kokola.co/uploads/images/gallery/2025-08/scaled-1680-/kicimage.png)

#### **View Explanation &amp; Filters**

#### This page is for viewing and managing all sales invoices.

- #### **Filters**: You can search for a specific invoice by **Invoice Number**, **Item Category**, **Invoice Status**, **Delivery Status**, or a date range.
- #### **Invoice List**: The table below displays all invoices that match the filters, with important columns such as **Invoice Number**, **Due Date**, **Customer Name**, **Amount**, and **Payment Status**.

#### **Button Functions**

- #### **New**: To create a **Regular Sales Invoice** (based on shipment).
- #### **New Direct Invoice**: To create a **Direct Sales Invoice** (without a goods shipment, e.g., for services).
- #### **Print bill**: To print the selected bill/invoice.
- #### **Export To MS Excel**: To download the list of invoices into an Excel format.

### **2. Steps to Create a Sales Invoice**

#### **A. Creating a Regular Sales Invoice (Based on Shipment)**

#### This is the most commonly used method for the sale of goods.

1. #### From the Main View, click the **New** button. ![image.png](https://manual.kokola.co/uploads/images/gallery/2025-08/scaled-1680-/h3dimage.png)
2. #### On the **Add Sales Invoice** form, select the **Customer**. The system will display a list of **Shipment Note Numbers** (from Shipping Instructions) that are ready to be billed for that customer. 
    
    ![image.png](https://manual.kokola.co/uploads/images/gallery/2025-08/scaled-1680-/OJKimage.png)
3. #### Select one or more Shipment Notes to be combined into a single invoice, then click **Get Detail**. ![image.png](https://manual.kokola.co/uploads/images/gallery/2025-08/scaled-1680-/GmNimage.png)
4. #### The system will automatically populate the item detail table below according to the shipping data.
5. #### Double-check all details, especially the dates (**Invoice Date**, **Due Date**) and the total value.
6. #### Click **Confirm** to finalize the invoice. ![image.png](https://manual.kokola.co/uploads/images/gallery/2025-08/scaled-1680-/2Jbimage.png)

#### **B. Creating a Direct Sales Invoice**

#### This method is used for the sale of services or other transactions that do not go through the goods shipment process from the warehouse.

1. #### From the Main View, click the **New Direct Invoice** button. ![image.png](https://manual.kokola.co/uploads/images/gallery/2025-08/scaled-1680-/BqRimage.png)
2. #### On the **Add - Direct** form, select the **Customer** and fill in header information such as **Invoice Date** and **Due Date**.   
    ![image.png](https://manual.kokola.co/uploads/images/gallery/2025-08/scaled-1680-/Z7himage.png)
3. #### In the **Transaction** table, enter the journaling details manually. You need to select an **Account Code** (for example, a Service Revenue account) and enter the **Amount**.   
    ![image.png](https://manual.kokola.co/uploads/images/gallery/2025-08/scaled-1680-/iJnimage.png)  
    ![image.png](https://manual.kokola.co/uploads/images/gallery/2025-08/scaled-1680-/YuRimage.png)
4. #### You can also add additional charges in the **Extra Cost** table.
5. #### Click **Confirm** to finalize the invoice. ![image.png](https://manual.kokola.co/uploads/images/gallery/2025-08/scaled-1680-/j9uimage.png)

### **Tips &amp; Important Notes**

- #### Creating an invoice from a **Shipping Instruction (the regular way)** is the best practice to ensure you only bill for what has actually been shipped.
- #### A **Direct Invoice** is generally used for non-inventory sales, such as the sale of services or assets.
- #### An invoice that has been **Confirmed** will automatically create a receivable record in the **Accounts Receivable Module** and is ready for the collections process.

# Sales Invoice Inbox

### **Module Guide: Sales Invoice Inbox**

#### **Module Location**

#### Sales &gt; Sales Invoice &gt; Sales Invoice Inbox

#### **Module Objective**

#### The **Sales Invoice Inbox** module serves as the approval center for all **Sales Invoice** documents that have been created and submitted. This module is used by a superior or manager who is authorized to conduct a final review and provide approval before an official invoice is posted to the Accounts Receivable Ledger.

### **1. Main View (Sales Invoice List)**

#### The main page of this module is an "inbox" that displays all Sales Invoices requiring your action.

![image.png](https://manual.kokola.co/uploads/images/gallery/2025-08/scaled-1680-/P2yimage.png)

#### **View Explanation &amp; Filters**

#### This page provides a summary of all invoices that are awaiting approval.

- #### **Filters**: You can search for a specific invoice by **Invoice Number**, **Item Category**, or a **Date From** and **Date To** range.
- #### **Request List**: The table below will display all invoices awaiting action. The table currently shows "...No Record Found...".

#### **Column Explanation**

- #### **Invoice Number**: The unique number of the submitted Sales Invoice document.
- #### **Invoice Date**: The date the invoice was created.
- #### **Vendor Name**: This column displays the **customer's** name, although it is labeled 'Vendor Name'.
- #### **Status / Approval Status**: Icons that indicate the document's status and the approval process status.

### **2. Approval Process Steps**

#### The following is the standard workflow for an approver.

#### **Step 1: Access the Inbox**

#### Open the **Sales Invoice Inbox** module to see the list of invoices that require approval.

#### **Step 2: Review the Sales Invoice Details**

#### Click on one of the rows in the table to open its detail view. In the detail view, you can check all the information that has been input, such as the product details, prices, discounts, taxes, and its consistency with the shipping document.

#### **Step 3: Provide Approval**

#### After you open and review the invoice details in Step 2, you will find the buttons to grant approval (e.g., **"Approve"** or **"Reject"** buttons) **within that detail page**. Click the appropriate button to complete the review process.

### **3. Workflow &amp; Integrated Business Process**

1. #### **Submission**: A user (e.g., a sales admin) creates a document in the **Sales Invoice** module and clicks **Confirm**.
2. #### **Entering the Queue**: The confirmed invoice automatically enters the queue in this **Sales Invoice Inbox** module.
3. #### **Review &amp; Approval**: A manager or approver opens this module, reviews, and provides approval.
4. #### **Posting to Receivables**: After approval, the Sales Invoice becomes a valid document, and its value will be officially posted to the **General Ledger and the Accounts Receivable Ledger**, creating a bill that must be paid by the customer.

# Void Sales Invoice

### **Module Guide: Void Sales Invoice**

#### **Module Location**

#### Sales &gt; Sales Invoice &gt; Void Sales Invoice

#### **Module Objective**

#### The **Void Sales Invoice** module serves as a tool to **void** a sales invoice that has already been issued. The "void" process is different from "delete"; "void" will keep a record of the invoice in the system but give it a "canceled" status and automatically create a reversing journal to neutralize its accounting impact. This is the correct accounting procedure for maintaining an **audit trail**.

### **1. Main View (Invoice List)**

#### The main page of this module displays a list of active sales invoices that can be voided.

![image.png](https://manual.kokola.co/uploads/images/gallery/2025-08/scaled-1680-/uDhimage.png)

#### **View Explanation &amp; Filters**

#### This page is for finding and selecting the invoice to be voided.

- #### **Filters**: You can search for a specific invoice by **Invoice Number**, **Item Category**, or a **Date From** and **Date To** range.
- #### **Invoice List**: The table below will display all invoices that match the filters, with columns such as **Invoice Number**, **Invoice Date**, **Due Date**, and **Customer Name**.

#### **Button Functions**

- #### **Void**: The main action button to run the voiding process on a selected invoice.

### **2. Steps to Void a Sales Invoice**

#### **Step 1: Find the Invoice**

#### Use the available filters, especially the **Invoice Number** search bar, to find and locate the sales invoice you wish to void.   
![image.png](https://manual.kokola.co/uploads/images/gallery/2025-08/scaled-1680-/5NBimage.png)

#### **Step 2: Select the Invoice**

#### Select one or more invoices to be voided by checking the box in the leftmost column of the corresponding row(s).   
![image.png](https://manual.kokola.co/uploads/images/gallery/2025-08/scaled-1680-/KDEimage.png)

#### **Step 3: Run the Voiding Process**

#### Click the **Void** button in the bottom-left section of the page. The system will likely ask for your confirmation before proceeding with the voiding process. Once confirmed, the invoice's status will change to "voided". ![image.png](https://manual.kokola.co/uploads/images/gallery/2025-08/scaled-1680-/vmPimage.png)

### **Tips &amp; Important Notes**

- #### The 'Void' process **does not delete the invoice data**, it only deactivates it. This is important for maintaining the integrity and completeness of historical data.
- #### After an invoice is voided, the system will automatically create a **reversing journal** to neutralize the accounting impact of the original invoice (e.g., crediting receivables and debiting revenue).
- #### Ensure you have sufficient **authorization** before voiding an invoice, as this action will directly affect the receivable and revenue records.
- #### This module is generally used by the **Accounting (AR) or Sales Admin teams** with supervision.

# Tax Form

### **Module Guide: Tax Invoice**

#### **Module Location**

#### Sales &gt; Sales Invoice &gt; Tax Form

#### **Module Objective**

#### The **Tax Invoice** module serves as a reporting and drill-down center for viewing all **Outgoing Tax Invoices** that have been issued from sales transactions. This module is **not** for creating new Tax Invoices, but rather for reviewing, searching, and managing the list of existing tax invoices for tax reporting purposes.

### **1. Main View (Tax Invoice List)**

#### The main page of this module displays a list of all Tax Invoices that match the filter criteria you select.

![image.png](https://manual.kokola.co/uploads/images/gallery/2025-08/scaled-1680-/dcBimage.png)

#### **View Explanation &amp; Filters**

#### This page is designed to facilitate the searching and summarization of tax invoices.

- #### **Search Filters**:
    
    
    - #### **Invoice No.**: To search by a specific invoice number.
    - #### **Type**: An important filter to separate types of tax invoices, namely **Invoice** for regular bills or **DP** for a Down Payment.
    - #### **Start Date / End Date**: Use this date range filter to pull all tax invoices issued within a specific period.
- #### **Tax Invoice List**: The table below will display all tax invoices that match the filters, complete with their details.

#### **Column Explanation**

- #### **Invoice No.**: The sales invoice number that is the basis for the issuance of the tax invoice.
- #### **Date**: The date the invoice was issued.
- #### **Customer**: The name of the related customer.
- #### **Tax Code**: The tax code used (e.g., PPN/VAT).
- #### **NPWP**: The customer's Tax ID Number.
- #### **Bonded Zone**: A marker indicating if the transaction is related to a bonded zone.

### **2. Workflow &amp; Integrated Business Process**

- #### **Automatic Creation**: Tax Invoices are **not created manually** in this module. A Tax Invoice is created **automatically** by the system when you create and confirm a Sales Invoice for a transaction that is subject to VAT.
- #### **Reporting Function**: This module is used by the **Tax and Customs** or **Accounting** team to review all tax invoices issued within a period, as a basis for the monthly VAT Return (SPT Masa PPN) reporting.

### **Tips &amp; Important Notes**

- #### Use the **date filter** to pull tax invoice data for the desired reporting period (e.g., August 1 - August 31).
- #### The **Type** filter is very useful for separating tax invoices for regular sales (**Invoice**) from those for down payments (**DP**) when creating a VAT summary.
- #### Ensure the customer's **NPWP** data is correct in the customer master data for the completeness of the tax report.

# Sales Return

### **Module Guide: Sales Return**

#### **Module Location**

#### Sales &gt; Sales Return &gt; Sales Return

#### **Module Objective**

#### The **Sales Return** module is used to record and manage the process of goods being returned by customers. The document created in this module becomes the basis for subsequent processes, namely the issuance of a **Credit Note** to reduce the customer's receivable and the readjustment of stock levels in the warehouse.

### **1. Main View (Sales Return List)**

#### The main page of this module displays a list of all Sales Return documents that have been created.

![image.png](https://manual.kokola.co/uploads/images/gallery/2025-08/scaled-1680-/rNjimage.png)

#### **View Explanation &amp; Filters**

#### This page is for viewing and managing all return transactions.

- #### **Filters**: You can search for a specific return by **Sales Return Number**, **Item Category**, or a date range (**Date From / Date To**).
- #### **Return List**: The table below will display all returns that match the filters, with columns such as **Sales Return Number**, **Customer**, **Customer Invoice** (Customer Invoice Number), and **Sales Return Status**.

#### **Button Functions**

- #### **New**: The primary button to create a new Sales Return record.
- #### **Change Status**: To change the status of a selected return document.
- #### **Print Sales Return**: To print the details of a selected return document.
- #### **Delete**: To delete a return document.

### **2. Steps to Record a Sales Return**

#### **Step 1: Create a New Return Record**

#### From the Main View, click the **New** button to open the **Add Sales Return** form.   
![image.png](https://manual.kokola.co/uploads/images/gallery/2025-08/scaled-1680-/spuimage.png)

#### **Step 2: Fill in Header Information**

#### On the form that appears, fill in the general information about the return:

- #### **Sales Return Date**: Enter the date the returned goods were received.   
    ![image.png](https://manual.kokola.co/uploads/images/gallery/2025-08/scaled-1680-/X7bimage.png)
- #### **Customer**: Select the customer who is making the return.   
    ![image.png](https://manual.kokola.co/uploads/images/gallery/2025-08/scaled-1680-/sb7image.png)
- #### **INVOICE Number**: **Important!** Select the original sales invoice number related to the returned goods. This will be the basis for determining the price and validating the return.   
    ![image.png](https://manual.kokola.co/uploads/images/gallery/2025-08/scaled-1680-/zuVimage.png)
- #### **Notes**: Provide a note regarding the reason for the return (e.g., damaged goods, wrong shipment, etc.).   
    ![image.png](https://manual.kokola.co/uploads/images/gallery/2025-08/scaled-1680-/128image.png)

#### **Step 3: Detail the Returned Items**

#### In the detail table at the bottom:

1. #### Click the **\[+\] Multiple Item \[-\]** link to add or remove rows. 
    
    #### ![image.png](https://manual.kokola.co/uploads/images/gallery/2025-08/scaled-1680-/SH1image.png)
2. #### Enter the **Item** (Item Code) and **Qty** (Quantity) that were returned by the customer.
3. #### The system will pull the price (**Price Per Unit**) from the original transaction and calculate the **Total Return**.

#### **Step 4: Save and Confirm**

1. #### Click the **Calculate** button to ensure all totals have been calculated correctly. ![image.png](https://manual.kokola.co/uploads/images/gallery/2025-08/scaled-1680-/hCNimage.png)
2. #### Use the buttons in the bottom-left section to finish:
    
    
    - #### **Save**: To save the return document as a draft. ![image.png](https://manual.kokola.co/uploads/images/gallery/2025-08/scaled-1680-/Gdkimage.png)
    - #### **Confirm**: To finalize the return document and send it into the approval workflow. ![image.png](https://manual.kokola.co/uploads/images/gallery/2025-08/scaled-1680-/NDmimage.png)
    - #### **Cancel**: To cancel the entry. ![image.png](https://manual.kokola.co/uploads/images/gallery/2025-08/scaled-1680-/l2Wimage.png)

### **Workflow &amp; Integrated Business Process**

- #### A Sales Return document that has been **Confirmed** and approved is the primary basis for creating a **Credit Note** in the Accounts Receivable Module to reduce the customer's bill.
- #### This return process will also trigger the process of adding sellable returned goods back into the warehouse inventory.

### **Tips &amp; Important Notes**

- #### Always link a return with the original **INVOICE Number** to ensure accurate history tracking and calculation of the credit value.
- #### Use the **Notes** column to record the reason for the goods return as material for evaluating product quality or delivery services.

# Sales Return Inbox

### **Module Guide: Sales Return Inbox**

#### **Module Location**

#### Sales &gt; Sales Return &gt; Sales Return Inbox

#### **Module Objective**

#### The **Sales Return Inbox** module serves as the approval center for all **Sales Return** documents that have been created and submitted. This module is used by a superior or manager who is authorized to conduct a review and provide approval before the return process can proceed to the next stage, such as the creation of a Credit Note.

### **1. Main View (Return List)**

#### The main page of this module is an "inbox" that displays all Sales Return documents requiring your action.

![image.png](https://manual.kokola.co/uploads/images/gallery/2025-08/scaled-1680-/bkoimage.png)

#### **View Explanation &amp; Filters**

#### This page provides a summary of all returns that are awaiting approval.

- #### **Filters**: You can search for a specific return by **Sales Return Number**, **Item Category**, or a **Date From** and **Date To** range.
- #### **Request List**: The table below will display all returns awaiting action. The table currently shows "...No Record Found...".

#### **Column Explanation**

- #### **Sales Return Number**: The unique number of the submitted Sales Return document.
- #### **Customer**: The name of the customer making the return.
- #### **Sales Return Date**: The date the return document was created.
- #### **Sales Return Status / Approval**: Icons that indicate the document's status and the approval process status.

#### **Button Functions**

- #### **Approve**: The main action button to approve one or more selected sales returns.

### **2. Approval Process Steps**

#### The following is the standard workflow for an approver.

#### **Step 1: Access the Inbox**

#### Open the **Sales Return Inbox** module to see the list of returns that require approval.

#### **Step 2: Review the Return Details**

#### Click on one of the rows in the table to open its detail view. In the detail view, you can check all the information that has been input, such as the details of the returned products, the quantity, and the reason for the return.

#### **Step 3: Provide Approval**

#### After you have reviewed and are certain about the submitted return data:

1. #### Return to the main **Inbox** page.
2. #### Check the box in the leftmost column for one or more return rows you wish to approve.
3. #### Click the **Approve** button located in the bottom-left section of the page to process the approval. ![image.png](https://manual.kokola.co/uploads/images/gallery/2025-08/scaled-1680-/O3Mimage.png)

### **3. Workflow &amp; Integrated Business Process**

1. #### **Submission**: A user (e.g., a sales admin) creates a document in the **Sales Return** module and clicks **Confirm**.
2. #### **Entering the Queue**: The confirmed return automatically enters the queue in this **Sales Return Inbox** module.
3. #### **Review &amp; Approval**: A manager or approver opens this module, reviews, and provides approval.
4. #### **Further Processing**: After approval, the return document becomes the valid basis for the **Accounting team to issue a Credit Note** and for the **Warehouse team to officially readjust the inventory stock**.

# Comission

### **Module Guide: Commission**

#### **Module Location**

#### Sales &gt; Commission &gt; Commission

#### **Module Objective**

#### The **Commission** module is used to calculate, manage, and track sales commission payments to the sales team. This process is typically based on invoices that have been fully paid by customers, to ensure that commission is given for sales that have been successfully collected.

### **1. Main View (Commission List)**

#### The main page of this module displays a list of all commission calculation documents that have been created.

![image.png](https://manual.kokola.co/uploads/images/gallery/2025-08/scaled-1680-/UGTimage.png)

#### **View Explanation &amp; Filters**

#### This page is for viewing and managing all commission documents.

- #### **Filters**: You can search for a specific commission document by **Commission Number** or a date range (**Date From / Date To**).
- #### **Commission List**: The table below will display all commission documents that match the filters, with columns such as **Commission Number**, **Commission Date**, **Commission Value**, **Payment Status**, and **Sales Person**.

#### **Button Functions**

- #### **New**: The primary button to create a new commission calculation.
- #### **Print**: To print the details of a selected commission document.
- #### **Export To Excel**: To download the commission list into an Excel format.

### **2. Steps to Calculate Commission**

#### **Step 1: Create a New Commission Document**

#### From the Main View, click the **New** button to open the **New Commission** form.   
![image.png](https://manual.kokola.co/uploads/images/gallery/2025-08/scaled-1680-/BUyimage.png)

#### **Step 2: Fill in Basic Information**

#### On the form that appears, fill in the general information:

- #### **Sales Person**: Select the salesperson whose commission will be calculated from the dropdown. ![image.png](https://manual.kokola.co/uploads/images/gallery/2025-08/scaled-1680-/MVAimage.png)
- #### **Tax Code**: Select the appropriate tax code (e.g., PPH23) for the tax withholding on the commission to be paid. ![image.png](https://manual.kokola.co/uploads/images/gallery/2025-08/scaled-1680-/vqdimage.png)
- #### **Commission Date**: Enter the date of the commission calculation.  
    ![image.png](https://manual.kokola.co/uploads/images/gallery/2025-08/scaled-1680-/EU6image.png)
- #### **Remarks**: Provide notes if needed (e.g., "Sales Commission for July 2025").   
    ![image.png](https://manual.kokola.co/uploads/images/gallery/2025-08/scaled-1680-/3LKimage.png)

#### **Step 3: Select the Paid Invoices**

1. #### Click the **\[+\] Multiple Invoice \[-\]** link to open a list of paid invoices under that salesperson.
2. #### Select one or more invoices to be included in the commission calculation. The selected invoices will appear in the detail table.

#### **Step 4: Calculate the Commission**

#### In the detail table that has been populated with invoice data:

1. #### The system will display the **Paid Invoice Amount (exclude PPN)**.
2. #### Enter the commission percentage in the **Percentage** column.   
    ![image.png](https://manual.kokola.co/uploads/images/gallery/2025-08/scaled-1680-/RjEimage.png)
3. #### The system will automatically calculate the **Sales Commission** value. Do this for each invoice row.
4. #### The **Grand Total** value in the bottom-right corner will sum up the total commission to be paid.

#### **Step 5: Save and Confirm**

#### After all calculations are complete, use the buttons in the bottom-left section:

- #### **Save**: To save the calculation as a draft. ![image.png](https://manual.kokola.co/uploads/images/gallery/2025-08/scaled-1680-/Dw4image.png)
- #### **Confirm**: To finalize the commission calculation and send it into the approval workflow. ![image.png](https://manual.kokola.co/uploads/images/gallery/2025-08/scaled-1680-/qZCimage.png)
- #### **Cancel**: To cancel the entry. ![image.png](https://manual.kokola.co/uploads/images/gallery/2025-08/scaled-1680-/OgMimage.png)

### **Tips &amp; Important Notes**

- #### This module ensures **transparent and data-driven** commission calculations, based on invoices that have actually been paid.
- #### Ensure you select the correct **Tax Code**, as this will affect the income tax calculation on the commission paid to the salesperson.
- #### A commission document that has been **Confirmed** will likely go to a **Commission Inbox** to be approved by a manager before being processed for payment by the Finance team.

# Comission Inbox

### **Module Guide: Commission Inbox**

#### **Module Location**

#### Sales &gt; Commission &gt; Commission Inbox

#### **Module Objective**

#### The **Commission Inbox** module serves as the approval center for all commission calculation documents that have been created and submitted. This module is used by a manager or an authorized leader to conduct a final review and provide approval before the commission can be processed further for payment.

### **1. Main View (Commission List)**

#### The main page of this module is an "inbox" that displays all commission documents requiring your action.

![image.png](https://manual.kokola.co/uploads/images/gallery/2025-08/scaled-1680-/7cJimage.png)

#### **View Explanation &amp; Filters**

#### This page provides a summary of all commission calculations that are awaiting approval.

- #### **Filters**: You can search for a specific commission document by **Commission Number** or a date range (**Date From / Date To**).
- #### **Request List**: The table below will display all commission documents awaiting action. The table currently shows "...No Record...".

#### **Column Explanation**

- #### **Commission Number**: The unique number of the submitted commission calculation document.
- #### **Commission Date**: The date the commission document was created.
- #### **Commission Status / Approval**: Icons that indicate the document's status and the approval process status.
- #### **Payment Status**: Shows the payment status of the commission.
- #### **Sales Person**: The name of the salesperson whose commission is being processed.

#### **Button Functions**

- #### **Approve**: The main action button to approve one or more selected commission calculations.

### **2. Approval Process Steps**

#### The following is the standard workflow for an approver.

#### **Step 1: Access the Inbox**

#### Open the **Commission Inbox** module to see the list of commission calculations that require approval.

#### **Step 2: Review the Commission Details**

#### Click on one of the rows in the table to open its detail view. In the detail view, you can check all the information that has been input, such as the details of the invoices used as the basis for the calculation and the percentage that was used.

#### **Step 3: Provide Approval**

#### After you have reviewed and are certain about the submitted commission calculation:

1. #### Return to the main **Inbox** page.
2. #### Check the box in the leftmost column for one or more commission rows you wish to approve.
3. #### Click the **Approve** button located in the bottom-left section of the page to process the approval. ![image.png](https://manual.kokola.co/uploads/images/gallery/2025-08/scaled-1680-/CfXimage.png)

### **3. Workflow &amp; Integrated Business Process**

1. #### **Submission**: A user (e.g., a sales admin) creates a calculation in the **Commission** module and clicks **Confirm**.
2. #### **Entering the Queue**: The confirmed commission calculation automatically enters the queue in this **Commission Inbox** module.
3. #### **Review &amp; Approval**: A manager or approver opens this module, reviews, and provides approval.
4. #### **Payment Process**: After approval, the commission document becomes the valid basis for the **Finance team to process the commission payment** to the salesperson. The status in the **Payment Status** column will be updated after the payment is made.

# Consignment Sales Order

### **Module Guide: Consignment Sales Order**

#### **Module Location**

#### Sales &gt; Consignment Sales &gt; Consignment Sales Order

#### **Module Objective**

#### The **Consignment Sales Order** module is used to create a command document for shipping goods on a consignment basis (placed for sale) to a customer. This document is **not a sales transaction** and does not create revenue or receivables. Its purpose is to record and authorize the movement of company-owned stock to a customer's location to be sold there.

### **1. Main View (Consignment Order List)**

#### The main page of this module displays a list of all Consignment Sales Orders that have been created.

![image.png](https://manual.kokola.co/uploads/images/gallery/2025-08/scaled-1680-/34gimage.png)

#### **View Explanation &amp; Filters**

#### This page is for viewing and managing all consignment shipment commands.

<div _ngcontent-ng-c3911098579="" class="conversation-container message-actions-hover-boundary ng-star-inserted" id="bkmrk-filters%3A-you-can-sea"><div _ngcontent-ng-c3335264474=""><div _ngcontent-ng-c585103654="" class="response-container ng-tns-c585103654-149 response-container-with-gpi is-mobile ng-star-inserted response-container-has-multiple-responses" jslog="173900;track:impression,attention"><div _ngcontent-ng-c585103654="" class="presented-response-container ng-tns-c585103654-149"><div _ngcontent-ng-c585103654="" class="response-container-content ng-tns-c585103654-149 is-mobile has-thoughts"><div _ngcontent-ng-c3335264474="" class="response-content ng-tns-c585103654-149"><div _ngcontent-ng-c1770593558="" class="markdown markdown-main-panel stronger enable-updated-hr-color" dir="ltr">- #### **Filters**: You can search for a specific order by **Sales Order Number**, **Item Category**, **Is Active**, or a date range.
- #### **Order List**: The table below will display all orders that match the filters, with columns such as **Sales Order Number**, **Customer**, **SO Date**, and **Sales Order Status**.

</div></div></div></div></div></div></div>#### **Button Functions**

<div _ngcontent-ng-c3911098579="" class="conversation-container message-actions-hover-boundary ng-star-inserted" id="bkmrk-new%3A-the-primary-but"><div _ngcontent-ng-c3335264474=""><div _ngcontent-ng-c585103654="" class="response-container ng-tns-c585103654-149 response-container-with-gpi is-mobile ng-star-inserted response-container-has-multiple-responses" jslog="173900;track:impression,attention"><div _ngcontent-ng-c585103654="" class="presented-response-container ng-tns-c585103654-149"><div _ngcontent-ng-c585103654="" class="response-container-content ng-tns-c585103654-149 is-mobile has-thoughts"><div _ngcontent-ng-c3335264474="" class="response-content ng-tns-c585103654-149"><div _ngcontent-ng-c1770593558="" class="markdown markdown-main-panel stronger enable-updated-hr-color" dir="ltr">- #### **New**: The primary button to create a new Consignment Sales Order.
- #### **Print**: To print the details of a selected order.
- #### **Change Status**: To change the status of a selected order.

</div></div></div></div></div></div></div>### **2. Steps to Create a Consignment Sales Order**

#### **Step 1: Create a New Order**

#### From the Main View, click the **New** button to open the **New Consignment Sales Order** form. ![image.png](https://manual.kokola.co/uploads/images/gallery/2025-08/scaled-1680-/LRDimage.png)

#### **Step 2: Fill in Header Information**

#### On the form that appears, fill in the general shipping information:

<div _ngcontent-ng-c3911098579="" class="conversation-container message-actions-hover-boundary ng-star-inserted" id="bkmrk-so-date-%26-estimated-"><div _ngcontent-ng-c3335264474=""><div _ngcontent-ng-c585103654="" class="response-container ng-tns-c585103654-149 response-container-with-gpi is-mobile ng-star-inserted response-container-has-multiple-responses" jslog="173900;track:impression,attention"><div _ngcontent-ng-c585103654="" class="presented-response-container ng-tns-c585103654-149"><div _ngcontent-ng-c585103654="" class="response-container-content ng-tns-c585103654-149 is-mobile has-thoughts"><div _ngcontent-ng-c3335264474="" class="response-content ng-tns-c585103654-149"><div _ngcontent-ng-c1770593558="" class="markdown markdown-main-panel stronger enable-updated-hr-color" dir="ltr">- #### **SO Date &amp; Estimated Date**: Enter the date the order is created and the estimated shipping date.   
    ![image.png](https://manual.kokola.co/uploads/images/gallery/2025-08/scaled-1680-/XU6image.png)
- #### **Customer**: Select the customer (consignee) who will receive the consigned goods. ![image.png](https://manual.kokola.co/uploads/images/gallery/2025-08/scaled-1680-/JdLimage.png)

</div></div></div></div></div></div></div>#### **Step 3: Detail the Consignment Items**

<div _ngcontent-ng-c3911098579="" class="conversation-container message-actions-hover-boundary ng-star-inserted" id="bkmrk-click-the-%5B%2B%5D-multip"><div _ngcontent-ng-c3335264474=""><div _ngcontent-ng-c585103654="" class="response-container ng-tns-c585103654-149 response-container-with-gpi is-mobile ng-star-inserted response-container-has-multiple-responses" jslog="173900;track:impression,attention"><div _ngcontent-ng-c585103654="" class="presented-response-container ng-tns-c585103654-149"><div _ngcontent-ng-c585103654="" class="response-container-content ng-tns-c585103654-149 is-mobile has-thoughts"><div _ngcontent-ng-c3335264474="" class="response-content ng-tns-c585103654-149"><div _ngcontent-ng-c1770593558="" class="markdown markdown-main-panel stronger enable-updated-hr-color" dir="ltr">1. #### Click the **\[+\] Multiple Item \[-\]** link to add an item row. ![image.png](https://manual.kokola.co/uploads/images/gallery/2025-08/scaled-1680-/ZhGimage.png)
2. #### Select the product from the **List of Item** that appears.
3. #### Return to the main form and fill in the **Qty** (quantity) column for each item that will be shipped on consignment.
4. #### Note that on this form there is **no price information**, as this is not a sales transaction.

</div></div></div></div></div></div></div>#### **Step 4: Save and Confirm**

#### After all data is filled in, use the buttons in the bottom-left section:

<div _ngcontent-ng-c3911098579="" class="conversation-container message-actions-hover-boundary ng-star-inserted" id="bkmrk-save%3A-to-save-the-do"><div _ngcontent-ng-c3335264474=""><div _ngcontent-ng-c585103654="" class="response-container ng-tns-c585103654-149 response-container-with-gpi is-mobile ng-star-inserted response-container-has-multiple-responses" jslog="173900;track:impression,attention"><div _ngcontent-ng-c585103654="" class="presented-response-container ng-tns-c585103654-149"><div _ngcontent-ng-c585103654="" class="response-container-content ng-tns-c585103654-149 is-mobile has-thoughts"><div _ngcontent-ng-c3335264474="" class="response-content ng-tns-c585103654-149"><div _ngcontent-ng-c1770593558="" class="markdown markdown-main-panel stronger enable-updated-hr-color" dir="ltr">- #### **Save**: To save the document as a draft. ![image.png](https://manual.kokola.co/uploads/images/gallery/2025-08/scaled-1680-/mulimage.png)
- #### **Confirm**: To finalize the document and send it to the next workflow (e.g., approval or directly to the warehouse). ![image.png](https://manual.kokola.co/uploads/images/gallery/2025-08/scaled-1680-/8t8image.png)
- #### **Cancel**: To cancel the entry. ![image.png](https://manual.kokola.co/uploads/images/gallery/2025-08/scaled-1680-/1Ueimage.png)

</div></div></div></div></div></div></div>### **Tips &amp; Important Notes**

<div _ngcontent-ng-c3911098579="" class="conversation-container message-actions-hover-boundary ng-star-inserted" id="bkmrk-a-consignment-sales-"><div _ngcontent-ng-c3335264474=""><div _ngcontent-ng-c585103654="" class="response-container ng-tns-c585103654-149 response-container-with-gpi is-mobile ng-star-inserted response-container-has-multiple-responses" jslog="173900;track:impression,attention"><div _ngcontent-ng-c585103654="" class="presented-response-container ng-tns-c585103654-149"><div _ngcontent-ng-c585103654="" class="response-container-content ng-tns-c585103654-149 is-mobile has-thoughts"><div _ngcontent-ng-c3335264474="" class="response-content ng-tns-c585103654-149"><div _ngcontent-ng-c1770593558="" class="markdown markdown-main-panel stronger enable-updated-hr-color" dir="ltr" id="bkmrk-a-consignment-sales--1">- #### A **Consignment Sales Order does not create receivables or revenue**. Its purpose is purely to record the movement of stock to a customer's location.
- #### This document will become the basis for the warehouse department to ship the consigned goods to the customer.
- #### The actual sale and the billing process will be recorded in a subsequent module (for example, a **Consignment Sales Report**) after the customer reports that they have successfully sold the goods.

</div><div _ngcontent-ng-c3335264474="" class="response-footer is-mobile gap has-thoughts complete"></div></div></div></div><div _ngcontent-ng-c585103654="" class="response-container-footer ng-tns-c585103654-149"><div _ngcontent-ng-c664847832="" class="actions-container-v2 ng-tns-c664847832-153 mobile"></div></div></div></div></div>

# Consignment Sales Order Inbox

### **Module Guide: Consignment Sales Order Inbox**

#### **Module Location**

#### Sales &gt; Consignment Sales &gt; Consignment Sales Order &gt; Consignment Sales Order Inbox

#### **Module Objective**

#### The **Consignment Sales Order Inbox** module serves as the approval center for all **Consignment Sales Order** documents that have been submitted. This module is used by a manager or an authorized leader to conduct a review and provide approval before consigned goods are shipped to the customer.

### **1. Main View (Order List)**

#### The main page of this module is an "inbox" that displays all consignment orders requiring your action.

![image.png](https://manual.kokola.co/uploads/images/gallery/2025-08/scaled-1680-/3Grimage.png)

#### **View Explanation &amp; Filters**

#### This page provides a summary of all consignment orders that are awaiting approval.

- #### **Filters**: You can search for a specific order by **Sales Order Number**, **Item Category**, or a date range (**Date From / Date To**).
- #### **Request List**: The table below will display all orders awaiting action. The table currently shows "...No Record...".

#### **Column Explanation**

- #### **Sales Order Number**: The unique number of the submitted Consignment Sales Order document.
- #### **Customer**: The name of the customer who will receive the consigned goods.
- #### **SO Date**: The date the order was created.
- #### **Sales Order Status / Approval**: Icons that indicate the document's status and the approval process status.

#### **Button Functions**

- #### **Approve**: The main action button to approve one or more selected consignment orders.

### **2. Approval Process Steps**

#### The following is the standard workflow for an approver.

#### **Step 1: Access the Inbox**

#### Open the **Consignment Sales Order Inbox** module to see the list of orders that require approval.

#### **Step 2: Review the Order Details**

#### Click on one of the rows in the table to open its detail view. In the detail view, you can check all the information that has been input, such as the product details and quantities to be shipped.

#### **Step 3: Provide Approval**

#### After you have reviewed and are certain about the submitted order:

1. #### Return to the main **Inbox** page.
2. #### Check the box in the leftmost column for one or more order rows you wish to approve.
3. #### Click the **Approve** button located in the bottom-left section of the page to process the approval. ![image.png](https://manual.kokola.co/uploads/images/gallery/2025-08/scaled-1680-/K7uimage.png)

### **3. Workflow &amp; Integrated Business Process**

1. #### **Submission**: A user creates a document in the **Consignment Sales Order** module and clicks **Confirm**.
2. #### **Entering the Queue**: The confirmed order automatically enters the queue in this **Consignment Sales Order Inbox** module.
3. #### **Review &amp; Approval**: A manager or approver opens this module, reviews, and provides approval.
4. #### **Warehouse Process**: After approval, the Consignment Sales Order becomes the official instruction for the **Warehouse Department** to begin the process of preparing and shipping the consigned goods.

# Consignment Item Transfer

### **Module Guide: Consignment Item Transfer**

#### **Module Location**

#### Sales &gt; Consignment Sales &gt; Consignment Item Transfer

#### **Module Objective**

#### The **Consignment Item Transfer** module is used to record and manage the movement or transfer of consignment stock that is already at a customer's location. It is used for transactions such as moving goods from one customer branch to another, or for the process of returning unsold consignment goods from the customer back to the company's warehouse.

### **1. Main View (Transfer List)**

#### The main page of this module displays a list of all consignment item transfer documents that have been created.

![image.png](https://manual.kokola.co/uploads/images/gallery/2025-08/scaled-1680-/h4iimage.png)

#### **View Explanation &amp; Filters**

#### This page is for viewing and managing all consignment item transfer transactions.

- #### **Filters**: You can search for a specific document by **Document Number**, **Transfer Type**, **Item Category**, or a date range (**Date From / Date To**).
- #### **Transfer List**: The table below will display all transfer documents that match the filters, with columns such as **Document Number**, **Request Date**, **Source**, **Destination**, and **Status**.

#### **Button Functions**

- #### **New**: The primary button to create a new transfer document.
- #### **Delete**: To delete a selected document.
- #### **Print**: To print the details of a transfer document.

### **2. Steps to Create a Transfer Document**

#### **Step 1: Create a New Document**

#### From the Main View, click the **New** button to open the **New Document** form.   
![image.png](https://manual.kokola.co/uploads/images/gallery/2025-08/scaled-1680-/ru4image.png)

#### **Step 2: Fill in Transfer Information**

#### On the form that appears, fill in the general transfer information:

- #### **Consignment Sales**: Select the original Consignment Sales Order reference that is related to the stock being moved. ![image.png](https://manual.kokola.co/uploads/images/gallery/2025-08/scaled-1680-/VNDimage.png)
- #### **Transfer From / Transfer To**: Define the source location (**Transfer From**) and the destination location (**Transfer To**) of the goods being moved.   
    ![image.png](https://manual.kokola.co/uploads/images/gallery/2025-08/scaled-1680-/3w7image.png)
- #### **Transfer Date**: Enter the date the item transfer is performed.   
    ![image.png](https://manual.kokola.co/uploads/images/gallery/2025-08/scaled-1680-/a98image.png)

#### **Step 3: Detail the Items being Transferred**

#### In the detail table at the bottom, the system will display the items available at the source location.

- #### Fill in the **Transfer Quantity** column with the number of goods to be moved for each item.

#### **Step 4: Save and Confirm**

#### After all data is filled in, use the buttons in the bottom-left section:

- #### **Save**: To save the transfer document as a draft. ![image.png](https://manual.kokola.co/uploads/images/gallery/2025-08/scaled-1680-/YvRimage.png)
- #### **Confirm**: To finalize the document. ![image.png](https://manual.kokola.co/uploads/images/gallery/2025-08/scaled-1680-/5AZimage.png)
- #### **Cancel**: To cancel the entry. ![image.png](https://manual.kokola.co/uploads/images/gallery/2025-08/scaled-1680-/qhTimage.png)

### **Tips &amp; Important Notes**

- #### This module is used to manage the movement of consignment stock that is already **outside of the company's main warehouse**.
- #### Ensure the **Transfer From** and **Transfer To** locations are correct to maintain the accuracy of your consignment stock location data.
- #### A document that has been **Confirmed** will become the basis for adjusting the inventory records regarding the location of your consigned goods.

# Consignment Item Transfer Inbox

### **Module Guide: Consignment Item Transfer Inbox**

#### **Module Location**

#### Sales &gt; Consignment Sales &gt; Consignment Item Transfer &gt; Consignment Item Transfer Inbox

#### **Module Objective**

#### The **Consignment Item Transfer Inbox** module serves as the approval center for all **Consignment Item Transfer** documents that have been submitted. This module is used by a superior or manager to conduct a review and provide approval before the consignment stock transfer is officially recorded in the system.

### **1. Main View (Transfer Request List)**

#### The main page of this module is an "inbox" that displays all transfer documents requiring your action.

![image.png](https://manual.kokola.co/uploads/images/gallery/2025-08/scaled-1680-/tAzimage.png)

#### **View Explanation &amp; Filters**

#### This page provides a summary of all consignment item transfers that are awaiting approval.

- #### **Filters**: You can search for a specific document by **Document Number**, **Transfer Type**, or a date range (**Date From / Date To**).
- #### **Request List**: The table below will display all documents awaiting action. The table currently shows "...No Record...".

#### **Column Explanation**

- #### **Document Number**: The unique number of the submitted transfer document.
- #### **Transfer Date**: The date the item transfer was proposed.
- #### **Source / Destination**: Shows the source and destination locations of the transfer.
- #### **Status / Approval**: Icons that indicate the document's status and the approval process status.

#### **Button Functions**

- #### **Mass Approve**: The main action button to approve one or more selected transfer documents simultaneously.

### **2. Approval Process Steps**

#### The following is the standard workflow for an approver.

#### **Step 1: Access the Inbox**

#### Open the **Consignment Item Transfer Inbox** module to see the list of transfer documents that require approval.

#### **Step 2: Review the Transfer Details**

#### Click on one of the rows in the table to open its detail view. In the detail view, you can check all the information that has been input, such as the product details, quantity, as well as the source and destination locations.

#### **Step 3: Provide Approval**

#### After you have reviewed and are certain about the submitted transfer data:

1. #### Return to the main **Inbox** page.
2. #### Check the box in the leftmost column for one or more rows you wish to approve.
3. #### Click the **Mass Approve** button located in the bottom-left section of the page to process the approval. ![image.png](https://manual.kokola.co/uploads/images/gallery/2025-08/scaled-1680-/op4image.png)

### **3. Workflow &amp; Integrated Business Process**

1. #### **Submission**: A user creates a document in the **Consignment Item Transfer** module and clicks **Confirm**.
2. #### **Entering the Queue**: The confirmed document automatically enters the queue in this **Consignment Item Transfer Inbox** module.
3. #### **Review &amp; Approval**: A manager or approver opens this module, reviews, and provides approval.
4. #### **Inventory Update**: After approval, the item transfer becomes official, and the system will update the inventory records to reflect the new location of the consignment stock.

# Consignment Report Entry

### **Module Guide: Consignment Sales Report Entry**

#### **Module Location**

#### Sales &gt; Consignment Sales &gt; Consignment Sales Report Entry

#### **Module Objective**

#### The **Consignment Sales Report Entry** module is the transaction module where you record the sales reports received from consignment partners (customers). This process is the point at which the consigned goods are officially recognized as an actual sale. The data input here will change the status of the consignment stock to a sale and become the basis for creating a billing invoice for the consignment partner.

### **1. Main View (Report List)**

#### The main page of this module displays a list of all Consignment Sales Reports that have been input.

![image.png](https://manual.kokola.co/uploads/images/gallery/2025-08/scaled-1680-/zwdimage.png)

#### **View Explanation &amp; Filters**

#### This page is for viewing and managing all incoming sales reports from consignment partners.

- #### **Filters**: You can search for a specific report by **Document Number**, **Item Category**, or a date range (**Date From / Date To**).
- #### **Report List**: The table below will display all reports that match the filters, with columns such as **Document Number**, **Document Date**, **Customer**, and **Status**.

#### **Button Functions**

- #### **New**: The primary button to input a new consignment sales report.
- #### **Print**: To print the details of a selected report.
- #### **Upload Transaction**: Likely functions to import sales report data from an external file (e.g., Excel) to speed up the input process.

### **2. Steps to Input a Sales Report**

#### **Step 1: Create a New Report**

#### From the Main View, click the **New** button to open the **Add Consignment Report Entry** form. ![image.png](https://manual.kokola.co/uploads/images/gallery/2025-08/scaled-1680-/wNmimage.png)

#### **Step 2: Fill in Header Information**

#### On the form that appears, fill in the general report information:

- #### **CRE Date &amp; Due Date**: Enter the report date and the payment due date. ![image.png](https://manual.kokola.co/uploads/images/gallery/2025-08/scaled-1680-/zjZimage.png)
- #### **Customer**: Select the customer (consignment partner) who sent the sales report. ![image.png](https://manual.kokola.co/uploads/images/gallery/2025-08/scaled-1680-/oMZimage.png)
- #### **Payment Terms, etc.**: Complete the payment terms and other relevant information. ![image.png](https://manual.kokola.co/uploads/images/gallery/2025-08/scaled-1680-/enbimage.png)

#### **Step 3: Detail the Sold Items**

#### In the detail table in the middle section:

1. #### Click **\[+\] Multiple Item \[-\]** to add a row. ![image.png](https://manual.kokola.co/uploads/images/gallery/2025-08/scaled-1680-/NfBimage.png)
2. #### Enter the **Item Code** of the product that was reported as sold.
3. #### The **Available Qty On Outlet** column will show the remaining consignment stock at the customer's location as a reference.
4. #### Fill in the **Qty** column with the quantity sold according to the customer's report.
5. #### The system will fill in the **Unit Price** according to the agreement and calculate the total in the **Amount (IDR)** column.

#### **Step 4: Set Up Payment Terms**

#### In the **Term Of Payment** section, you can set up the payment schedule for the invoice that will be created based on this report.

#### **Step 5: Save and Confirm**

#### After all data is filled in, use the buttons in the bottom-left section:

- #### **Save**: To save the report as a draft. ![image.png](https://manual.kokola.co/uploads/images/gallery/2025-08/scaled-1680-/UkWimage.png)
- #### **Confirm**: To finalize the report. ![image.png](https://manual.kokola.co/uploads/images/gallery/2025-08/scaled-1680-/5MHimage.png)
- #### **Cancel**: To cancel the entry. ![image.png](https://manual.kokola.co/uploads/images/gallery/2025-08/scaled-1680-/Kg5image.png)

### **Workflow &amp; Integrated Business Process**

- #### This module is the crucial point at which **consignment stock is converted into an actual sale**.
- #### A report that has been **Confirmed** will become the basis for the creation of a **Consignment Sales Invoice**.
- #### This process will **reduce the consignment stock records and create a receivable** from the customer.

### **Tips &amp; Important Notes**

- #### Ensure the **Qty** you enter matches the sales report data sent by the consignment partner.
- #### The **Upload Transaction** button on the main page is very useful if the consignment partner sends their report in a file format like Excel, as it can speed up the data input process.

# Consignment Sales Invoice

### **Module Guide: Consignment Sales Invoice**

#### **Module Location**

#### Sales &gt; Consignment Sales &gt; Consignment Sales Invoice

#### **Module Objective**

#### The **Consignment Sales Invoice** module is the final stage of the consignment sales process. Its purpose is to create an official billing document or invoice for the customer (consignee) based on the sales report they have provided. The invoice created here will officially record revenue and generate a receivable in the general ledger.

### **1. Main View (Invoice List)**

#### The main page of this module displays a list of all Consignment Sales Invoices that have been issued.

![image.png](https://manual.kokola.co/uploads/images/gallery/2025-08/scaled-1680-/QW7image.png)

#### **View Explanation &amp; Filters**

#### This page is for viewing and managing all consignment sales invoices.

- #### **Filters**: You can search for a specific invoice by **Invoice Number**, **Item Category**, or a date range (**Date From / Date To**).
- #### **Invoice List**: The table below will display all invoices that match the filters, with columns such as **Invoice Number**, **Invoice Date**, **Due Date**, **Customer Name**, and **Payment Status**.

#### **Button Functions**

- #### **New**: The primary button to create a new Consignment Sales Invoice.
- #### **Print**: To print a selected invoice.

### **2. Steps to Create a Consignment Sales Invoice**

#### **Step 1: Create a New Invoice**

#### From the Main View, click the **New** button to open the **Add Consignment Sales Invoice** form. ![image.png](https://manual.kokola.co/uploads/images/gallery/2025-08/scaled-1680-/tgnimage.png)

#### **Step 2: Select the Sales Report (CRE)**

#### This is the most crucial step.

1. #### Select the **Customer** to be billed. ![image.png](https://manual.kokola.co/uploads/images/gallery/2025-08/scaled-1680-/3WYimage.png)
2. #### Select the **CRE Number** (Consignment Report Entry) from the dropdown. This is the reference number from the Consignment Sales Report Entry that you created previously. ![image.png](https://manual.kokola.co/uploads/images/gallery/2025-08/scaled-1680-/dtiimage.png)

#### **Step 3: Verify Invoice Details**

1. #### After the **CRE Number** is selected, the system will automatically pull all the item, quantity, and price details from that sales report document and populate them into the detail table at the bottom.
2. #### Double-check and ensure that important dates like the **Invoice Date** and **Due Date** are correct.

#### **Step 4: Save and Confirm**

#### After all data has been verified, use the buttons in the bottom-left section:

- #### **Save**: To save the invoice as a draft. ![image.png](https://manual.kokola.co/uploads/images/gallery/2025-08/scaled-1680-/QvXimage.png)
- #### **Cancel**: To cancel the entry. ![image.png](https://manual.kokola.co/uploads/images/gallery/2025-08/scaled-1680-/0cpimage.png)

### **Workflow &amp; Integrated Business Process**

- #### This module is the final step in the consignment sales workflow.
- #### This invoice is created based on data from the **Consignment Sales Report Entry** module.
- #### After this invoice is confirmed, the transaction will create a receivable that can be viewed and managed in the **Accounts Receivable Module**.

### **Tips &amp; Important Notes**

- #### Ensure you select the correct **CRE Number** to guarantee the issued invoice matches the sales report sent by the consignment partner.
- #### The invoice created here is the **official billing document** and will become the basis for the AR (Account Receivable) team to carry out the collections process.

# Distributor Sales Forecast

### **Sales Forecasting Process**

#### This section covers the modules used to manage sales forecast data, which is a critical input for production and inventory planning.

### **Module Guide: Distributor Sales Forecast**

#### **Module Location**

#### Sales &gt; Sales Forecasting &gt; Distributor Sales Forecast

#### **Module Objective**

#### The **Distributor Sales Forecast** module serves as a tool to view, search for, and review sales forecast data that has been uploaded into the system. This module is **read-only** or for displaying data only, not for manually inputting new forecasts.

![image.png](https://manual.kokola.co/uploads/images/gallery/2025-08/scaled-1680-/dqpimage.png)

### **1. Main View (Forecast List)**

#### The main page of this module displays a list of forecasts that have been uploaded, which can be filtered by distributor and period.

#### **View Explanation &amp; Filters**

#### This page is for searching for and viewing existing forecast data.

- #### **Filters**:
    
    
    - #### **Distributor**: Use the dropdown and text field to search for and select a specific distributor.
    - #### **Period**: Select the month and year, then click **Search** to display the forecast for that period.
- #### **Forecast List**: The table below will display all forecast data that matches the filters, with columns for **Period**, **Distributor**, and **Qty** (Quantity).

### **2. Workflow &amp; Integrated Business Process**

- #### **Data Source**: Sales forecast data is **not** input manually in this module. The forecast data from the distributor is usually received in a file format (e.g., Excel), then uploaded into the system via another related module, **Upload Data Forecast**.
- #### **Module Function**: This module is then used to view, search for, and verify the forecast data that has been successfully uploaded.

### **Tips &amp; Important Notes**

- #### Use this module to review the forecast sent by distributors. This data is a very important input for the **Production Planning (PPIC)** team to plan the production schedule.
- #### Ensure you select the correct **Distributor** and **Period** to see the relevant data.
- #### If the data you are looking for is not found, it is likely that the forecast file from that distributor has not yet been uploaded into the system.

# Sales Forecast

### **Report Module Guide: Sales Forecast**

#### **Module Location**

#### Sales &gt; Sales Forecasting &gt; Sales Forecast

#### **Module Objective**

#### The **Sales Forecast** report module is used to display and export the company's overall sales forecast report in a highly detailed matrix format. This report presents **daily sales forecast data** for each product item and is a crucial input for production planning and raw material purchasing.

### **1. Main View (Forecast Period List)**

#### The main page of this module displays a list of forecast periods for which data is already available in the system.

![image.png](https://manual.kokola.co/uploads/images/gallery/2025-08/scaled-1680-/cDlimage.png)

#### **View Explanation**

#### This page is the starting point for accessing the detailed forecast report.

- #### **Filter**: You can search for a specific forecast period using the **Transaction ID** filter.
- #### **Period List**: The table below displays all available forecast periods, based on **Month** and **Year**.

#### **Action Column**

#### The **Action** column on the right is the key to viewing the report. There are two icons:

- #### **Eye Icon (View)**: Click this icon to see the detailed Sales Forecast Report directly on your screen.
- #### **Excel Icon (Export)**: Click this icon to download the detailed report in an Excel file format.

### **2. Steps to View the Report**

#### **Step 1: Select a Period**

#### In the Main View, find and locate the period (**Month** and **Year**) whose data you wish to see.

#### **Step 2: Display or Export the Report**

#### In the row for your selected period, click one of the icons in the **Action** column:

- #### Click the **eye icon** to display the report on the screen. ![image.png](https://manual.kokola.co/uploads/images/gallery/2025-08/scaled-1680-/4ctimage.png)
- #### Click the **Excel icon** to download the report. ![image.png](https://manual.kokola.co/uploads/images/gallery/2025-08/scaled-1680-/hnGimage.png)

### **Example of the Sales Forecast Report View**

#### After you click, the system will generate a detailed report in a matrix format as follows:

![image.png](https://manual.kokola.co/uploads/images/gallery/2025-08/scaled-1680-/8pEimage.png)

- #### **Rows**: Show the **Item Code** and **Item Name**, grouped by product category (e.g., KOKIS, CRACKERS, CREAM).
- #### **Columns**: Show the **Dates** of the month, from the 1st to the 31st, with a **Total** column at the end.
- #### **Data Cells**: Each cell contains the forecast sales quantity for a specific item on a specific date.

### **Tips &amp; Important Notes**

- #### The forecast data displayed here is most likely input via a separate module such as **Upload Data Forecast**. This module is specifically for viewing the results.
- #### This report provides a very detailed view down to the **daily level**, which is very useful for the **PPIC (Production Planning and Inventory Control)** team for short-term production planning.
- #### Use the export to Excel feature to further process the forecast data if needed.

# Sales Forecast Inbox

### **Module Guide: Sales Forecast Inbox**

#### **Module Location**

#### Sales &gt; Sales Forecasting &gt; Sales Forecast Inbox

#### **Module Objective**

#### The **Sales Forecast Inbox** module serves as the approval center for all sales forecast data that has been uploaded to the system. This module is used by a manager or an authorized leader to conduct a review and provide final approval before the forecast data becomes the official benchmark for production planning and other operational activities.

### **1. Main View (Forecast List)**

#### The main page of this module is an "inbox" that displays all forecast documents requiring your action.

![image.png](https://manual.kokola.co/uploads/images/gallery/2025-08/scaled-1680-/qCbimage.png)

#### **View Explanation &amp; Filters**

#### This page provides a summary of all forecasts that are awaiting approval.

- #### **Filters**: You can search for a specific forecast by **Forecast Code** or a date range (**Date From / Date To**).
- #### **Request List**: The table below will display all forecast documents awaiting action. The table currently shows "...No Record...".

#### **Column Explanation**

- #### **Forecast Code**: The unique code of the submitted forecast document.
- #### **FC Status / Approval**: Icons that indicate the document's status and the approval process status.
- #### **Month Period / Year Period**: Shows the month and year period of the forecast data.

#### **Button Functions**

- #### **Approve**: The main action button to approve one or more selected forecast documents.

### **2. Approval Process Steps**

#### The following is the standard workflow for an approver.

#### **Step 1: Access the Inbox**

#### Open the **Sales Forecast Inbox** module to see the list of forecasts that require approval.

#### **Step 2: Review the Forecast Details**

#### Click on one of the rows in the table to open its detail view. In the detail view (which will likely open the **Sales Forecast** report), you can check the forecast details per item and per day.

#### **Step 3: Provide Approval**

#### After you have reviewed and are certain about the submitted forecast data:

1. #### Return to the main **Inbox** page.
2. #### Check the box in the leftmost column for one or more forecast rows you wish to approve.
3. #### Click the **Approve** button located in the bottom-left section of the page to process the approval. ![image.png](https://manual.kokola.co/uploads/images/gallery/2025-08/scaled-1680-/JjVimage.png)

### **3. Workflow &amp; Integrated Business Process**

1. #### **Submission**: Forecast data is uploaded to the system via the **Upload Data Forecast** module.
2. #### **Entering the Queue**: The uploaded forecast automatically enters the queue in this **Sales Forecast Inbox** module.
3. #### **Review &amp; Approval**: A manager or approver opens this module, reviews, and provides approval.
4. #### **Data Activation**: After approval, the forecast data becomes official and can be used as a valid reference by the **PPIC (Production Planning and Inventory Control)** team for production planning and by the **Finance** team for financial projections.

# Item Category Sales Forecast

### **Module Guide: Sales Forecast Item Category**

#### **Module Location**

#### Sales &gt; Sales Forecasting &gt; Sales Forecast Item Category

#### **Module Objective**

#### The **Sales Forecast Item Category** module serves as a tool to manage the master data used for grouping products into various categories and sub-categories. This categorization aims to simplify the process of creating and analyzing sales forecast reports.

### **1. Main View (Category Structure)**

#### The main page of this module displays all the product categories and sub-categories that have been created in a hierarchical structure format.

![image.png](https://manual.kokola.co/uploads/images/gallery/2025-08/scaled-1680-/Apuimage.png)

#### **View Explanation**

- #### **Tree View**: This display shows the parent-child relationship between categories, such as **1. KUKIS** as the main category and **1.1. KUKIS 300g** as its sub-category.
- #### **Navigation**:
    
    
    - #### To add a new main category, click the **&lt;&lt;&lt; Add Category** link at the top.
    - #### To view or edit the contents of a category (for example, to see which products are in "KUKIS 300g"), click on the category name.

### **2. Category Detail Page**

#### After you click on one of the category names from the main page, you will be directed to a detail page that displays all the product items included in that category.

![image.png](https://manual.kokola.co/uploads/images/gallery/2025-08/scaled-1680-/NrOimage.png)

#### **View Explanation**

#### This page, for example for "KUKIS 300g", displays all product items such as "BK/Kukis Butter 300 gr", "BK/Kukis Coconut 300 gr", and others that are included in that category.

#### **Button Functions**

#### The buttons at the bottom of this page are the primary tools for managing the category's contents:

- #### **Add Subcategory**: To create a new sub-category under the category you are currently viewing. ![image.png](https://manual.kokola.co/uploads/images/gallery/2025-08/scaled-1680-/llFimage.png)
- #### **Delete Category**: To permanently delete this category. ![image.png](https://manual.kokola.co/uploads/images/gallery/2025-08/scaled-1680-/gowimage.png)
- #### **Add Item**: To add a new product to this category. This action will usually open a product search window. ![image.png](https://manual.kokola.co/uploads/images/gallery/2025-08/scaled-1680-/RQBimage.png)
- #### **Remove Item**: To remove a selected product (by checking the box on the left) from this category. ![image.png](https://manual.kokola.co/uploads/images/gallery/2025-08/scaled-1680-/7z2image.png)
- #### **Back**: To return to the Main View (Category Structure). ![image.png](https://manual.kokola.co/uploads/images/gallery/2025-08/scaled-1680-/bWuimage.png)

### **Tips &amp; Important Notes**

- #### The category structure you create here will become the basis for grouping items in the **Sales Forecast Report**.
- #### Ensure all products have been placed into their appropriate categories so that the forecast data becomes organized and easy to analyze.
- #### This is an important master data setup module and is typically managed by the **Sales Admin team** or the **master data team**.

# Upload Data Forecast

### **Module Guide: Upload Data Forecast**

#### **Module Location**

#### Sales &gt; Sales Forecasting &gt; Upload Data Forecast

#### **Module Objective**

#### The **Upload Data Forecast** module serves as a tool to upload or import sales forecast data in bulk into the system. This process uses a file in CSV (Comma-Separated Values) format, which allows for the efficient input of large amounts of data, especially for data that comes from external parties like distributors.

### **1. Main View and Parameters**

#### The main page of this module is a simple form for performing the file upload process.

![image.png](https://manual.kokola.co/uploads/images/gallery/2025-08/scaled-1680-/h4Limage.png)

#### Here is an explanation for each parameter:

<div _ngcontent-ng-c3911098579="" class="chat-history-scroll-container" id="bkmrk-customer%3A-select-the" style="text-align: justify;"><div _ngcontent-ng-c3911098579="" class="conversation-container message-actions-hover-boundary ng-star-inserted"><div _ngcontent-ng-c3335264474=""><div _ngcontent-ng-c585103654="" class="response-container ng-tns-c585103654-219 response-container-with-gpi is-mobile ng-star-inserted response-container-has-multiple-responses" jslog="173900;track:impression,attention"><div _ngcontent-ng-c585103654="" class="presented-response-container ng-tns-c585103654-219"><div _ngcontent-ng-c585103654="" class="response-container-content ng-tns-c585103654-219 is-mobile has-thoughts"><div _ngcontent-ng-c3335264474="" class="response-content ng-tns-c585103654-219"><div _ngcontent-ng-c1770593558="" class="markdown markdown-main-panel stronger enable-updated-hr-color" dir="ltr">- #### **Customer**:
    
    
    - #### Select the customer scope. The **All** option is likely used if your CSV file contains data from many customers.
- #### **File**:
    
    
    - #### Use the **Choose File** button to find and select the CSV file from your computer that contains the forecast data.

</div></div></div></div></div></div></div></div>#### **Upload File Format (Important!)**

#### To ensure the data can be uploaded successfully, your file **must** be in CSV format and have **4 columns** with the following exact order and names:

<div _ngcontent-ng-c3911098579="" class="chat-history-scroll-container" id="bkmrk-date-%28forecast-date%29" style="text-align: justify;"><div _ngcontent-ng-c3911098579="" class="conversation-container message-actions-hover-boundary ng-star-inserted"><div _ngcontent-ng-c3335264474=""><div _ngcontent-ng-c585103654="" class="response-container ng-tns-c585103654-219 response-container-with-gpi is-mobile ng-star-inserted response-container-has-multiple-responses" jslog="173900;track:impression,attention"><div _ngcontent-ng-c585103654="" class="presented-response-container ng-tns-c585103654-219"><div _ngcontent-ng-c585103654="" class="response-container-content ng-tns-c585103654-219 is-mobile has-thoughts"><div _ngcontent-ng-c3335264474="" class="response-content ng-tns-c585103654-219"><div _ngcontent-ng-c1770593558="" class="markdown markdown-main-panel stronger enable-updated-hr-color" dir="ltr">- #### **Date** (Forecast date)
- #### **CustomerID** (Customer Code)
- #### **itemcode** (Product Code)
- #### **qty** (Forecast quantity amount)

</div></div></div></div></div></div></div></div>### **2. Steps to Upload Forecast Data**

#### **Step 1: Prepare and Select the File**

#### Prepare your forecast data in a CSV file according to the instructions above. Then, on the module page, click the **Choose File** button to find and select that file from your computer.

![image.png](https://manual.kokola.co/uploads/images/gallery/2025-08/scaled-1680-/V1Eimage.png)

#### **Step 2: Start the Upload Process**

#### After the file is selected, click the **Upload Report** button in the bottom-left section to start the process of uploading the data into the system. ![image.png](https://manual.kokola.co/uploads/images/gallery/2025-08/scaled-1680-/9q6image.png)

#### **Step 3: Verification**

#### After the upload process is complete, you must verify that the data has been entered correctly. Open the **Sales Forecast** or **Distributor Sales Forecast** module to see the data you just uploaded.

### **Tips &amp; Important Notes**

<div _ngcontent-ng-c3911098579="" class="chat-history-scroll-container" id="bkmrk-upload-failures-are-"><div _ngcontent-ng-c3911098579="" class="conversation-container message-actions-hover-boundary ng-star-inserted" id="bkmrk-upload-failures-are--1"><div _ngcontent-ng-c3335264474=""><div _ngcontent-ng-c585103654="" class="response-container ng-tns-c585103654-219 response-container-with-gpi is-mobile ng-star-inserted response-container-has-multiple-responses" jslog="173900;track:impression,attention"><div _ngcontent-ng-c585103654="" class="presented-response-container ng-tns-c585103654-219"><div _ngcontent-ng-c585103654="" class="response-container-content ng-tns-c585103654-219 is-mobile has-thoughts"><div _ngcontent-ng-c3335264474="" class="response-content ng-tns-c585103654-219"><div _ngcontent-ng-c1770593558="" class="markdown markdown-main-panel stronger enable-updated-hr-color" dir="ltr" id="bkmrk-upload-failures-are--2">- #### Upload failures are most often caused by an **incorrect CSV file format**. Ensure the column names and their order are an exact match.
- #### Successfully uploaded data will likely go to the **Sales Forecast Inbox** first for an approval process before it becomes official forecast data.
- #### This module is very efficient for importing forecast data that is received routinely from external parties like distributors

</div><div _ngcontent-ng-c3335264474="" class="response-footer is-mobile gap has-thoughts complete"></div></div></div></div><div _ngcontent-ng-c585103654="" class="response-container-footer ng-tns-c585103654-219"><div _ngcontent-ng-c664847832="" class="actions-container-v2 ng-tns-c664847832-223 mobile"></div></div></div></div></div></div>

# Focus Item Sales Forecast

### **Module Guide: Sales Forecast Focus Item**

#### **Module Location**

#### Sales &gt; Sales Forecasting &gt; Sales Forecast Focus Item

#### **Module Objective**

#### The **Sales Forecast Focus Item** module is a tool to set up and manage which products are considered "focus items" in the sales forecasting process. This setup allows the company to give special attention to the planning of key products, including linking them to raw material requirements.

### **1. Main View (Category List)**

#### The main page of this module displays a list of product categories to facilitate the management of focus items.

![image.png](https://manual.kokola.co/uploads/images/gallery/2025-08/scaled-1680-/WiYimage.png)

#### **View Explanation**

- #### **Category List**: This page displays all main product categories such as CRACKERS, CREAM, KUKIS, and others.
- #### **Action Column**: To the right of each category name, there are action icons:
    
    
    - #### **Eye Icon (View)**: Click to see the list of items within that category.
    - #### **List Icon (Detail)**: Likely has the same function as the view icon or is for a report.

### **2. Category Detail Page**

#### After you click on one of the categories from the main page (e.g., CRACKERS), you will be directed to a detail page that displays all the product items included in that category.

![image.png](https://manual.kokola.co/uploads/images/gallery/2025-08/scaled-1680-/S3Eimage.png)

#### **View Explanation**

#### This page is where you manage the items within a category.

- #### **Item List**: This table displays all products in the selected category, along with their **Item Code** and **Item Name**.
- #### **RM Focus Column**: This column, along with the **Add item formula** button, most likely functions to mark a product as a "focus item" and link it to its formula or primary **Raw Material**.
- #### **Action Column**: Contains an icon to delete an item from the list.

#### **Button Functions**

- #### **Save Sort Order**: To save the display order of items after it has been changed. ![image.png](https://manual.kokola.co/uploads/images/gallery/2025-08/scaled-1680-/WV9image.png)
- #### **Add Other Item**: To add another product to this category list. ![image.png](https://manual.kokola.co/uploads/images/gallery/2025-08/scaled-1680-/N2Uimage.png)
- #### **Back**: To return to the Category List page. ![image.png](https://manual.kokola.co/uploads/images/gallery/2025-08/scaled-1680-/UrAimage.png)

### **Tips &amp; Important Notes**

- #### This module is used to highlight key products that require special attention in the planning process.
- #### By marking an item as a 'focus' and linking it to raw materials via the **RM Focus** feature, the **PPIC (Production Planning and Inventory Control)** team can be more proactive in planning material requirements based on the forecast for that finished good.
- #### This is an important master data setup and is typically managed by the **Sales Admin** or **PPIC** team.

# Sales Forecast

### **Report Module Guide: Sales Forecast**

#### **Module Location**

#### Sales &gt; Sales Forecasting &gt; Sales Forecast

#### **Module Objective**

#### The **Sales Forecast** report module is used to generate a highly detailed sales forecast report in a matrix format. This report presents daily sales forecast data for each product item and can be filtered by distributor and period, making it a critical input for production and inventory planning.

### **1. Report Parameters**

#### The main page of this module is a simple form containing several parameters to define the report that will be generated.

![image.png](https://manual.kokola.co/uploads/images/gallery/2025-08/scaled-1680-/2qLimage.png)

#### Here is an explanation for each parameter:

- #### **Distributor**:
    
    
    - #### Use this dropdown to select the report's scope, whether for **All** distributors or for a specific distributor.
- #### **Month/Year**:
    
    
    - #### Select the month and year of the forecast period you wish to view (e.g., 01 / 2017).

### **2. Steps to Generate the Report**

#### **Step 1: Set Report Parameters**

#### Define the **Distributor** and **Month/Year** parameters according to the data you wish to see.

#### **Step 2: Generate the Report**

#### After the parameters are set, click one of the two buttons at the bottom:

- #### **Display Report**: To preview the sales forecast report directly on your screen. ![image.png](https://manual.kokola.co/uploads/images/gallery/2025-08/scaled-1680-/lTeimage.png)
- #### **Export To MS Excel**: To download the report data in an Excel file format. 
    
    #### ![image.png](https://manual.kokola.co/uploads/images/gallery/2025-08/scaled-1680-/HHrimage.png)

### **3. Example of the Report View**

#### After you click, the system will generate a detailed report in a matrix format as follows:

![image.png](https://manual.kokola.co/uploads/images/gallery/2025-08/scaled-1680-/SlQimage.png)

- #### **Report Title**: SALES FORECAST REPORT.
- #### **Rows**: Show the **Item Code** and **Item Name**, grouped by product category (KUKIS, CRACKERS, CREAM, etc.).
- #### **Columns**: Show the **Dates** of the month, from the 1st to the 31st, with a **Total** column at the end.
- #### **Data Cells**: Each cell will contain the forecast sales quantity for a specific item on a specific date.

### **Tips &amp; Important Notes**

- #### This report provides a very detailed view down to the **daily level**, which is very useful for the **PPIC (Production Planning and Inventory Control)** team to plan the production schedule.
- #### To ensure the displayed data is accurate, make sure the forecast data from distributors has been uploaded via the **Upload Data Forecast** module before running this report.

# Transaction Journal

### **Report Module Guide: Transaction Journal**

#### **Module Location**

#### Sales &gt; Transaction Journal

#### **Module Objective**

#### The **Transaction Journal** module is a powerful and comprehensive reporting and drill-down center. Its purpose is to display all transaction details from every module in the ERP system in a single, integrated view. Although it is located within the Sales menu, this module has the ability to pull data from all areas, providing full visibility into the accounting impact of every transaction.

### **1. Main View (Transaction Report Center)**

#### The main page of this module is an interactive report equipped with various filtering tools to help you find specific data.

![Screenshot 2025-08-07 081737.png](https://manual.kokola.co/uploads/images/gallery/2025-08/scaled-1680-/screenshot-2025-08-07-081737.png)  
  
![Screenshot 2025-08-07 081805.png](https://manual.kokola.co/uploads/images/gallery/2025-08/scaled-1680-/screenshot-2025-08-07-081805.png)

#### **Advanced Filter Functions**

#### The top section of the page provides various filters to screen the data:

- #### **Date From / To**: Specify a date range to limit the transaction period.
- #### **Chart Of Accounts**: Filter transactions that only affect a specific account.
- #### **Cost Center &amp; Project**: Filter transactions that are only allocated to a specific department or project.
- #### **Journal Status**: Choose to display journals with a specific status (e.g., already approved).

#### **Table Column Explanation**

#### The main table will display the details of each journal line, including **Journal Number**, **Account**, **Debit**, **Credit**, **Cost Center**, **Project Name**, and a very detailed **Description**.

#### **Main Button Functions**

- #### **Search / Show All**: To apply the filters or display all data again.
- #### **Export To MS Excel / Export To CSV File**: An important feature to download the displayed data for further processing outside the system.

### **2. Usage Example (Case Study)**

#### **Case**: The Sales team wants to see the complete journaling details (including COGS) of a sales transaction for the customer "Mega Global Food Industry".

#### **Steps**:

1. #### Open the **Transaction Journal** module.
2. #### Set the **Date** range to the known transaction date (e.g., 08/02/2025). 
    
    #### ![image.png](https://manual.kokola.co/uploads/images/gallery/2025-08/scaled-1680-/nVIimage.png)
3. #### Click **Search**. ![image.png](https://manual.kokola.co/uploads/images/gallery/2025-08/scaled-1680-/lWSimage.png)
4. #### Find the transaction rows related to "Mega Global Food Industry".
5. #### The result will display all related journal lines, from the recording of **ACCOUNT RECEIVABLE TRADE**, **SALES**, to **COST OF GOOD SOLD (COGS)**. This data can then be exported to Excel for analysis.

### **Example of a Generated Report**

#### The exported or printed report will display transaction details like the image below, detailing every debit and credit movement.

![image.png](https://manual.kokola.co/uploads/images/gallery/2025-08/scaled-1680-/kKrimage.png)

### **Tips &amp; Important Notes**

- #### This module is **read-only**. You cannot create or modify transactions here.
- #### This is a very useful tool for the **Sales team to understand the accounting impact** of every transaction they make, from revenue to the cost of goods sold.
- #### Use the **Export to MS Excel** feature for more in-depth data analysis.

# Free of Charge Report

### **Report Module Guide: Free of Charge Report**

#### **Module Location**

#### Sales &gt; Free of Charge &gt; Free of Charge Report

#### **Module Objective**

#### The **Free of Charge Report** module is used to generate a report that details all transactions of goods shipped to customers at no charge (for free). This report is very useful for tracking the issuance of goods for promotional purposes, samples, or other marketing activities.

### **1. Report Parameters (Filter)**

#### The main page of this module is a form containing several parameters to customize the report that will be generated.

![image.png](https://manual.kokola.co/uploads/images/gallery/2025-08/scaled-1680-/NKwimage.png)

#### Here is an explanation for each parameter:

- #### **Contact Person**:
    
    
    - #### Filter the report by a specific contact person (**Selected**) or display data from all contact persons (**All**).
- #### **Sales Date**:
    
    
    - #### Specify the **From** and **To** date range to define the report's period (e.g., 08/01/2025 to 08/31/2025).
- #### **Approval**:
    
    
    - #### Use this dropdown to filter by the approval status of the free-of-charge transaction (e.g., New).

### **2. Steps to Generate the Report**

#### **Step 1: Set Report Parameters**

#### Select all the parameters you need, especially defining the **Sales Date** range to get specific data. ![image.png](https://manual.kokola.co/uploads/images/gallery/2025-08/scaled-1680-/o6mimage.png)

#### **Step 2: Generate the Report**

#### After all parameters are set, click one of the two buttons in the bottom-left section of the page:

- #### **Display Report**: To preview the report directly on your screen. ![image.png](https://manual.kokola.co/uploads/images/gallery/2025-08/scaled-1680-/lebimage.png)
- #### **Export To MS Excel**: To download the report data in an Excel file format. 
    
    #### ![image.png](https://manual.kokola.co/uploads/images/gallery/2025-08/scaled-1680-/Tjpimage.png)

### **3. Example of the Report View**

#### After you click, the system will generate a detailed report like the following, which details every shipment of free goods.

![image.png](https://manual.kokola.co/uploads/images/gallery/2025-08/scaled-1680-/vEEimage.png)

#### **Report Explanation**: This report displays a detailed list of each free-of-charge transaction, complete with information on:

- #### **Contact Name** and **Customer**: The recipient of the goods.
- #### **Sales Order Number**: The reference sales order number.
- #### **Memo**: A description of the purpose of the shipment (e.g., SOCIAL MEDIA SAMPLE AUGUST).
- #### **Item Code, Item Description, and Qty**: Details of the items and the quantities given.

### **Tips &amp; Important Notes**

- #### This report is very important for the **Marketing and Sales teams** to track the distribution of sample goods or promotional items.
- #### The **Accounting team** can use this report for the purpose of recording promotional expenses or for inventory control of goods that are issued without generating revenue.
- #### To ensure this report is accurate, make sure that free-of-charge transactions (for example, a Sales Order with a zero price) are recorded correctly in the system.

# Sale Analysis

### **Sales Reports**

#### This section covers various types of reports that can be generated from sales data for analysis and monitoring purposes.

### **Report Module Guide: Sales Analysis**

#### **Module Location**

#### Sales &gt; Reports &gt; Sales Analysis

#### **Module Objective**

#### The **Sales Analysis** module is a very powerful business analysis tool. Its purpose is to generate a detailed report that not only displays sales data but also calculates the profitability or **Margin** for each transaction line. This report compares sales revenue with the **Cost of Goods Sold (COGS)** to provide deep insights into product and customer performance.

![image.png](https://manual.kokola.co/uploads/images/gallery/2025-08/scaled-1680-/cYWimage.png)

### **1. Report Parameters (Filter)**

#### The main page of this module is a form containing several parameters to define the scope of the analysis.

#### Here is an explanation for each parameter:

- #### **Category Type**:
    
    
    - #### Select the product category you want to analyze (e.g., FINISHED GOOD).
- #### **Customer Date**:
    
    
    - #### Specify the **From** and **To** date range to define the analysis period (e.g., August 1, 2025, to August 31, 2025).
- #### **Based On**:
    
    
    - #### Choose the data basis for the analysis:
    - #### **Invoice**: Analysis based on invoices that have already been issued (finalized sales).
    - #### **Sales Order**: Analysis based on confirmed sales orders.
- #### **Currency**:
    
    
    - #### Choose how currency values will be displayed: **Respective Currency** or **Base Currency**.

### **2. Steps to Generate the Report**

#### **Step 1: Set Report Parameters**

#### Select all the parameters you need, especially defining the date range and the analysis basis (**Invoice** or **Sales Order**).   
![image.png](https://manual.kokola.co/uploads/images/gallery/2025-08/scaled-1680-/dAUimage.png)

#### **Step 2: Generate the Report**

#### After all parameters are set, click the **Analysis Report** button in the bottom-left section of the page to generate the detailed report.![image.png](https://manual.kokola.co/uploads/images/gallery/2025-08/scaled-1680-/rEJimage.png)

### **3. Reading the Sales Analysis Report**

#### The generated report will display a highly detailed data matrix.  
![image.png](https://manual.kokola.co/uploads/images/gallery/2025-08/scaled-1680-/XIyimage.png)

- #### **Summary (Header)**: The top section of the report displays a summary of totals such as **Net Sales** and **Margin**.
- #### **Detail Columns**: The main table displays a breakdown per transaction line, with these key columns:
    
    
    - #### **Selling Gross**: The gross sales value (Qty x Selling Price).
    - #### **Net Amount**: The net sales value after discounts.
    - #### **COGS Amount**: The Cost of Goods Sold value for the items sold.
    - #### **Margin**: The gross profit generated from the transaction (**Net Amount - COGS Amount**).
- #### **Report Features**: This report is interactive, equipped with internal filters and export buttons for various formats like CSV, Excel, and PDF.

### **Tips &amp; Important Notes**

- #### This report is a very powerful **profitability analysis tool**. Use it to identify which products or customers are the most profitable.
- #### Selecting **Based On 'Invoice'** provides a picture of profitability from finalized sales, whereas **'Sales Order'** provides an estimated profitability of incoming orders.
- #### To get a valid **Margin** value, ensure that the **Cost of Goods Sold (COGS) data is accurate** in the system.

# Customer Sales Report

### **Sales Reports**

#### This section covers various types of reports that can be generated from sales data for analysis and monitoring purposes.

### **Report Module Guide: Customer Sales Report**

#### **Module Location**

#### Sales &gt; Reports &gt; Customer Reports &gt; Customer Sales Report

#### **Module Objective**

#### The **Customer Sales Report** module is used to generate a detailed report that displays all sales transactions, grouped by customer. This report is very useful for analyzing the purchasing patterns and total sales volume of each customer within a specific time period.

### **1. Report Parameters (Filter)**

#### The main page of this module is a form containing various parameters to customize the report that will be generated.

![image.png](https://manual.kokola.co/uploads/images/gallery/2025-08/scaled-1680-/NgQimage.png)

#### Here is an explanation for each parameter:

- #### **Customer Active/Not Active**:
    
    
    - #### Filter customers by their active status, whether **All**, **Active**, or **Not Active**.
- #### **Customer**:
    
    
    - #### Select the customer scope for the report: **All**, **Category** (by Category), or **Selected** (for a specific Customer).
- #### **Customer Date**:
    
    
    - #### Specify the **From** and **To** date range to define the period of sales transactions to be displayed (e.g., August 1, 2025, to August 31, 2025).
- #### **Document Active Status**:
    
    
    - #### Use this dropdown to filter by the active status of the sales documents.

### **2. Steps to Generate the Report**

#### **Step 1: Set Report Parameters**

#### Select all the parameters you need, especially defining the **Customer Date** range and the **Customer** scope.

![image.png](https://manual.kokola.co/uploads/images/gallery/2025-08/scaled-1680-/CTMimage.png)

#### **Step 2: Generate the Report**

#### After all parameters are set, click one of the two buttons in the bottom-left section of the page:

- #### **Display Report**: To preview the customer sales report directly on your screen. ![image.png](https://manual.kokola.co/uploads/images/gallery/2025-08/scaled-1680-/JI9image.png)
- #### **Export To MS Excel**: To download the report data in an Excel file format. 
    
    #### ![image.png](https://manual.kokola.co/uploads/images/gallery/2025-08/scaled-1680-/AvEimage.png)

### **3. Example of the Report View**

#### After you click, the system will generate a detailed report like the following, which details every product purchased by each customer.

![image.png](https://manual.kokola.co/uploads/images/gallery/2025-08/scaled-1680-/Nr0image.png)

#### **Report Explanation**: This report displays a detailed list of each sales transaction, sorted or grouped by **Customer**.

#### **Key Columns**:

- #### **Product Code** and **Product Name**: Shows which products were purchased.
- #### **Qty**: The number of units purchased.
- #### **Gross**: The gross sales value.
- #### **Net**: The net sales value after discounts or other adjustments.

### **Tips &amp; Important Notes**

- #### Use this report to analyze which products are most frequently purchased by a specific customer.
- #### This report is very useful for the **Sales team**, especially **Account Officers**, to review the activity and sales volume on the accounts they manage.
- #### Filtering by a **Selected** Customer is very useful for preparing data before a customer visit or business meeting.

# Customer Sales Report Detail

### **Report Module Guide: Customer Sales Detail Report**

#### **Module Location**

#### Sales &gt; Reports &gt; Customer Reports &gt; Customer Sales Detail Report

#### **Module Objective**

#### The **Customer Sales Detail** report module is used to generate a highly detailed report of all sales transactions. This report displays sales data down to the item line level per invoice or shipment, making it suitable for in-depth analysis and data tracing.

### **1. Report Parameters (Filter)**

#### The main page of this module is a form containing various parameters to customize the report that will be generated.

![image.png](https://manual.kokola.co/uploads/images/gallery/2025-08/scaled-1680-/xphimage.png)

#### Here is an explanation for each parameter:

- #### **Customer**:
    
    
    - #### Select the customer scope for the report: **All**, **Category** (by Category), or **Selected** (for a specific Customer).
- #### **Customer Date**:
    
    
    - #### Specify the **From** and **To** date range to define the period of sales transactions to be displayed (e.g., August 1, 2025, to August 31, 2025).

### **2. Steps to Generate the Report**

#### **Step 1: Set Report Parameters**

#### Select all the parameters you need, especially defining the **Customer Date** range and the **Customer** scope.

![image.png](https://manual.kokola.co/uploads/images/gallery/2025-08/scaled-1680-/lMaimage.png)

#### **Step 2: Generate the Report**

#### After all parameters are set, click one of the two buttons in the bottom-left section of the page:

- #### **Display Report**: To preview the detail report directly on your screen. ![image.png](https://manual.kokola.co/uploads/images/gallery/2025-08/scaled-1680-/Vlhimage.png)
- #### **Export To MS Excel**: To download the report data in an Excel file format. 
    
    #### ![image.png](https://manual.kokola.co/uploads/images/gallery/2025-08/scaled-1680-/Goyimage.png)

### **3. Example of the Report View**

#### After you click, the system will generate a detailed report like the following, which details every product purchased by each customer in every transaction.

![image.png](https://manual.kokola.co/uploads/images/gallery/2025-08/scaled-1680-/YSeimage.png)

#### **Report Explanation**: This report displays a very detailed list of each sales transaction line, not a summary.

#### **Key Columns**:

- #### **Customer, Address**: Customer details.
- #### **Product code, Product name**: Details of the product sold.
- #### **Unit price, Quantity, Amount**: Transaction value details per line.
- #### **Shipment Number, Invoice Number**: Reference document numbers for tracing.

### **Tips &amp; Important Notes**

- #### Use this report when you need the most detailed and **un-aggregated** (non-summary) sales data.
- #### The **Export to MS Excel** feature is very useful for this report, as it allows you to process the raw data into summaries, charts, or Pivot Tables according to your analysis needs.
- #### This report is very suitable for **audit** purposes or for very **in-depth sales data reconciliation**.

# Customer Transaction Report

### **Report Module Guide: Customer Transaction Report**

#### **Module Location**

#### Sales &gt; Reports &gt; Customer Reports &gt; Customer Transaction Report

#### **Module Objective**

#### The **Customer Transaction Report** module is used to generate a combined report that displays the history of various types of sales transaction documents for a specific customer. This report consolidates data from multiple document types (such as Proforma Invoice and Sales Order) into a single view to facilitate tracing and analysis.

### **1. Report Parameters (Filter)**

#### The main page of this module is a form containing various parameters to customize the report that will be generated.

![image.png](https://manual.kokola.co/uploads/images/gallery/2025-08/scaled-1680-/Wz3image.png)

#### Here is an explanation for each parameter:

- #### **Customer**:
    
    
    - #### Select the customer scope for the report: **All**, **Category** (by Category), or **Selected** (for a specific Customer).
- #### **Document Date**:
    
    
    - #### Specify the **From** and **To** date range to define the period of transactions to be displayed (e.g., August 1, 2025, to August 31, 2025).
- #### **Document Type**:
    
    
    - #### Use this dropdown to select the specific document type you wish to see (for example, only Sales Orders), or select **'All'** to display all transaction types.

### **2. Steps to Generate the Report**

#### **Step 1: Set Report Parameters**

#### Select all the parameters you need, especially defining the **Document Date** range and the **Customer** scope.

![image.png](https://manual.kokola.co/uploads/images/gallery/2025-08/scaled-1680-/kXtimage.png)

#### **Step 2: Generate the Report**

#### After all parameters are set, click one of the two buttons in the bottom-left section of the page:

- #### **Display Report**: To preview the customer transaction report directly on your screen. ![image.png](https://manual.kokola.co/uploads/images/gallery/2025-08/scaled-1680-/Yvwimage.png)
- #### **Export To MS Excel**: To download the report data in an Excel file format. 
    
    #### ![image.png](https://manual.kokola.co/uploads/images/gallery/2025-08/scaled-1680-/0jUimage.png)

### **3. Example of the Report View**

#### After you click, the system will generate a detailed report like the following, which groups transactions by their document type.

![image.png](https://manual.kokola.co/uploads/images/gallery/2025-08/scaled-1680-/Dphimage.png)

#### **Report Explanation**: This report displays a list of transactions grouped by their type, such as a section for **Proforma Invoices** and a section for **Sales Orders**.

#### **Key Columns**: Each section will detail the transactions with relevant columns such as **PI Number** or **Sales Order Number**, **Item Code**, **Item Name**, **Qty**, and **Amount**.

### **Tips &amp; Important Notes**

- #### Use this report to get a complete overview of the entire **sales document flow** for a customer in a single view.
- #### The **Document Type** filter is very useful if you only want to focus on one type of transaction, for example, reviewing all Sales Orders from a specific customer in a month.
- #### This report is very helpful for the **Sales and Customer Service teams** to track the complete transaction history of a customer.

# PS Monitoring

### **Sales Reports**

#### This section covers various types of reports that can be generated from sales data for analysis and monitoring purposes.

### **Report Module Guide: PS Monitoring**

#### **Module Location**

#### Sales &gt; Reports &gt; Customer Reports &gt; PS Monitoring

#### **Module Objective**

#### The **PS Monitoring** report module is used to generate a very comprehensive sales monitoring report. This report is designed to track sales performance in detail, linking customer information, product details by category, all the way to logistics documents like Shipment Notes and Invoices.

### **1. Report Parameters (Filter)**

#### The main page of this module is a form containing several parameters to customize the report that will be generated.

![image.png](https://manual.kokola.co/uploads/images/gallery/2025-08/scaled-1680-/prgimage.png)

#### Here is an explanation for each parameter:

- #### **Customer**:
    
    
    - #### Select the customer scope for the report: **All**, **Category** (by Category), **sales** (by Salesman), or **Selected** (for a specific Customer).
- #### **Customer Date**:
    
    
    - #### Specify the **From** and **To** date range to define the period of sales transactions to be displayed (e.g., August 1, 2025, to August 31, 2025).

### **2. Steps to Generate the Report**

#### **Step 1: Set Report Parameters**

#### Select all the parameters you need, especially defining the **Customer Date** range and the **Customer** scope.

![image.png](https://manual.kokola.co/uploads/images/gallery/2025-08/scaled-1680-/361image.png)

#### **Step 2: Generate the Report**

#### After all parameters are set, click one of the two buttons in the bottom-left section of the page:

- #### **Display Report**: To preview the monitoring report directly on your screen. 
    
    #### ![image.png](https://manual.kokola.co/uploads/images/gallery/2025-08/scaled-1680-/BX1image.png)
- #### **Export To MS Excel**: To download the report data in an Excel file format.

### **3. Example of the Report View**

#### After you click, the system will generate a detailed report like the following, which provides a comprehensive view of sales activity.

![image.png](https://manual.kokola.co/uploads/images/gallery/2025-08/scaled-1680-/Q5ximage.png)

#### **Report Explanation**: This report presents data in a highly detailed table format for monitoring from various perspectives.

#### **Key Columns**:

- #### **Customer Detail**: Displays complete customer information, from Distributor, City, to Address.
- #### **Product**: Details sales by product category or brand such as Kukis, Majestic, and others.
- #### **Shipment Notes &amp; Invoice No**: Links the sales data with the relevant logistics and billing documents.

### **Tips &amp; Important Notes**

- #### Use this report to get a **360-degree view** of sales activity within a single period.
- #### Filtering by the **sales** option is very useful for evaluating the sales performance per individual salesperson.
- #### This report is very suitable for in-depth sales analysis by the **Sales Analyst** and **Sales Management** teams.

# Item Sales Report

### **Sales Reports**

#### This section covers various types of reports that can be generated from sales data for analysis and monitoring purposes.

### **Report Module Guide: Item Sales Detail**

#### **Module Location**

#### Sales &gt; Reports &gt; Item Reports &gt; Item Sales Report

#### **Module Objective**

#### The **Item Sales Detail** report module is used to generate a detailed report that displays all sales transactions, grouped by item or product. This report is very useful for analyzing the sales performance of each product item individually.

### **1. Report Parameters (Filter)**

#### The main page of this module is a form containing various parameters to customize the report that will be generated.

![image.png](https://manual.kokola.co/uploads/images/gallery/2025-08/scaled-1680-/HnXimage.png)

#### Here is an explanation for each parameter:

- #### **Item Description**:
    
    
    - #### Filter the report to display **All** items or a **Selected** item.
- #### **Dimension**:
    
    
    - #### An additional filter to screen by product dimension.
- #### **Customer Date**:
    
    
    - #### Specify the **From** and **To** date range to define the period of sales transactions to be displayed (e.g., August 1, 2025, to August 31, 2025).

### **2. Steps to Generate the Report**

#### **Step 1: Set Report Parameters**

#### Select all the parameters you need, especially defining the **Customer Date** range and the **Item Description** scope. 

![image.png](https://manual.kokola.co/uploads/images/gallery/2025-08/scaled-1680-/vljimage.png)  
  
![image.png](https://manual.kokola.co/uploads/images/gallery/2025-08/scaled-1680-/OkTimage.png)

#### **Step 2: Generate the Report**

#### After all parameters are set, click one of the two buttons in the bottom-left section of the page:

- #### **Display Report**: To preview the item sales report directly on your screen. 
    
    #### ![image.png](https://manual.kokola.co/uploads/images/gallery/2025-08/scaled-1680-/CPPimage.png)
- #### **Export To MS Excel**: To download the report data in an Excel file format. 
    
    #### ![image.png](https://manual.kokola.co/uploads/images/gallery/2025-08/scaled-1680-/Ryvimage.png)

### **3. Example of the Report View**

#### After you click, the system will generate a detailed sales-per-item report as in the example below (although there is currently no data).

#### **Report Explanation**: The report will display a detailed list of each sales transaction, sorted or grouped by product.

#### **Key Columns**: This report will typically contain columns such as **Item Code**, **Item Name**, **Quantity Sold**, **Sales Value**, and the **Customer** who made the purchase.

### **Tips &amp; Important Notes**

- #### Use this report to identify which products are the **best-sellers** in a given period.
- #### This report is very useful for the **Product Management and Marketing teams** to evaluate the performance and popularity of each product.
- #### The **Selected** filter for **Item Description** is very useful for performing an in-depth analysis of one specific product.

# Free Item Report

### **Report Module Guide: Free Item Report**

#### **Module Location**

#### Sales &gt; Reports &gt; Item Reports &gt; Free Item Report

#### **Module Objective**

#### The **Free Item Report** module is used to generate a detailed list of all products that were given to customers for free. This report is very useful for tracking promotional items or samples that have been distributed, as well as for analyzing the volume and cost of "free product" promotion programs.

### **1. Report Parameters**

#### The main page of this module is a simple form containing a date parameter for the report.

![image.png](https://manual.kokola.co/uploads/images/gallery/2025-08/scaled-1680-/TCJimage.png)

#### Here is an explanation for each parameter:

- #### **Free Item Period**:
    
    
    - #### Specify the **From** and **To** date range to display all free items that were given out during that period (e.g., August 1, 2025, to August 31, 2025).

### **2. Steps to Generate the Report**

#### **Step 1: Set Report Parameters**

#### Define the date range in the **Free Item Period** fields.   
![image.png](https://manual.kokola.co/uploads/images/gallery/2025-08/scaled-1680-/MCCimage.png)

#### **Step 2: Generate the Report**

#### After the parameters are set, click one of the two buttons in the bottom-left section of the page:

- #### **Display Report**: To preview the free item report directly on your screen. 
    
    #### ![image.png](https://manual.kokola.co/uploads/images/gallery/2025-08/scaled-1680-/CTDimage.png)
- #### **Export To MS Excel**: To download the report data in an Excel file format. 
    
    #### ![image.png](https://manual.kokola.co/uploads/images/gallery/2025-08/scaled-1680-/2FMimage.png)

### **3. Example of the Report View**

#### After you click, the system will generate a detailed report like the following, which details every free item that was given.

![image.png](https://manual.kokola.co/uploads/images/gallery/2025-08/scaled-1680-/ksgimage.png)

#### **Report Explanation**: This report displays a detailed list of every free item that has been given to customers.

#### **Key Columns**:

- #### **Sales Order Number**: Shows the related sales transaction reference number.
- #### **Customer Name**: The name of the customer who received the free item.
- #### **Free Item Code** and **Free Item Name**: Details of the product given as a gift.
- #### **Qty**: The number of free item units given.

### **Tips &amp; Important Notes**

- #### This report is very useful for the **Marketing and Sales teams** to evaluate the effectiveness and total cost of the "free product" promotion programs they have run.
- #### This report's data is pulled from **Sales Order** transactions that automatically received a free item based on the settings in the **Free Item Program** module.

# Cubication Calculation

### **Report Module Guide: Cubication Calculation**

#### **Module Location**

#### Sales &gt; Reports &gt; Item Reports &gt; Cubication Calculation

#### **Module Objective**

#### The **Cubication Calculation** module is a logistics planning tool. Its purpose is to calculate the total volume (cubication) and weight of a set of products to be shipped, and then compare that against the capacity of various types of transport vehicles. This helps the logistics team to select the most efficient transport fleet for each shipment.

### **1. Report Parameters**

#### The main page of this module is a form for selecting the items whose cubication will be calculated.

![image.png](https://manual.kokola.co/uploads/images/gallery/2025-08/scaled-1680-/9Foimage.png)

#### Here is an explanation for each parameter:

- #### **Warehouse / Customer**:
    
    
    - #### Select the origin **Warehouse** for the shipment and the destination **Customer**.
- #### **Item Code**:
    
    
    - #### Use this dual-list box to select all the products that will be included in a single shipment. Move the items from the left box to the right box using the **&gt;&gt;** button.

### **2. Steps to Generate the Report**

#### **Step 1: Set Report Parameters**

#### Select the **Warehouse**, **Customer**, and move all the **Item Codes** to be shipped into the right-hand box.

![image.png](https://manual.kokola.co/uploads/images/gallery/2025-08/scaled-1680-/xSVimage.png)

#### **Step 2: Generate the Report**

#### After all parameters are set, click one of the two buttons in the bottom-left section of the page:

- #### **Display Report**: To preview the calculation report directly on your screen. 
    
    #### ![image.png](https://manual.kokola.co/uploads/images/gallery/2025-08/scaled-1680-/yLUimage.png)
- #### **Export To MS Excel**: To download the report data in an Excel file format. 
    
    #### ![image.png](https://manual.kokola.co/uploads/images/gallery/2025-08/scaled-1680-/vLbimage.png)

### **3. Reading the Cubication Calculation Report**

**![image.png](https://manual.kokola.co/uploads/images/gallery/2025-08/scaled-1680-/Xz9image.png)**

#### The generated report is divided into two main parts.

#### **Part 1: Cubication Calculation**

#### This section details the total volume of the items you selected. Its columns include **Item Code**, **Item Name**, **Volume**, and **Total Carton**. Pay attention to the final number in the **Total Volume** column.

#### **Part 2: Transporter Volume**

#### This section serves as a reference table that displays the volume capacity of various **Vehicle Types**, such as a Tronton Box Truck and a 20' Container.

#### **How to Use the Report**

#### Compare the **Total Volume** figure from the first part with the **Volume (M3)** column in the second part to choose the most efficient and suitable vehicle for your shipment.

### **Tips &amp; Important Notes**

- #### This module is a very important planning tool for the **Logistics and Sales Admin teams** to optimize shipping costs.
- #### To get a valid calculation, ensure that the dimension data (length, width, height) and weight in the **product master data** is accurate.

# Penetration Report

### **Report Module Guide: Penetration Report**

#### **Module Location**

#### Sales &gt; Reports &gt; Item Reports &gt; Penetration Report

#### **Module Objective**

#### The **Penetration Report** module is used to generate a matrix report that shows the distribution or "penetration" of product sales across various customers or points of sale. This report is very useful for analyzing which products have been sold at each customer and identifying further **cross-selling** opportunities.

### **1. Report Parameters (Filter)**

#### The main page of this module is a form containing various parameters to customize the report that will be generated.

![image.png](https://manual.kokola.co/uploads/images/gallery/2025-08/scaled-1680-/MQSimage.png)

#### Here is an explanation for each parameter:

- #### **Customer**:
    
    
    - #### Filter data by the customer scope: **Customer** (specific customer), **Leader**, or **All**.
- #### **Customer Category**:
    
    
    - #### Further filter by customer category, either **All** or a specific **Category**.
- #### **Period**:
    
    
    - #### Specify the **From** and **To** date range to define the period of sales transactions to be analyzed (e.g., August 1, 2025, to August 7, 2025).

### **2. Steps to Generate the Report**

#### **Step 1: Set Report Parameters**

#### Select all the parameters you need, especially defining the **Period** range and the **Customer** scope.

![image.png](https://manual.kokola.co/uploads/images/gallery/2025-08/scaled-1680-/mKCimage.png)

![image.png](https://manual.kokola.co/uploads/images/gallery/2025-08/scaled-1680-/E5Simage.png)

#### **Step 2: Generate the Report**

#### After all parameters are set, click one of the two buttons in the bottom-left section of the page:

- #### **Display Report**: To preview the product penetration report directly on your screen. ![image.png](https://manual.kokola.co/uploads/images/gallery/2025-08/scaled-1680-/sq7image.png)
- #### **Export To MS Excel**: To download the report data in an Excel file format. 
    
    #### ![image.png](https://manual.kokola.co/uploads/images/gallery/2025-08/scaled-1680-/ksSimage.png)

### **3. Example of the Report View**

#### After you click, the system will generate a detailed report in a matrix format as follows:

![image.png](https://manual.kokola.co/uploads/images/gallery/2025-08/scaled-1680-/jIvimage.png)

#### **Report Explanation**: This report presents data in a matrix format to facilitate the analysis of product spread.

- #### **Rows**: Display a list of **Item Code** and **Item Name**, grouped by product category (CRACKERS, CREAM, KUKIS, etc.).
- #### **Columns**: Display a list of customers or sales outlets. Each column represents one point of sale or customer.
- #### **Data Cells**: Each cell at the intersection of a row and column will show the quantity of the product sold to that customer/outlet.

### **Tips &amp; Important Notes**

- #### Use this report to identify which customers have not yet purchased certain products, thereby opening up opportunities to **cross-sell**.
- #### This report is very useful for the **Sales and Marketing teams** to design more effective and targeted distribution and promotion strategies.
- #### Analyzing this report can help in understanding which products are popular in specific customer segments.

# Sales Order Report

### **Report Module Guide: Sales Order Report**

#### **Module Location**

#### Sales &gt; Reports &gt; Sales Order Reports &gt; Sales Order Report

#### **Module Objective**

#### The **Sales Order Report** module is used to generate a detailed list of all Sales Orders (SOs) along with their item details for a single period. This report is a primary operational tool for tracking incoming orders, monitoring sales activity, and managing the queue of orders to be processed.

### **1. Report Parameters (Filter)**

#### The main page of this module is a form containing various parameters to customize the report that will be generated.

![image.png](https://manual.kokola.co/uploads/images/gallery/2025-08/scaled-1680-/RUqimage.png)

#### Here is an explanation for each parameter:

- #### **Customer**:
    
    
    - #### Filter the report by **All** customers or a **Selected** customer.
- #### **Status Filter**:
    
    
    - #### There are several very useful status filters:
    - #### **Approval Status**: Filter by the SO's approval status.
    - #### **Delivery Status**: Filter by the shipping status.
    - #### **Invoice Status**: Filter by the billing status.
- #### **Sales Type**:
    
    
    - #### Select the type of sale, whether **All**, **Local**, or **Export**.
- #### **SO Date**:
    
    
    - #### Specify the creation date range of the SOs to be displayed (e.g., August 1, 2025, to August 31, 2025).

### **2. Steps to Generate the Report**

#### **Step 1: Set Report Parameters**

#### Select all the parameters you need, especially defining the **SO Date** range and the relevant statuses for your analysis.

![image.png](https://manual.kokola.co/uploads/images/gallery/2025-08/scaled-1680-/tTximage.png)

#### **Step 2: Generate the Report**

#### After all parameters are set, click one of the two buttons in the bottom-left section of the page:

- #### **Display Report**: To preview the Sales Order report directly on your screen. 
    
    #### ![image.png](https://manual.kokola.co/uploads/images/gallery/2025-08/scaled-1680-/OpOimage.png)
- #### **Export To MS Excel**: To download the report data in an Excel file format. 
    
    #### ![image.png](https://manual.kokola.co/uploads/images/gallery/2025-08/scaled-1680-/zjzimage.png)

### **3. Example of the Report View**

#### After you click, the system will generate a detailed report like the following, which details every SO and the items within it.

![image.png](https://manual.kokola.co/uploads/images/gallery/2025-08/scaled-1680-/DTCimage.png)

#### **Report Explanation**: This report displays a very detailed list of each Sales Order, which contains a breakdown per Item line.

#### **Key Columns**:

- #### **Sales Order, SO Date, Customer Name**: The main information for each order.
- #### **Item Code, Item Description**: Details of the products ordered.
- #### **Qty, Price, Total Amount**: The quantity and value details for each order line.

### **Tips &amp; Important Notes**

- #### Use this report to monitor all incoming orders from customers on a **daily or weekly basis**.
- #### Filtering by **Approval Status or Delivery Status** is very useful for the **Sales Admin and Logistics teams** to know which orders require immediate follow-up.
- #### This report provides the raw data of incoming orders, which is very useful for analyzing daily and weekly sales activity.

# Sales Contract Report

### **Report Module Guide: Sales Contract Report**

#### **Module Location**

#### Sales &gt; Reports &gt; Sales Order Reports &gt; Sales Contract Report

#### **Module Objective**

#### The **Sales Contract Report** module is used to generate a detailed list of all Sales Contracts that have been created. This report is used to review the terms and conditions, period, as well as the product and price details within long-term agreements with customers.

### **1. Report Parameters (Filter)**

#### The main page of this module is a form containing various parameters to customize the report that will be generated.

![image.png](https://manual.kokola.co/uploads/images/gallery/2025-08/scaled-1680-/4lSimage.png)

#### Here is an explanation for each parameter:

- #### **Contract Number**:
    
    
    - #### Use this field to search for a report by a specific contract number.
- #### **Customer**:
    
    
    - #### Filter the report by **All** customers or a **Selected** customer.
- #### **Document Status / Active**:
    
    
    - #### Use this dropdown to filter contracts based on their document status or active status.
- #### **Date From / To**:
    
    
    - #### Specify a date range to display contracts that are relevant within that period (e.g., August 1, 2025, to August 31, 2025).
- #### **Currency**:
    
    
    - #### Choose how currency values will be displayed: **Document** or **Base Currency**.

### **2. Steps to Generate the Report**

#### **Step 1: Set Report Parameters**

#### Select all the parameters you need, especially defining the date range and the customer scope.

#### **Step 2: Generate the Report**

#### After all parameters are set, click one of the two buttons in the bottom-left section of the page:

- #### **Display Report**: To preview the contract report directly on your screen. 
    
    #### ![image.png](https://manual.kokola.co/uploads/images/gallery/2025-08/scaled-1680-/YQpimage.png)
- #### **Export To MS Excel**: To download the report data in an Excel file format. 
    
    #### ![image.png](https://manual.kokola.co/uploads/images/gallery/2025-08/scaled-1680-/ja2image.png)

### **3. Example of the Report View**

#### After you click, the system will generate a detailed report like the following, which details every sales contract.

![image.png](https://manual.kokola.co/uploads/images/gallery/2025-08/scaled-1680-/LqUimage.png)

#### **Report Explanation**: This report displays a very detailed list of each sales contract along with the items within it.

#### **Key Columns**:

- #### **Contract Number, Customer**: Basic contract information.
- #### **Contract Start Date, End Date**: The validity period of the contract.
- #### **Item Code, Item Description**: Details of the products included in the contract.
- #### **Qty, Unit Price, Amount**: The quantity and value details for each line item in the contract.

### **Tips &amp; Important Notes**

- #### Use this report to review all contracts that are **expiring or are still active** for follow-up by the sales team.
- #### This report is a recapitulation of the data input in the **Sales Contract** module. Ensure the data in that module is accurate.
- #### The **Export to MS Excel** feature is useful for performing further analysis or for archiving contract data externally.

# Sales Contract Balance

### **Report Module Guide: Sales Contract Balance**

#### **Module Location**

#### Sales &gt; Reports &gt; Sales Order Reports &gt; Sales Contract Balance

#### **Module Objective**

#### The **Sales Contract Balance** report module is used to monitor the usage and remaining balance of Sales Contracts that have been created. This report compares the maximum value set in a contract with the total value of Sales Orders (SOs) that have been created based on that contract.

### **1. Report Parameters (Filter)**

#### The main page of this module is a form containing various parameters to customize the report that will be generated.

![image.png](https://manual.kokola.co/uploads/images/gallery/2025-08/scaled-1680-/zuyimage.png)

#### Here is an explanation for each parameter:

- #### **Contract Number**:
    
    
    - #### Use this field to search for and display the report for a specific contract number.
- #### **Customer**:
    
    
    - #### Filter the report by **All** customers or a **Selected** customer.
- #### **Active**:
    
    
    - #### Use this dropdown to filter contracts based on their active status.
- #### **Date From / To**:
    
    
    - #### Specify a date range to display contracts that are relevant within that period (e.g., August 1, 2025, to August 31, 2025).
- #### **Currency**:
    
    
    - #### Choose how currency values will be displayed: **Document** or **Base Currency**.

### **2. Steps to Generate the Report**

#### **Step 1: Set Report Parameters**

#### Select all the parameters you need to focus the report on the contract(s) you wish to analyze.

#### **Step 2: Generate the Report**

#### After all parameters are set, click one of the two buttons in the bottom-left section of the page:

- #### **Display Report**: To preview the contract balance report directly on your screen. ![image.png](https://manual.kokola.co/uploads/images/gallery/2025-08/scaled-1680-/9UOimage.png)
- #### **Export To MS Excel**: To download the report data in an Excel file format. 
    
    #### ![image.png](https://manual.kokola.co/uploads/images/gallery/2025-08/scaled-1680-/5K0image.png)

### **3. Example of the Report View**

#### After you click, the system will generate a detailed report like the following, which details the usage of each sales contract.

![image.png](https://manual.kokola.co/uploads/images/gallery/2025-08/scaled-1680-/W6Bimage.png)

#### **Report Explanation**: This report will display a list of sales contracts along with the details of the Sales Orders (SOs) that have been created referencing those contracts.

#### **Key Columns for Analysis**:

- #### **Contract Number**: The number of the contract being analyzed.
- #### **Maximum Sales Amount**: The maximum value set in the contract.
- #### **Sales Order Number**: A list of the SOs created under that contract.
- #### **Amount**: The value of each SO.

#### **How to Analyze**: To find the remaining contract balance, compare the value in the **Maximum Sales Amount** column with the total of the **Amount** column for all Sales Orders linked to that contract.

### **Tips &amp; Important Notes**

- #### Use this report routinely to monitor contracts whose value is **approaching the maximum limit**, so you can promptly negotiate an extension or a new contract with the customer.
- #### This report is very important for the **Sales and Finance teams** to control and manage contract-based sales.
- #### The accuracy of this report depends on the discipline of **linking every Sales Order to the appropriate Sales Contract** when the transaction is created.

# Unvoiced SO Report

### **Report Module Guide: Uninvoiced SO Report**

#### **Module Location**

#### Sales &gt; Reports &gt; Sales Order Reports &gt; Uninvoiced SO

#### **Module Objective**

#### The **Uninvoiced SO Report** module is used to generate a list of all Sales Orders (SOs) that have been processed but have not yet been fully invoiced. This report is a crucial control tool to ensure no sales or shipments are missed for billing, thereby helping to maintain smooth cash flow.

### **1. Report Parameters (Filter)**

#### The main page of this module is a form containing various parameters to customize the report that will be generated.

![image.png](https://manual.kokola.co/uploads/images/gallery/2025-08/scaled-1680-/mKqimage.png)

#### Here is an explanation for each parameter:

- #### **Customer**:
    
    
    - #### Filter the report by **All** customers or a **Selected** customer.
- #### **SO Date**:
    
    
    - #### Specify the **From** and **To** SO creation date range to be displayed (e.g., August 1, 2025, to August 31, 2025).
- #### **Location**:
    
    
    - #### Filter the report by location or warehouse.
- #### **Show**:
    
    
    - #### Select the report's level of detail: **Summary** or **Detail**.

### **2. Steps to Generate the Report**

#### **Step 1: Set Report Parameters**

#### Select all the parameters you need, especially defining the **SO Date** range to see the uninvoiced SOs within that period.

![image.png](https://manual.kokola.co/uploads/images/gallery/2025-08/scaled-1680-/Q7Nimage.png)

#### **Step 2: Generate the Report**

#### After all parameters are set, click one of the two buttons in the bottom-left section of the page:

- #### **Display Report**: To preview the report directly on your screen. ![image.png](https://manual.kokola.co/uploads/images/gallery/2025-08/scaled-1680-/QkXimage.png)
- #### **Export To MS Excel**: To download the report data in an Excel file format. ![image.png](https://manual.kokola.co/uploads/images/gallery/2025-08/scaled-1680-/EUdimage.png)

### **3. Example of the Report View**

#### After you click, the system will generate a detailed report like the following, which details every SO that still has a remaining balance to be billed.

![image.png](https://manual.kokola.co/uploads/images/gallery/2025-08/scaled-1680-/5Bsimage.png)

#### **Report Explanation**: This report displays a detailed list of each Sales Order that still has a quantity or value yet to be invoiced, grouped per customer.

#### **Key Columns**:

- #### **Sales Order Number**: The reference SO number.
- #### **Item Name**: Details of the product yet to be billed.
- #### **Remaining Qty**: The remaining quantity that has not been invoiced.
- #### **Remaining Amount Uninvoiced**: The remaining value that has not been invoiced.
- #### **Total Remaining**: The total remaining bill per Sales Order.

### **Tips &amp; Important Notes**

- #### Run this report routinely (e.g., daily or weekly) to ensure no sales are **missed for billing**.
- #### This report serves as a **"worklist"** for the Sales Admin or Accounting (AR) team to create Sales Invoices.
- #### The **Remaining Amount Uninvoiced** column is a key indicator of potential revenue that has not yet been recorded as a receivable.

# Forecast Dist Scheduling Report

### **Report Module Guide: Distributor Forecast Scheduling Report**

#### **Module Location**

#### Sales &gt; Reports &gt; Delivery Report &gt; Forecast Dist Scheduling Report

#### **Module Objective**

#### The **Forecast Dist Scheduling Report** (Forecast Distributor Sales Report) is an advanced analysis tool for generating various types of reports that compare actual sales data with the forecast provided by distributors. This module helps in measuring forecast accuracy, sales performance, and shipping efficiency.

### **1. Report Parameters (Filter)**

#### The main page of this module is a form containing various parameters to customize the type of analysis that will be generated.

![image.png](https://manual.kokola.co/uploads/images/gallery/2025-08/scaled-1680-/SY4image.png)

#### Here is an explanation for each parameter:

- #### **Customer / Customer Category**:
    
    
    - #### Filter data by the customer scope, whether **All**, by **Leader**, **Salesman**, **Distributor**, or by **Category**.
- #### **Option Import/Export Data**:
    
    
    - #### This is the key filter that determines the type of analysis to be displayed. The options likely include:
    - #### **By Customer**: Analyzes data per customer.
    - #### **By SKU / By SKU Detail**: Analyzes data per product (SKU) in summary or detail.
    - #### **By Ontime KJ VS Real**: Analyzes the on-time performance between commitment/schedule and actual delivery realization.
    - #### **By Zero To Hero**: Analyzes sales growth from zero.
- #### **Period**:
    
    
    - #### Specify the **From** and **To** date range to define the analysis period (e.g., August 1, 2025, to August 31, 2025).

### **2. Steps to Generate the Report**

#### **Step 1: Set Report Parameters**

#### Select all the parameters you need, especially defining the **Period** range and the type of analysis in the **Option Import/Export Data** field.

![image.png](https://manual.kokola.co/uploads/images/gallery/2025-08/scaled-1680-/0ASimage.png)

![image.png](https://manual.kokola.co/uploads/images/gallery/2025-08/scaled-1680-/ZmNimage.png)

#### **Step 2: Generate the Report**

#### After all parameters are set, click one of the two buttons in the bottom-left section of the page:

- #### **Display Report**: To preview the analysis report directly on your screen. 
    
    #### ![image.png](https://manual.kokola.co/uploads/images/gallery/2025-08/scaled-1680-/7eWimage.png)
- #### **Export To MS Excel**: To download the report data in an Excel file format. 
    
    #### ![image.png](https://manual.kokola.co/uploads/images/gallery/2025-08/scaled-1680-/S48image.png)

### **3. Example of the Report View**

#### The appearance of the report will vary depending on the 'Option' you choose. The example below displays a report focused on sales team performance.

![image.png](https://manual.kokola.co/uploads/images/gallery/2025-08/scaled-1680-/zp0image.png)

#### **Report Explanation**: This report can display various metrics. The example shows columns like **Leader Name**, **Sales Name**, and **Account Name**, which focuses on sales performance analysis.

### **Tips &amp; Important Notes**

- #### This is an **advanced analysis tool**. Use the various **Option Import/Export Data** to get different insights from your sales and forecast data.
- #### To get a valid comparison, ensure the **forecast data from the distributor has been uploaded** and the **actual sales data is complete**.
- #### This report is very useful for the **Sales Analyst and Management teams** for evaluating distributor performance and forecast accuracy.

# SKU Sales Performance Report

### **Report Module Guide: SKU Sales Performance Report**

#### **Module Location**

#### Sales &gt; Reports &gt; Shipping Reports &gt; SKU Sales Performance Report

#### **Module Objective**

#### The **SKU Sales Performance Report** module is used to generate a highly in-depth profitability analysis report at the individual product level (SKU - Stock Keeping Unit). This report not only displays sales data but also takes into account the Cost of Goods Sold (COGS), returns, and various promotional costs to calculate the final profit from each product.

### **1. Report Parameters (Filter)**

#### The main page of this module is a form containing various parameters to customize the report that will be generated.

![image.png](https://manual.kokola.co/uploads/images/gallery/2025-08/scaled-1680-/x5limage.png)

#### Here is an explanation for each parameter:

- #### **Customer / Customer Category**:
    
    
    - #### Filter data by the customer scope, whether **All**, by **Leader**, **Salesman**, **Distributor**, or by **Category** (Customer Category).
- #### **Period**:
    
    
    - #### Specify the **From** and **To** date range to define the analysis period (e.g., August 1, 2025, to August 31, 2025).

### **2. Steps to Generate the Report**

#### **Step 1: Set Report Parameters**

#### Select all the parameters you need, especially defining the **Period** range.   
![image.png](https://manual.kokola.co/uploads/images/gallery/2025-08/scaled-1680-/Y3timage.png)

#### **Step 2: Generate the Report**

#### After all parameters are set, click one of the two buttons in the bottom-left section of the page:

- #### **Display Report**: To preview the SKU performance report directly on your screen. ![image.png](https://manual.kokola.co/uploads/images/gallery/2025-08/scaled-1680-/QFGimage.png)
- #### **Export To MS Excel**: To download the report data in an Excel file format. 
    
    #### ![image.png](https://manual.kokola.co/uploads/images/gallery/2025-08/scaled-1680-/dRfimage.png)

### **3. Example of the Report View**

#### After you click, the system will generate a detailed report like the following, which provides a complete profitability analysis per product.

![image.png](https://manual.kokola.co/uploads/images/gallery/2025-08/scaled-1680-/i5fimage.png)

#### **Report Explanation**: This report presents a very in-depth profitability analysis for each product, grouped by category (CRACKERS, CREAM, KUKIS, etc.).

#### **Key Columns for Analysis**:

- #### **Total Sales (Value)**: Total gross revenue from the sale of the product.
- #### **Nett Sales**: Net revenue after deducting returns or direct discounts.
- #### **HPP**: The Cost of Goods Sold for the product.
- #### **CBR Report**: This section details various promotional costs and discounts allocated to the product, such as Prog Disc, BS/Bonus, Refractions, etc.
- #### **Total Expense**: The total of all recorded promotional costs.
- #### **Profit Sales**: The final profit generated by each product, calculated after deducting HPP and all related costs from net sales.

### **Tips &amp; Important Notes**

- #### Use this report to identify which products are the **most and least profitable** on a net profit basis, after taking all related costs into account.
- #### This report is crucial for **Product Managers and Management** to make strategic decisions regarding the product portfolio, pricing, and the allocation of the promotional budget.
- #### The accuracy of this report is highly dependent on the accuracy of the **HPP (COGS) data** and the discipline in **allocating all promotional costs** to each sales transaction.

# Shipping Instruction

### **Report Module Guide: Daily Shipping Instruction Schedule**

#### **Module Location**

#### Sales &gt; Reports &gt; Shipping Reports &gt; Daily Shipping Instruction Schedule

#### **Module Objective**

#### The **Daily Shipping Instruction Schedule** report module is used to generate a daily or periodic shipping schedule. This report is a primary operational work tool for the logistics and warehouse teams to plan, monitor, and execute all goods shipment activities to customers based on Shipping Instruction documents.

### **1. Report Parameters (Filter)**

#### The main page of this module is a form containing various parameters to customize the schedule that will be generated.

![image.png](https://manual.kokola.co/uploads/images/gallery/2025-08/scaled-1680-/pbUimage.png)

#### Here is an explanation for each parameter:

- #### **Date Type**:
    
    
    - #### A key filter to determine the basis for pulling the data:
    - #### **Shipping Instruction Date**: Displays the schedule based on the date the instruction document was created.
    - #### **Expected Delivery Date**: Displays the schedule based on the estimated date the goods will arrive at the customer.
- #### **Date**:
    
    
    - #### Specify the **From** and **To** date range to define the schedule's period (e.g., August 1, 2025, to August 31, 2025).
- #### **Status**:
    
    
    - #### Use this list box to filter by shipping status, such as **Full Delivered**, **Half Delivered**, or **Not Delivered**.
- #### **Type / Sort By**:
    
    
    - #### Select the report's level of detail (**Summary** or **Detail**) and sort the results by a specific criterion (e.g., Customer).

### **2. Steps to Generate the Report**

#### **Step 1: Set Report Parameters**

#### Select all the parameters you need, especially defining the **Date Type**, the **Date** range, and the **Status** to get the relevant schedule.

![image.png](https://manual.kokola.co/uploads/images/gallery/2025-08/scaled-1680-/5ccimage.png)  
  
![image.png](https://manual.kokola.co/uploads/images/gallery/2025-08/scaled-1680-/6urimage.png)

#### **Step 2: Generate the Report**

#### After all parameters are set, click one of the two buttons in the bottom-left section of the page:

- #### **Display Report**: To preview the shipping schedule directly on your screen. 
    
    #### ![image.png](https://manual.kokola.co/uploads/images/gallery/2025-08/scaled-1680-/M4Pimage.png)
- #### **Export To MS Excel**: To download the schedule data in an Excel file format. ![image.png](https://manual.kokola.co/uploads/images/gallery/2025-08/scaled-1680-/2HZimage.png)

### **3. Example of the Report View**

#### After you click, the system will generate a detailed report like the following, which functions as a shipping work schedule.

![image.png](https://manual.kokola.co/uploads/images/gallery/2025-08/scaled-1680-/uMnimage.png)

#### **Report Explanation**: This report displays a detailed list of all shipping instructions that match your filters.

#### **Key Columns**:

- #### **Shipping Instruction Number**: The instruction's reference number.
- #### **Customer**: The destination customer.
- #### **Shipping Instruction Date**: The date the instruction was created.
- #### **Expected Delivery Date**: The estimated arrival date of the goods.
- #### **Delivery Status**: The current shipping status.

### **Tips &amp; Important Notes**

- #### Use this report **every day** to create a shipping worklist for the **Warehouse and Logistics teams**.
- #### The **Date Type** filter is very useful. Select **Shipping Instruction Date** to see what needs to be prepared today, and select **Expected Delivery Date** to monitor shipments that are supposed to arrive at the customer's location.
- #### Filtering by **Status** with the **'Not Delivered'** option will effectively give you a to-do list of pending shipments.

# Delivery Tracking Report

### **Report Module Guide: Delivery Tracking Report**

#### **Module Location**

#### Sales &gt; Reports &gt; Delivery Report &gt; Delivery Tracking Report

#### **Module Objective**

#### The **Delivery Tracking Report** module is used to generate a report that tracks the document flow of the entire order fulfillment process. This report allows users to trace an order from the initial **Sales Order** stage, on to the **Shipping Instruction**, and through to the final stage, the **Delivery Order (Surat Jalan)**.

### **1. Report Parameters**

#### The main page of this module is a form containing several parameters to customize the report that will be generated.

#### Here is an explanation for each parameter:

- #### **Sales Order**:
    
    
    - #### Use this field to search for and trace the status of one specific Sales Order number.
- #### **Customer**:
    
    
    - #### Filter the report by **All** customers or a **Selected** customer.
- #### **Sales Order document date**:
    
    
    - #### Specify the creation date range (**From** and **To**) of the Sales Orders whose document flow you want to see (e.g., August 1, 2025, to August 31, 2025).

### **2. Steps to Generate the Report**

#### **Step 1: Set Report Parameters**

#### Select all the parameters you need, for example, a date range to see all orders within a month.

#### **Step 2: Generate the Report**

#### After the parameters are set, click the **Display Report** button in the bottom-left section of the page to see the tracking report. ![image.png](https://manual.kokola.co/uploads/images/gallery/2025-08/scaled-1680-/zTlimage.png)

### **3. Reading the Tracking Report**

#### The generated report will display the interlinked document flow for each order.

![image.png](https://manual.kokola.co/uploads/images/gallery/2025-08/scaled-1680-/Qr2image.png)

#### **Report Explanation**: This report displays the sales document flow, grouped by **Customer** (e.g., "Mega Global Food Industry").

#### **Document Flow Structure**:

1. #### **Sales Order**: Displays the list of sales orders from the customer. This is the initial stage.
2. #### **Shipping Instruction**: Displays the command document to the warehouse that was created based on the Sales Order to its left.
3. #### **Delivery Order (Surat Jalan)**: Displays the final shipping document created based on the Shipping Instruction.

#### **Document Status**: Pay attention to the status icons next to each document number (e.g., \[Approved\], \[Confirmed\]) to know the progress and the latest status of each stage.

### **Tips &amp; Important Notes**

- #### Use this report to answer customer questions about their **order status** quickly and accurately.
- #### This report is very useful for the **Customer Service and Sales Admin teams** to monitor the smoothness of the order fulfillment process from start to finish.
- #### If a Sales Order does not yet have a Shipping Instruction or Delivery Order, this indicates a **pending order that requires immediate follow-up**.

# Weekly Delivery

### **Report Module Guide: Weekly Shipping Report**

#### **Module Location**

#### Sales &gt; Reports &gt; Shipping Reports &gt; Weekly Shipping (Note: The title in the system indicates this report is related to PPIC | Report | Detail Production Report)

#### **Module Objective**

#### The **Weekly Shipping** report module is used to generate a comparative report between the shipping **Plan** and the **Actual** realization within a single week. This report is an important Key Performance Indicator (KPI) for monitoring the on-time performance and fulfillment of the shipping schedule by the logistics and production teams.

### **1. Report Parameters**

#### The main page of this module is a simple form for selecting the report period.

![image.png](https://manual.kokola.co/uploads/images/gallery/2025-08/scaled-1680-/CbWimage.png)

#### Here is an explanation for each parameter:

- #### **Period**:
    
    
    - #### Select the month and year of the report period you wish to see.
- #### **Week number**:
    
    
    - #### Select the week number within that month that you want to analyze (e.g., week 1, 2, 3, or 4).

### **2. Steps to Generate the Report**

#### **Step 1: Set Report Parameters**

#### Select the **Period** (month and year) as well as the **Week number** to be analyzed.   
![image.png](https://manual.kokola.co/uploads/images/gallery/2025-08/scaled-1680-/0p9image.png)

#### **Step 2: Generate the Report**

#### After the parameters are set, click one of the two buttons at the bottom:

- #### **Display Report**: To preview the comparison report directly on your screen. 
    
    #### ![image.png](https://manual.kokola.co/uploads/images/gallery/2025-08/scaled-1680-/Sueimage.png)
- #### **Export To MS Excel**: To download the report data in an Excel file format. 
    
    #### ![image.png](https://manual.kokola.co/uploads/images/gallery/2025-08/scaled-1680-/EkPimage.png)

### **3. Reading the Weekly Shipping Report**

#### The generated report will present a detailed comparison between the plan and the realization.

![image.png](https://manual.kokola.co/uploads/images/gallery/2025-08/scaled-1680-/Ihjimage.png)

#### **Report Explanation**: This report is designed for in-depth Plan vs. Actual analysis.

- #### **Daily Breakdown**: The **Week 1** section details the **Plan** and **Act** (Actual) comparison for each working day (dates 01 to 05).
- #### **Weekly Total &amp; Commitment**: The **Total Week 1** and **Shipping Commitment Week 1** columns summarize the performance for the full week.
- #### **Analysis Columns**:
    
    
    - #### **%**: Shows the percentage of shipping target achievement.
    - #### **Gap**: Shows the difference or gap between the planned quantity and the realized quantity.

### **Tips &amp; Important Notes**

- #### This report is a crucial performance measurement tool for the **PPIC (Production Planning and Inventory Control) and Logistics** teams.
- #### Use this report to identify delays or problems in fulfilling the shipping schedule early and to take corrective action.
- #### The 'Plan' data is likely pulled from a forecast or master production schedule, while the 'Act' data is pulled from actual shipping documents like Delivery Orders.

# Expedition Monitoring

### **Report Module Guide: Expedition Monitoring**

#### **Module Location**

#### Sales &gt; Reports &gt; Delivery Reports &gt; Expedition Monitoring

#### **Module Objective**

#### The **Expedition Monitoring** report module is used to generate a report that details and monitors the activities and performance of shipping service partners (expeditions). This report helps in tracking which shipments are handled by each expedition, the shipping destinations, as well as the details of the products that were shipped.

### **1. Report Parameters (Filter)**

#### The main page of this module is a form containing various parameters to customize the report that will be generated.

![image.png](https://manual.kokola.co/uploads/images/gallery/2025-08/scaled-1680-/eHeimage.png)

#### Here is an explanation for each parameter:

- #### **Expedition Date**:
    
    
    - #### Specify the **From** and **To** date range to define the shipping period to be displayed (e.g., August 1, 2025, to August 31, 2025).
- #### **Expedition Name**:
    
    
    - #### Use this list box to select one or more specific expedition names you wish to monitor (e.g., 6 LOGISTIC SIDOARJO, AB CARGO, etc.). Leave it blank to display all expeditions.

### **2. Steps to Generate the Report**

#### **Step 1: Set Report Parameters**

#### Define the **Expedition Date** range and select an **Expedition Name** if you want to focus on a specific expedition.

![image.png](https://manual.kokola.co/uploads/images/gallery/2025-08/scaled-1680-/wAuimage.png)

#### **Step 2: Generate the Report**

#### After all parameters are set, click one of the two buttons in the bottom-left section of the page:

- #### **Display Report**: To preview the monitoring report directly on your screen. 
    
    #### ![image.png](https://manual.kokola.co/uploads/images/gallery/2025-08/scaled-1680-/2DKimage.png)
- #### **Export To MS Excel**: To download the report data in an Excel file format. 
    
    #### ![image.png](https://manual.kokola.co/uploads/images/gallery/2025-08/scaled-1680-/GiFimage.png)

### **3. Example of the Report View**

#### After you click, the system will generate a detailed report like the following, which details every shipment per expedition.   
![image.png](https://manual.kokola.co/uploads/images/gallery/2025-08/scaled-1680-/Tmuimage.png)

#### **Report Explanation**: This report presents highly detailed shipping data per transaction line, grouped by expedition.

#### **Key Columns**:

- #### **Expedition Name**: The name of the expedition company that performed the shipment.
- #### **Destination**: The city or area of the shipping destination.
- #### **Invoice Number &amp; Invoice Amount**: Details of the shipped invoice.
- #### **Product Category Columns (BISCUIT, CRACKERS, etc.)**: This section details the quantity or value of products from each category that were sent by that expedition in a single shipment.

### **Tips &amp; Important Notes**

- #### Use this report to **evaluate the performance of your expedition partners**, for example, by looking at shipping volumes to various destinations or on-time delivery performance (Time Accuracy).
- #### This report is very useful for the **Logistics team** to manage relationships and monitor the performance of third-party shipping services.
- #### The **Expedition Name** filter allows you to focus the analysis on the performance of a single expedition company.

# Report Shipping Instruction

### **Report Module Guide: Shipping Instruction Report**

#### **Module Location**

Sales &gt; Reports &gt; Delivery Report &gt; Report Shipping Instruction

#### **Module Objective**

#### The **Shipping Instruction Report** module is used to generate a summary report that aggregates the total product demand from all Shipping Instruction documents within a specific period. This report presents the demand data alongside inventory data and Job Order data, making it very useful for production planning and order fulfillment.

### **1. Report Parameters**

#### The main page of this module is a simple form containing a date parameter for the report.

![image.png](https://manual.kokola.co/uploads/images/gallery/2025-08/scaled-1680-/Utnimage.png)

#### Here is an explanation for each parameter:

- #### **Date Shipping Instruction**:
    
    
    - #### Specify the **From** and **To** date range to accumulate the demand from all Shipping Instructions created within that period (e.g., August 1, 2025, to August 7, 2025).

### **2. Steps to Generate the Report**

#### **Step 1: Set Report Parameters**

#### Define the date range in the **Date Shipping Instruction** fields.

#### **Step 2: Generate the Report**

#### After the parameters are set, click one of the two buttons at the bottom:

- #### **Display Report**: To preview the report directly on your screen. ![image.png](https://manual.kokola.co/uploads/images/gallery/2025-08/scaled-1680-/NhEimage.png)
- #### **Export To MS Excel**: To download the report data in an Excel file format. 
    
    #### ![image.png](https://manual.kokola.co/uploads/images/gallery/2025-08/scaled-1680-/pY8image.png)

### **3. Example of the Report View**

#### After you click, the system will generate a detailed report like the following, which details the demand per product.

![image.png](https://manual.kokola.co/uploads/images/gallery/2025-08/scaled-1680-/tlRimage.png)

#### **Report Explanation**: This report displays a list of products grouped by category (KUKIS, CRACKERS, etc.).

#### **Key Columns**:

- #### **Item Code** and **Item Name**: Details of the product requested in the shipping instructions.
- #### **Inventory**: The quantity of stock available in the warehouse for that product.
- #### **Job Order**: Details of the production work orders (Shift 1, Shift 2, Shift 3) for this product, which shows the current production plan.
- #### **Balance**: Likely shows the final balance after considering the demand, existing stock, and production plans.

### **Tips &amp; Important Notes**

- #### Although named 'Shipping Instruction Report', this report is more focused on **analysis from the production and inventory side** to meet the total shipping demand.
- #### This report is a crucial tool for the **PPIC (Production Planning and Inventory Control)** team to ensure product availability and plan the production schedule to match sales demand.
- #### Use this report to see the big picture of the total product demand generated by the sales team in a single period.

# Link Account Report

### **Report Module Guide: Linked Account Report**

#### **Module Location**

#### Sales &gt; Reports &gt; Invoice Reports &gt; Linked Account Report

#### **Module Objective**

#### The **Linked Account Report** module is used to display the mapping or "linking" between each customer and their specific accounts in the General Ledger. This report is a crucial verification tool for the accounting team to ensure that every customer has been connected to the correct GL accounts for various transaction types, such as Receivables, Down Payments, and Deposits.

### **1. Report Parameters (Filter)**

#### The main page of this module is a simple form containing several parameters to customize the report that will be generated.

![image.png](https://manual.kokola.co/uploads/images/gallery/2025-08/scaled-1680-/f5uimage.png)

#### Here is an explanation for each parameter:

- #### **Item Category**:
    
    
    - #### Use this dropdown to filter customers based on the product category they purchase.
- #### **Customer**:
    
    
    - #### Filter the report by **All** customers or a **Selected** customer.

### **2. Steps to Generate the Report**

#### **Step 1: Set Report Parameters**

#### Select the parameters you need to focus the report.

#### **Step 2: Generate the Report**

#### After the parameters are set, click one of the two buttons in the bottom-left section of the page:

- #### **Display Report**: To preview the linked account report directly on your screen. ![image.png](https://manual.kokola.co/uploads/images/gallery/2025-08/scaled-1680-/jxUimage.png)
- #### **Export To MS Excel**: To download the report data in an Excel file format. 
    
    #### ![image.png](https://manual.kokola.co/uploads/images/gallery/2025-08/scaled-1680-/pe6image.png)

### **3. Example of the Report View**

#### After you click, the system will generate a detailed report in a matrix format as follows:

![image.png](https://manual.kokola.co/uploads/images/gallery/2025-08/scaled-1680-/tczimage.png)

#### **Report Explanation**: This report displays a matrix of the account links for each customer.

- #### **Rows**: Each row represents one customer (**Account Name**).
- #### **Columns**: The main columns, such as **Account for AR Invoiced**, **Account for Customer Down Payment**, and **Account for Customer Deposit**, show the transaction types. Under each main column, there are details of the GL account used per currency.

### **Workflow &amp; Integrated Business process**

- #### This report is a reflection of the settings configured in the **Sales &gt; Customer &gt; Customer Category** module.
- #### The Accounting team should use this report periodically to verify that all customers are linked to the correct GL accounts to ensure the integrity of the financial statements.

### **Tips &amp; Important Notes**

- #### If you find a customer whose 'Account Link' is incorrect or empty in this report, immediately correct the settings in the **Customer Category** module or the customer master data.
- #### This report is an important **audit tool** to ensure the automated journaling process is functioning correctly.

# Document Flow Report

### **Report Module Guide: Sales Document Flow Report**

#### **Module Location**

#### Sales &gt; Reports &gt; Invoice Reports &gt; Sales Document Flow Report

#### **Module Objective**

#### The **Sales Document Flow Report** module is used to generate a report that tracks the entire end-to-end document flow of a sales process. This report visually links one document to the next, starting from the **Sales Order**, to **Shipment Notes** (Shipping), to the **Sales Invoice** (Billing), and finally to the **Cash Book** (Payment Receipt).

### **1. Report Parameters (Filter)**

#### The main page of this module is a form containing several parameters to customize the report that will be generated.

![image.png](https://manual.kokola.co/uploads/images/gallery/2025-08/scaled-1680-/zh8image.png)

#### Here is an explanation for each parameter:

- #### **Sales Order**:
    
    
    - #### Use this field to search for and trace the document flow of one specific Sales Order number.
- #### **Customer**:
    
    
    - #### Filter the report by **All** customers or a **Selected** customer.
- #### **Sales Order Document Date**:
    
    
    - #### Specify the creation date range (**From** and **To**) of the Sales Orders whose document flow you want to see (e.g., August 1, 2025, to August 8, 2025).

### **2. Steps to Generate the Report**

#### **Step 1: Set Report Parameters**

#### Select all the parameters you need to focus the report on the transaction(s) you wish to trace.

#### **Step 2: Generate the Report**

#### After the parameters are set, click the **Display Report** button in the bottom-left section of the page to see the document flow report. ![image.png](https://manual.kokola.co/uploads/images/gallery/2025-08/scaled-1680-/fyLimage.png)

### **3. Reading the Document Flow Report**

#### The generated report will display the interlinked document flow for each order.

#### **Report Explanation**: This report displays the sales document flow, grouped by **Customer**.

![image.png](https://manual.kokola.co/uploads/images/gallery/2025-08/scaled-1680-/KHNimage.png)

#### **Document Flow Structure**: This report shows the complete flow from left to right:

1. #### **Sales Order**: The initial stage where the customer's order is recorded.
2. #### **Shipment Notes**: The shipping command document created based on the Sales Order.
3. #### **Sales Invoice**: The billing document created based on the shipment.
4. #### **Cash Book**: The final stage, showing the payment receipt document.

#### **Document Status**: Pay attention to the status next to each document number (e.g., \[approved\]) to know its progress at each stage.

### **Tips &amp; Important Notes**

- #### Use this report to get a complete picture of an order's lifecycle, from the moment the order is received until it is fully paid.
- #### This report is very useful for the **Customer Service and AR (Account Receivable)** teams to accurately answer customer questions about the status of orders, shipments, and payments.
- #### If the **Cash Book** column is still empty, it indicates that the related invoice has not yet been paid.

# Sales Invoice Schedule Report

### **Report Module Guide: Sales Invoice Schedule Report**

#### **Module Location**

#### Sales &gt; Reports &gt; Invoice Reports &gt; Sales Invoice Schedule Report

#### **Module Objective**

#### The **Sales Invoice Schedule Report** module is used to generate a report that monitors billings or invoices that are issued on a schedule. This is very useful for sales scenarios with recurring payments or installments. The report tracks the progress of billing against the total value of the initial Sales Order.

### **1. Report Parameters (Filter)**

#### The main page of this module is a simple form containing several parameters to customize the report that will be generated.

![image.png](https://manual.kokola.co/uploads/images/gallery/2025-08/scaled-1680-/Zjiimage.png)

#### Here is an explanation for each parameter:

- #### **Invoice Date**:
    
    
    - #### Specify the **From** and **To** date range to display invoice schedules that are relevant within that period (e.g., August 1, 2025, to August 31, 2025).
- #### **Show Details**:
    
    
    - #### Check this box if you want to get a report with more complete details.

### **2. Steps to Generate the Report**

#### **Step 1: Set Report Parameters**

#### Define the date range in the **Invoice Date** fields and choose whether to display details or not. ![image.png](https://manual.kokola.co/uploads/images/gallery/2025-08/scaled-1680-/i3Fimage.png)

#### **Step 2: Generate the Report**

#### After the parameters are set, click one of the two buttons in the bottom-left section of the page:

- #### **Display Report**: To preview the invoice schedule report directly on your screen. ![image.png](https://manual.kokola.co/uploads/images/gallery/2025-08/scaled-1680-/8Jiimage.png)
- #### **Export To MS Excel**: To download the report data in an Excel file format. 
    
    #### ![image.png](https://manual.kokola.co/uploads/images/gallery/2025-08/scaled-1680-/KLZimage.png)

### **3. Example of the Report View**

#### After you click, the system will generate a detailed report like the following, which details the progress of each invoice schedule.

![image.png](https://manual.kokola.co/uploads/images/gallery/2025-08/scaled-1680-/uKBimage.png)

#### **Report Explanation**: This report will display a list of all active sales invoice schedules.

#### **Key Columns for Analysis**:

- #### **Sales Invoice Schedule Number**: The unique number for each invoice schedule.
- #### **Total SO Amount**: The total value of the Sales Order that is the basis for the schedule.
- #### **Installment**: Information regarding the installment or billing term.
- #### **Total Generated Invoice Amount**: The total value for which invoices have been issued to date.
- #### **Total Paid Invoice Amount**: The total value that has been paid by the customer from the issued invoices.

### **Tips &amp; Important Notes**

- #### Use this report to effectively monitor **recurring revenue** or installment-based billing.
- #### This report is a recapitulation of the data set up in the **Sales Invoice Schedule** module.
- #### This report is crucial for the **Accounts Receivable (AR) and Finance teams** for forecasting cash inflow from scheduled billings.

# Credit Limit Usage

### **Report Module Guide: Credit Limit Usage**

#### **Module Location**

#### Sales &gt; Reports &gt; Invoice Reports &gt; Credit Limit Usage

#### **Module Objective**

#### The **Credit Limit Usage** report module is used to generate a report that details the usage of the credit limit by customers. This report displays all outstanding (unpaid) documents that contribute to a customer's total receivable balance, making it easier for the sales and finance teams to manage credit risk.

### **1. Report Parameters (Filter)**

#### The main page of this module is a form containing several parameters to customize the report that will be generated.

![image.png](https://manual.kokola.co/uploads/images/gallery/2025-08/scaled-1680-/MMBimage.png)

#### Here is an explanation for each parameter:

- #### **Customer**:
    
    
    - #### Filter the report by **All** customers or a **Selected** customer that you wish to check.
- #### **Type**:
    
    
    - #### Select the report's level of detail:
    - #### **Detail**: Displays the details of each outstanding document (invoice, debit/credit note).
    - #### **Summary**: Displays a summary of the total credit limit usage.

### **2. Steps to Generate the Report**

#### **Step 1: Set Report Parameters**

#### Select the **Customer** scope and the report **Type** that you want.   
![image.png](https://manual.kokola.co/uploads/images/gallery/2025-08/scaled-1680-/ws9image.png)  
  
![image.png](https://manual.kokola.co/uploads/images/gallery/2025-08/scaled-1680-/d3Zimage.png)

#### **Step 2: Generate the Report**

#### After all parameters are set, click one of the two buttons in the bottom-left section of the page:

- #### **Display Report**: To preview the report directly on your screen. ![image.png](https://manual.kokola.co/uploads/images/gallery/2025-08/scaled-1680-/LvWimage.png)
- #### **Export To MS Excel**: To download the report data in an Excel file format. 
    
    #### ![image.png](https://manual.kokola.co/uploads/images/gallery/2025-08/scaled-1680-/qQGimage.png)

### **3. Example of the Report View**

#### After you click, the system will generate a detailed report like the following, which details every document that affects the customer's receivable balance.

![image.png](https://manual.kokola.co/uploads/images/gallery/2025-08/scaled-1680-/t3pimage.png)

#### **Report Explanation**: This report will display a detailed list of all the documents that make up the customer's total outstanding receivable.

#### **Key Columns**:

- #### **Type**: The type of document (e.g., Invoice, Debit Note).
- #### **Document No**: The document's reference number.
- #### **Invoice Due Date**: The due date.
- #### **Amount**: The value of each outstanding document.

### **Tips &amp; Important Notes**

- #### Use this report **before approving a new Sales Order** to ensure a customer does not exceed their approved credit limit.
- #### This is an important tool for the **Credit Control, Sales, and Accounts Receivable (AR)** teams.
- #### The accuracy of this report depends on the **Credit Limit** data being set up correctly in the customer master data or in the Sales Contract / MOU.

# Sales Return Report

### **Sales Return Reports**

#### This section covers reports related to the process of returns or the sending back of goods from customers.

### **Report Module Guide: Sales Return Report**

#### **Module Location**

#### Sales &gt; Reports &gt; Return Reports &gt; Sales Return Report

#### **Module Objective**

#### The **Sales Return Report** module is used to generate a detailed list of all return transactions or goods returns made by customers within a specific period. This report is used to monitor, summarize, and analyze sales return activities.

### **1. Report Parameters (Filter)**

#### The main page of this module is a form containing various parameters to customize the report that will be generated.

![image.png](https://manual.kokola.co/uploads/images/gallery/2025-08/scaled-1680-/qhPimage.png)

#### Here is an explanation for each parameter:

- #### **Filter**:
    
    
    - #### Use this dropdown to filter the report by the category of the returned product (e.g., RAW MATERIAL).
- #### **Customer**:
    
    
    - #### Select the customer scope for the report: **All** or **Selected** (Specific Customer).
- #### **Sales Return Date**:
    
    
    - #### Specify the **From** and **To** date range to define the period of returns to be displayed (e.g., August 1, 2025, to August 31, 2025).
- #### **Show Details**:
    
    
    - #### Check this box if you want to get a report with more complete details.

### **2. Steps to Generate the Report**

#### **Step 1: Set Report Parameters**

#### Select all the parameters you need, especially defining the **Sales Return Date** range. ![image.png](https://manual.kokola.co/uploads/images/gallery/2025-08/scaled-1680-/nBLimage.png)

#### **Step 2: Generate the Report**

#### After all parameters are set, click one of the two buttons in the bottom-left section of the page:

- #### **Display Report**: To preview the return report directly on your screen. 
    
    #### ![image.png](https://manual.kokola.co/uploads/images/gallery/2025-08/scaled-1680-/9gximage.png)
- #### **Export To MS Excel**: To download the report data in an Excel file format. 
    
    #### ![image.png](https://manual.kokola.co/uploads/images/gallery/2025-08/scaled-1680-/IeOimage.png)

### **3. Example of the Report View**

#### After you click, the system will generate a detailed report like the following, which details every return transaction.

#### **Report Explanation**: This report will display a list of all sales return documents.

#### **Key Columns**:

- #### **Sales Return Number**: The reference number of the return document.
- #### **Sales Return Date**: The date the return occurred.
- #### **Customer**: The name of the customer who made the return.
- #### **Shipment Note** and **Sales Order**: Reference document numbers from the original sales transaction.

### **Tips &amp; Important Notes**

- #### Use this report to **analyze return trends**, for example, to find out which products or customers have the most frequent returns.
- #### This report is a recapitulation of the data input in the **Sales Return** module. Ensure all return data has been recorded correctly.
- #### This report is useful for the **Quality Assurance, Sales, and Warehouse teams** for further investigation into the causes of returns and for process improvement.

# Distributor Sales Return

### **Sales Return Reports**

#### This section covers reports related to the process of returns or the sending back of goods from customers.

### **Report Module Guide: Distributor Sales Return Report**

#### **Module Location**

#### Sales &gt; Reports &gt; Sales Return Reports &gt; Distributor Sales Return Report

#### **Module Objective**

#### The **Distributor Sales Return Report** module is used to generate an analytical report that calculates the return rate or percentage for a distributor. This report compares the total sales value (turnover) with the total value of returned goods to provide an overview of the distributor's performance and potential product issues in the market.

### **1. Report Parameters (Filter)**

#### The main page of this module is a form containing various parameters to customize the report that will be generated.

![image.png](https://manual.kokola.co/uploads/images/gallery/2025-08/scaled-1680-/m9Nimage.png)

#### Here is an explanation for each parameter:

- #### **Customer**:
    
    
    - #### The primary filter to select the **Distributor** to be analyzed from the dropdown (e.g., A. Karim,Bp-palembang).
- #### **Period**:
    
    
    - #### Specify the **From** and **To** date range to pull sales and return data within that period (e.g., August 1, 2025, to August 31, 2025).
- #### **Item Category**:
    
    
    - #### Use this list box to focus the analysis on specific product categories.

### **2. Steps to Generate the Report**

#### **Step 1: Set Report Parameters**

#### Select the **Customer** (Distributor) you wish to analyze and define the **Period** range.

![image.png](https://manual.kokola.co/uploads/images/gallery/2025-08/scaled-1680-/8usimage.png)

#### **Step 2: Generate the Report**

#### After all parameters are set, click one of the two buttons in the bottom-left section of the page:

- #### **Display Report**: To preview the analysis report directly on your screen. 
    
    #### ![image.png](https://manual.kokola.co/uploads/images/gallery/2025-08/scaled-1680-/TuVimage.png)
- #### **Export To MS Excel**: To download the report data in an Excel file format. 
    
    #### ![image.png](https://manual.kokola.co/uploads/images/gallery/2025-08/scaled-1680-/aQ6image.png)

### **3. Example of the Report View**

#### After you click, the system will generate a summary report like the following.

![image.png](https://manual.kokola.co/uploads/images/gallery/2025-08/scaled-1680-/Dxpimage.png)

#### **Report Explanation**: This report presents a summary of the return rate per **Product Category** for the selected distributor.

#### **Key Columns for Analysis**:

- #### **Total Omset (Total Turnover)**: Shows the total sales value to the distributor in that period.
- #### **Total Return**: Shows the total value of goods returned by the distributor.
- #### **Percentage %**: Shows the return percentage, calculated from **(Total Return / Total Turnover) x 100%**.

### **Tips &amp; Important Notes**

- #### Use this report to **evaluate distributor performance**. A high return rate may indicate problems with sales activities, product handling, or logistics at the distributor level.
- #### This report is an important analysis tool for **Sales Management** to manage distributor relationships and performance.
- #### To get an accurate percentage calculation, ensure all sales and return transactions for that distributor have been recorded correctly in the system.

# Register Retur Report

### **Report Module Guide: Return Register Report**

#### **Module Location**

#### Sales &gt; Reports &gt; Sales Return Reports &gt; Return Register Report

#### **Module Objective**

#### The **Return Register Report** module is used to generate a "register book" or a highly detailed transactional record of all sales return activities. This report provides raw, line-by-line data from each return, making it highly suitable for audits, in-depth tracing, and data verification.

### **1. Report Parameters (Filter)**

#### The main page of this module is a form containing various parameters to customize the report that will be generated.

![image.png](https://manual.kokola.co/uploads/images/gallery/2025-08/scaled-1680-/QJiimage.png)

#### Here is an explanation for each parameter:

- #### **Warehouse**:
    
    
    - #### Use this list box to filter the report based on the warehouse where the returned goods were received.
- #### **Customer**:
    
    
    - #### Select the customer scope for the report: **All**, **Category**, **Leader**, **Salesman**, or **Selected** (for a specific Customer).
- #### **Customer Date**:
    
    
    - #### Specify the **From** and **To** date range to define the period of returns to be displayed (e.g., August 1, 2025, to August 31, 2025).

### **2. Steps to Generate the Report**

#### **Step 1: Set Report Parameters**

#### Define the parameters you need, especially selecting the **Customer** scope and the **Customer Date** range.

![image.png](https://manual.kokola.co/uploads/images/gallery/2025-08/scaled-1680-/Ln7image.png)

#### **Step 2: Generate the Report**

#### After all parameters are set, click one of the two buttons in the bottom-left section of the page:

- #### **Display Report**: To preview the return register report directly on your screen. ![image.png](https://manual.kokola.co/uploads/images/gallery/2025-08/scaled-1680-/eemimage.png)
- #### **Export To MS Excel**: To download the report data in an Excel file format. 
    
    #### ![image.png](https://manual.kokola.co/uploads/images/gallery/2025-08/scaled-1680-/NE8image.png)

### **3. Example of the Report View**

#### After you click, the system will generate a detailed report like the following, which details every return transaction.

#### **Report Explanation**: This report presents return data in a highly detailed register or log format, displaying one row for each item that was returned.

#### **Key Columns**:

- #### **Notes Number**: The reference number of the return document.
- #### **Customer Name**: The name of the customer who made the return.
- #### **Warehouse**: The destination warehouse for the returned goods.
- #### **Item Code, Item Name**: Details of the product that was returned.
- #### **Qty, Price, Amount**: The quantity and value details of each returned item.
- #### **Salesman**: The name of the salesperson associated with the original transaction.

### **Tips &amp; Important Notes**

- #### Use this report for **audit purposes** or when you need the most complete details of every return transaction.
- #### This report is a recapitulation of the raw data from the **Sales Return** module.
- #### The **Export to MS Excel** feature is very useful for further processing of this register data, for example, to create pivot analyses.

# Sales Time Series

### **Report Module Guide: Time Series Report**

#### **Module Location**

#### Sales &gt; Reports &gt; Sales Register Reports &gt; Time Series Sales

#### **Module Objective**

#### The **Time Series Report** module is used to generate a "register book" or a highly detailed transactional record of all sales activities, presented chronologically (by time sequence). This report provides a fundamental record of all items sold within a single period.

### **1. Report Parameters (Filter)**

#### The main page of this module is a form containing various parameters to customize the report that will be generated.

![image.png](https://manual.kokola.co/uploads/images/gallery/2025-08/scaled-1680-/VSUimage.png)

#### Here is an explanation for each parameter:

- #### **Customer**:
    
    
    - #### Select the customer scope for the report: **All**, **Category** (by Category), or **Selected** (for a specific Customer).
- #### **Customer Date**:
    
    
    - #### Specify the **From** and **To** date range to define the period of sales transactions to be displayed (e.g., August 1, 2025, to August 31, 2025).
- #### **Document Active Status**:
    
    
    - #### Use this dropdown to filter by the active status of the sales documents.

### **2. Steps to Generate the Report**

#### **Step 1: Set Report Parameters**

#### Select all the parameters you need, especially defining the **Customer Date** range. ![image.png](https://manual.kokola.co/uploads/images/gallery/2025-08/scaled-1680-/1U6image.png)

#### **Step 2: Generate the Report**

#### After all parameters are set, click one of the two buttons in the bottom-left section of the page:

- #### **Display Report**: To preview the sales register report directly on your screen. ![image.png](https://manual.kokola.co/uploads/images/gallery/2025-08/scaled-1680-/ef9image.png)
- #### **Export To MS Excel**: To download the report data in an Excel file format. 
    
    #### ![image.png](https://manual.kokola.co/uploads/images/gallery/2025-08/scaled-1680-/DQMimage.png)

### **3. Example of the Report View**

#### After you click, the system will generate a detailed report like the following, which details every sales transaction line chronologically.

![image.png](https://manual.kokola.co/uploads/images/gallery/2025-08/scaled-1680-/wIgimage.png)

#### **Report Explanation**: This report displays a list of all sales transactions in detail and in chronological order.

#### **Key Columns**:

- #### **Category**: The customer category.
- #### **Customer**: The name of the purchasing customer.
- #### **Product code** and **Product Name**: Details of the product sold.
- #### **Qty**: The number of units sold.
- #### **Net**: The net sales value of each transaction line.

### **Tips &amp; Important Notes**

- #### Use this report to see a **chronological record** of all sales activities.
- #### This report functions as a "sales diary" and is very useful for **audit purposes or for tracing transactions** in detail.
- #### The **Export to MS Excel** feature allows you to process the raw data from this register for various types of analysis.

# Perdistributor Sales Report

### **Report Module Guide: Sales Report by Distributor**

#### **Module Location**

#### Sales &gt; Reports &gt; Sales Register Reports &gt; Sales Report by Distributor

#### **Module Objective**

#### The **Sales Report by Distributor** (Perdistributor Sales Report) module is used to generate a detailed transactional report of all sales activities. This report can be filtered and grouped by various levels of the sales hierarchy such as Distributor, Salesman, or Leader, making it very useful for monitoring sales performance specifically.

### **1. Report Parameters (Filter)**

#### The main page of this module is a form containing various parameters to customize the report that will be generated.

![image.png](https://manual.kokola.co/uploads/images/gallery/2025-08/scaled-1680-/z7rimage.png)

#### Here is an explanation for each parameter:

- #### **Option By**:
    
    
    - #### The primary filter to select the report's scope, whether **All**, per **Leader**, **Salesman**, or a specific **Distributor**.
- #### **Customer Category**:
    
    
    - #### A further filter based on customer category.
- #### **Customer Date**:
    
    
    - #### Specify the **From** and **To** date range to define the period of sales transactions to be displayed (e.g., August 1, 2025, to August 8, 2025).
- #### **Option Import/Export Data**:
    
    
    - #### Select **Row** or **Column** to set the layout of the generated report.

### **2. Steps to Generate the Report**

#### **Step 1: Set Report Parameters**

#### Select all the parameters you need, especially defining the scope in **Option By** and the **Customer Date** range.

![image.png](https://manual.kokola.co/uploads/images/gallery/2025-08/scaled-1680-/vWWimage.png)  
  
![image.png](https://manual.kokola.co/uploads/images/gallery/2025-08/scaled-1680-/q3Yimage.png)

#### **Step 2: Generate the Report**

#### After all parameters are set, click one of the two buttons in the bottom-left section of the page:

- #### **Display Report**: To preview the sales report directly on your screen. 
    
    #### ![image.png](https://manual.kokola.co/uploads/images/gallery/2025-08/scaled-1680-/2UMimage.png)
- #### **Export To MS Excel**: To download the report data in an Excel file format. 
    
    #### ![image.png](https://manual.kokola.co/uploads/images/gallery/2025-08/scaled-1680-/fF4image.png)

### **3. Example of the Report View**

#### After you click, the system will generate a detailed report like the following, which details every sales transaction chronologically.

![image.png](https://manual.kokola.co/uploads/images/gallery/2025-08/scaled-1680-/CqVimage.png)

#### **Report Explanation**: This report displays a list of all sales transactions in detail and in order by **Date** (Tanggal).

#### **Key Columns**:

- #### **Item Code** and **Item Name**: Details of the product sold.
- #### **Quantity** and **Rupiah Value**: The quantity and value of each transaction.
- #### **Distributor, Salesman Name, Lead Name**: Displays the parties involved in each sales transaction.

### **Tips &amp; Important Notes**

- #### Use this report to monitor the **daily or weekly sales performance** of each distributor or salesman.
- #### The **Option By** filter is very flexible for performance analysis. For example, select **Salesman** to see all transactions successfully recorded by one salesperson.
- #### This is a detailed register report, highly suitable for further processing using the **Export to MS Excel** feature.

# Sales Quantity Analysis

### **Report Module Guide: Sales Quantity Analysis**

#### **Module Location**

#### Sales &gt; Reports &gt; Sales Quantity Analysis

#### **Module Objective**

#### The **Sales Quantity Analysis** report module is used to generate a report that analyzes the total sales quantity for each product, broken down into various Units of Measure. This report is very useful for understanding sales volume from different logistics and packaging perspectives.

### **1. Report Parameters (Filter)**

#### The main page of this module is a simple form containing several parameters to customize the report that will be generated.

![image.png](https://manual.kokola.co/uploads/images/gallery/2025-08/scaled-1680-/tLJimage.png)

#### Here is an explanation for each parameter:

- #### **Sales Type**:
    
    
    - #### Use this dropdown to select the data basis that will be used for the analysis, for example, **Shipment Notes** (based on goods that have already been shipped).
- #### **Period**:
    
    
    - #### Specify the **From** and **To** date range to define the period of transactions to be analyzed (e.g., 08/01/2025 to 08/09/2025).

### **2. Steps to Generate the Report**

#### **Step 1: Set Report Parameters**

#### Select the **Sales Type** and define the **Period** range.

![image.png](https://manual.kokola.co/uploads/images/gallery/2025-08/scaled-1680-/ViSimage.png)

#### **Step 2: Generate the Report**

#### After all parameters are set, click one of the two buttons in the bottom-left section of the page:

- #### **Display Report**: To preview the analysis report directly on your screen.
    
    #### ![image.png](https://manual.kokola.co/uploads/images/gallery/2025-08/scaled-1680-/GpWimage.png)
- #### **Export To MS Excel**: To download the report data in an Excel file format. 
    
    #### ![image.png](https://manual.kokola.co/uploads/images/gallery/2025-08/scaled-1680-/2sYimage.png)

### **3. Example of the Report View**

#### After you click, the system will generate a detailed report in a matrix format as follows:

![image.png](https://manual.kokola.co/uploads/images/gallery/2025-08/scaled-1680-/qqoimage.png)

#### **Report Explanation**: This report presents sales quantity data in a matrix format based on various units of measurement.

- #### **Rows**: Display the **Item Code** and **Item Description** of the products sold.
- #### **Columns**: Display the total sales quantity in various units, such as **KILOGRAM**, **DOS** (cartons), **RENTENG** (strips), and others.

### **Tips &amp; Important Notes**

- ##### Use this report to understand product sales volume in various units, which is useful for **logistics, packaging, and production planning**.
- ##### This report helps answer questions like, "How many total cartons (DOS) of product A were sold last month?".
- ##### To get accurate analysis results, ensure the **unit conversion data in the product master data** has been set up correctly.

# Sales Cost Ratio Transporter

### **Report Module Guide: Transporter Cost Ratio Report**

#### **Module Location**

#### Sales &gt; Reports &gt; Transporter Cost Ratio Report

#### **Module Objective**

#### The **Transporter Cost Ratio Report** module is used to generate a report that analyzes the shipping cost ratio. This report calculates the percentage of the shipping cost (freight cost) against the value of the goods being shipped. This is a Key Performance Indicator (KPI) for measuring and comparing the cost-efficiency of each shipping company (expedition/transporter).

### **1. Report Parameters (Filter)**

#### The main page of this module is a form containing various parameters to customize the report that will be generated.

![image.png](https://manual.kokola.co/uploads/images/gallery/2025-08/scaled-1680-/mMBimage.png)

#### Here is an explanation for each parameter:

- #### **State / Province**:
    
    
    - #### Filter the report by destination area, whether **All**, per **Island**, or **Selected** (Specific Province).
- #### **Expedition**:
    
    
    - #### Select the scope of shipping services, whether **All** or **Selected** (Specific Expedition).
- #### **From WH / Destination**:
    
    
    - #### Filter by the origin warehouse and the shipping destination.
- #### **Shipment Date**:
    
    
    - #### Specify the **From** and **To** date range to define the shipping period to be analyzed (e.g., August 1, 2025, to August 31, 2025).

### **2. Steps to Generate the Report**

#### **Step 1: Set Report Parameters**

#### Select all the parameters you need, for example, a **Shipment Date** range and a specific **Expedition** to compare efficiency.

#### **Step 2: Generate the Report**

#### After all parameters are set, click one of the two buttons in the bottom-left section of the page:

- #### **Display Report**: To preview the analysis report directly on your screen. 
    
    #### ![image.png](https://manual.kokola.co/uploads/images/gallery/2025-08/scaled-1680-/tqHimage.png)
- #### **Export To MS Excel**: To download the report data in an Excel file format. 
    
    #### ![image.png](https://manual.kokola.co/uploads/images/gallery/2025-08/scaled-1680-/yOwimage.png)

### **3. Example of the Report View**

#### After you click, the system will generate a detailed report like the following, which details every shipment and its cost ratio.   
![image.png](https://manual.kokola.co/uploads/images/gallery/2025-08/scaled-1680-/nSnimage.png)

#### **Report Explanation**: This report will display a detailed list of each shipment along with its cost ratio analysis.

#### **Key Columns for Analysis**:

- #### **Expedition**: The name of the expedition company used.
- #### **Amount**: Likely the total value of the goods shipped.
- #### **%CostRatio**: This column is the main analysis result, showing the percentage of the shipping cost against the value of the goods. **A lower number indicates better efficiency.**

### **Tips &amp; Important Notes**

- #### Use this report to **compare the cost-efficiency** among various expedition companies.
- #### Analyzing the cost ratio per destination (**State / Province**) can help in making strategic logistics decisions and determining shipping charges.
- #### This report is an important performance measurement tool for the **Logistics and Finance teams**.

# Sales Forecast Report

### **Report Module Guide: Sales Forecast Report**

#### **Module Location**

#### Sales &gt; Reports &gt; Sales Forecast Report

#### **Module Objective**

#### The **Sales Forecast Report** module is used to generate an analytical report that summarizes sales forecast data and compares it with historical data as well as other operational data. This report provides a high-level view for the **Sales and Operations Planning (S&amp;OP)** process.

### **1. Report Parameters**

#### The main page of this module is a simple form containing a date parameter for the report.

![image.png](https://manual.kokola.co/uploads/images/gallery/2025-08/scaled-1680-/HNzimage.png)

#### Here is an explanation for each parameter:

- #### **Sales Forecast Period**:
    
    
    - #### Specify the **From** and **To** date range to define the report period you wish to analyze (e.g., August 1, 2025, to August 31, 2025).

### **2. Steps to Generate the Report**

#### **Step 1: Set Report Parameters**

#### Define the date range in the **Sales Forecast Period** fields.

#### **Step 2: Generate the Report**

#### After the parameters are set, click one of the two buttons at the bottom:

- #### **Display Report**: To preview the report directly on your screen. ![image.png](https://manual.kokola.co/uploads/images/gallery/2025-08/scaled-1680-/kKDimage.png)
- #### **Export To MS Excel**: To download the report data in an Excel file format. 
    
    #### ![image.png](https://manual.kokola.co/uploads/images/gallery/2025-08/scaled-1680-/nG9image.png)

### **3. Example of the Report View**

#### After you click, the system will generate a detailed report like the following, which summarizes and analyzes the forecast data.   
![image.png](https://manual.kokola.co/uploads/images/gallery/2025-08/scaled-1680-/66zimage.png)

#### **Report Explanation**: This report displays a comparison between historical sales data, the forecast, and other operational data for each product.

#### **Key Columns**:

- #### **Product Name**: The name of the product being analyzed.
- #### **Last 3 Month Average**: The average sales of the last 3 months.
- #### **Last month**: The previous month's sales data.
- #### **Forecast (F)**: The sales forecast quantity for the selected period.
- #### **Order (O)**: The quantity of incoming Sales Orders.
- #### **Selling (S)**: The quantity of actual sales (from invoices).
- #### **Beginning Stock (BS)**: The beginning stock for the period.
- #### **Production Output (P)**: The quantity of production output.
- #### **Calculation Columns**: The columns on the right (**\[BS\] + (P)**, **\[(BS) + (P)\] / (F)**) are calculations used for S&amp;OP analysis, such as calculating **coverage days**.

### **Tips &amp; Important Notes**

- #### This report is a crucial **strategic analysis tool** for Management, the Sales team, and the PPIC team.
- #### Use this report in **monthly S&amp;OP meetings** to align sales plans, production capabilities, and inventory levels.
- #### To get an accurate analysis, ensure the forecast data has been uploaded and approved, and that all sales and production transaction data has been entered correctly.

# Custom Report

### **Report Module Guide: Custom Report**

#### **Module Location**

#### Sales &gt; Reports &gt; Custom Reports

#### **Module Objective**

#### This module, titled **Custom Report** in the system, is used to generate sales reports with specific or custom formats that may not be available in other standard report modules. It is a collection of miscellaneous reports for specific analysis needs.

### **1. Report Parameters (Filter)**

#### The main page of this module is a form containing several parameters to customize the report that will be generated.

![image.png](https://manual.kokola.co/uploads/images/gallery/2025-08/scaled-1680-/92Qimage.png)

#### Here is an explanation for each parameter:

- #### **Type of Report**:
    
    
    - #### Use this dropdown to select the type of custom report you want to generate (e.g., FINISHED GOOD).
- #### **Invoice Date**:
    
    
    - #### Specify the **From** and **To** date range to define the period of transactions for which data will be pulled (e.g., August 1, 2025, to August 31, 2025).

### **2. Steps to Generate the Report**

#### **Step 1: Set Report Parameters**

#### Define the **Invoice Date** range and select the **Type of Report** you want.   
![image.png](https://manual.kokola.co/uploads/images/gallery/2025-08/scaled-1680-/vTFimage.png)  
  
![image.png](https://manual.kokola.co/uploads/images/gallery/2025-08/scaled-1680-/8TGimage.png)

#### **Step 2: Generate the Report**

#### After all parameters are set, click one of the two buttons in the bottom-left section of the page:

- #### **Display Sales Report**: To preview the report directly on your screen. 
    
    #### ![image.png](https://manual.kokola.co/uploads/images/gallery/2025-08/scaled-1680-/cVJimage.png)
- #### **Export To MS Excel**: To download the report data in an Excel file format. 
    
    #### ![image.png](https://manual.kokola.co/uploads/images/gallery/2025-08/scaled-1680-/9oBimage.png)

### **3. Example of the Report View**

#### The generated report will vary depending on the **Type of Report** selected. One example is a summary of sales reports as shown below.   
![image.png](https://manual.kokola.co/uploads/images/gallery/2025-08/scaled-1680-/strimage.png)

#### **Report Explanation**: This example displays a summary of sales documents within the selected period.

#### **Key Columns**:

- #### **Date Delivery**: The date of delivery.
- #### **INVOICE**: The invoice reference number.
- #### **Net Amount**: The net value in USD and IDR currency.
- #### **PPN**: The Value Added Tax (VAT) amount.
- #### **Due Date**: The due date.

### **Tips &amp; Important Notes**

- #### Use this module to access sales reports with specific formats that might not be available in other report modules.
- #### **Explore the options in the `Type of Report`** dropdown to see other types of custom reports that may be available for your analysis needs.

# Item Transaction Report

### **Report Module Guide: Item/Service Transaction Report**

#### **Module Location**

#### Sales &gt; Reports &gt; Item Reports &gt; Item Transaction Report

#### **Module Objective**

#### The **Item/Service Transaction Report** module is used to generate a report that resembles a "stock card," which is to say it displays a detailed transaction history for each item or service. This report is very flexible as it can display transactions from both the Sales and Purchasing sides, thereby providing a complete overview of an item's movement.

### **1. Report Parameters (Filter)**

#### The main page of this module is a form containing various parameters to customize the report that will be generated.

![image.png](https://manual.kokola.co/uploads/images/gallery/2025-08/scaled-1680-/1tUimage.png)

#### Here is an explanation for each parameter:

- #### **Item**:
    
    
    - #### Select **All** to display transactions for all items, or **Selected** to choose specific items.
- #### **Document Date**:
    
    
    - #### Specify the **From** and **To** date range to define the period of transactions to be displayed (e.g., August 1, 2025, to August 31, 2025).
- #### **Transaction Type Filter**:
    
    
    - #### Use these radio buttons to define the type of transaction you wish to see. You can select **Sales** or **Purchasing**.
- #### **Customer**:
    
    
    - #### Filter transactions by **All** customers or a **Selected** customer.

### **2. Steps to Generate the Report**

#### **Step 1: Set Report Parameters**

#### Select all the parameters you need, especially defining the **Document Date** range and the transaction type (**Sales** or **Purchasing**).

![image.png](https://manual.kokola.co/uploads/images/gallery/2025-08/scaled-1680-/x1Kimage.png)  
![image.png](https://manual.kokola.co/uploads/images/gallery/2025-08/scaled-1680-/8EFimage.png)

#### **Step 2: Generate the Report**

#### After all parameters are set, click one of the two buttons in the bottom-left section of the page:

- #### **Display Report**: To preview the item transaction report directly on your screen. ![image.png](https://manual.kokola.co/uploads/images/gallery/2025-08/scaled-1680-/ZhVimage.png)
- #### **Export To MS Excel**: To download the report data in an Excel file format. 
    
    #### ![image.png](https://manual.kokola.co/uploads/images/gallery/2025-08/scaled-1680-/1rgimage.png)

### **3. Example of the Report View**

#### After you click, the system will generate a detailed report like the following, which will detail the transactions under each item name.

![image.png](https://manual.kokola.co/uploads/images/gallery/2025-08/scaled-1680-/7Ncimage.png)

#### **Report Explanation**: The report will display a list of the products you selected. Under each product, there will be a detailed list of every transaction (sales or purchase) that occurred within the selected period. In this example, no transactions were found ("Tidak Ada Transaksi").

#### **Content**: This report will contain details such as the transaction date, document number, quantity, and value for each item movement.

### **Tips &amp; Important Notes**

- #### Use this report to trace the complete history of a product, both from the purchasing side (**goods in**) and the sales side (**goods out**).
- #### This report is very useful for the **Inventory and PPIC (Production Planning and Inventory Control)** teams for stock movement analysis.
- #### By choosing between **Sales** and **Purchasing**, you can get a complete 'in-out' picture for an item.
