# Finance Module
# Invoice Payment Selection
### **Module Guide: Invoice Payment Selection**
#### **Module Location**
#### Finance > Invoice Payment Selection
#### **Module Objective**
#### The **Invoice Payment Selection** module is the first step in the supplier payment process. Its purpose is to review and select approved purchase invoices that are ready to be processed for payment. This module serves as a "preparation area" for the Finance team to gather and mark which invoices will be included in the next payment cycle.
### **1. Main View (List of Invoices Ready for Payment)**
#### The main page of this module displays a list of all approved, unpaid purchase invoices.
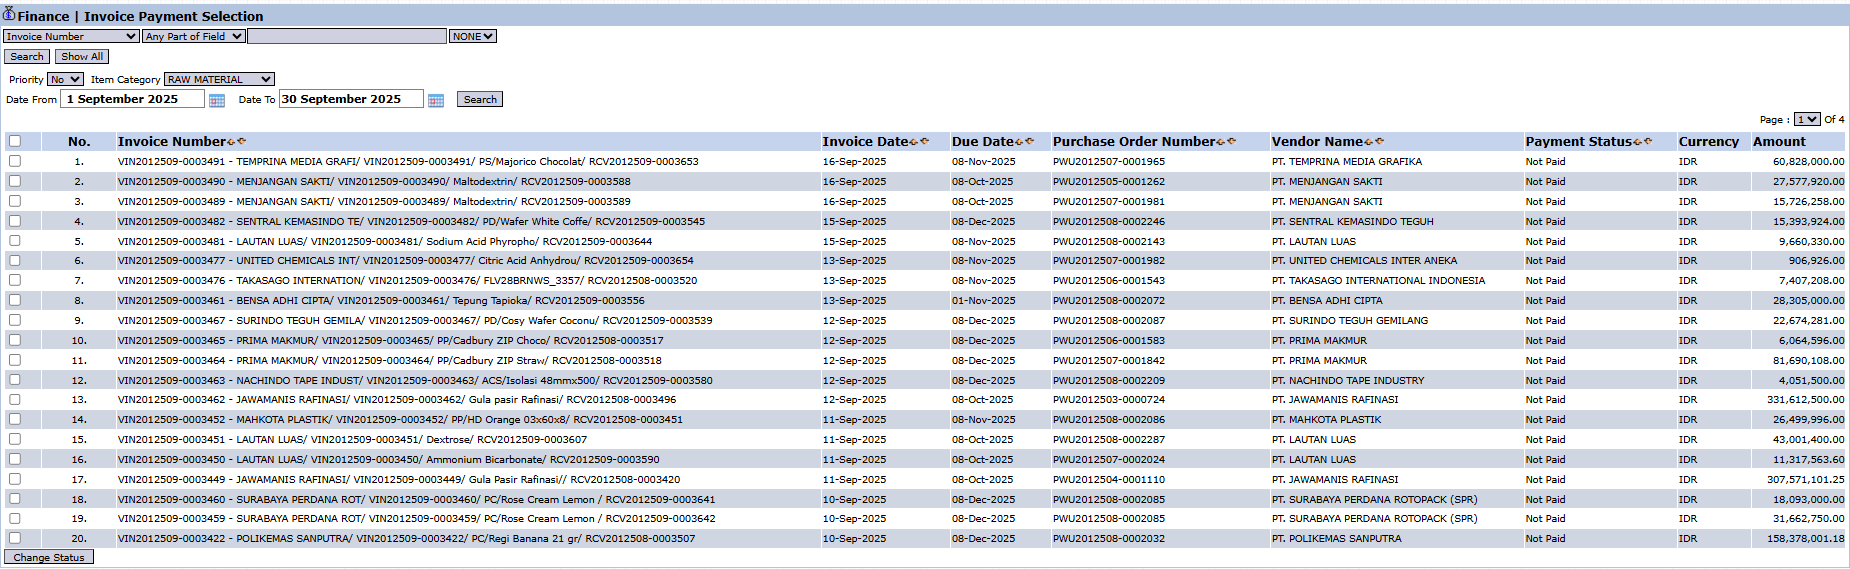
#### **View Explanation & Filters**
#### This page is for viewing and selecting invoices to be paid.
- #### **Filters**: You can search for a specific invoice by **Invoice Number** or a date range (**Date From / To**).
- #### **Invoice List**: The table below displays all invoices awaiting payment, with important columns such as **Invoice Number**, **Invoice Date**, **Due Date**, **Vendor Name**, and a **Payment Status** showing "Not Paid".
#### **Button Functions**
- #### **Change Status**: The main action button to change the status of the selected invoices, indicating that they are ready to be processed in the payment module.
### **2. Steps to Select Invoices for Payment**
#### **Step 1: Review Due Invoices**
#### Use the filters and pay attention to the **Due Date** column to see which invoices need to be paid soon based on their due date.
#### **Step 2: Select Invoices**
#### Select one or more invoices to be included in the next payment cycle by checking the box in the leftmost column of the corresponding row(s).
#### **Step 3: Change Status**
#### After selecting all the desired invoices, click the **Change Status** button in the bottom-left section of the page. This action will 'send' the selected invoices to the **Vendor Payment** module, where the actual payment process (e.g., creating a voucher) will be carried out.
### **Tips & Important Notes**
- #### This module only displays purchase invoices that have passed all approval stages and still have a **'Not Paid'** status.
- #### This is a preparatory step before the actual payment process is carried out in the next module.
- #### This module is crucial for the **Finance (AP - Account Payable)** team to manage cash outflow and ensure timely payments to vendors.
# List Of Cash Book Entry
### **Module Guide: List Of Cash Book Entry**
#### **Module Location**
#### Finance > List Of Cash Book Entry
#### **Module Objective**
#### The **List Of Cash Book Entry** module serves as the central hub for recording, managing, and monitoring all of the company's cash and bank inflow transactions. This module is the primary register book for all cash inflows, whether from customer payments, interest income, or other sources, before they are finally posted to the General Ledger.
### **1. Main View (List Of Cash Book Entry)**
#### The main page of this module displays a list of all cash and bank inflow transactions that have been recorded in the system.
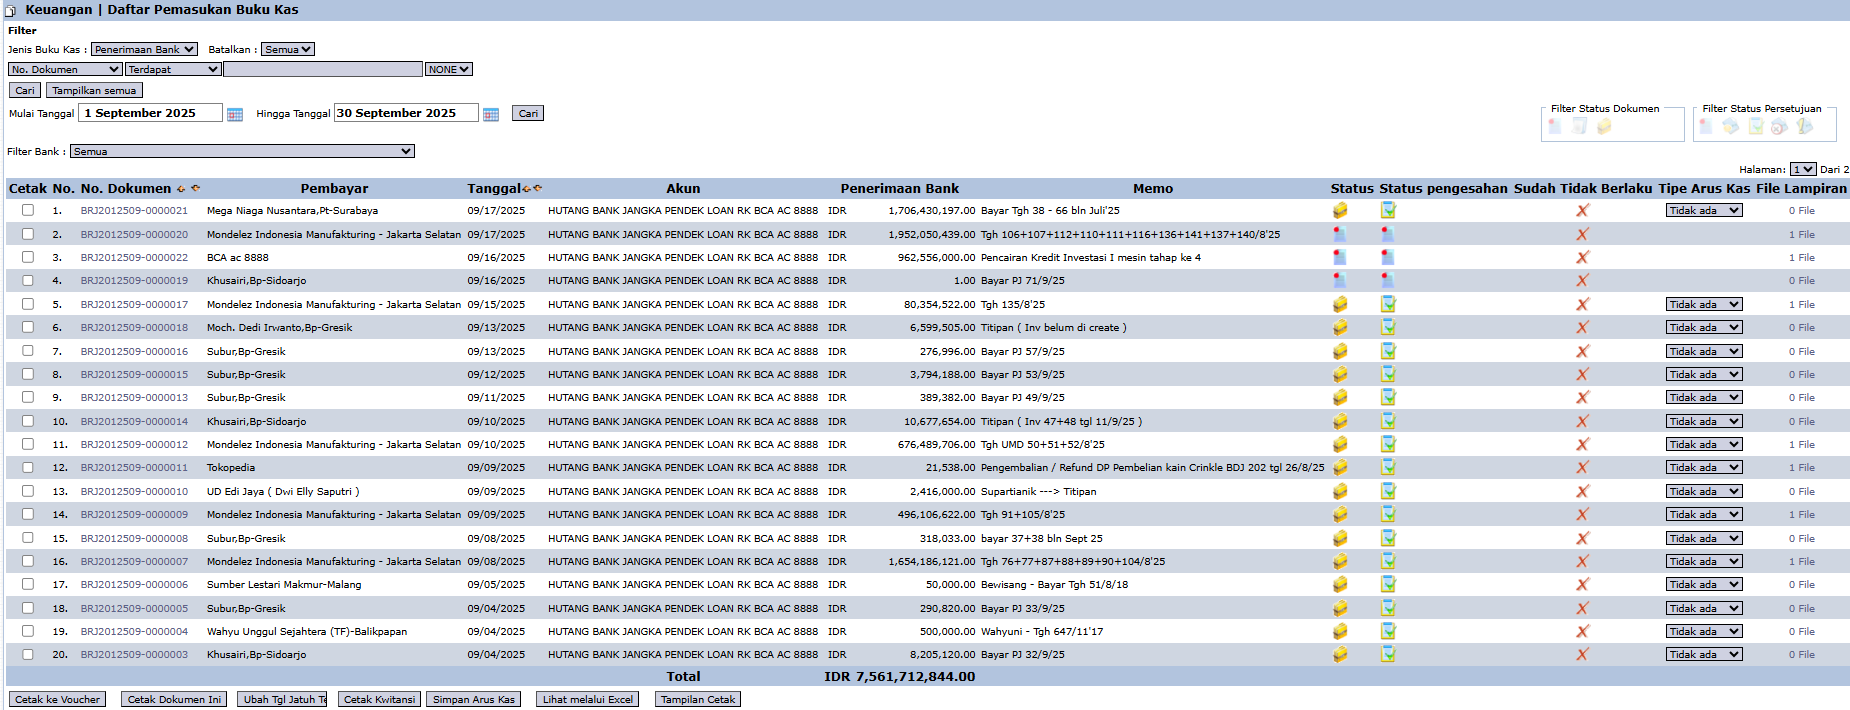
#### **View Explanation & Filters**
#### This page is for viewing and managing all inflow transactions.
- #### **Filters**: You can filter transactions by **Cash Book Type** (e.g., Bank Receipt), **Document No.**, a **Date** range, or a specific **Bank Filter**.
- #### **Transaction List**: The table below displays all transactions that match the filters, with important columns such as **Doc. No.**, **Payer**, **Date**, **Account** (Bank Account), **Bank Receipt (Amount)**, **Approval Status**, and **Is Posted**.
#### **Main Button Functions**
#### The bottom section of this page provides various action buttons to manage the selected transactions:
- #### **Detail**: To see the complete details of a transaction.
- #### **Post This Document**: The crucial button for **posting** the transaction to the General Ledger. This action will change the status in the **Is Posted** column from **X** to **✓** and will officially record the transaction in accounting.
- #### **Print to Voucher**: To print the transaction proof in a voucher format.
- #### **View via Excel**: To export the displayed data into an Excel file format.
### **2. General Workflow**
1. #### **Transaction Recording**: A cash/bank inflow transaction is created, either automatically from another module (e.g., Customer Receipt) or input manually.
2. #### **Appears in List**: The transaction will appear in the list in this module, typically with the **'Is Posted'** status still marked as 'X'.
3. #### **Verification & Posting**: The user (Finance/Treasury staff) verifies the data. Once certain it is correct, the user selects the transaction and clicks **Post This Document** to officially book it.
4. #### **Finalization**: The transaction is now recorded in the General Ledger and affects the related account balances.
### **Tips & Important Notes**
- #### The **Is Posted** column is a very important indicator. An **'X'** mark means the transaction is still temporary (unposted) and has not yet affected the account balances in the financial statements.
- #### This module is a vital daily monitoring tool for the **Treasury and Finance teams** to monitor the company's cash inflow.
- #### To ensure accurate financial reports, make sure all relevant transactions have been posted (**Post This Document**) at the end of the period (e.g., end of day or end of month).
# Void Cash Book
### **Module Guide: Void Cash Book**
#### **Module Location**
#### Finance > Void Cash Book
#### **Module Objective**
#### The **Void Cash Book** module is an administrative tool that is used to **void** cash or bank transactions (both inflows and outflows) that have been incorrectly recorded. The "void" process is different from "delete"; "void" will keep a record of the transaction in the system but give it a "canceled" status and automatically create a reversing journal to neutralize its accounting impact.
### **1. Main View (Cash/Bank Transaction List)**
#### The main page of this module displays a list of active cash and bank transactions that can be voided.
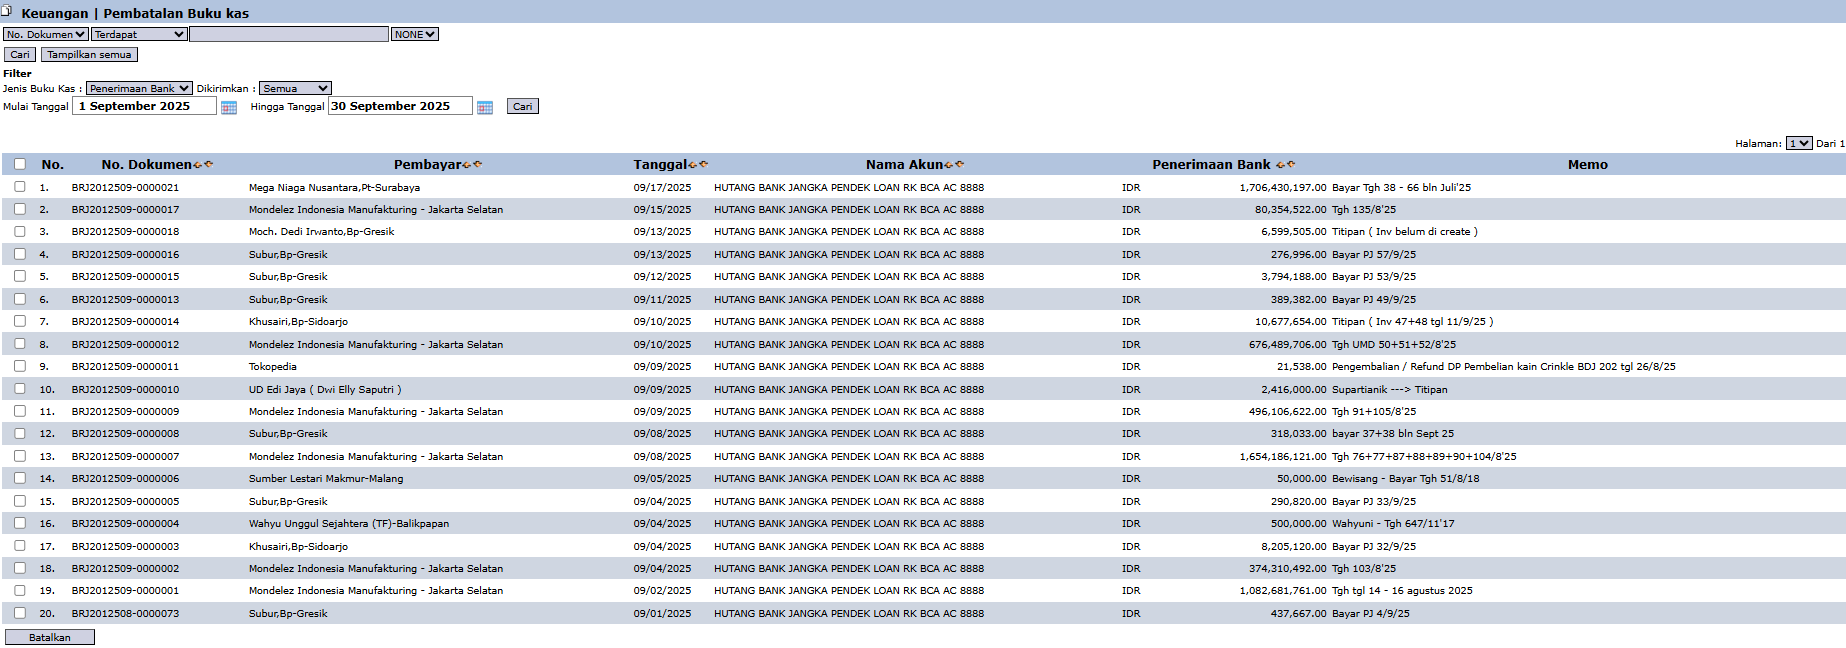
#### **View Explanation & Filters**
#### This page is for finding and selecting the transaction to be voided.
- #### **Filters**: You can search for a specific transaction by **Doc. Number**, **Cash Book Type** (e.g., Bank Receipt), or a **Start Date** and **End Date** range.
- #### **Transaction List**: The table below will display all transactions that match the filters, with columns such as **Doc. Number**, **Payer** (for inflows) or **Payee**, **Date**, **Account Name** (bank account), and the amount.
#### **Button Functions**
- #### **Void**: The main action button to run the voiding process on a selected transaction.
### **2. Steps to Void a Cash Book Transaction**
#### **Step 1: Find the Transaction**
#### Use the available filters to find and locate the cash/bank transaction you wish to void.
#### **Step 2: Select the Transaction**
#### Select one or more transactions to be voided by checking the box in the leftmost column of the corresponding row(s).
#### **Step 3: Run the Voiding Process**
#### Click the **Void** button in the bottom-left section of the page. The system will likely ask for your confirmation before proceeding with the voiding process. Once confirmed, the transaction's status will change to "voided".
### **Tips & Important Notes**
- #### The 'Void' process **does not delete the transaction data**, it only deactivates it. This is the correct accounting practice to maintain an **audit trail**.
- #### After a transaction is voided, the system will automatically create a **reversing journal** to neutralize the accounting impact of the original transaction.
- #### Ensure you have sufficient **authorization** before voiding a transaction, as this action will directly affect the cash/bank records and related accounts.
- #### This module is generally used by the **Finance/Treasury team** with supervision.
# Bank Receipt
### **Module Guide: Bank Receipt**
#### **Module Location**
#### Finance > Cash Book Entry > Bank Receipt
#### **Module Objective**
#### The **Bank Receipt** module is the primary transactional module for recording all money received into the company's bank accounts. Its main function is to apply payments received from customers against one or more outstanding sales invoices, thereby settling the receivable. This module can also be used to record other bank inflows.
### **1. Main View (Bank Receipt Entry Form)**
#### The main page of this module is a form for inputting the details of a fund receipt. The process begins by creating a new document which will then be displayed in the **Cash/Bank Inflow List** module.

### **2. Steps to Record a Bank Receipt**
#### **Step 1: Fill in Header Information**
#### At the top of the form, fill in the main details of the fund receipt:
- #### **Type**: Select the type of inflow, in this case, **Bank Receipt**.
- #### **Date**: Enter the date the money was received in the bank (e.g., September 18, 2025).
- #### **Bank Receipt**: Enter the total amount of money received.
- #### **Cash Book Account**: **Important!** Select the company's bank account that received the funds from the dropdown (e.g., BANK BCA AC 31653).
- #### **Notes / Memo**: Provide any relevant descriptions or notes.
#### **Step 2: Allocate the Payment to Invoices**
#### In the detail table at the bottom, you will detail which invoices are being settled by this payment:
1. #### Click the **\[+\]** icon to add a new row.
2. #### In the **Document No.** column, find and select one or more sales invoice numbers that are being settled by this payment.
3. #### Once selected, the system will automatically fill in details like **Received from** (customer name) and **Value** (invoice bill amount).
4. #### Ensure the total **Value** in the detail table equals the **Bank Receipt** amount in the header.
#### **Step 3: Verify and Confirm**
#### After all data is filled in and the allocation is correct, use the buttons in the bottom-left section:
- #### **Save**: To save the transaction as a draft.
- #### **Confirm**: To finalize and post the transaction into the system.
- #### **Calculate**: Likely for recalculating totals.
#### **Workflow & Integrated Business Process**
- #### Transactions recorded here will officially settle receivables originating from **Sales Invoices**.
- #### After being **Confirmed**, this document will appear in the **Cash/Bank Inflow List** and will automatically create an accounting journal entry (e.g., a **Debit** to the Bank account and a **Credit** to the Accounts Receivable account).
### **Tips & Important Notes**
- #### This module is a daily work tool for the **AR (Account Receivable) and Treasury** teams.
- #### You can allocate one bank receipt to settle **multiple invoices** at once by adding several rows in the detail table.
- #### To make the reconciliation process with the bank statement easier, ensure you select the correct **Cash Book Account**.
# Bank Payment
### **Module Guide: Bank Disbursement**
#### **Module Location**
#### Finance > Cash Book Entry > Bank Payment
#### **Module Objective**
#### The **Bank Payment** module is the primary transactional module for recording all money disbursed from the company's bank accounts. Its main function is to apply payments to suppliers (vendors) against one or more outstanding purchase invoices, thereby settling the accounts payable. This module can also be used to record other bank expenditures.
### **1. Main View (Bank Payment Entry Form)**
#### The main page of this module is a form for inputting the details of a fund disbursement. The process begins by creating a new document which will then be displayed in the **Cash/Bank Outflow List** module.
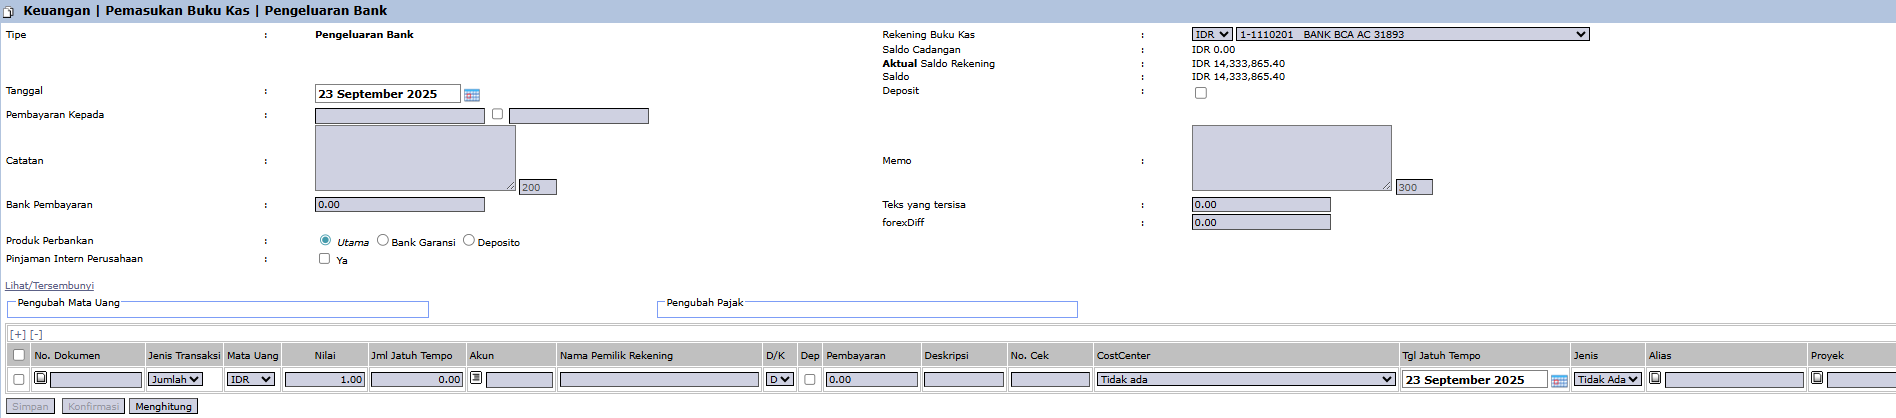
### **2. Steps to Record a Bank Disbursement**
#### **Step 1: Fill in Header Information**
#### At the top of the form, fill in the main payment details:
- #### **Type**: Select the type of expenditure, in this case, **Bank Disbursement**.
- #### **Date**: Enter the date the payment was made (e.g., September 18, 2025).
- #### **Bank Payment**: Enter the total amount of money paid.
- #### **Cash Book Account**: **Important!** Select the company's bank account that is being used for the payment from the dropdown. The account balance will be displayed next to it.
- #### **Notes / Memo**: Provide any relevant descriptions or notes.
#### **Step 2: Allocate the Payment to Invoices**
#### In the detail table at the bottom, you will detail which invoices are being settled by this payment:
1. #### Click the **+** icon to add a new row.
2. #### In the **Document No.** column, find and select one or more purchase invoice numbers to be settled. The invoices that appear here are those you have previously selected in the **Invoice Payment Selection** module.
3. #### Once selected, the system will automatically fill in details like **Pay to** (vendor name) and **Value** (invoice bill amount).
4. #### Ensure the total **Payment** in the detail table equals the **Bank Payment** amount in the header.
#### **Step 3: Verify and Confirm**
#### After all data is filled in and the allocation is correct, use the buttons in the bottom-left section:
- #### **Save**: To save the transaction as a draft.
- #### **Confirm**: To finalize and post the payment transaction into the system.
### **Workflow & Integrated Business Process**
- #### This module is the follow-up to the **Invoice Payment Selection** module.
- #### A transaction that has been **Confirmed** will officially settle the accounts payable originating from **Purchase Invoices**.
- #### After being confirmed, this document will appear in the **Cash/Bank Outflow List** and will automatically create an accounting journal entry (e.g., a **Debit** to the Accounts Payable account and a **Credit** to the Bank account).
### **Tips & Important Notes**
- #### This module is a daily work tool for the **AP (Account Payable) and Treasury** teams.
- #### You can allocate one bank payment to settle **multiple invoices** at once by adding several rows in the detail table.
- #### To make the reconciliation process with the bank statement easier, always ensure you select the correct **Cash Book Account**.
# Cash Receipt
### **Module Guide: Cash Receipt**
#### **Module Location**
#### Finance > Cash Book Entry > Cash Receipt
#### **Module Objective**
#### The **Cash Receipt** module is a transactional module specifically used to record all receipts of money in the form of **physical cash**. Its main function is to apply cash payments received from customers against one or more outstanding sales invoices, thereby settling the receivable.
### **1. Main View (Cash Receipt Entry Form)**
#### The main page of this module is a form for inputting the details of a cash receipt. The process begins by creating a new document which will then be displayed in the **Cash/Bank Inflow List** module.
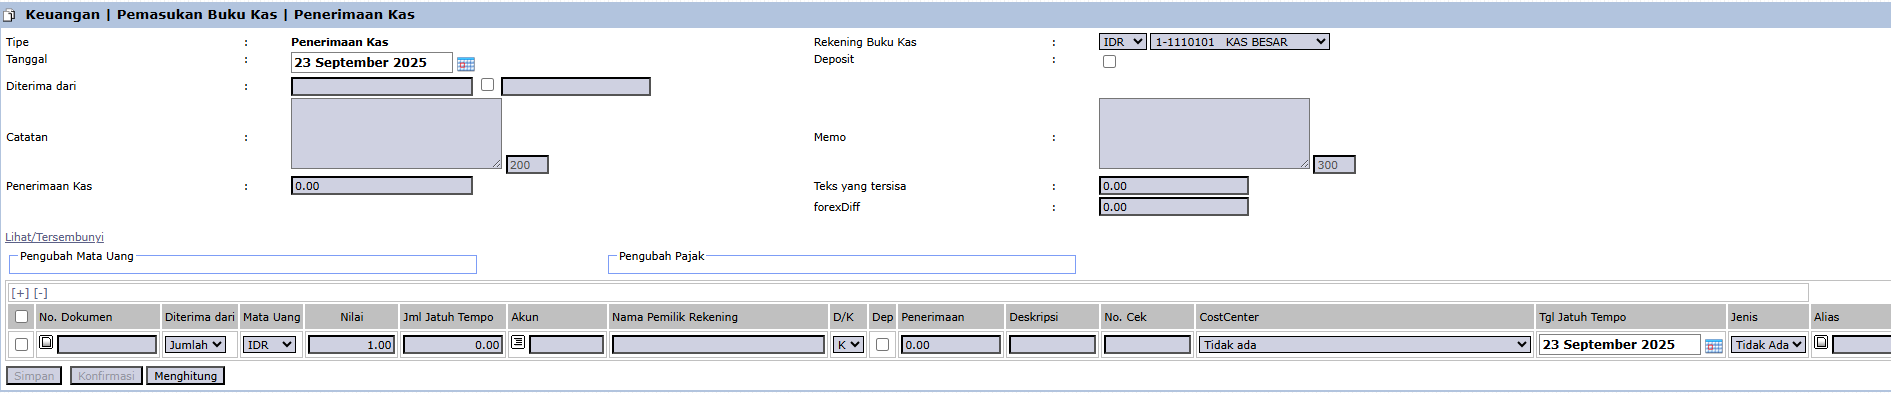
### **2. Steps to Record a Cash Receipt**
#### **Step 1: Fill in Header Information**
#### At the top of the form, fill in the main details of the cash receipt:
- #### **Type**: Select the type of inflow, in this case, **Cash Receipt**.
- #### **Date**: Enter the date the cash was received (e.g., September 22, 2025).
- #### **Cash Receipt**: Enter the total amount of cash received.
- #### **Cash Book Account**: **Important!** Select the company's cash account that received the funds from the dropdown (e.g., MAIN CASHIER).
- #### **Notes / Memo**: Provide any relevant descriptions or notes.
#### **Step 2: Allocate the Payment to Invoices**
#### In the detail table at the bottom, you will detail which invoices are being settled by this cash payment:
1. #### Click the **\[+\]** icon to add a new row.
2. #### In the **Document No.** column, find and select one or more sales invoice numbers that are being settled by this payment.
3. #### Once selected, the system will automatically fill in details like **Received from** (customer name) and **Value** (invoice bill amount).
4. #### Ensure the total **Value** in the detail table equals the **Cash Receipt** amount in the header.
#### **Step 3: Verify and Confirm**
#### After all data is filled in and the allocation is correct, use the buttons in the bottom-left section:
- #### **Save**: To save the transaction as a draft.
- #### **Confirm**: To finalize and post the transaction into the system.
#### **Workflow & Integrated Business Process**
- #### Transactions recorded here will officially settle receivables originating from **Sales Invoices**.
- #### After being **Confirmed**, this document will appear in the **Cash/Bank Inflow List** and will automatically create an accounting journal entry (e.g., a **Debit** to the Cash account and a **Credit** to the Accounts Receivable account).
### **Tips & Important Notes**
- #### This module is functionally very similar to the **Bank Receipt** module, but is specifically used for **cash transactions**.
- #### To maintain the accuracy of physical cash records, ensure you select the correct **Cash Book Account** (e.g., 'PETTY CASH' for small operations vs 'MAIN CASHIER' for the main cashier).
# Cash Payment
### **Module Guide: Cash Payment**
#### **Module Location**
#### Finance > Cash Book Entry > Cash payment
#### **Module Objective**
#### The **Cash Disbursement/Payment** module is a transactional module specifically used to record all expenditures of money in the form of **physical cash**. Its main functions are to pay bills from suppliers (vendors) in cash or to record other direct cash expenditures (for example, for petty cash).
### **1. Main View (Cash Disbursement Entry Form)**
#### The main page of this module is a form for inputting the details of a cash disbursement. The process begins by creating a new document which will then be displayed in the **Cash/Bank Outflow List** module.
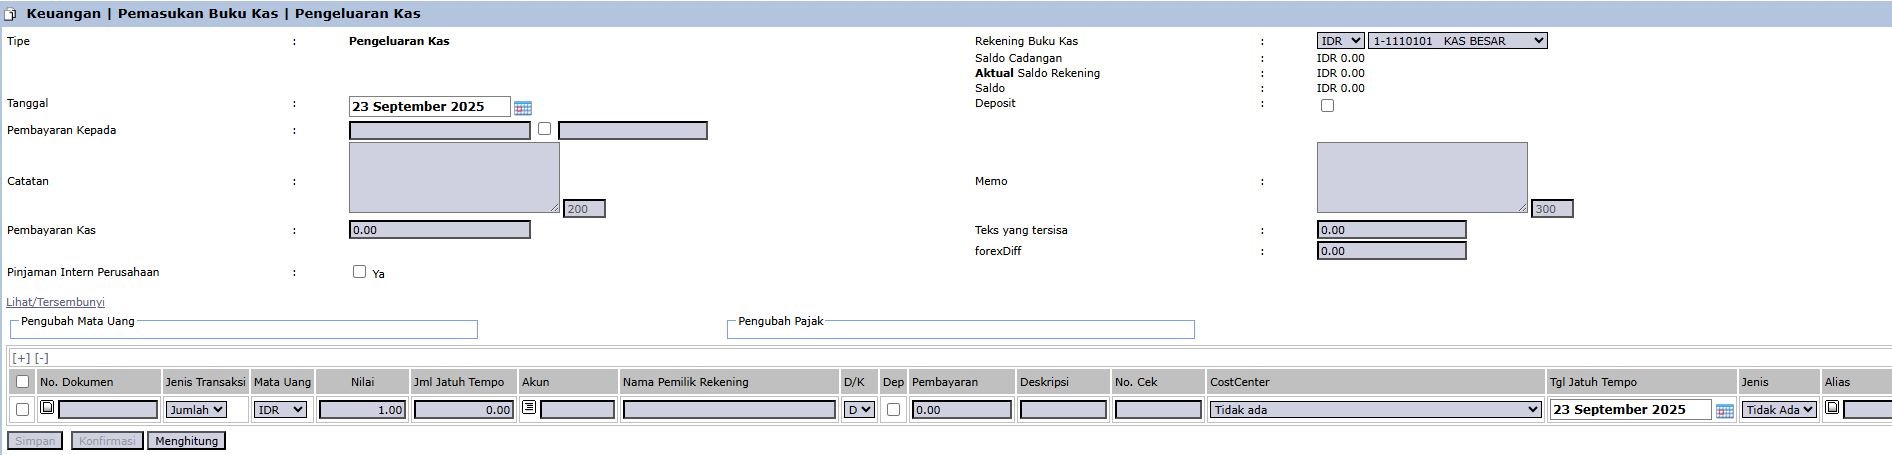
### **2. Steps to Record a Cash Disbursement**
#### **Step 1: Fill in Header Information**
#### At the top of the form, fill in the main details of the cash payment:
- #### **Type**: Select the type of expenditure, in this case, **Cash Disbursement**.
- #### **Date**: Enter the date the cash was paid out (e.g., September 23, 2025).
- #### **Cash Payment**: Enter the total amount of cash disbursed.
- #### **Cash Book Account**: **Important!** Select the company's cash account that is being used for the payment from the dropdown (e.g., MAIN CASHIER).
- #### **Notes / Memo**: Provide any relevant descriptions or notes.
#### **Step 2: Allocate the Payment**
#### In the detail table at the bottom, you will detail the purpose of this cash expenditure:
1. #### Click the **\[+\]** icon to add a new row.
2. #### **To Pay an Invoice**: In the **Document No.** column, find and select one or more purchase invoice numbers being settled by this payment.
3. #### **For a Direct Expense**: Leave the **Document No.** blank. Directly select the appropriate expense **Account** (e.g., 'Travel Expense' or 'Office Supplies Expense') and allocate it to the relevant **CostCenter**.
#### **Step 3: Verify and Confirm**
#### After all data is filled in and the allocation is correct, use the buttons in the bottom-left section:
- #### **Save**: To save the transaction as a draft.
- #### **Confirm**: To finalize and post the cash disbursement transaction.
### **Workflow & Integrated Business Process**
- #### This transaction can settle accounts payable originating from **Purchase Invoices**.
- #### After being **Confirmed**, this document will appear in the **Cash/Bank Outflow List** and will automatically create an accounting journal entry (e.g., a **Debit** to the Accounts Payable/Expense account and a **Credit** to the Cash account).
### **Tips & Important Notes**
- #### This module is functionally very similar to the **Bank Disbursement** module, but is specifically used for **cash transactions**.
- #### This is the primary module for managing expenditures from **Petty Cash**.
- #### To maintain the accuracy of the company's physical cash records, ensure you always select the correct **Cash Book Account**.
# Cash Book Entry Inbox
### **Module Guide: Cash Book Entry Inbox**
#### **Module Location**
#### Finance > Cash Book Entry > Cash Book Entry Inbox
#### **Module Objective**
#### The **Cash/Bank Inflow Inbox** module serves as the approval center for all cash and bank inflow transactions that have been input. This module is used by a superior or manager to conduct a review and provide approval before the inflow transaction can be processed further to the booking stage.
### **1. Main View (Inflow List)**
#### The main page of this module is an "inbox" that displays all cash/bank inflow documents requiring your action.

#### **View Explanation & Filters**
#### This page provides a summary of all inflow transactions that are awaiting approval.
- #### **Filters**: You can search for a specific transaction by **Cash Book Type**, **Doc. Number**, a **Date** range, or a **Bank Filter**.
- #### **Request List**: The table below will display all transactions awaiting action, with columns such as **Archive Number**, **Payer**, **Date**, **Account**, and **Bank Receipt**.
### **2. Approval Process Steps**
#### The following is the standard workflow for an approver.
#### **Step 1: Access the Inbox**
#### Open the **Cash/Bank Inflow Inbox** module to see the list of transactions that require approval.
#### **Step 2: Review the Inflow Details**
#### Click on one of the rows in the table to open its detail view. In the detail view, you can check all the information that has been input, such as the amount, the payer, and the allocation to invoices.
#### **Step 3: Provide Approval**
#### After you open and review the transaction details in Step 2, you will find the buttons to grant approval (e.g., **"Approve"** or **"Reject"** buttons) **within that detail page**. Click the appropriate button to complete the review process.
### **3. Workflow & Integrated Business Process**
1. #### **Submission**: A user (e.g., an AR staff or cashier) creates a document in the **Bank Receipt** or **Cash Receipt** module and clicks **\[Confirm\]**.
2. #### **Entering the Queue**: The confirmed transaction automatically enters the queue in this **Cash/Bank Inflow Inbox** module.
3. #### **Review & Approval**: A manager or approver opens this module, reviews, and provides approval.
4. #### **Ready for Posting**: After approval, the transaction will appear in the **Cash/Bank Inflow List** and will be ready to be **posted to the General Ledger** using the **\[Post This Document\]** button.
# Cash Book Entry Requisition
### **Module Guide: Cash Book Request**
#### **Module Location**
#### Finance > Cash Book Requisition> Cash Book Requisition
#### **Module Objective**
#### The **Cash Book Request** module serves as a formal channel for employees or departments to request funds (disbursements) or report the receipt of funds that are not directly related to sales or purchase invoices. This module is essential for managing operational cash transactions such as reimbursement claims, cash advances, or fund requests for departmental needs.
### **1. Main View (Cash Book Request List)**
#### The main page of this module displays a list of all Cash Book Request documents that have been created.

#### **View Explanation & Filters**
#### This page is for viewing and managing all cash requests.
- #### **Filters**: You can search for a specific request by **Document Number** or a date range (**Start Date / End Date**).
- #### **Request List**: The table below displays all requests that match the filters, with columns such as **Document Number**, **Description**, **Requested By**, **Payment Status**, and **Approval**.
#### **Button Functions**
- #### **New**: The primary button to create a new Cash Book Request.
- #### **Print**: To print the details of a selected request.
- #### **Cancel**: To cancel a request that has already been made.
### **2. Steps to Create a Cash Book Request**
**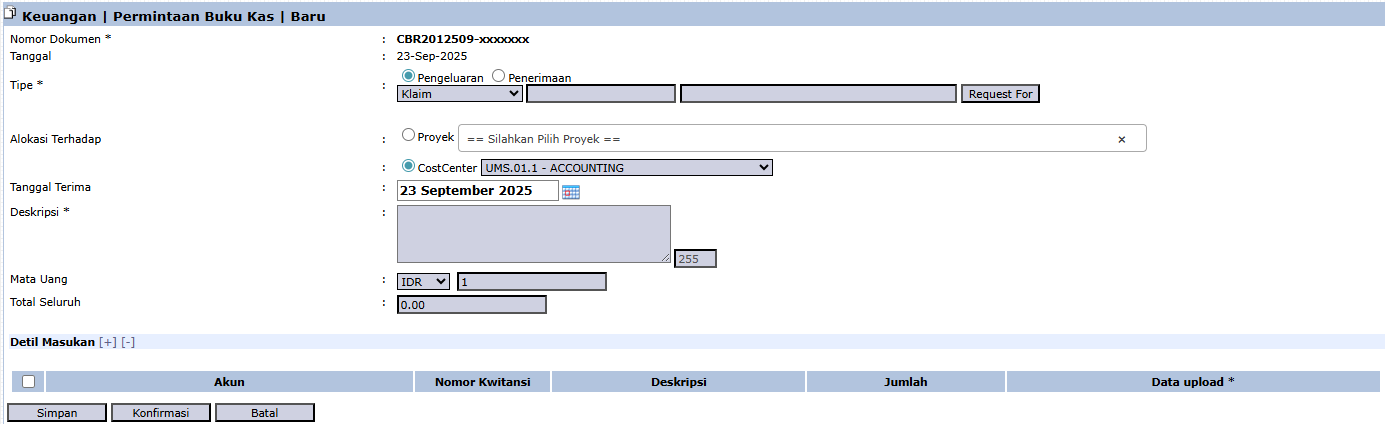**
#### **Step 1: Create a New Request**
#### From the Main View, click the **\[New\]** button to open the request creation form.
#### **Step 2: Fill in Header Information**
#### On the form that appears, fill in the general request information:
- #### **Type**: Select the request type: **Disbursement** (to request funds) or **Receipt** (to report received funds).
- #### **CostCenter**: Allocate this request to the correct department or cost center (e.g., UMS.01.1 - ACCOUNTING).
- #### **Description**: Provide a clear explanation of the purpose of the fund request.
- #### **Grand Total**: Enter the total value of the money being requested or reported.
#### **Step 3: Detail the Transaction**
#### In the **Detail Input** table at the bottom:
1. #### Click the **\[+\]** icon to add a detail line.
2. #### Select the appropriate expense or revenue **Account** from the General Ledger.
3. #### Enter the **Amount** for that detail.
4. #### **Important**: Upload supporting evidence (receipts, notes, etc.) in the **Data upload** column.
#### **Step 4: Save and Confirm**
#### After all data is filled in, use the buttons in the bottom-left section:
- #### **\[Save\]**: To save the request as a draft.
- #### **\[Confirm\]**: To finalize the request and send it into the approval workflow.
### **Workflow & Integrated Business Process**
- #### A request that has been **Confirmed** will go to the **Cash Book Request Inbox** to be approved by a superior.
- #### After approval, a **Disbursement** request will become the basis for the Treasury/Finance team to make a payment via the **Cash Disbursement** or **Bank Disbursement** modules.
### **Tips & Important Notes**
- #### This is the standard and documented way to manage **petty cash** requests or **reimbursements**.
- #### Always attach valid supporting evidence via **Data upload** to speed up the approval process.
# Cash Book Entry Requisition Declaration
### **Module Guide: Cash Book Request Declaration (Accountability Report)**
#### **Module Location**
#### Finance > Cash Book Request > Cash Book Request Declaration
#### **Module Objective**
#### The **Cash Book Request Declaration** module is used to create an accountability document (SPJ) for funds that have been received from the **Cash Book Request** module. This module is the closing step of the cash advance cycle, where the user reports the real (actual) use of funds and compares it with the amount requested at the beginning.
### **1. Main View (Declaration List)**
#### The main page of this module displays a list of all Declaration/SPJ documents that have been created.

#### **View Explanation & Filters**
#### This page is for viewing and managing all accountability documents.
- #### **Filters**: You can search for a specific document by **Document Number** or a date range (**Start Date / End Date**).
- #### **Declaration List**: The table below will display all SPJ documents that match the filters, with columns such as **Document Number**, **Cash Book Request** (original request reference number), and **Payment Status**.
#### **Button Functions**
- #### **\[New\]**: The primary button to create a new Declaration/SPJ document.
- #### **\[Cancel\]**: To cancel a declaration document that has already been created.
### **2. Steps to Create a Declaration (Accountability Report)**
#### **Step 1: Create a New Declaration**
#### From the Main View, click the **\[New\]** button to open the **Accountability Report | New** form.
#### **Step 2: Select the Initial Request**
#### On the form that appears, the first step is to link this accountability report with the original fund request:
- #### In the **Cash Book Request** section (top part), select the **Document Number** of the initial Cash Book Request whose funds you have used. The system will automatically load the details of that request.
#### **Step 3: Fill in Accountability Details**
1. #### In the **Accountability Report** section (bottom part), fill in the **Date** and **Description** of your accountability report.
2. #### **Important**: In the detail table, in the **Actual Amount** column, enter the real expenditure value based on supporting evidence (receipts, notes, etc.).
#### **Step 4: Save the Declaration**
#### Click **\[Save\]** at the bottom. The system will record your accountability report and calculate the difference (remaining funds) between the **Requested Amount** and the **Actual Amount**.
### **Workflow & Integrated Business Process**
- #### This module is the final step to close the cash advance cycle that was initiated in the **Cash Book Request** module.
- #### After the declaration is created, if there is a remaining balance, the employee must return it to the cashier. If the expenditure was greater than the funds received (underpayment), a reimbursement process can be initiated.
### **Tips & Important Notes**
- #### This module is crucial for **internal control** and ensuring all operational fund expenditures can be accounted for.
- #### To ensure the transaction flow is recorded accurately, always select the correct original request **Document Number**.
# Cash Book Inbox
### **Module Guide: Cash Book Inbox**
#### **Module Location**
#### Finance > Cash Book > Cash Book Inbox
#### **Module Objective**
#### The **Cash Book Request Inbox** module serves as the approval center for all **Cash Book Request** documents that have been submitted by employees. This module is used by a superior or manager to conduct a review and provide approval before the fund request can be processed further by the Finance team.
### **1. Main View (Request List)**
#### The main page of this module is an "inbox" that displays all Cash Book Requests requiring your action.

#### **View Explanation & Filters**
#### This page provides a summary of all cash requests that are awaiting approval.
- #### **Filters**: You can search for a specific request by **Document Number**, a **Date** range, or **Type** (Disbursement/Receipt).
- #### **Request List**: The table below will display all requests awaiting action. The example in the image shows several requests that have already been approved (green checkmark icon).
#### **Column Explanation**
- #### **Document Number**: The unique number of the Cash Book Request document.
- #### **Requested By**: The name of the employee who submitted the request.
- #### **Amount**: The total value of the request.
- #### **Description**: A brief explanation of the request's purpose.
- #### **Status / Approval**: Icons that indicate the document's status and the approval process status.
### **2. Approval Process Steps**
#### The following is the standard workflow for an approver.
#### **Step 1: Access the Inbox**
#### Open the **Cash Book Request Inbox** module to see the list of requests that require approval.
#### **Step 2: Review the Request Details**
#### Click on one of the rows in the table to open its detail view. In the detail view, you can check all the information that has been input, such as the expense account details, the amount, and the uploaded supporting evidence.
#### **Step 3: Provide Approval**
#### After you open and review the request details in Step 2, you will find the buttons to grant approval (e.g., **"Approve"** or **"Reject"** buttons) **within that detail page**. Click the appropriate button to complete the review process. The approval status will be updated in the **Approval** column.
### **3. Workflow & Integrated Business Process**
1. #### **Submission**: An employee creates a document in the **Cash Book Request** module and clicks **\[Confirm\]**.
2. #### **Entering the Queue**: The confirmed request automatically enters the queue in this **Cash Book Request Inbox** module.
3. #### **Review & Approval**: A manager or approver opens this module, reviews, and provides approval.
4. #### **Payment Process**: After approval, the request becomes a valid instruction for the **Treasury/Finance team to make a payment** via the **Cash Disbursement** or **Bank Disbursement** modules.
# Company Loan Board
### **Module Guide: Loan Receipt**
#### **Module Location**
#### Finance > Company Loan
#### **Module Objective**
#### The **Loan Receipt** module is used to record the transaction of receiving funds that originate from a loan. This module is used when the company receives loan funds from an external party (e.g., a bank or other financial institution) to be recorded as a cash inflow and, at the same time, as an increase in liabilities (loan payable).
### **1. Main View (Loan Receipt List)**
#### The main page of this module displays a list of all Loan Receipt documents that have been created.

#### **View Explanation & Filters**
#### This page is for viewing and managing all loan receipt transactions.
- #### **Filters**: You can search for a specific document by **Loan Document** or a date range (**Start Date / End Date**).
- #### **Loan List**: The table below will display all loan receipts that match the filters, with columns such as **Loan Document**, **From (Lender)**, **Loan Date**, and **Amount**.
#### **Button Functions**
- #### **\[Loan Receipt\]**: The primary button to create a new Loan Receipt record.
### **2. Steps to Record a Loan Receipt**
#### **Step 1: Create a New Document**
#### From the Main View, click the **Loan Receipt** button to open the new entry form.
#### **Step 2: Fill in Loan Details**
#### On the form that appears (not shown in the image), you will be asked to fill in the loan details, such as:
- #### **Lender**: Select the party providing the loan.
- #### **Principal Loan Amount**: Enter the total loan funds received.
- #### **Date Funds Received**: Select the date the funds entered the company's account.
- #### **Destination Bank Account**: Select the company's bank account that received the funds.
- #### **Loan Terms and Conditions**: Enter details like the interest rate, due date, and installment scheme.
#### **Step 3: Save the Document**
#### Save the document to record the loan receipt. After confirmation, this action will automatically:
- #### Increase the company's cash/bank balance.
- #### Record the loan payable (liability) on the balance sheet.
### **Tips & Important Notes**
- #### This module is specifically used for loans **received by** the company.
- #### Accurate recording here is crucial for the correct reporting of the company's **liabilities** in the financial statements.
- #### The document created here will become the basis for the installment payment process in the **Loan Payment** module.
# Banks
### **Module Guide: Bank List**
#### **Module Location**
#### Finance > Banks
#### **Module Objective**
#### The **Bank List** module serves as the master data hub for registering and managing all of the company's bank accounts. The settings in this module are crucial because each registered bank account will be linked to a specific account in the **Chart of Accounts**, thereby ensuring every bank transaction is recorded in the correct account.
### **1. Main View (Bank Account List)**
#### The main page of this module displays a list of all the company's bank accounts that have been registered in the system.

#### **View Explanation & Filters**
#### This page is for viewing and managing all bank account data.
- #### **Filter**: You can search for a specific bank account using the search bar based on **Bank Name**.
- #### **Bank List**: The table below displays a summary of each account, with columns such as **Bank Name**, **Bank Branch**, **Bank Account**, and **Currency**.
#### **Button Functions**
- #### **\[Add\]**: The primary button to register a new bank account.
- #### **\[Delete\]**: To delete a selected bank account's data.
### **2. Steps to Add a New Bank Account**
**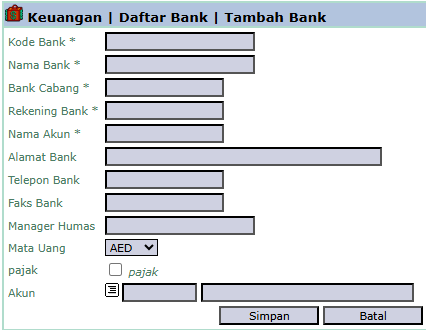**
#### **Step 1: Add New Data**
#### From the Main View, click the **Add** button to open the **Add Bank** form.
#### **Step 2: Fill in Bank Details**
#### On the form that appears, fill in all the relevant operational details of the bank account:
- #### **Bank Code, Bank Name, Bank Branch**
- #### **Bank Account** (Account Number) and **Account Name** (Account Owner Name)
- #### The **Currency** of the account.
#### **Step 3: Link to the General Ledger Account (Important!)**
1. #### In the **Account** field, click the **\[...\]** icon to select the corresponding cash/bank account from the **Chart of Accounts**.
2. #### This step is crucial as it will link this physical bank account with its accounting record in the system.
#### **Step 4: Save the Data**
#### After all data has been filled in correctly, click the **Save** button to save the new bank account data.
### **Tips & Important Notes**
- #### The bank data you create here will become the options in the **'Cash Book Account'** dropdown in all cash/bank transaction modules, such as Bank Receipt and Bank Disbursement.
- #### Ensure you link each bank account to the correct **General Ledger Account**. An error in this step will cause recording errors in the financial statements.
- #### This is a fundamental master data setup that must be managed by the **Treasury or Accounting team**.
# Bank Product
### **Report Module Guide: Banking Product**
#### **Module Location**
#### Finance > Bank Product
#### **Module Objective**
#### The **Banking Product** module serves as a reporting and inquiry tool for monitoring various banking products or instruments that the company holds, such as a **Bank Guarantee**. This module provides a centralized list for tracking the status, key dates, and other details of these financial instruments.
### **1. Main View (Banking Product List)**
#### The main page of this module is a list that displays all banking products registered in the system.

#### **View Explanation & Filters**
#### This page is for viewing and monitoring all existing banking products.
- #### **Filters**:
- #### **Bank Product Type**: This is the primary filter to select the type of product you want to view. In the example, **Bank Guarantee** is selected.
- #### **Start Date / End Date**: Use this filter to screen products based on a specific date range.
#### **Column Explanation**
#### The table below will display all products that match the filters, with important columns such as:
- #### **Bank Product Number**: The reference number of the banking product.
- #### **Bank Product Date**: The date of issuance.
- #### **Due Date**: The due date.
- #### **Expiry Date**: The expiration date of the instrument.
- #### **Bank**: The bank that issued the product.
- #### **Active**: The active status of the product.
### **2. Workflow & Integrated Business Process**
- #### This is a **reporting and inquiry module**. Data is not created or modified here.
- #### Data for banking products like Bank Guarantees is likely input in other, more specific transactional modules.
- #### Use this report to monitor banking products that are approaching their due date or expiry date to ensure renewal or settlement is done on time.
### **Tips & Important Notes**
- #### This is an important monitoring tool for the **Treasury and Finance teams** to manage the company's financial instruments.
- #### Pay close attention to the **Expiry Date** column to ensure timely renewal is performed if needed, to avoid business risks.
# Bank Reconciliation
### **Module Guide: Bank Reconciliation**
#### **Module Location**
#### Finance > Bank Reconciliation
#### **Module Objective**
#### The **Bank Reconciliation** module serves as a tool to match and align the company's internal cash/bank transaction records (recorded in the General Ledger) with the transaction records on the statement from the bank. This process is crucial for ensuring the accuracy of the company's cash balance, identifying unrecorded transactions, and detecting any errors or discrepancies.
### **1. Main View (Reconciliation List)**
#### The main page of this module displays a list of all Bank Reconciliation documents that have been created.

#### **View Explanation & Filters**
#### This page is for viewing the history of reconciliations that have been performed.
- #### **Filters**: You can search for a specific reconciliation document by **Bank Reconciliation Number** or a date range (**Start Date / End Date**).
- #### **Reconciliation List**: The table below will display all documents that match the filters, with columns such as **Bank Reconciliation Number**, **Account Name**, and **Bank Statement Date**.
#### **Button Functions**
- #### **\[New\]**: The primary button to start a new Bank Reconciliation process.
- #### **\[Cancel\]**: To cancel a reconciliation document that has already been created.
### **2. Steps to Perform a Bank Reconciliation**
**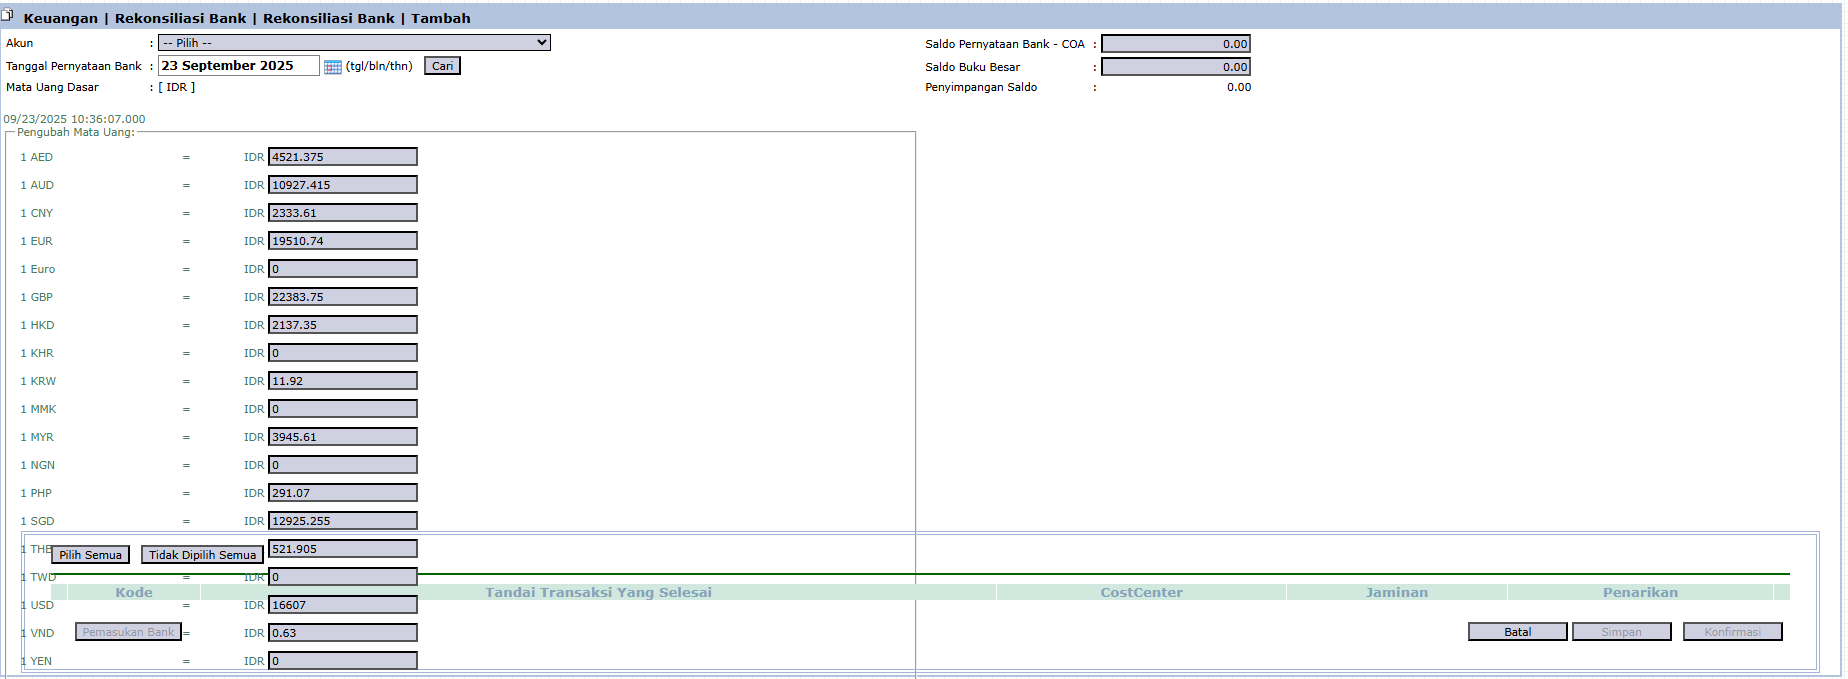**
#### **Step 1: Start a New Reconciliation**
#### From the Main View, click the **\[New\]** button to open the reconciliation form.
#### **Step 2: Fill in Initial Information**
- #### **Account**: Select the bank account to be reconciled from the dropdown.
- #### **Bank Statement Date**: Enter the end date from the bank statement (e.g., September 23, 2025).
- #### **Bank Statement Balance - COA**: Enter the ending balance as it appears on the bank statement.
- #### The system will display the **General Ledger Balance** (the balance according to internal records) and calculate the **Balance Discrepancy** (the difference).
#### **Step 3: Match Transactions (Clearing)**
#### The system will display two lists of transactions: transactions that are not yet "cleared" in the company's records and transactions that are not yet "cleared" in the bank's records.
- #### Your task is to check all matching transactions (those that appear on both records) in the **"Mark Cleared Transactions"** column. This process is called **clearing**.
#### **Step 4: Handle Differences**
- #### **Transactions on Bank, Not in Books**: For transactions that are on the bank statement but not yet in the General Ledger (e.g., bank administration fees, interest income), you must create adjusting journal entries.
- #### **Transactions in Books, Not on Bank**: Transactions that are in the General Ledger but have not yet appeared on the bank statement (e.g., outstanding checks or deposits in transit) will remain as **outstanding items** until the next period.
#### **Step 5: Save and Confirm**
#### Continue the matching process until the **Balance Discrepancy** becomes zero. After that, click **\[Save\]** or **\[Confirm\]** to complete and save the reconciliation report.
### **Tips & Important Notes**
- #### Bank reconciliation is a mandatory **internal control procedure** that should be performed routinely (usually monthly).
- #### The primary goal of this process is to ensure the **Balance Discrepancy becomes zero**, which indicates that all differences have been identified and explained.
- #### This module is a primary work tool for the **Accounting and Treasury teams**.
# Bank Reconciliation Inbox
### **Module Guide: Bank Reconciliation Inbox**
#### **Module Location**
#### Finance > Bank Reconciliation > Bank Reconciliation Inbox
#### **Module Objective**
#### The **Bank Reconciliation Inbox** module serves as the approval center for all **Bank Reconciliation** reports that have been completed and submitted. This module is used by a superior or manager (e.g., a Chief Accountant) to conduct a final review and provide approval before a reconciliation is considered final.
### **1. Main View (Reconciliation List)**
#### The main page of this module is an "inbox" that displays all Bank Reconciliation documents requiring your action.

#### **View Explanation & Filters**
#### This page provides a summary of all reconciliations that are awaiting approval.
- #### **Filters**: You can search for a specific reconciliation by **Bank Reconciliation Number** or a date range (**Start Date / End Date**).
- #### **Request List**: The table below will display all reconciliations awaiting action. The table currently shows "...No Data Available...".
#### **Column Explanation**
- #### **Bank Reconciliation Number**: The unique number of the reconciliation document.
- #### **Account Name**: The name of the bank account being reconciled.
- #### **Bank Statement Date**: The end date of the reconciliation period.
- #### **Document Status / Approval**: Icons that indicate the document's status and the approval process status.
### **2. Approval Process Steps**
#### The following is the standard workflow for an approver.
#### **Step 1: Access the Inbox**
#### Open the **Bank Reconciliation Inbox** module to see the list of reconciliations that require approval.
#### **Step 2: Review the Reconciliation Details**
#### Click on one of the rows in the table to open its detail view. In the detail view, you can check all the information, including the bank balance, the general ledger balance, the items that have been cleared, and the items that are still outstanding.
#### **Step 3: Provide Approval**
#### After you open and review the reconciliation details in Step 2, you will find the buttons to grant approval (e.g., **"Approve"** or **"Reject"** buttons) **within that detail page**. Click the appropriate button to complete the review process.
### **3. Workflow & Integrated Business Process**
1. #### **Submission**: A user (e.g., an accounting staff) completes the process in the **Bank Reconciliation** module and clicks **\[Confirm\]**.
2. #### **Entering the Queue**: The confirmed reconciliation document automatically enters the queue in this **Bank Reconciliation Inbox** module.
3. #### **Review & Approval**: A manager or approver opens this module, reviews, and provides approval.
4. #### **Finalization**: After approval, the bank reconciliation report for that period is considered **final** and becomes an official company record.
# Cheque
### **Module Guide: Check/Giro**
#### **Module Location**
#### Finance > Checkque
#### **Module Objective**
#### The **Check/Giro** module serves as a monitoring and management center for all transactions that use a Check or Bilyet Giro as the payment instrument. This module provides a centralized list to track all outstanding Checks/Giros (both those received from customers and those issued to suppliers), their due dates, and their status (e.g., outstanding, cleared, or rejected).
### **1. Main View (Giro List)**
#### The main page of this module is a list that displays all Check/Giro transactions recorded in the system.

#### **View Explanation & Filters**
#### This page is for monitoring all outstanding Checks/Giros.
- #### **Filter**: You can search for a specific Check/Giro using the search bar based on its **Number**.
#### **Column Explanation**
#### The table below will display all Checks/Giros that match the filters, with important columns such as:
- #### **Number**: The Check or Giro number.
- #### **Payer**: The paying party (if this is an incoming Giro).
- #### **Check Date**: The issue date of the Check/Giro.
- #### **Due Date**: The date the Check/Giro can be cleared.
- #### **Giro Status**: The current status of the Check/Giro (e.g., Outstanding, Cleared, Rejected).
- #### **Amount**: The nominal value of the Check/Giro.
### **2. Workflow & Integrated Business Process**
- #### This is a **monitoring module**. Check/Giro transactions are not created here.
- #### Giro transactions (both receipts and disbursements) are recorded in the related transactional modules, namely in **Bank Receipt** or **Bank Disbursement**, by selecting "Giro" as the payment method.
- #### When a Giro transaction is recorded there, an entry will automatically appear in this module to be tracked.
- #### The Treasury team will use this module to **update the Giro Status** after the Check/Giro has been successfully cleared at the bank or if it turns out to be rejected during the clearing process.
### **Tips & Important Notes**
- #### Use this module daily to monitor Giros that are approaching their due date, both those you will clear (receipts) and those that will be cleared by vendors (payments).
- #### **Accurately updating the Giro Status** is crucial for maintaining the accuracy of the actual cash/bank balance in the system.
- #### This module is an important cash control tool for the **Finance and Treasury teams**.
# AR-AP Adjustmen
### **Module Guide: AR/AP Adjustment**
#### **Module Location**
#### Finance > AR/AP Adjustment
#### **Module Objective**
#### The **AR/AP Adjustment** module is a special accounting tool used to perform a "netting" process. Netting is the process of offsetting an Accounts Receivable (AR) balance with an Accounts Payable (AP) balance for the same entity, which acts as both a customer and a supplier.
### **1. Main View (Adjustment List)**
#### The main page of this module displays a list of all AR/AP Adjustment documents that have been created.

#### **View Explanation & Filters**
#### This page is for viewing the history of adjustment/netting transactions that have been performed.
- #### **Filters**: You can search for a specific document by **Document Number** or a date range (**Start Date / End Date**).
- #### **Adjustment List**: The table below will display all documents that match the filters, with columns such as **Document Number**, **Document Date**, and **Document Status**.
#### **Button Functions**
- #### **\[New\]**: The primary button to create a new AR/AP Adjustment document.
- #### **\[Cancel\]**: To cancel an adjustment document that has already been created.
### **2. Steps to Perform an Adjustment (Netting)**
**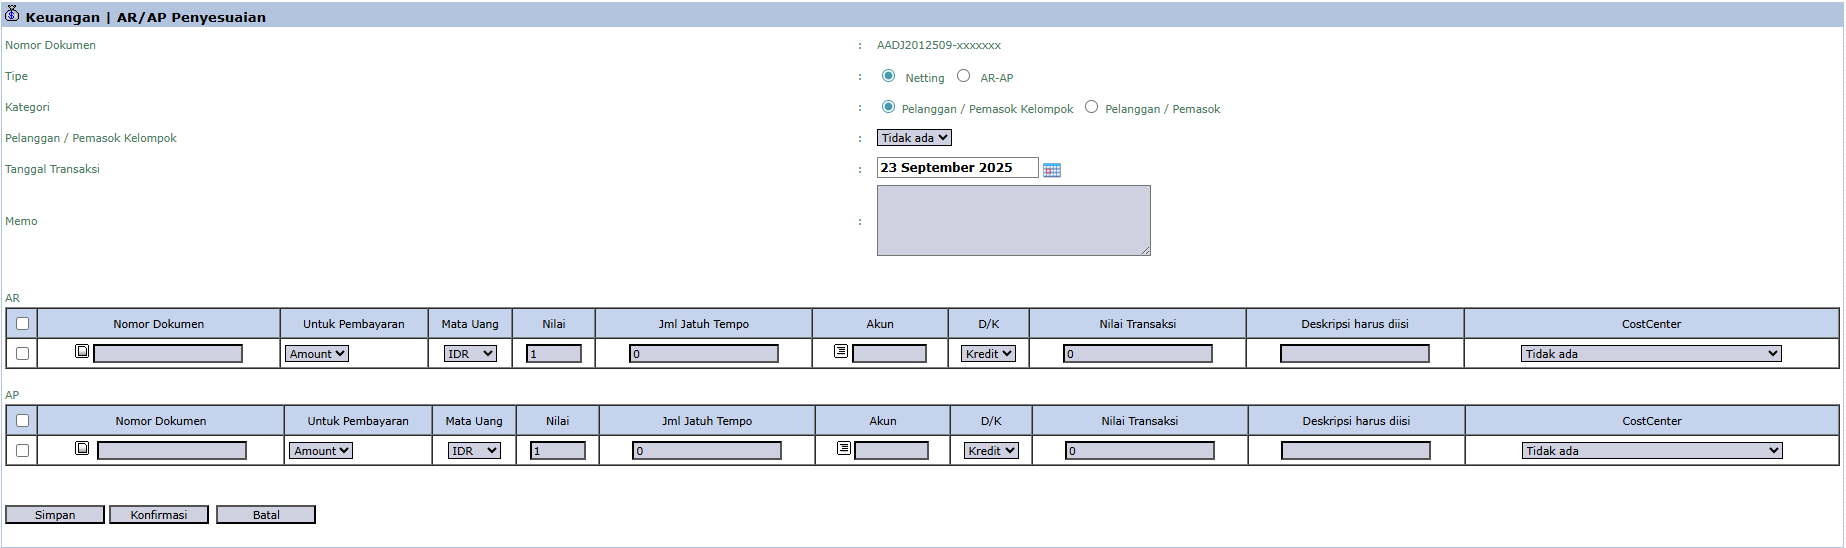**
#### **Step 1: Create a New Adjustment Document**
#### From the Main View, click the **\[New\]** button to open the **AR/AP Adjustment** form.
#### **Step 2: Fill in Header Information**
- #### **Type**: Select the type of adjustment, for example, **Netting**.
- #### **Category**: Select whether you will perform netting for a specific **Customer / Supplier** or a **Group**.
- #### **Customer / Supplier Group**: Select the entity to be netted.
- #### **Transaction Date**: Enter the effective date of this adjustment transaction.
#### **Step 3: Select Receivable (AR) Documents**
#### In the **AR** section, select one or more outstanding sales invoices from that customer that you want to use to reduce the payable.
#### **Step 4: Select Payable (AP) Documents**
#### In the **AP** section, select one or more outstanding purchase invoices from that supplier that you want to reduce with the receivable above.
#### **Step 5: Save and Confirm**
#### After selecting all the relevant documents, the system will calculate the totals. Verify the amounts, then click the **\[Confirm\]** button to process the adjustment. This action will create a journal entry that **debits Accounts Payable (AP)** and **credits Accounts Receivable (AR)**.
### **Tips & Important Notes**
- #### This is an **advanced accounting tool** and must be used with a proper understanding. Always ensure a valid netting agreement exists with the customer/supplier.
- #### After confirmation, this transaction will effectively **"settle"** part or all of the selected receivable and payable balances.
- #### This is an efficient way to settle transactions with business partners who have a **two-way relationship** (as both a buyer and a seller).
# Set Deposit to Income
### **Module Guide: Convert Deposit to Revenue**
#### **Module Location**
#### Finance > Set Deposit to Income
#### **Module Objective**
#### The **Convert Deposit to Revenue** module is a special accounting tool used to create an adjusting journal entry to recognize a "Deposit" or "Customer Down Payment" (which was initially recorded as a liability) as official company Revenue. This process is performed when the conditions for revenue recognition have been met (for example, the goods have been shipped or the service has been rendered).
### **1. Main View (Deposit List)**
#### The main page of this module is an interactive list that displays all deposits from customers that still have a remaining balance.
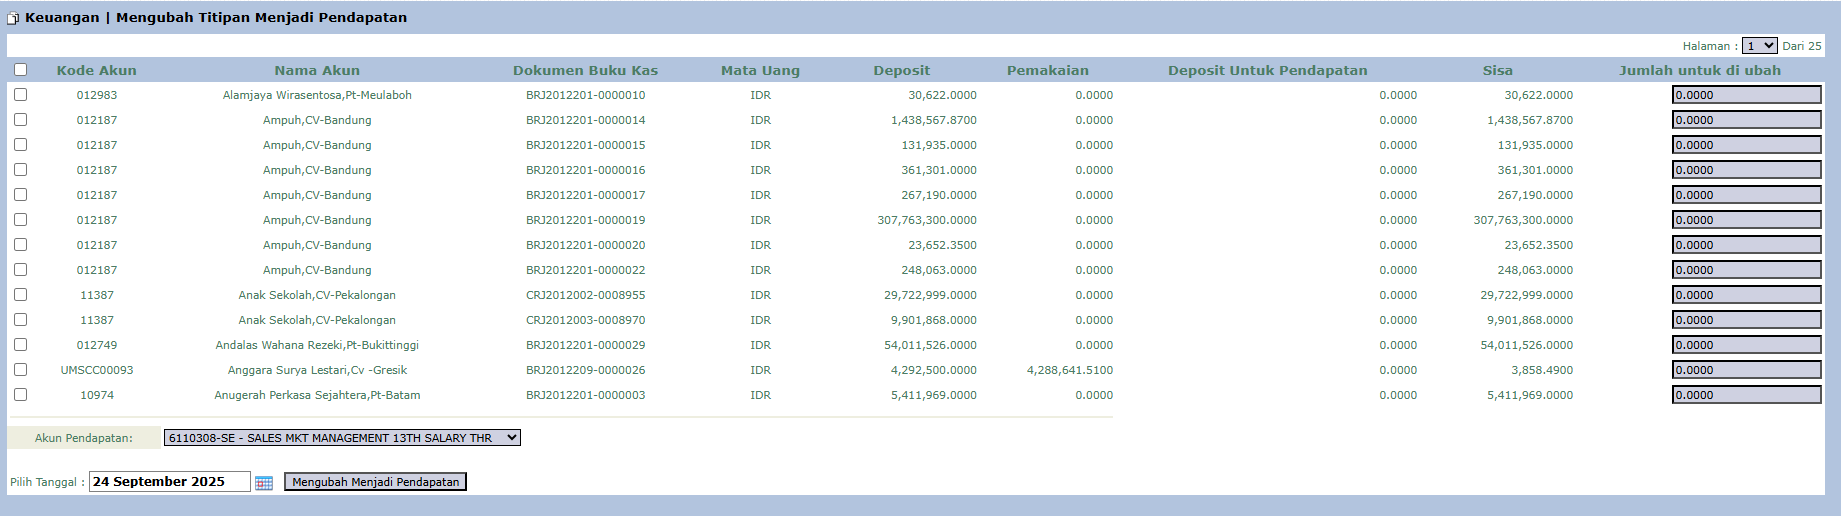
#### **View and Column Explanation**
#### This page is for selecting and processing deposits that will be recognized as revenue.
- #### **Deposit List**: The main table displays all available deposits, with important columns such as:
- #### **Account Name**: The name of the customer who made the deposit.
- #### **Deposit**: The initial deposit amount received.
- #### **Usage**: The amount of the deposit that has been previously used.
- #### **Remaining**: The remaining balance of the deposit that is still available.
- #### **Amount to be converted**: The main input column where you enter the amount to be recognized as revenue.
### **2. Steps to Recognize Revenue**
#### **Step 1: Find and Select the Deposit**
#### Find the row for the customer's deposit that will be recognized as revenue in the available list.
#### **Step 2: Enter the Amount to be Recognized**
#### On the corresponding row, in the **Amount to be converted** column, enter the value that will be recognized as revenue. You can enter a partial amount or the entire remaining balance.
#### **Step 3: Select the Revenue Account**
#### At the bottom of the page, in the **Revenue Account** field, select the appropriate revenue account from the General Ledger for this transaction.
#### **Step 4: Set the Date & Process**
1. #### Select the effective **Date** for this revenue recognition.
2. #### Click the **\[Convert To Revenue\]** button to process the transaction.
#### **Workflow & Integrated Business Process**
- #### **Accounting Impact**: This action will automatically create a journal entry: **Debit** the Deposit/Customer Down Payment liability account and **Credit** the Revenue Account you selected.
- #### **Accounting Principle**: This process is the core of the accrual accounting principle for revenue recognition. Only perform this when the conditions for revenue recognition (e.g., services have been rendered or goods have been shipped) have been met.
### **Tips & Important Notes**
- #### This is a primary work tool for the **Accounting team**.
- #### This process will reduce the liability balance (down payment liability) and increase the revenue balance on the **Profit & Loss Statement**.
# Deposit Management
### **Report Module Guide: Deposit Management**
#### **Module Location**
#### Finance > Deposit Management
#### **Module Objective**
#### The **Deposit Management** module serves as a reporting and inquiry tool for monitoring all deposit transactions. This includes both deposits received from customers (sales down payments) and deposits given to suppliers (purchase down payments). This module provides a centralized list for tracking the amount, usage, and remaining balance of all deposits.
### **1. Main View (Deposit List)**
#### The main page of this module displays a list of all deposit transactions recorded in the system.

#### **View Explanation & Filters**
#### This page is for viewing and monitoring all deposit transactions.
- #### **Filters**:
- #### **Customer/Supplier**: Use this filter to search for deposits from or to a specific party.
- #### **Deposit Type**: A key filter to select the type of deposit to be viewed, for example, **Sales** (for deposits from customers) or **Purchasing** (for deposits to suppliers).
- #### **Start Date / End Date**: Use this filter to screen deposits based on a specific date range.
#### **Column Explanation**
#### The table below will display all deposits that match the filters, with important columns such as:
- #### **Customer/Supplier**: The name of the party associated with the deposit.
- #### **Deposit Date**: The date the deposit was recorded.
- #### **Amount**: The initial value of the deposit.
- #### **Usage**: The amount of the deposit that has already been used or applied to an invoice.
- #### **Remaining**: The remaining balance of the deposit that is still available.
- #### **COA**: The Chart of Account linked to the deposit.
### **2. Workflow & Integrated Business Process**
- #### This is a **reporting and inquiry module**. Deposit data is not created or modified here.
- #### Customer deposit data is recorded via the **Bank/Cash Receipt** modules.
- #### Supplier deposit data is recorded via the **Bank/Cash Disbursement** modules.
- #### This **Deposit Management** module consolidates all of that data into one centralized view for easy monitoring.
### **Tips & Important Notes**
- #### Use this report to monitor the unused deposit balances from all customers or to all vendors.
- #### The **Remaining** column is an important indicator of a liability (for customer deposits) or an asset (for deposits to vendors) that the company still holds.
- #### This is an important monitoring report for the **Finance and Accounting** teams.
# Settlement
### **Module Guide: Settlement (Deposit Settlement)**
#### **Module Location**
#### Finance > Settlement > Settlement
#### **Module Objective**
#### The **Settlement** module is used to perform the settlement process, which is to apply or use funds from a customer's deposit/down payment (recorded as a Guarantee) to pay off an outstanding sales invoice. This is the formal accounting process for "using" a down payment to pay a bill.
### **1. Main View (Settlement List)**
#### The main page of this module displays a list of all Settlement documents that have been created.

#### **View Explanation & Filters**
#### This page is for viewing the history of settlement transactions that have been performed.
- #### **Filters**: You can search for a specific document by **Settlement Number** or a date range (**Start Date / End Date**).
- #### **Settlement List**: The table below will display all documents that match the filters, with columns such as **Settlement Number**, **Account Name**, **Settlement Date**, and **Amount**.
#### **Button Functions**
- #### **\[New\]**: The primary button to create a new Settlement document.
- #### **\[Print\]**: To print the details of a selected settlement.
- #### **\[Cancel\]**: To cancel a settlement document that has already been created.
### **2. Steps to Perform a Settlement**
**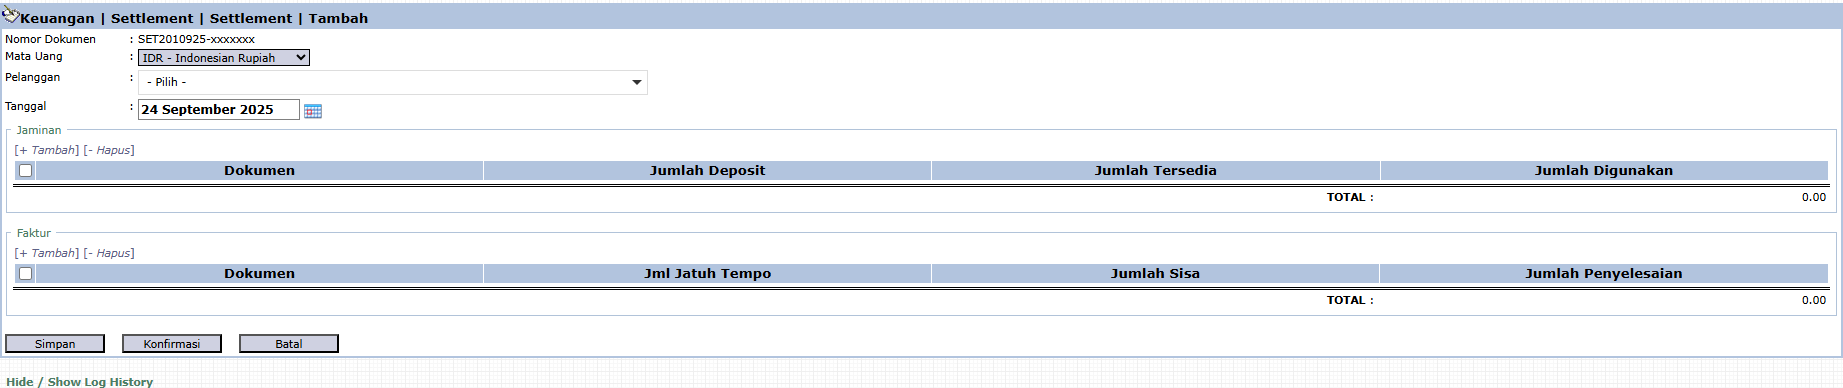**
#### **Step 1: Create a New Settlement Document**
#### From the Main View, click the **\[New\]** button to open the **Add Settlement** form.
#### **Step 2: Select the Customer**
#### On the form that appears, select the **Customer** from the dropdown. This will filter the available deposit and invoice documents for that customer only.
#### **Step 3: Select the Deposit to be Used**
#### In the **Guarantee** section, click **\[+ Add\]** then select the deposit or down payment document that will be used for payment. Enter the amount to be used in the **Amount Used** column.
#### **Step 4: Select the Invoice(s) to be Paid**
#### In the **Invoice** section, click **\[+ Add\]** then select one or more invoices that will be paid using that deposit. Enter the payment amount in the **Settlement Amount** column.
#### **Step 5: Save and Confirm**
1. #### Ensure the total **Amount Used** equals the total **Settlement Amount**.
2. #### After all data is filled in, click **\[Save\]** to save as a draft or **\[Confirm\]** to finalize the transaction.
#### **Workflow & Integrated Business Process**
- #### **Accounting Impact**: After confirmation, this transaction will create a journal to **reduce the down payment liability balance** and simultaneously **reduce the accounts receivable asset balance**.
- #### **Function**: This is an important accounting step to officially 'use' a customer's down payment to settle their bill.
### **Tips & Important Notes**
- #### This is a primary work tool for the **AR (Account Receivable) team**.
- #### This process ensures that the customer's down payment and receivable balances are always up-to-date and accurate.
# Settlement Inbox
### **Module Guide: Settlement Inbox (Deposit Settlement)**
#### **Module Location**
#### Finance > Settlement > Settlement Inbox
#### **Module Objective**
#### The **Settlement Inbox** module serves as the approval center for all **Settlement** documents that have been created. This module is used by a superior or manager to conduct a review and provide approval before the settlement process (application of a deposit to an invoice) is considered final and booked.
### **1. Main View (Settlement List)**
#### The main page of this module is an "inbox" that displays all Settlement documents requiring your action.

#### **View Explanation & Filters**
#### This page provides a summary of all settlement transactions that are awaiting approval.
- #### **Filters**: You can search for a specific document by **Settlement Number** or a date range (**Start Date / End Date**).
- #### **Request List**: The table below will display all settlement documents awaiting action. The table currently shows "...No Data Available...".
#### **Column Explanation**
- #### **Settlement Number**: The unique number of the settlement document.
- #### **Account Name**: The name of the related customer or party.
- #### **Settlement Date**: The date the settlement document was created.
- #### **Amount**: The total value of the settlement transaction.
- #### **Document Status / Approval Status**: Icons that indicate the document's status and the approval process status.
### **2. Approval Process Steps**
#### The following is the standard workflow for an approver.
#### **Step 1: Access the Inbox**
#### Open the **Settlement Inbox** module to see the list of transactions that require approval.
#### **Step 2: Review the Settlement Details**
#### Click on one of the rows in the table to open its detail view. In the detail view, you can check all the information, such as which deposit document was used to pay which invoice document.
#### **Step 3: Provide Approval**
#### After you open and review the settlement details in Step 2, you will find the buttons to grant approval (e.g., **"Approve"** or **"Reject"** buttons) **within that detail page**. Click the appropriate button to complete the review process.
### **3. Workflow & Integrated Business Process**
1. #### **Submission**: A user (e.g., an AR staff) creates a document in the **Settlement** module and clicks **\[Confirm\]**.
2. #### **Entering the Queue**: The confirmed document automatically enters the queue in this **Settlement Inbox** module.
3. #### **Review & Approval**: A manager or approver opens this module, reviews, and provides approval.
4. #### **Finalization**: After approval, the accounting journal for the settlement (**Debit Down Payment, Credit Receivables**) is officially posted to the General Ledger.
# Cash Flow Setting
### **Module Guide: Cash Flow Setup**
#### **Module Location**
#### Finance > Cash Flow Setting
#### **Module Objective**
#### The **Cash Flow Setup** module is a crucial master data module for accounting. Its purpose is to configure and map every relevant account in the Chart of Accounts to its correct classification on the **Statement of Cash Flows**. The setup here allows the system to automatically generate an accurate Statement of Cash Flows based on operating, investing, and financing activities.
### **1. Main View (Setup List)**
#### The main page of this module displays a list of all account-to-cash-flow-category mappings that have been created.

#### **View Explanation**
#### This page shows the mapping between a General Ledger account (**Cash Flow Name**) and its category on the Statement of Cash Flows (**Header, Sub**).
- #### **Filter**: You can search for a specific setup using the search bar based on the **Cash Flow Code**.
- #### **Setup List**: The table below displays the existing mappings. For example, the account **ACCOUNT PAYABLE TRADE** is mapped to the category **Header: OPERATING** and **Sub: PAYMENT TO SUPPLIER**.
#### **Button Functions**
- #### **\[New\]**: The primary button to create a new cash flow account mapping.
- #### **\[Delete\]**: To delete a selected mapping.
- #### **\[Change Status\]**: To change the active status of a mapping.
### **2. Steps to Set Up a Cash Flow**
#### **Step 1: Create a New Setup**
#### From the Main View, click the **\[New\]** button to open the **Add Cash Flow Setup** form.
#### **Step 2: Select an Account**
#### On the form that appears, in the **Cash Flow Code** column, select the **Account** from the Chart of Accounts that you want to map.
#### **Step 3: Classify the Cash Flow**
1. #### In the **Parent Sub** column, select the parent category for this account (for example, PAYMENT TO SUPPLIER, which is part of OPERATING activities).
2. #### Define its flow **Type**: **Inflow**, **Outflow**, or **In & Out**.
3. #### Ensure the **Active Status** is checked.
#### **Step 4: Save the Setup**
#### Click **\[Save\]** to save the new mapping.
### **Tips & Important Notes**
- #### The correct setup in this module is the **key to automatically generating an accurate Statement of Cash Flows** from the system.
- #### This is an **advanced accounting setup** that must be managed by the **Chief Accountant or Finance Manager**.
- #### Every account related to the movement of cash or cash equivalents (e.g., all Cash, Bank, Receivable, Payable accounts) needs to be mapped here for the Statement of Cash Flows to be valid.
# Cash Flow Setting Sub
### **Module Guide: Cash Flow Sub-Category Setup**
#### **Module Location**
#### Finance > Cash Flow Setup > Cash Flow Sub Setup
#### **Module Objective**
#### The **Cash Flow Sub Setup** module serves as the master data tool for creating and managing the sub-categories that will be used in the **Statement of Cash Flows**. These sub-categories are the details of the three main cash flow activities (Operating, Investing, and Financing). The setup created here becomes the foundation for the main **Cash Flow Setup** module.
### **1. Main View (Sub-Category List)**
#### The main page of this module displays all the cash flow sub-categories that have been defined in the system.
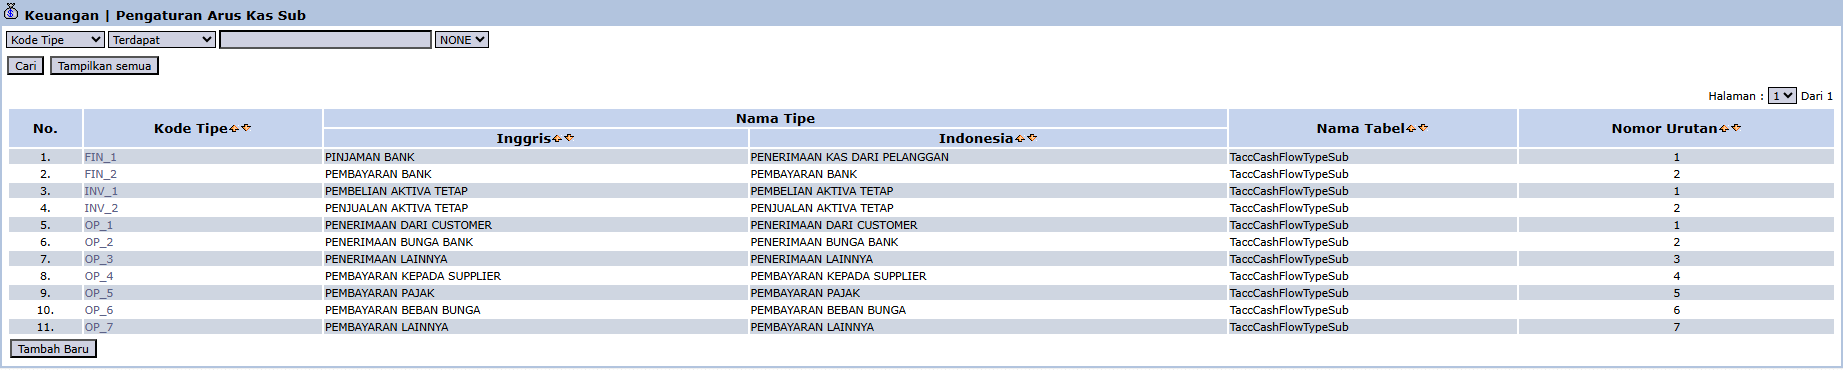
#### **View Explanation**
#### This page is for viewing and managing all existing sub-categories.
- #### **Filter**: You can search for a specific sub-category using the search bar based on the **Type Code**.
- #### **Sub-Category List**: The table below displays all existing sub-categories, such as "CASH RECEIPTS FROM CUSTOMERS" and "PAYMENT TO SUPPLIER".
#### **Button Functions**
- #### **\[Add New\]**: The primary button to create a new cash flow sub-category.
### **2. Steps to Create a New Sub-Category**
#### **Step 1: Create a New Sub-Category**
#### From the Main View, click the **\[Add New\]** button to open the **New Cash Flow Sub Setup** form.
#### **Step 2: Fill in Details**
#### On the form that appears, fill in the required details:
- #### **Parent**: Select the main parent category from the dropdown. The options will be the three main cash flow activities (Operating, Investing, Financing).
- #### **Cash Flow Sub Setup Type**: Enter the name for your new sub-category in English and Indonesian.
#### **Step 3: Save**
#### After all data is filled in, click the **\[Save\]** button to save the new sub-category.
#### **Workflow & Integrated Business Process**
- #### This module is the **first and fundamental step** in configuring the Statement of Cash Flows.
- #### After the sub-categories are created here, you can use them in the **Cash Flow Setup** module to map the accounts from the General Ledger to these sub-categories.
### **Tips & Important Notes**
- #### The sub-category structure you create here will directly determine the detail and appearance of your **Statement of Cash Flows**.
- #### This is an advanced accounting setup that should be managed by the **Chief Accountant or Finance Manager**.
# Receipt Journal
### **Report Module Guide: Transaction Journal**
#### **Module Location**
#### Finance > Transaction Journal
#### **Module Objective**
#### The **Transaction Journal** module is the primary reporting center for all accounting activities. Its purpose is to display, search, filter, and export all journal entries from all modules that exist in the system. From this single module, you can generate various types of specific journal reports, including a Receipt Journal.
### **1. Main View (Transaction Report Center)**
#### The main page of this module is a comprehensive, interactive report.
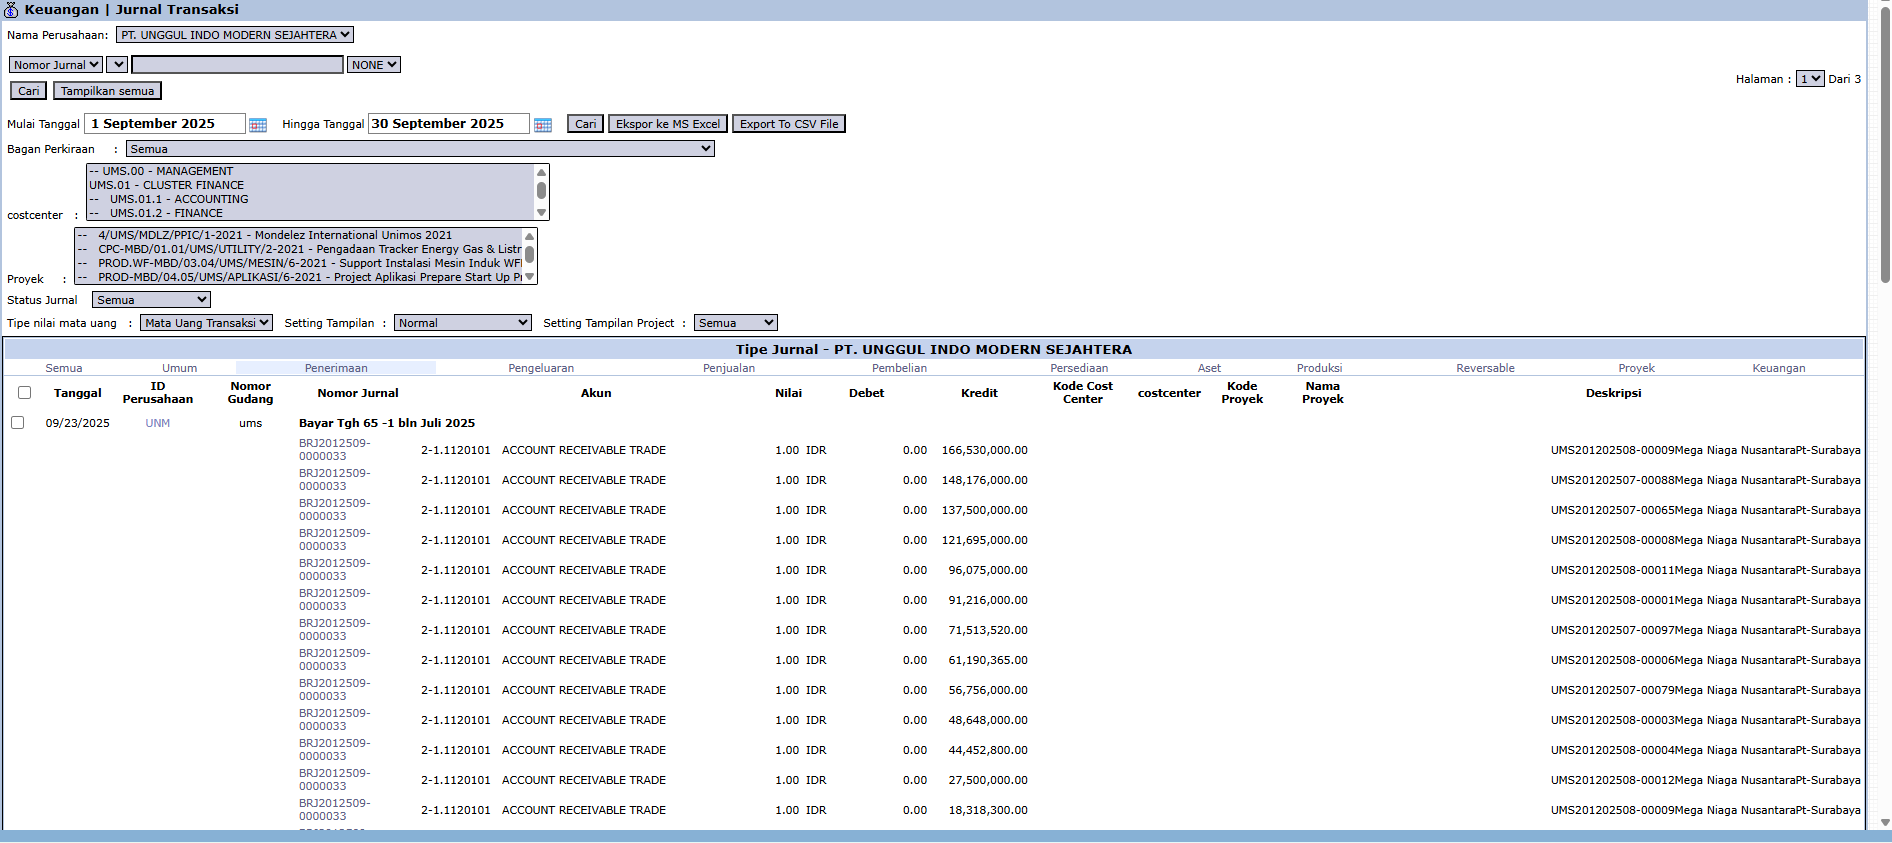
#### **Advanced Filter Functions**
#### The top section of the page provides various advanced filters to screen the data:
- #### **Journal Number**: To search by a specific journal or source document number.
- #### **Start Date / End Date**: Specify a date range to limit the transaction period.
- #### **Chart of Accounts**: Filter transactions that only affect a specific account.
- #### **Costcenter / Project**: Filter transactions that are only allocated to a specific department or project.
### **2. How to Generate a Specific Report (Example: Receipt Journal)**
#### To create a specific report like a Receipt Journal (as you asked), you just need to use the available filters effectively.
1. #### **Set the Period**: Define the date range in the **Start Date** and **End Date** fields.
2. #### **Filter by Account**: In the **Chart of Accounts** filter, select the accounts related to receipts, such as all **Cash and Bank accounts**.
3. #### **Use Built-in Filters**: Under **Journal Type**, there is likely a special filter to select **Receipt** transactions.
4. #### **Display Results**: Click the **\[Search\]** button. The results displayed in the table will be the **Receipt Journal** for your selected period.
### **Tips & Important Notes**
- #### This module is the most powerful **read-only tool** for the Accounting team for conducting audits, ensuring traceability, and performing reconciliations.
- #### By using the right combination of filters, you can generate almost any type of special journal from this single module, such as a **Sales Journal, Purchase Journal, Cash Receipt Journal, and Cash Disbursement Journal**.
- #### Use the **\[Export to MS Excel\]** button to download the data and perform further analysis.
# CBR Analysis
### **Report Module Guide: CBR Analysis Report (Detail)**
#### **Module Location**
#### Finance > Reports > CBR Analysis Report
#### **Module Objective**
#### The **CBR Analysis Report** module is used to generate a detailed report of all **Cash Book Requests (CBRs)**. This report is the primary tool for tracking, summarizing, and analyzing all internal fund requests (e.g., for petty cash, reimbursement claims, etc.) based on various criteria.
### **1. Report Parameters (Filter)**
#### The main page of this module is a form containing various parameters to customize the report that will be generated.
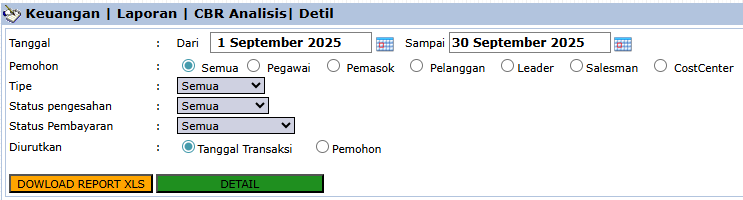
#### Here is an explanation for each parameter:
- #### **Date**:
- #### Specify the **From** and **To** date range to define the period of requests to be displayed.
- #### **Requestor**:
- #### A very flexible filter to select the type of requestor, such as **All, Employee, Supplier**, or per **CostCenter**.
- #### **Approval Status / Payment Status**:
- #### Use these dropdowns to filter requests based on their approval or payment status.
- #### **Sort by**:
- #### Choose how the data will be sorted in the report, whether by **Transaction Date** or **Requestor**.
### **2. Steps to Generate the Report**
#### **Step 1: Set Report Parameters**
#### Select all the parameters you need from the comprehensive list to focus the report on the data you wish to analyze.
#### **Step 2: Generate the Report**
#### After all parameters are set, click one of the two buttons at the bottom:
- #### **\[DETAIL\]**: To preview the CBR analysis report directly on your screen.
- #### **\[DOWNLOAD REPORT XLS\]**: To download the report data in an Excel file format.
### **Tips & Important Notes**
- #### Use this report to analyze operational cash expenditures per department by filtering by **CostCenter**.
- #### This report is a recapitulation of all data created in the **Cash Book Request** module.
- #### This is an important audit tool for **Finance Management and Internal Audit** to monitor cash expenditures that do not originate from purchase invoices.
# Cash Book Transaction
### **Report Module Guide: Cash Book Transaction Report**
#### **Module Location**
#### Finance > Reports > Cash Book Report
#### **Module Objective**
#### The **Cash Book Transaction Report** module is used to generate a "Cash Book" or "Bank Book" report. This report details all transactions, both inflows and outflows, that occurred on a specific cash or bank account within a single period. It is a fundamental report for daily cash monitoring and the reconciliation process.
### **1. Report Parameters (Filter)**
#### The main page of this module is a form containing various parameters to customize the report that will be generated.

#### Here is an explanation for each parameter:
- #### **Transaction Type**:
- #### Filter the report to display **ALL** transactions, or only **Inflows** or **Outflows**.
- #### **Cash Book Account**:
- #### This is the primary filter to select the specific cash or bank account whose report you want to view.
- #### **Start Date / To**:
- #### Specify the transaction date range to be displayed (e.g., September 1, 2025, to September 30, 2025).
- #### **Approval status**:
- #### Filter transactions based on their approval status.
### **2. Steps to Generate the Report**
#### **Step 1: Set Report Parameters**
#### Define the parameters you need, especially selecting the **Cash Book Account** to be checked and specifying its date range.
#### **Step 2: Generate the Report**
#### After all parameters are set, click one of the two buttons at the bottom:
- #### **\[Display Report\]**: To preview the cash book report directly on your screen.
- #### **\[View via Excel\]**: To download the report data in an Excel file format.
### **3. Report Content (Conceptual)**
#### The generated report will resemble a cash book or bank statement format, which will most likely display:
- #### Transaction Date
- #### Description / Narration
- #### Document Reference Number
- #### Debit column (for outflows)
- #### Credit column (for inflows)
- #### Running Balance
### **Tips & Important Notes**
- #### Use this report to perform an **internal reconciliation** before comparing it with the actual statement from the bank.
- #### This report is a recapitulation of all transactions recorded in the **Bank/Cash Receipt and Bank/Cash Disbursement** modules.
- #### This is a crucial daily operational report for the **Treasury and Accounting teams** to monitor cash and bank positions.
# Cash Flow
### **Report Module Guide: Statement of Cash Flows**
#### **Module Location**
#### Finance > Reports > Cash Flow
#### **Module Objective**
#### The **Statement of Cash Flows** report module is used to generate the Statement of Cash Flows, which is one of the three main financial statements. This report presents a summary of all company cash inflows (receipts) and cash outflows (disbursements) during a specific period, classified into three main activities: **Operating, Investing, and Financing**.
#### **Important**: The accuracy of this report depends entirely on the correct configuration in the **Cash Flow Setup** and **Cash Flow Sub Setup** modules.
### **1. Report Parameters (Filter)**
#### The main page of this module is a form containing various parameters to generate a specific report.
#### Here is an explanation for each key parameter:
- #### **Company / Account**:
- #### Select the **Company** and the cash/bank **Account** that will be the basis for the report.
- #### **Period**:
- #### Specify the **From** and **To** date range to define the report's period.
- #### **Report Type**:
- #### Select the report format, for example, **Detail** to display transaction details or **Summary** (if available) for a total summary per category.
- #### **Currency**:
- #### Set the currency preference for the report.
### **2. Steps to Generate the Report**
#### **Step 1: Set Report Parameters**
#### Select all the parameters you need, especially the report period.
#### **Step 2: Generate the Report**
#### After all parameters are set, click one of the buttons at the bottom:
- #### **\[Display Report\]**: To preview the Statement of Cash Flows directly on your screen.
- #### **\[Export to MS Excel\]**: To download the report data in an Excel file format.
### **3. Report Content (Conceptual)**
#### The generated report will have the standard structure of a Statement of Cash Flows, which displays:
- #### **Cash Flow from Operating Activities** (e.g., Receipts from Customers, Payments to Suppliers, Salary Payments).
- #### **Cash Flow from Investing Activities** (e.g., Purchase or Sale of Fixed Assets).
- #### **Cash Flow from Financing Activities** (e.g., Loan Receipts, Dividend Payments).
- #### **Net Increase/Decrease in Cash**.
- #### **Beginning Cash Balance** and **Ending Cash Balance** for the period.
### **Tips & Important Notes**
- #### Ensure the **Cash Flow Setup** module has been configured correctly. This report will not be accurate without a valid account mapping setup.
- #### The Statement of Cash Flows is crucial for analyzing the company's **liquidity health** and its ability to generate cash.
- #### This is an essential report for **Top Management, Investors, and Creditors**.
# Recapitulation Cash Flow
### **Report Module Guide: Cash Flow Recapitulation**
#### **Module Location**
#### Finance > Reports > Cash Flow Recapitulation
#### **Module Objective**
#### The **Cash Flow Recapitulation** report module is used to present a summary or recap of the Statement of Cash Flows. Unlike the detailed Statement of Cash Flows that shows a breakdown by category (Operating, Investing, Financing), this recapitulation report most likely presents a summary of total cash inflows and outflows in a period to provide a quick general overview.
### **1. Report Parameters (Filter)**
#### The main page of this module is a form containing various parameters to customize the report that will be generated.
#### Here is an explanation for each parameter:
- #### **Company / Account**:
- #### The primary filter to select the **Company** and the specific cash/bank **Account** for which you want to see the recapitulation (e.g., MAIN CASHIER).
- #### **Period**:
- #### Specify the **From** and **To** date range to define the report's period.
- #### **Currency**:
- #### Set the currency preference for the report.
### **2. Steps to Generate the Report**
#### **Step 1: Set Report Parameters**
#### Define the parameters you need, especially selecting the **Account** to be recapped and specifying its date range.
#### **Step 2: Generate the Report**
#### After all parameters are set, click one of the two buttons at the bottom:
- #### **\[Display Report\]**: To preview the recapitulation report directly on your screen.
- #### **\[Export to MS Excel\]**: To download the report data in an Excel file format for further analysis.
### **3. Report Content (Conceptual)**
#### The generated report will likely display a simple summary, such as:
- #### Beginning Balance for the Period
- #### Total Cash Inflows (during the period)
- #### Total Cash Outflows (during the period)
- #### Net Increase/Decrease in Cash
- #### Ending Balance for the Period
### **Tips & Important Notes**
- #### This report provides a very quick **high-level overview** of cash movement without having to see the detailed activities.
- #### This is a useful report for **Executive Management** to get a quick picture of the company's cash position.
# Cash and Bank Balance Position Report
### **Report Module Guide: Cash and Bank Balance Position Report**
#### **Module Location**
#### Finance > Reports > Cash and Bank Balance Position Report
#### **Module Objective**
#### The **Cash and Bank Balance Position Report** module is used to generate a report that displays the **ending balance** of all cash and bank accounts the company holds as of a specific date. This report provides a quick and comprehensive overview of the company's total liquidity position (cash and cash equivalents).
### **1. Report Parameters (Filter)**
#### The main page of this module is a form containing various parameters to customize the report that will be generated.
#### Here is an explanation for each parameter:
- #### **Company**:
- #### Select the company whose report you wish to see from the dropdown.
- #### **Period**:
- #### Specify the report's date range. The **To** date is the "as of" date at which the balance will be displayed.
- #### **Currency**:
- #### Set the currency preference for the report, whether to use the base currency or the transaction currency rates.
### **2. Steps to Generate the Report**
#### **Step 1: Set Report Parameters**
#### Define the parameters you need, especially the **To** period which will be the reference date for the balance position.
#### **Step 2: Generate the Report**
#### After all parameters are set, click one of the two buttons at the bottom:
- #### **\[Display Report\]**: To preview the balance position report directly on your screen.
- #### **\[Export to MS Excel\]**: To download the report data in an Excel file format.
### **3. Report Content (Conceptual)**
#### The generated report will be a simple list that will most likely display:
- #### Account Code (Cash/Bank).
- #### Account Name (e.g., 'MAIN CASHIER', 'BANK BCA IDR', 'BANK MANDIRI USD').
- #### The Ending Balance as of the selected date.
- #### A grand total of all cash and cash equivalents.
### **Tips & Important Notes**
- #### This report is crucial for **daily liquidity management**.
- #### Use this report to provide a quick overview to management regarding the company's current cash position.
- #### This is a very frequently used operational report by the **Treasury and Finance Management teams**.
# Bank Reconciliation Report
### **Report Module Guide: Bank Reconciliation Report**
#### **Module Location**
#### Finance > Reports > Bank Reconciliation Report
#### **Module Objective**
#### The **Bank Reconciliation Report** module is used to print, view, and export the final report from a Bank Reconciliation process that has been completed. This module is the means to generate the formal document from a reconciliation that has been previously created and approved in the **Bank Reconciliation** module.
### **1. Report Parameters (Filter)**
#### The main page of this module is a form containing various parameters to find and generate a specific reconciliation report.
#### Here is an explanation for each parameter:
- #### **Account**:
- #### The primary filter to select the specific bank account whose reconciliation report you want to generate.
- #### **Reconciliation Date**:
- #### Specify the **From** and **To** date range to find reconciliation documents that were created in that period (e.g., October 1, 2025, to October 31, 2025).
### **2. Steps to Generate the Report**
#### **Step 1: Set Report Parameters**
#### Define the parameters you need, especially selecting the bank **Account** and specifying the appropriate **Reconciliation Date**.
#### **Step 2: Generate the Report**
#### After all parameters are set, click one of the two buttons at the bottom:
- #### **\[Display Report\]**: To preview the bank reconciliation report directly on your screen.
- #### **\[Export to MS Excel\]**: To download the report data in an Excel file format.
### **3. Report Content (Conceptual)**
#### The generated report will have the standard format of a Bank Reconciliation Report, which displays:
- #### Balance per Bank (Bank Statement Balance).
- #### Add: Deposits in Transit.
- #### Less: Outstanding Checks.
- #### **Adjusted Bank Balance**.
- #### Balance per Company (General Ledger Balance).
- #### Add/Less: Reconciling items (e.g., Bank Fees, Interest Income).
- #### **Adjusted Company Balance**.
#### Both adjusted balances must ultimately show the same figure.
### **Tips & Important Notes**
- #### This report can only be generated if the reconciliation process for that account and period has been **completed and approved** in the **Bank Reconciliation** module.
- #### This is a very important **audit document** and serves as proof that internal control over cash has been properly executed.
- #### Save this report, either in printed or digital form, as part of the monthly book-closing documents.
# Giro Report
### **Report Module Guide: Giro Report**
#### **Module Location**
#### Finance > Reports > Giro Report
#### **Module Objective**
#### The **Giro Report** module is used to generate a detailed report of all transactions that use a Check or Bilyet Giro. This report is crucial for the Finance team to monitor Checks/Giros that are approaching their due date, manage cash flow, and track the status of every outstanding Check/Giro.
### **1. Report Parameters (Filter)**
#### The main page of this module is a form containing various parameters to customize the report that will be generated.
#### Here is an explanation for each key parameter:
- #### **Order**:
- #### Select the sorting basis for the data in the report, for example, by **Check Date**.
- #### **Date**:
- #### Specify the **From** and **To** date range to define the period of the Checks/Giros to be displayed (e.g., October 1, 2025, to October 31, 2025).
- #### **Check Type**:
- #### Filter the report by its type, for example, **All**, **Incoming Giro** (receipt), or **Outgoing Giro** (payment).
- #### **Giro Status**:
- #### This is a very important filter to view Checks/Giros based on their status, for example, **Outstanding**, **Cleared**, or **Bounced**.
- #### **Grouped by**:
- #### Choose if you want the data to be grouped, for example, by **Bank Account**.
### **2. Steps to Generate the Report**
#### **Step 1: Set Report Parameters**
#### Define the parameters you need, especially the date range and the **Giro Status**, to get the most relevant data.
#### **Step 2: Generate the Report**
#### After all parameters are set, click one of the two buttons at the bottom:
- #### **\[Display Report\]**: To preview the Giro report directly on your screen.
- #### **\[Export to MS Excel\]**: To download the report data in an Excel file format.
### **3. Report Content (Conceptual)**
#### The generated report will be a list of Checks/Giros that will most likely display:
- #### Giro/Check Number
- #### Issue Date
- #### Due Date
- #### Customer/Supplier Name
- #### Nominal Value
- #### Giro Status
### **Tips & Important Notes**
- #### Use this report to **project cash inflows and outflows** from maturing Checks/Giros.
- #### Filter by **Giro Status "Outstanding"** to get a list of all active Giros that need to be closely monitored.
- #### This report is a recapitulation of the data managed in the **Giro module**. It is a crucial daily operational report for the **Treasury team**.
# Cash Projection
### **Report Module Guide: Cash Projection**
#### **Module Location**
#### Finance > Reports > Cash Projection
#### **Module Objective**
#### The **Cash Projection Report** module is used to generate a forecast or projection report of the company's future cash balance. This report simulates cash inflows and outflows based on existing transaction data (such as invoice due dates) to help management anticipate cash positions, manage liquidity, and make strategic financial decisions.
### **1. Report Parameters (Filter)**
#### The main page of this module is a form containing various parameters to customize the projection report that will be generated.
#### Here is an explanation for each parameter:
- #### **Company**:
- #### Select the company whose report you wish to see from the dropdown.
- #### **Period**:
- #### Specify the future date range you wish to project (e.g., October 1, 2025, to October 31, 2025).
- #### **Currency**:
- #### Set the currency preference for the report.
### **2. Steps to Generate the Report**
#### **Step 1: Set Report Parameters**
#### Define the parameters you need, especially the future projection **Period**.
#### **Step 2: Generate the Report**
#### After all parameters are set, click one of the two buttons at the bottom:
- #### **\[Display Report\]**: To preview the cash projection report directly on your screen.
- #### **\[Export to MS Excel\]**: To download the report data in an Excel file format.
### **3. Report Content (Conceptual)**
#### The generated report will be a table (often displayed per week or per day) that shows:
- #### Beginning Cash Balance
- #### Projected Cash Receipts (based on receivables due, incoming Giros, etc.)
- #### Projected Cash Disbursements (based on payables due, outgoing Giros, routine costs, etc.)
- #### Projected Net Cash Flow
- #### Projected Ending Cash Balance
### **Tips & Important Notes**
- #### The accuracy of this report is highly dependent on the accuracy of the **due dates** on all receivable and payable transactions in the system.
- #### Use this report to plan for funding needs, identify potential **cash deficits**, or plan for investments if there is a **cash surplus**.
- #### This is a crucial strategic planning tool for **Finance Management and Treasury**.
# Statement Of Cash Flows
### **Report Module Guide: Statement of Cash Flows (Direct/Indirect Method)**
#### **Module Location**
#### Finance > Reports > Statement of Cash Flows
#### **Module Objective**
#### The **Statement of Cash Flows** report module is used to generate the company's official Statement of Cash Flows. This module provides the important option to generate the report using either the **Direct Method** or the **Indirect Method**, in accordance with applicable accounting standards.
### **1. Report Parameters (Filter)**
#### The main page of this module is a form containing various parameters to generate a specific report.
#### Here is an explanation for each key parameter:
- #### **Document Type**:
- #### Filter transactions by their type, whether **Internal** or **External**.
- #### **Master Type**:
- #### This is the most important parameter in this report. You can choose the presentation method for the Statement of Cash Flows:
- #### **Direct**: This method details the sources of gross cash receipts (e.g., from customers) and the uses of cash (e.g., payments to suppliers).
- #### **In Direct (Indirect)**: This method starts with Net Income, which is then adjusted for non-cash items (like depreciation) and changes in working capital.
- #### **Period**:
- #### Specify the **From** and **To** date range to define the report's period (e.g., October 1, 2025, to October 7, 2025).
### **2. Steps to Generate the Report**
#### **Step 1: Set Report Parameters**
#### Define the parameters you need, especially selecting the **Master Type** (Direct/Indirect) and specifying the report **Period**.
#### **Step 2: Generate the Report**
#### After all parameters are set, click one of the three buttons at the bottom:
- #### **\[Display Report\]**: To preview the Statement of Cash Flows directly on your screen.
- #### **\[Export to MS Excel\]**: To download the report data in an Excel file format.
- #### **\[Export to PDF\]**: To download the report in a PDF format that is ready to be distributed.
### **Tips & Important Notes**
- #### The choice between the Direct and Indirect Method is an **accounting policy decision**. Ensure you select the method that aligns with the standards your company uses.
- #### Just like other cash flow reports, its accuracy is highly dependent on the configuration in the **Cash Flow Setup** module.
- #### The ability to export to **PDF** makes this report very useful for formal reporting to management, investors, or other external parties.
# Financial Statements
### **Report Module Guide: Financial Statements**
#### **Module Location**
#### Finance > Reports > Financial Statements
#### **Module Objective**
#### The **Financial Statements** module is the final and most important module in the accounting reporting cycle. Its purpose is to generate the company's main financial statements, such as the **Balance Sheet** and the **Income Statement**, which summarize the company's overall financial health and performance.
### **1. Report Parameters (Filter)**
#### The main page of this module is a form containing various parameters to generate a specific financial report.
#### Here is an explanation for each key parameter:
- #### **Report Type Filter (Topmost)**:
- #### This is the primary filter (currently showing "All") used to select the type of financial statement you want to generate. The options will most likely be **Balance Sheet**, **Income Statement**, and other related reports.
- #### **Period**:
- #### Specify the report's date range.
- #### For the **Income Statement**, the **From** and **To** dates define the performance period (e.g., October 1 to 31).
- #### For the **Balance Sheet**, the **To** date is the financial position date ("as of" date).
- #### **Currency**:
- #### Set the currency preference for the report.
### **2. Steps to Generate the Report**
#### **Step 1: Set Report Parameters**
#### Define the parameters you need, especially selecting the desired report type and specifying its **Period**.
#### **Step 2: Generate the Report**
#### After all parameters are set, click one of the two buttons at the bottom:
- #### **\[Display Report\]**: To preview the financial statement directly on your screen.
- #### **\[Export to MS Excel\]**: To download the report data in an Excel file format.
### **3. Report Content (Conceptual)**
- #### **If you select 'Balance Sheet'**: The report will display the position of the company's **Assets, Liabilities, and Equity** on a specific date, with Assets = Liabilities + Equity.
- #### **If you select 'Income Statement'**: The report will display the total **Revenues and Expenses** over a period to generate the **Net Income or Loss**.
### **Tips & Important Notes**
- #### This is the **pinnacle module** of all accounting activities. The accuracy of this report reflects the accuracy of all data input throughout the entire ERP system.
- #### Ensure all adjusting journal entries and the **month-end closing process** have been completed before generating the final financial statements from this module.
- #### This report is the primary output of the accounting department, used by all stakeholders: **management, investors, banks, and the government (taxes)**.
# Daily Cash Report
### **Report Module Guide: Daily Cash Report**
#### **Module Location**
#### Finance > Reports > Daily Cash Report
#### **Module Objective**
#### The **Daily Cash Report** module is used to generate a detailed report that resembles a daily cash book or bank book. This report presents a chronological list of all transactions (inflows and outflows) for one or more selected cash/bank accounts within a specific period. It is a fundamental tool for the control and monitoring of daily cash activities.
### **1. Report Parameters (Filter)**
#### The main page of this module is a form containing various parameters to customize the report that will be generated.
#### Here is an explanation for each parameter:
- #### **1. Account**:
- #### Select **Selected Account** to choose one or more specific cash/bank accounts from a list, or select **All Accounts** to generate a combined report.
- #### **2. To**:
- #### Specify the report's date range in the **Start Date** and **End Date** fields.
- #### **4. Include 0.00 Balance**:
- #### Check **Yes** if you want to display accounts that have no balance or transactions in the selected period.
- #### **5. Currency**:
- #### Set the currency preference for the report.
### **2. Steps to Generate the Report**
#### **Step 1: Set Report Parameters**
#### Define the parameters you need, especially selecting the **Account(s)** to be reported on and specifying the date range.
#### **Step 2: Generate the Report**
#### After all parameters are set, click one of the two buttons at the bottom:
- #### **\[Display Report\]**: To preview the daily cash report directly on your screen.
- #### **\[Export to MS Excel\]**: To download the report data in an Excel file format.
### **3. Report Content (Conceptual)**
#### The generated report will be a detailed daily cash book, which will most likely display:
- #### The beginning balance for the period.
- #### A chronological list of transactions, each with a Date, Description, Document Number, Debit (outflow), and Credit (inflow).
- #### The ending balance for the period.
### **Tips & Important Notes**
- #### This report is very similar to the **Cash Book Transaction Report**, but with the main advantage of being flexible enough to **select and combine multiple accounts** in one report.
- #### This is a fundamental operational report for the **Treasury team** in monitoring daily cash activities and for **Accounting** in the process of auditing or tracing transactions.
# Daily Bank Report
### **Report Module Guide: Daily Bank Report**
#### **Module Location**
#### Finance > Reports > Daily Bank Report
#### **Module Objective**
#### The **Daily Bank Report** module is used to generate a detailed daily transaction report, specifically for **bank accounts**. This report provides a chronological list of all transactions (inflows and outflows) for one or more selected bank accounts, making it an important tool for monitoring and reconciliation.
### **1. Report Parameters (Filter)**
#### The main page of this module is a form containing various parameters to customize the report that will be generated.
#### Here is an explanation for each parameter:
- #### **1. Account**:
- #### Select **Selected Account** to choose one or more specific bank accounts from the list, or select **All Accounts** to generate a combined report of all bank accounts.
- #### **2. To**:
- #### Specify the report's date range in the **Start Date** and **End Date** fields.
- #### **3. Currency**:
- #### Set the currency preference for the report.
### **2. Steps to Generate the Report**
#### **Step 1: Set Report Parameters**
#### Define the parameters you need, especially selecting the bank **Account(s)** to be reported on and specifying the date range.
#### **Step 2: Generate the Report**
#### After all parameters are set, click one of the two buttons at the bottom:
- #### **\[Display Report\]**: To preview the daily bank report directly on your screen.
- #### **\[Export to MS Excel\]**: To download the report data in an Excel file format.
### **Tips & Important Notes**
- #### Functionally, this report is very similar to the **Daily Cash Report**. The main difference is that this report is focused specifically on **Bank accounts**, while the Daily Cash Report can include both Cash and Bank accounts.
- #### This report is very useful for the **Treasury team** who need to monitor activity across various bank accounts simultaneously in one view.
# Financial Ratios
### **Report Module Guide: Financial Ratios**
#### **Module Location**
#### Finance > Reports > Financial Ratios
#### **Module Objective**
#### The **Financial Ratios** report module serves as an automated analysis tool to calculate and present various important financial ratios. This report pulls data directly from the Financial Statements (Balance Sheet and Income Statement) to provide a quick overview of the company's financial performance and health from various aspects, such as liquidity, profitability, and solvency.
### **1. Report Parameters (Filter)**
#### The main page of this module is a form containing various parameters to customize the report that will be generated.
#### Here is an explanation for each parameter:
- #### **Company**:
- #### Select the company whose report you wish to see from the dropdown.
- #### **Period**:
- #### Specify the **From** and **To** date range to be analyzed. The system will use data from the Financial Statements of this period to calculate the ratios.
#### **2. Steps to Generate the Report**
#### **Step 1: Set Report Parameters**
#### Define the **Company** and the **Period** you wish to analyze.
#### **Step 2: Generate the Report**
#### After the parameters are set, click one of the two buttons at the bottom:
- #### **\[Display Report\]**: To preview the financial ratios report directly on your screen.
- #### **\[Export to MS Excel\]**: To download the report data in an Excel file format.
### **3. Report Content (Conceptual)**
#### The generated report will display various important financial ratios, which will likely be grouped into the following categories:
- #### **Liquidity Ratios**: Measures the company's ability to meet its short-term obligations.
- #### Current Ratio
- #### Quick Ratio
- #### **Profitability Ratios**: Measures the company's ability to generate profit.
- #### Gross Profit Margin
- #### Net Profit Margin
- #### Return on Equity (ROE)
- #### **Solvency Ratios**: Measures the company's long-term financial health.
- #### Debt to Equity Ratio
- #### Debt to Asset Ratio
### **Tips & Important Notes**
- #### The accuracy of this report depends entirely on the accuracy of the **Financial Statements (Balance Sheet and Income Statement)** generated by the system.
- #### Use this report to compare the company's performance from one period to another or against **industry standards**.
- #### This is a **high-level analysis report** that is very useful for **Top Management, Financial Analysts, and Investors**.
# Cash Flow Report
### **Report Module Guide: Cash Flow Report (Worksheet)**
#### **Module Location**
#### Finance > Financial Statements > Cash Flow Report
#### **Module Objective**
#### This **Cash Flow Report** module is used to generate a report detailing the balances of all accounts that affect cash flow on a specific date. Unlike a formal cash flow statement, this report functions more as a **worksheet** or supporting data, displaying the ending position of each cash, bank, receivable, inventory, and other related accounts.
### **1. Report Parameters (Filter)**
#### The main page of this module is a simple form for defining the report date.
- #### **Date**:
- #### Select a single specific date that will be the reference date ("as of" date) for all the account balances to be displayed (e.g., October 31, 2025).
### **2. Steps to Generate the Report**
#### **Step 1: Set Report Parameters**
#### Select the report **Date** you want.
#### **Step 2: Generate the Report**
#### After the date is set, click one of the two buttons at the bottom:
- #### **\[Display Report\]**: To preview the report directly on your screen.
- #### **\[Export to MS Excel\]**: To download the report data in an Excel file format.
### **3. Reading the Report (Report Content)**
#### The generated report is **not a formal Statement of Cash Flows** (Operating, Investing, Financing), but rather a detailed list of account balances.
#### This report displays:
- #### A list of all accounts relevant to cash flow, such as **MAIN CASHIER, BANK BCA, ACCOUNTS RECEIVABLE, INVENTORY,** and **VENDOR DEPOSIT**.
- #### The **ending balance** of each of those accounts on the selected date.
### **Tips & Important Notes**
- #### Use this report as **supporting data or a first step** for preparing a formal Statement of Cash Flows, especially with the indirect method.
- #### This report provides the detailed balances that make up the **changes in working capital** needed for the analysis of cash flow from operating activities.
- #### This is a useful report for the **Controller or Accounting Manager** during the book-closing process.
# Bank Product Report
### **Report Module Guide: Bank Product Report (Aging Report)**
#### **Module Location**
#### Finance > Reports > Bank Product Report
#### **Module Objective**
#### The **Bank Product Report** module is used to generate an **aging report** for various banking products or instruments, such as a **Bank Guarantee**. This report helps management monitor how long these financial instruments have been outstanding or active.
### **1. Report Parameters (Filter)**
#### The main page of this module is a form containing various parameters to customize the report that will be generated.
#### Here is an explanation for each parameter:
- #### **1. As of**:
- #### Specify the reference date ("as of" date) for the calculation of the bank product's age.
- #### **2. Aging Method**:
- #### Select the basis to be used for calculating the age, for example, **"Calculate Number of Days Since Bank Product Date"**.
- #### **3. Aging Period**:
- #### Set the time range for each aging bucket in the report, for example, the first 30 days, the second 60 days, and the third 90 days.
### **2. Steps to Generate the Report**
#### **Step 1: Set Report Parameters**
#### Define the parameters you need, especially the reference date and the aging ranges you wish to analyze.
#### **Step 2: Generate the Report**
#### After all parameters are set, click one of the two buttons at the bottom:
- #### **\[Display Report\]**: To preview the bank product aging report directly on your screen.
- #### **\[Export to MS Excel\]**: To download the report data in an Excel file format.
### **3. Reading the Report (Report Content)**
#### The generated report will be a list of banking products classified by their age.
#### This report displays details such as the **Bank Product Number, Bank Product Date,** and **Amount**. The **Amount** value of each product will be placed in one of the aging columns on the right (e.g., 0 - 30, 31 - 60, etc.) according to the result of its age calculation.
### **Tips & Important Notes**
- #### Use this report to monitor financial instruments that have been outstanding for a long time and may require attention or follow-up.
- #### This report is a recapitulation of the data managed in the **Banking Product** module.
- #### This is an important monitoring report for the **Treasury team** to manage the company's portfolio of banking instruments.
# Company Loan Report
### **Report Module Guide: Company Loan Report**
#### **Module Location**
#### Finance > Reports > Company Loan Report
#### **Module Objective**
#### The **Company Loan Report** module is used to generate a detailed report of all loan activities received by the company. This report can be used to view a list of new loans received as well as the details of installment payments that have been made, making it important for tracking and managing total loan liabilities.
### **1. Report Parameters (Filter)**
#### The main page of this module is a form containing various parameters to customize the report that will be generated.
#### Here is an explanation for each key parameter:
- #### **Based on**:
- #### This is the primary filter to select the type of report you want to see:
- #### **Loan Receipt**: To display a list of new loans received by the company in a period.
- #### **Loan Installment**: To display a list of loan installment payments that have been made.
- #### **Status**:
- #### Filter loans by their status, for example, **Fully Paid** or those still outstanding/active.
- #### **Date**:
- #### Specify the **From** and **To** date range to define the report's period.
### **2. Steps to Generate the Report**
#### **Step 1: Set Report Parameters**
#### Define the parameters you need, especially selecting the report type in the **Based on** filter and specifying its date range.
#### **Step 2: Generate the Report**
#### After all parameters are set, click one of the two buttons at the bottom:
- #### **\[Display Report\]**: To preview the loan report directly on your screen.
- #### **\[Export to MS Excel\]**: To download the report data in an Excel file format.
### **3. Reading the Report (Report Content)**
#### The generated report will be a list of loan transactions according to the filters you have selected.
#### This report displays important details such as:
- #### Lender
- #### Initial loan amount
- #### Details of Installments that have been paid
- #### Remaining loan balance
- #### Loan status
### **Tips & Important Notes**
- #### Use this report to monitor the company's total loan debt and to track its payment schedule.
- #### This report is a recapitulation of the data created in the **Loan Receipt** module and its installment payment module.
- #### This is a crucial report for **Finance Management** to manage liabilities and plan for cash outflows.
# Customer Deposit
### **Report Module Guide: Customer Deposit Report**
#### **Module Location**
#### Finance > Reports > Customer Deposit
#### **Module Objective**
#### The **Customer Deposit Report** module is used to generate a detailed report regarding all deposit or down payment transactions received from customers. This report is crucial for tracking the initial deposit amount, how that deposit was used to pay invoices (settlement), and how much of the balance is still available.
### **1. Report Parameters (Filter)**
#### The main page of this module is a form containing various parameters to customize the report that will be generated.
#### Here is an explanation for each parameter:
- #### **Customer Code/Name**:
- #### Filter the report to display deposits from one specific customer, or leave it blank to display all customers.
- #### **From / To**:
- #### Specify the date range of the deposit transactions you wish to display (e.g., September 7, 2025, to October 7, 2025).
- #### **Unsettled**:
- #### Important filter: Check this box to **only display deposits that still have a remaining balance** (that have not been fully used).
### **2. Steps to Generate the Report**
#### **Step 1: Set Report Parameters**
#### Define the parameters you need, such as the date range or a specific customer. Use the **Unsettled** filter if you only want to see remaining deposits.
#### **Step 2: Generate the Report**
#### After all parameters are set, click one of the two buttons at the bottom:
- #### **\[Display Report\]**: To preview the customer deposit report directly on your screen.
- #### **\[Export to MS Excel\]**: To download the report data in an Excel file format.
### **3. Reading the Report (Report Content)**
#### The generated report will be a list of deposit details, grouped by customer.
#### This report displays important details such as:
- #### **Document Number**: The cash receipt number from when the deposit was received.
- #### **Invoice No.**: The sales invoice number that was paid using the deposit.
- #### **Deposit**: The initial down payment amount received.
- #### **Used/Deposit**: The amount of the deposit that has been used/applied.
- #### **Remaining**: The remaining balance of the deposit that is still available.
### **Tips & Important Notes**
- #### Use the **Unsettled** filter to quickly see the total down payment **liability** that the company still has towards its customers.
- #### This report is a recapitulation of the data created in the **Bank/Cash Receipt** module and processed in the **Settlement** module.
- #### This is an important operational report for the **AR (Account Receivable) and Accounting** teams.
# Invoice Payment Selection Report
### **Report Module Guide: Invoice Payment Selection Report**
#### **Module Location**
#### Finance > Reports > Invoice Payment Selection Report
#### **Module Objective**
#### The **Invoice Payment Selection Report** module is used to generate a list of all invoices from suppliers (vendors) that have been **selected for payment**. This report acts as a **"proposed payment list"** that can be reviewed by management or the finance team before the payment process is executed.
### **1. Report Parameters (Filter)**
#### The main page of this module is a form containing various parameters to customize the report that will be generated.
#### Here is an explanation for each parameter:
- #### **1. Start Date / End Date**:
- #### Specify the date range of the invoices selected for payment (e.g., October 1, 2025, to October 31, 2025).
- #### **2. Priority / 3. Goods/Services Category**:
- #### Use these dropdowns to further filter the report by priority or category if needed.
### **2. Steps to Generate the Report**
#### **Step 1: Set Report Parameters**
#### Define the date range to see which invoices have been selected for payment in that period.
#### **Step 2: Generate the Report**
#### After all parameters are set, click one of the two buttons at the bottom:
- #### **\[Display Report\]**: To preview the report directly on your screen.
- #### **\[Export to MS Excel\]**: To download the report data in an Excel file format.
### **3. Reading the Report (Report Content)**
#### The generated report will be a list of purchase invoices that are ready to be paid.
#### This report displays important details such as:
- #### Vendor Invoice Number
- #### Due Date
- #### Supplier Name
- #### Payment Status (will usually show "Unpaid")
- #### The amount to be paid.
### **Tips & Important Notes**
- #### This report is a recapitulation of the data created in the transactional **Invoice Payment Selection** module.
- #### Use this report as an **internal review document** before the Treasury team processes the payments in the **Bank Disbursement** module.
- #### This is an important control tool to ensure that only invoices that have actually been approved for payment will be processed.
# Cash Book Request Aging Report
### **Report Module Guide: Cash Book Request Aging (CBR Aging)**
#### **Module Location**
#### Finance > Reports > Cash Book Request Aging Report
#### **Module Objective**
#### The **Cash Book Request Aging** report module is used to generate an aging report of all **Cash Book Requests** that are still outstanding (unresolved). This report is crucial for monitoring cash advances given to employees and for identifying which requests have passed the deadline for submitting an accountability report (SPJ).
### **1. Report Parameters (Filter)**
#### The main page of this module is a form containing various parameters to customize the report that will be generated.
#### Here is an explanation for each parameter:
- #### **Request For**:
- #### Select **All** to display all requestors, or **Select** to choose a specific requestor.
- #### **As of**:
- #### Specify the reference date ("as of" date) for the calculation of the request's age.
- #### **Aging Period**:
- #### Set the time range for each aging bucket in the report, for example, 1-30 days, 31-60 days, 61-90 days, and so on.
- #### **Type**:
- #### Select **Summary** to see totals per requestor, or **Detail** to see the breakdown per request document.
### **2. Steps to Generate the Report**
#### **Step 1: Set Report Parameters**
#### Define the parameters you need, especially the reference date and the aging ranges.
#### **Step 2: Generate the Report**
#### After all parameters are set, click one of the two buttons at the bottom:
- #### **\[Display Report\]**: To preview the cash request aging report directly on your screen.
- #### **\[Export to MS Excel\]**: To download the report data in an Excel file format.
### **3. Reading the Report (Report Content)**
#### The generated report will be a list of outstanding cash requests, classified by their age since the request date.
#### This report displays:
- #### The **Requestor's Name** (labeled as Customer Name in the example).
- #### The **total amount** of outstanding requests (labeled as Invoice Amount in the example).
- #### A breakdown of that total amount into the **aging columns**, such as **1 - 30, 31 - 60, 61 - 90,** and **>90** (more than 90 days).
### **Tips & Important Notes**
- #### Use this report to **follow up with employees** who have not yet submitted their accountability report (SPJ) for the cash advance they received.
- #### This report is a crucial **internal control tool** for Finance Management to manage cash that is outstanding outside of the cashier/bank.
- #### This report's data comes from the **Cash Book Request** module for requests whose status has not yet been closed by the **Cash Book Request Declaration** module.
# AR AP Cash Flow Report
### **Report Module Guide: AR AP Cash Flow Report**
#### **Module Location**
#### Finance > Reports > AR AP Cash Flow Report
#### **Module Objective**
#### The **AR AP Cash Flow Report** module is used to generate a summary report that quickly projects the cash position. This report calculates an estimated remaining cash balance by taking the current bank balance, adding the total receivables that are due, and subtracting the total payables that are due in a specific period.
### **1. Report Parameters (Filter)**
#### The main page of this module is a form containing various parameters to customize the report that will be generated.
#### Here is an explanation for each parameter:
- #### **Period**:
- #### Specify the due date range for the receivables (AR) and payables (AP) to be included in the calculation.
- #### **Account**:
- #### Select the main bank account whose starting balance will be used as the basis for the calculation.
- #### **Currency**:
- #### Set the currency preference for the report.
### **2. Steps to Generate the Report**
#### **Step 1: Set Report Parameters**
#### Define the parameters you need, especially the **Period** and the bank **Account**.
#### **Step 2: Generate the Report**
#### After all parameters are set, click one of the two buttons at the bottom:
- #### **\[Display Report\]**: To preview the projection report directly on your screen.
- #### **\[Export to MS Excel\]**: To download the report data in an Excel file format.
### **3. Reading the Report (Report Content)**
#### The generated report is a simple calculation summary for projecting the cash position.
#### Here is how to read it:
- #### **Account Balance (A)**: This is the beginning balance of the bank account you selected.
- #### **Receivables Due (B)**: This is the total of all sales invoices to customers that are due within your selected period.
- #### **Payables Due (C)**: This is the total of all purchase invoices from suppliers that you must pay within the same period.
- #### **Remainder (Balance - C)**: This is the final result of your cash projection, calculated with the formula **(A + B) - C**.
### **Tips & Important Notes**
- #### This report is a **simplified version of the Cash Projection** and provides a very quick overview of short-term liquidity.
- #### The accuracy of this report is highly dependent on the **correct due dates** on all sales and purchase invoices.
- #### This is a very useful report for **business owners or managers** for quick decision-making regarding cash availability.
# Deposit Report
### **Report Module Guide: Deposit Report (Sales/Purchase)**
#### **Module Location**
#### Finance > Reports > Deposit Report
#### **Module Objective**
#### The **Deposit Report** module is used to generate a detailed report of all outstanding deposit transactions. This report can display down payments received from customers (**Sales** type) as well as down payments given to suppliers (**Purchase** type), with a focus on deposits that are still active or have not been fully used.
### **1. Report Parameters (Filter)**
#### The main page of this module is a form containing various parameters to customize the report that will be generated.
#### Here is an explanation for each parameter:
- #### **Menu**:
- #### The primary filter to select the type of deposit you want to see: **Sales** (for down payments from customers) or **Purchase** (for down payments to suppliers).
- #### **Customer Name**:
- #### Filter the report for a specific customer or customer group.
- #### **Report Date**:
- #### Specify the reference date ("as of" date) for the report.
- #### **Show All**:
- #### Select **only Partially Paid/Unpaid** to focus on deposits that are still active or have a remaining balance.
### **2. Steps to Generate the Report**
#### **Step 1: Set Report Parameters**
#### Define the parameters you need, for example, select **Menu: Sales** and check **only Partially Paid/Unpaid**.
#### **Step- 2: Generate the Report**
#### After the parameters are set, click the **Display Report** button at the bottom.
### **3. Reading and Using the Report**
#### The generated report is interactive and displays the details of outstanding deposits according to your filters.
#### This report displays details such as:
- #### **Document Number**: The cash document number for the deposit.
- #### **Settlement Number**: The settlement document number if the deposit has been applied.
- #### **Payment Status**: The current status of the deposit.
#### **Interactive Features**:
- #### You can perform advanced filtering directly in each column header (e.g., Select value).
- #### You can export the data to various formats (Copy, CSV, Excel, PDF) using the buttons in the top-right corner.
### **Tips & Important Notes**
- #### The **only Partially Paid/Unpaid** filter is the most efficient way to see all active down payment liabilities.
- #### This report provides a more **modern and functional** appearance with its per-column filtering and complete export features.
- #### This is an important operational report for the **AR (Account Receivable) and AP (Account Payable)** teams for managing down payments.
# Deposit Mutation Report
### **Report Module Guide: Deposit Ledger (Mutation)**
#### **Module Location**
#### Finance > Reports > Deposit Mutation Report
#### **Module Objective**
#### The **Deposit Ledger** report module is used to generate a mutation report or a "subsidiary ledger" for deposit accounts. This report details every movement (mutation) that occurred on a customer's or supplier's deposit balance within a specific period, displaying the **beginning balance, all additions, all usages, and the ending balance**.
### **1. Report Parameters (Filter)**
#### The main page of this module is a form containing various parameters to customize the report that will be generated.
#### Here is an explanation for each parameter:
- #### **Menu**:
- #### Select the type of deposit to be viewed: **Sales** (for down payments from customers) or **Purchase** (for down payments to suppliers).
- #### **Customer Name**:
- #### Filter the report for one or more specific customers/suppliers using the **Selected** option, or select **All** to display all.
- #### **Report Date**:
- #### Specify the mutation date range you wish to see (e.g., October 1, 2025, to October 7, 2025).
- #### **Payment Detail**:
- #### Select **Summary** or **Detail** to define the report's level of detail.
### **2. Steps to Generate the Report**
#### **Step 1: Set Report Parameters**
#### Define the parameters you need, such as the menu type, customer, and the report period.
#### **Step 2: Generate the Report**
#### After the parameters are set, click the **\[Display Report\]** button at the bottom.
### **3. Reading the Report (Report Content)**
#### The generated report functions like a statement of account for a deposit account, showing all fund movements.
- #### **Summary Box**: At the top of the report, you will see a summary of totals for the selected period:
- #### **Beginning Balance**: The deposit balance at the start of the period.
- #### **Debit**: The total of new deposit additions.
- #### **Credit**: The total usage of the deposit (to pay invoices).
- #### **Ending Balance**: The remaining balance at the end of the period.
- #### **Detail Table**: The table below details each transaction that makes up the summary above, displaying the date, document number, and amount for each addition (debit) and usage (credit).
### **Tips & Important Notes**
- #### Use this report to provide deposit transaction details to customers if there are questions, or for **internal audit** purposes.
- #### This report provides the most detailed view of how a customer's or supplier's deposit balance changes over time.
- #### This report is **interactive**, allowing you to filter further by column and export the data to various formats.