Customs Documents
- BC 1.6
- BC 2.3
- BC 2.3 PJT
- BC 2.5
- BC 2.6.1
- BC 2.6.2
- BC 2.7
- BC 2.7 INBOUND
- BC 2.8
- BC 3.0
- BC 3.3
- BC 4.0
- BC 4.1
- BC 4.2
- Master SKEP
BC 1.6
Customs Documents Module Guide
Module Location:
CEISA > Customs Documents > BC 1.6
Purpose
How to Access
- Log in to the CEISA Loka application.
- Select the Customs Documents menu.
- Click BC 1.6.
- The system displays the BC 1.6 Document List page.
Page View
The BC 1.6 page generally consists of:
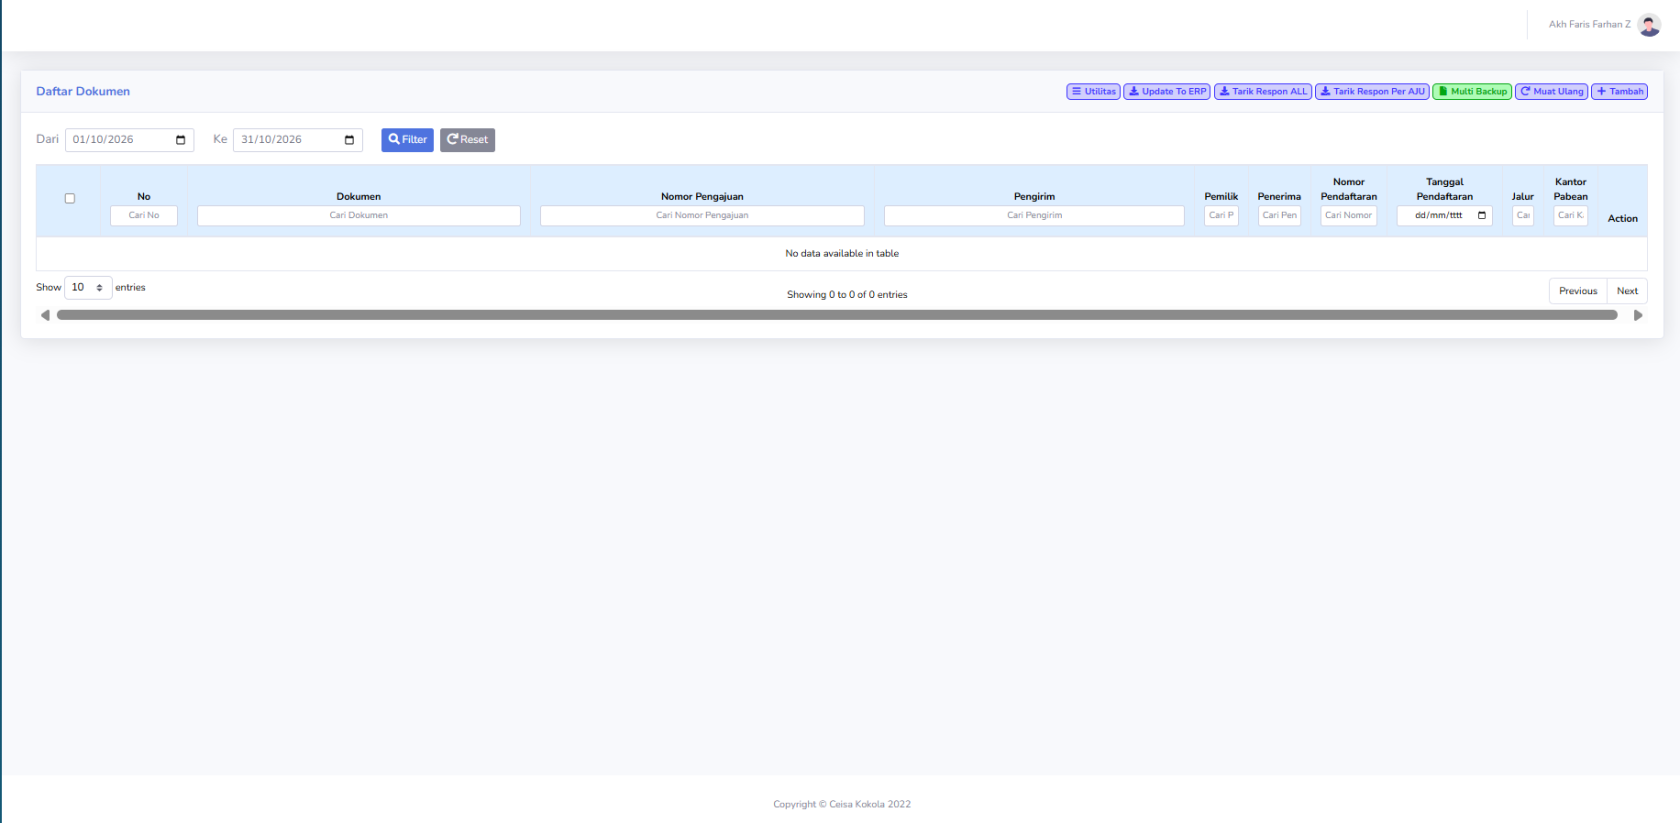
- Period Filter: Used to specify the document period.
- Document List Displays available BC 1.6 documents.
- Search Column: Used to search for documents based on specific information.
- Utility Menu: Used for additional processes such as synchronization or retrieving responses.
Column Descriptions
| No | Displays the sequential number of the data. |
| Dokumen | Displays the document type, namely BC 1.6. |
| Nomor Pengajuan |
Displays the document submission identification number. |
| Pengirim/Pemilik | Displays the party associated with the goods. |
| Penerima | Displays the recipient, if available. |
| Nomor Pendaftaran | Displays the registration number received from the customs system. |
| Tanggal Pendaftaran |
Displays the document’s registration date. Customs Office Displays the Customs and Excise Office handling the document. |
Button Descriptions
- Filter: Displays documents based on the From and To dates.
- Reset: Clears the applied filters.
- Retrieve ALL Responses: Retrieves the latest responses for multiple documents.
- Retrieve Responses by Application Number: Retrieves responses for a single application number.
- Reload: Refreshes the data on the page.
- Add: Used to create a new document, if available.
Usage Steps
BC 2.3
Customs Documents Module Guide
Module Location :
CEISA > Dokumen Pabean > BC 2.3
How to Open
- Select the Customs Documents menu.
- Click the BC 2.3 submenu.
- The system displays the Document List page.
Page Display
Displays a list of BC 2.3 document submissions for the import of goods into a TPB. Each row displays document information, such as submission number, shipper, registration number, registration date, route, customs office, and document processing status.
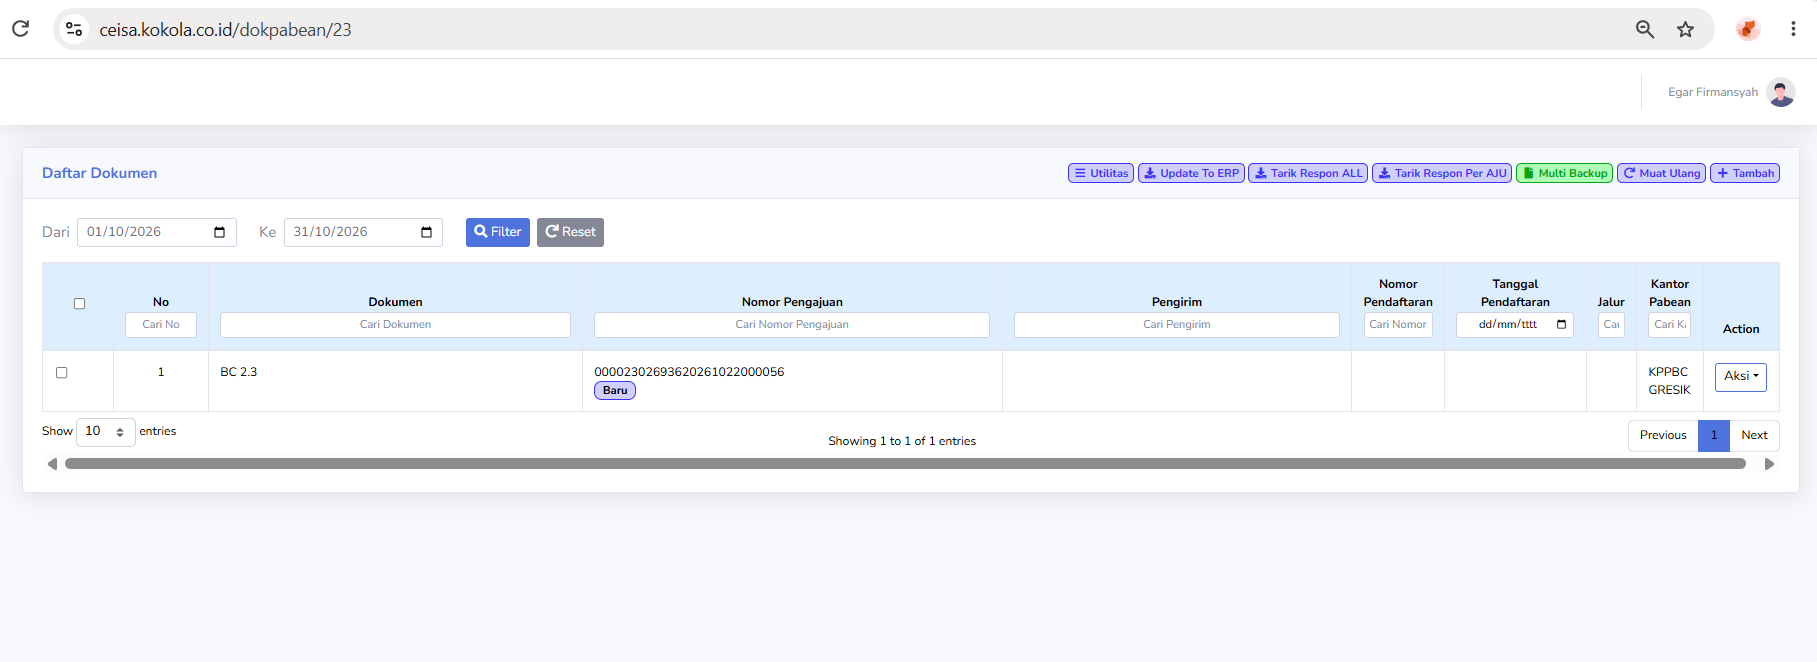
The page layout consists of:
- Period filter.
- Document table.
- Search field.
- Utility buttons.
- Action menu.
On the document list page, users can view documents that have already been created as well as documents that do not yet have registration data.
Button Descriptions
The functions of the buttons on the BC 2.3 page include:
- Filter: Displays data according to the selected period.
- Reset: Resets the filter to its default state.
- Utilities: Opens a menu of additional functions.
- Update to ERP: Updates or synchronizes data with the ERP.
- Retrieve ALL Responses: Retrieves responses for a number of relevant documents.
- Retrieve Response by AJU: Retrieves responses based on a specific application number.
- Multi Backup: Backs up multiple documents.
- Reload: Refreshes the data display.
- Add: Creates a new BC 2.3 document.
- Actions: Opens the list of actions available for the document.
Column Descriptions
- No.: Displays the document’s serial number.
- Document: Displays the document type, namely BC 2.3.
- Application Number: Displays the document’s identification number.
- Sender: Displays the sender of the goods, if available.
- Registration Number: Displays the document’s registration number if the registration process has been completed.
- Registration Date: Displays the date the document was registered.
- Channel: Displays the customs service channel, if available.
- Customs Office: Displays the Customs and Excise office handling the document.
- Action: Displays available actions for the document.
Button Descriptions
- Filter: Displays data according to the selected period.
- Reset: Resets the filter to its default state.
- Utilities: Opens the additional functions menu.
- Update to ERP: Updates or synchronizes data with the ERP.
- Retrieve ALL Responses: Retrieves responses for a number of relevant documents.
- Retrieve Response by AJU: Retrieves responses based on a specific application number.
- Multi Backup: Backs up multiple documents.
- Reload: Refreshes the data display.
- Add: Creates a new BC 2.3 document.
- Actions: Opens the list of actions available for the document
-
Explanation of the Action Menu

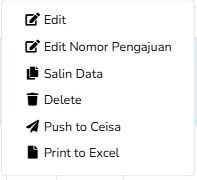
In the Action column, the Action button displays the following options:
Edit:
- Opens the document edit page to modify or complete BC 2.3 data.
- Edit Submission Number: Used to change the document’s submission number.
- Copy Data: Copies existing document data to serve as the basis for creating a new document.
- Delete: Deletes the document.
- Push to CEISA: Sends or pushes the document data to the CEISA system.
- Print to Excel: Exports the document data to Excel format.
- Opens the document edit page to modify or complete BC 2.3 data.
-
-
Document Edit Page
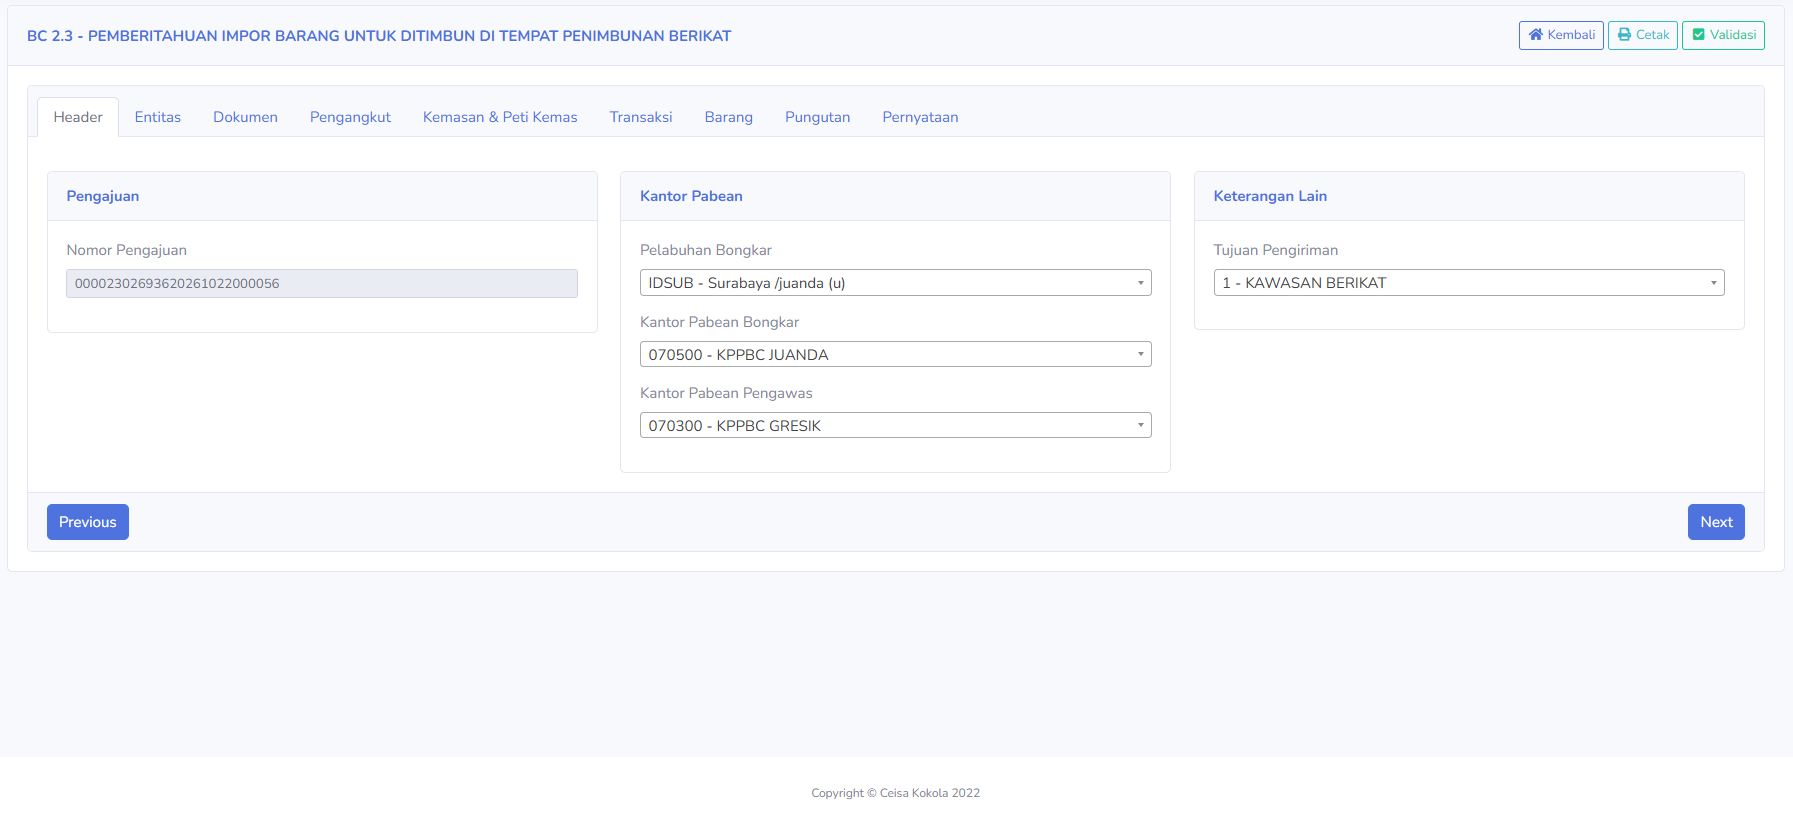
When the user selects the Edit menu, the system displays the BC 2.3 document details page. On this page, the following buttons are available:
-
Back: Returns to the previous page.
-
Print: Prints the document
-
Validate: Validates the document data.
In addition, there are navigation tabs for entering document data, namely:
-
- Header:

Used to enter general application data. The available sections include:
Application.
-
Application Number: Displays the document’s application number.
Customs Office
-
Port of Unloading: Displays the port where the goods were unloaded.
-
Unloading Customs Office: Displays the customs office where unloading takes place.
-
Supervising Customs Office: Displays the customs office that supervises the document.
Other Information
-
Shipping Destination: Displays the destination of the goods, for example, a Bonded Zone
-
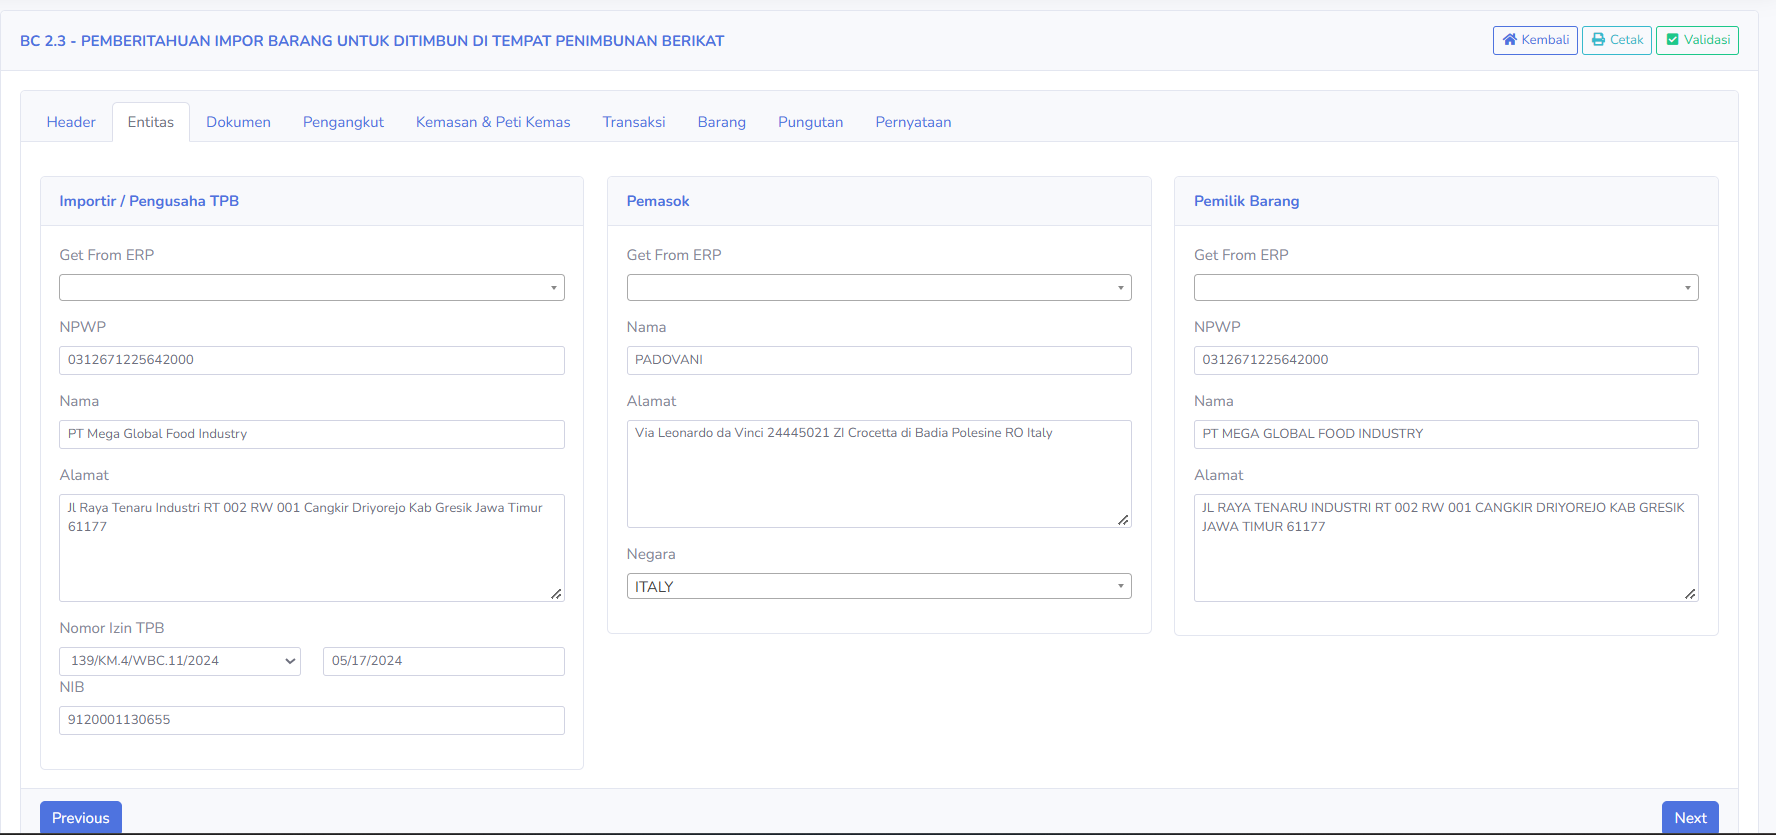
- Entity:

The Entity tab is used to enter data on the parties involved in the document. The available fields include:
Importer / TPB Operator
-
Get From ERP
-
Tax ID (NPWP)
-
Name
-
Address
-
TPB License Number
-
License Date
- NIB
Supplier
-
Get From ERP
-
Name
-
Address
-
Country
Owner of Goods-
Get From ERP
-
Tax ID (NPWP)
-
Name
-
Address
This tab is used to ensure that the identities of the parties involved have been entered completely and correctly
-
-
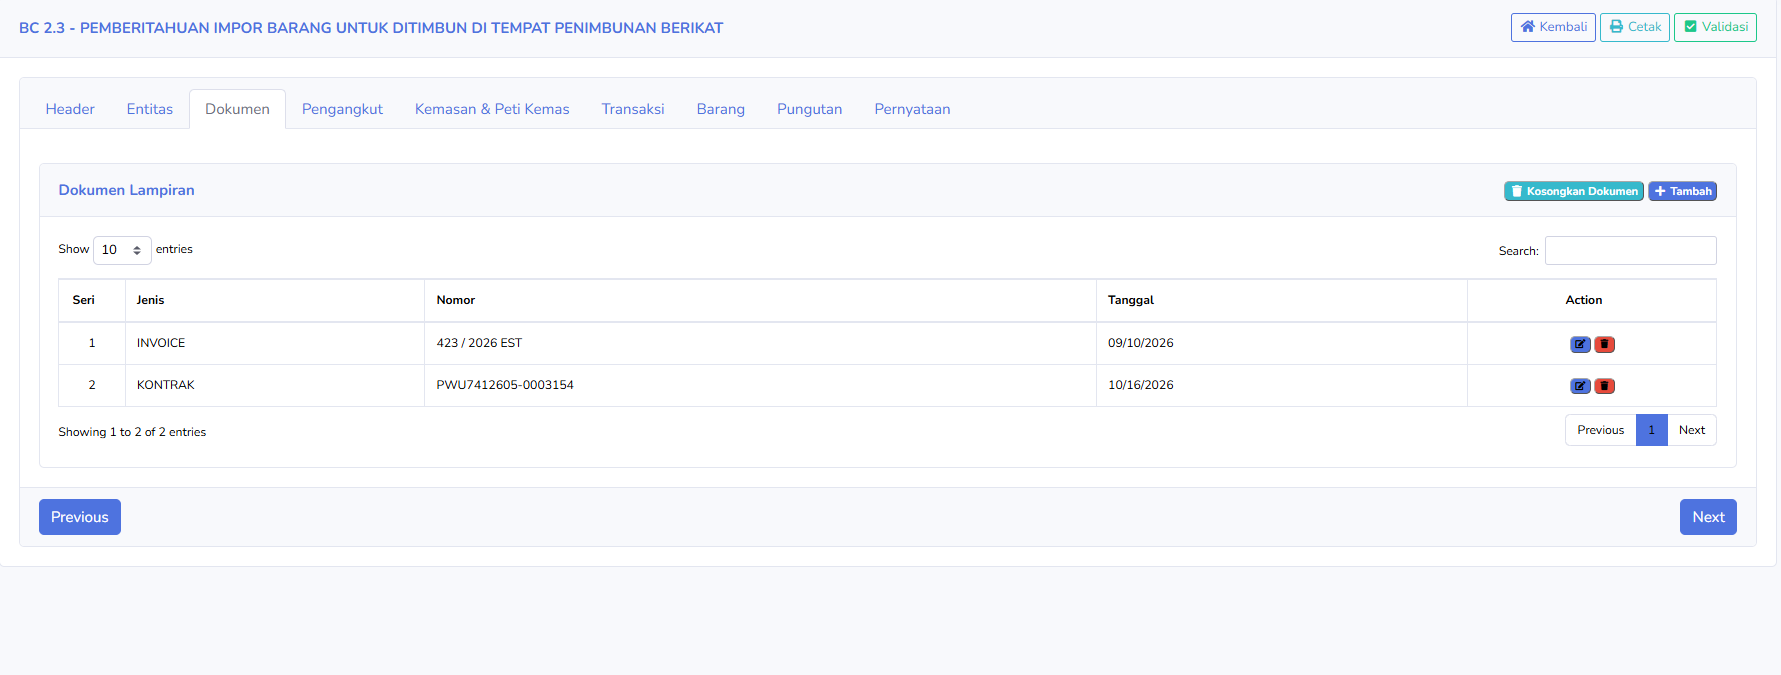
Document:

The Documents tab is used to manage the attached documents that accompany BC 2.3. The columns available in the attached documents table include:
-
Series
-
Type
- Date
- Action
-
Number
An example of an attached document shown in the image:
-
INVOICE
-
CONTRACT
-
Available buttons:
-
Clear Documents: Clears the list of attached documents that have been entered.
-
Add: Adds a new attached document.
In the Action column, there are icons for editing or deleting attachment
-
-
Carrier:
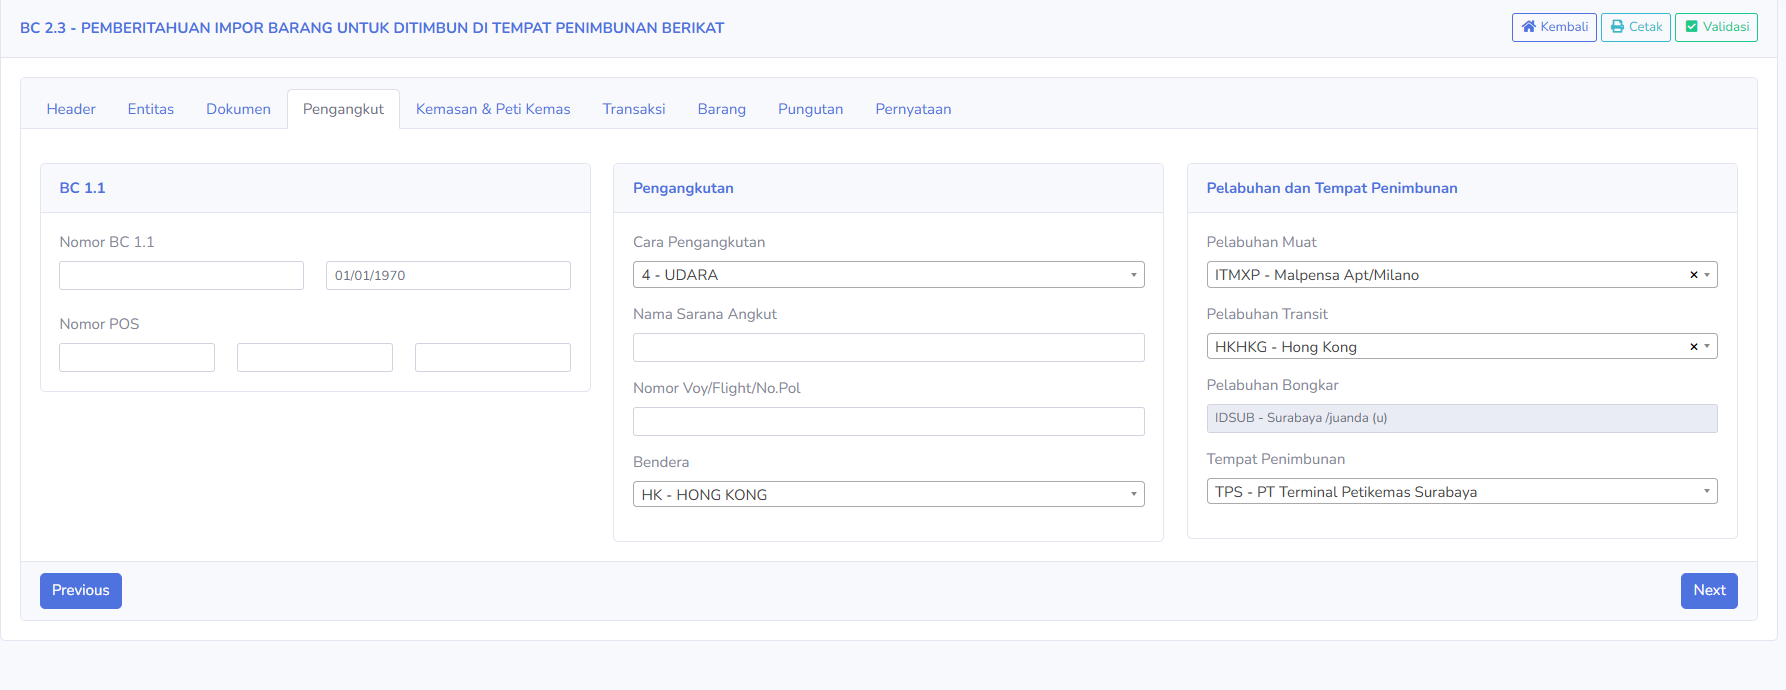
The Carrier tab is used to enter cargo transportation data. The available fields include:
BC 1.1
- BC 1.1 Number
- Date
- POS Number
Transportation
- Mode of Transportation
- Name of Transport Vehicle
- Voyage/Flight/License Plate Number
- Flag
Ports and Storage Locations
- Port of Loading
- Transit Port
- Port of Discharge
- Storage Location
This tab helps users record information regarding the movement and means of transportation of goods.
-
Packaging & Containers:
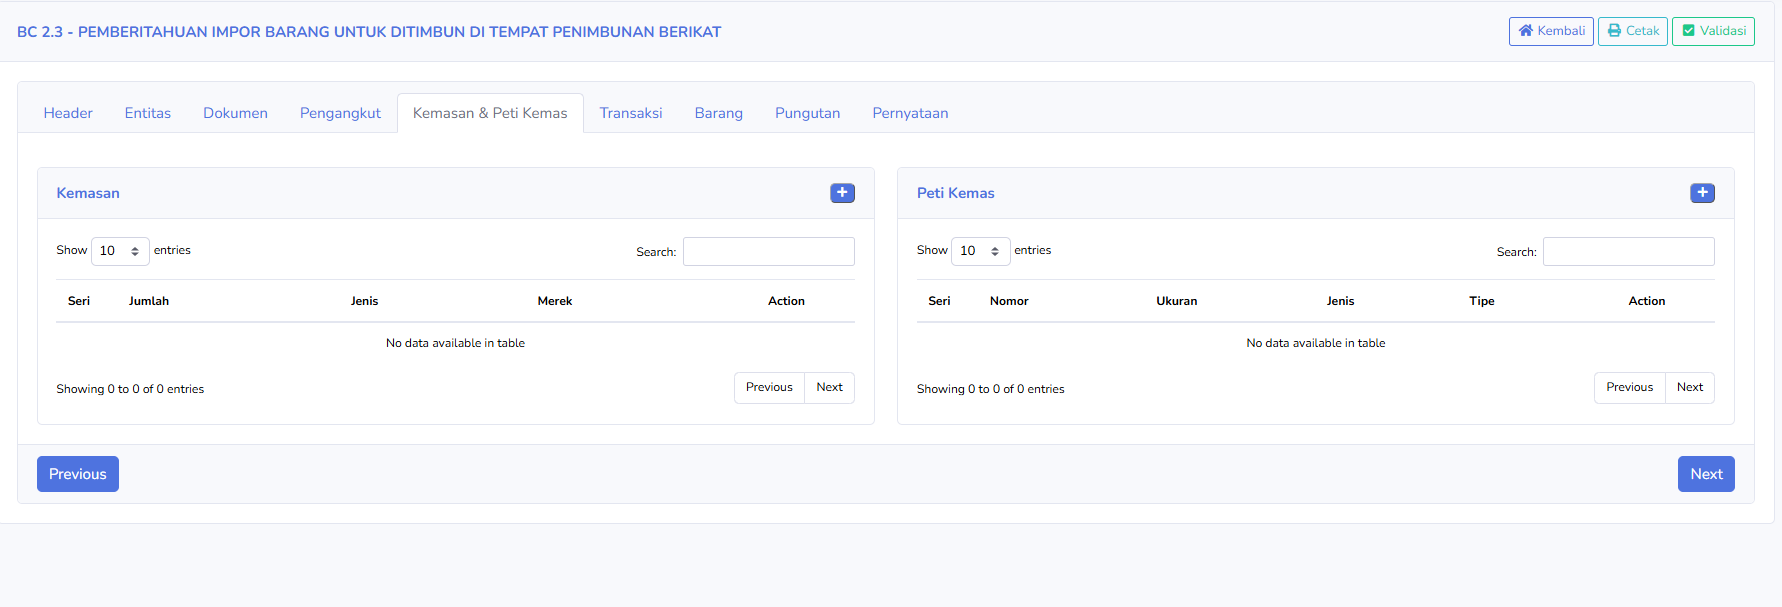
The Packaging & Container tab is used to record packaging and container data. There are two main sections:
Packaging
-
- Series
- Quantity
- Type
- Brand
- Action
Container
-
- Series
- Number
- Size
- Type
- Class
- Action
Each section has an Add button for adding new data.
If there is no data, the table will display the message “No data available in table.”
-
Transactions
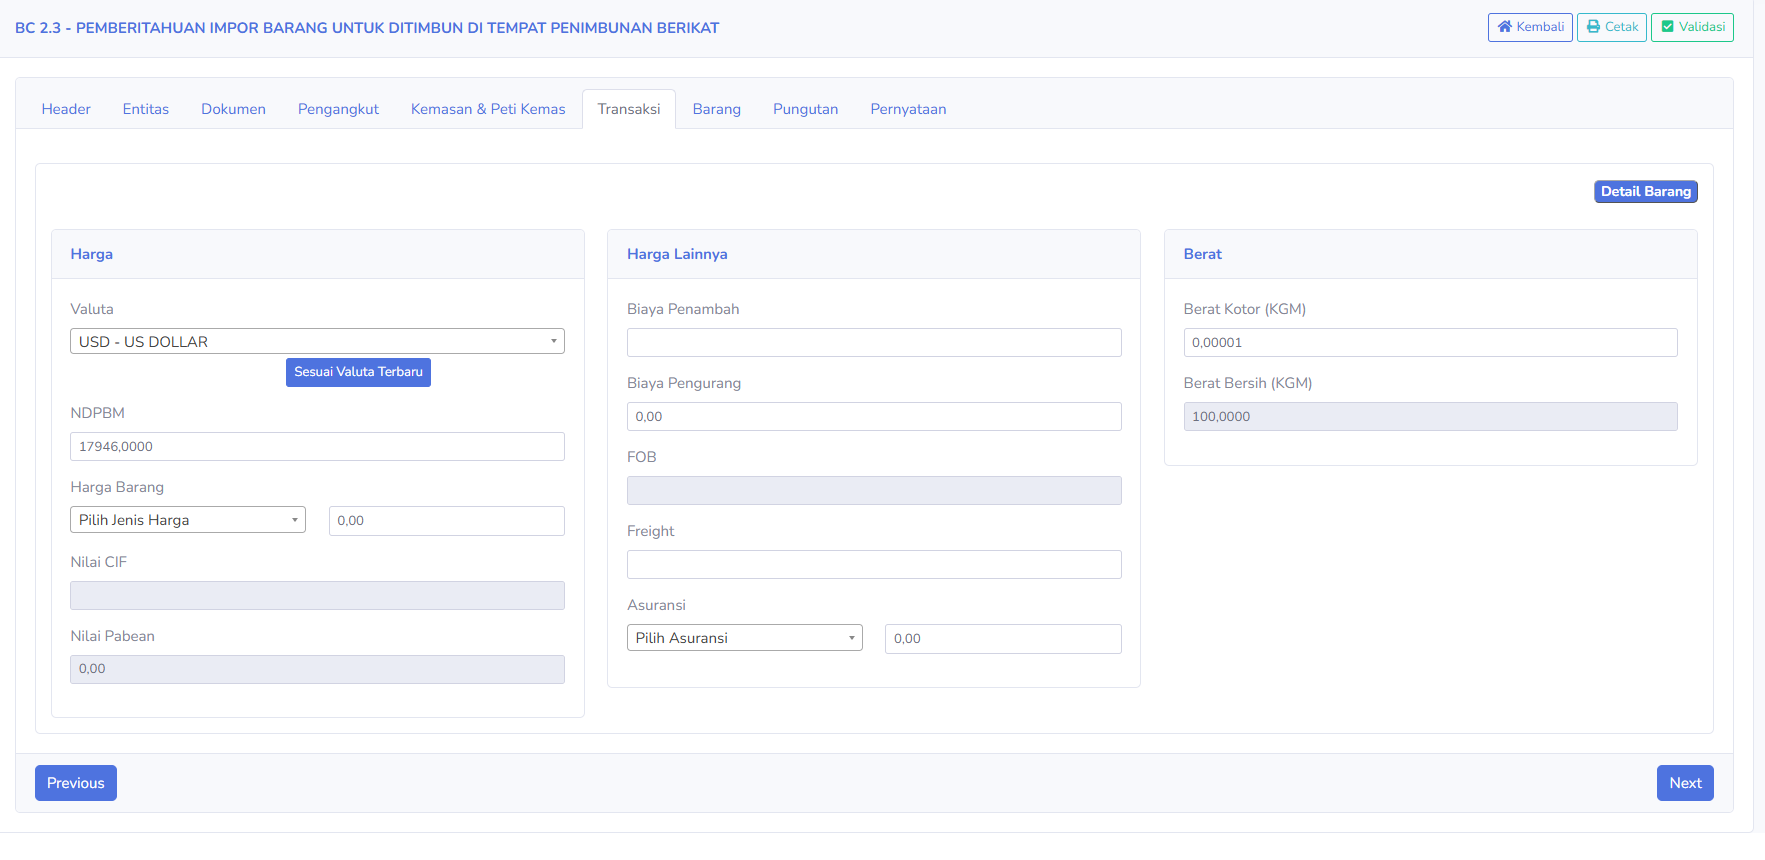
The Transactions tab is used to enter transaction value and goods weight data. The available fields include:
Price
-
- Currency
-
NDPBM
-
Goods Price
-
CIF Value
-
Customs Value
-
- Update to Latest Currency: Used to update values based on the selected currency and exchange rate data available in the application.
Other Prices
-
- Add-On Costs
- Deduction Costs
- FOB
- Freight
- Insurance
Weight
-
- Gross Weight (KGM)
- Net Weight (KGM)
Additionally, there is a “Item Details” button to view item details.
-
Goods
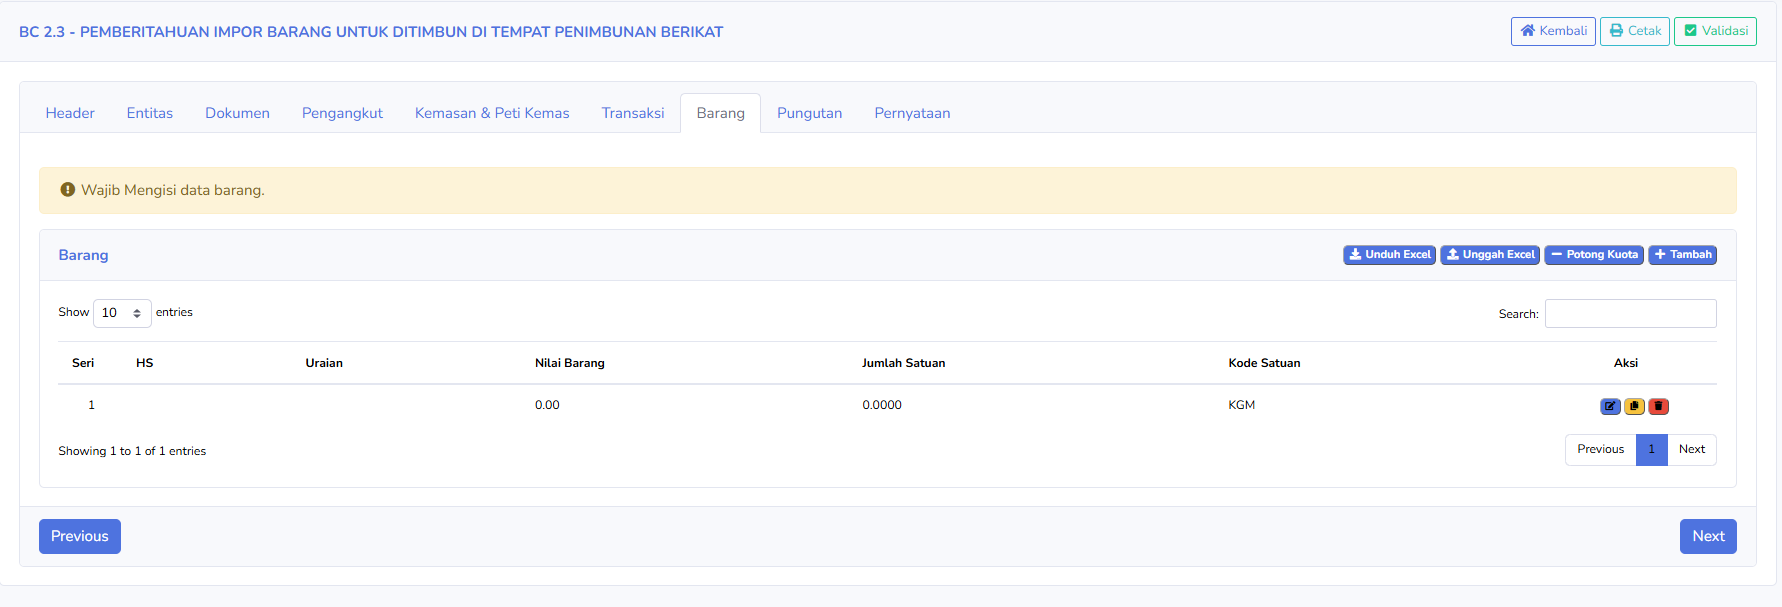
The Items tab is used to manage the list of items listed in the document. The columns in the items table include:
-
- Series
- HS
- Description
- Item Value
- Quantity
- Unit Code
- Action
-
- Download Excel: Downloads the data or Excel template provided by the application.
- Upload Excel: Upload item data from an Excel file.
- Deduct Quota: Execute the quota deduction feature according to system regulations.
- Add: Add new item data.
Notifications may also appear at the top, for example:
-
- Item data must be filled in.
-
Fees
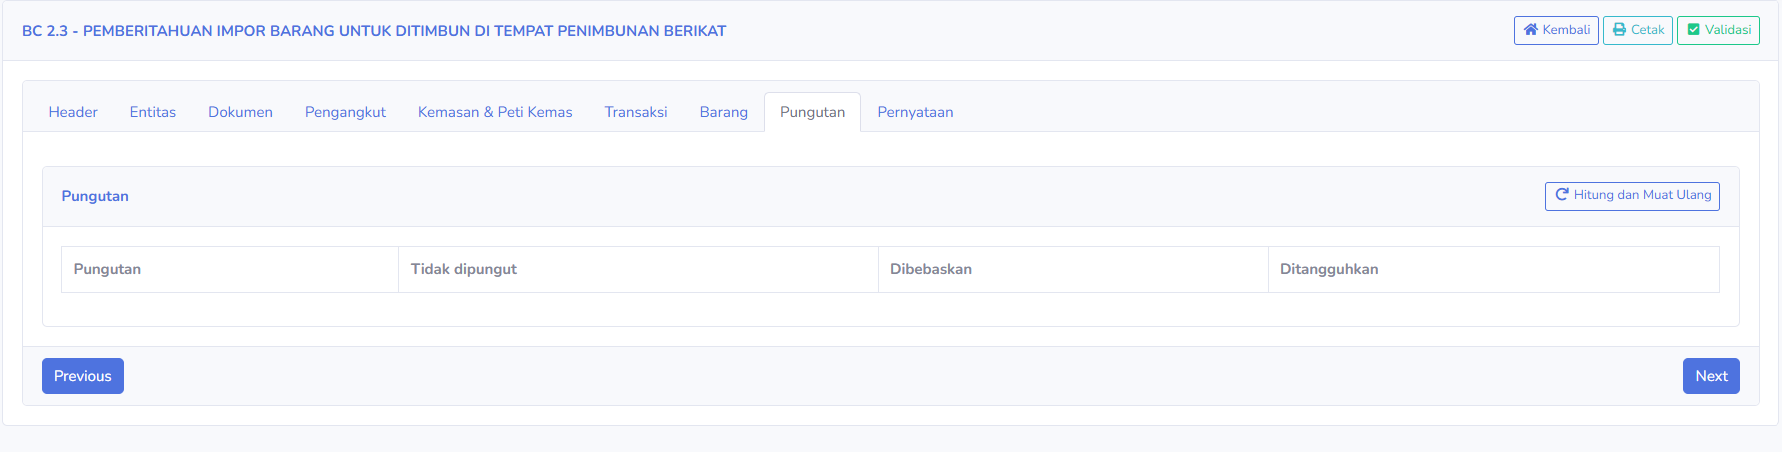
The Fees tab is used to display or calculate fees associated with a document. Available sections:
-
- Charged
- Not Charged
- Exempt
- Deferred
- Available buttons:
Calculate and Reload: Recalculates fee data and updates the display.
-
Statements
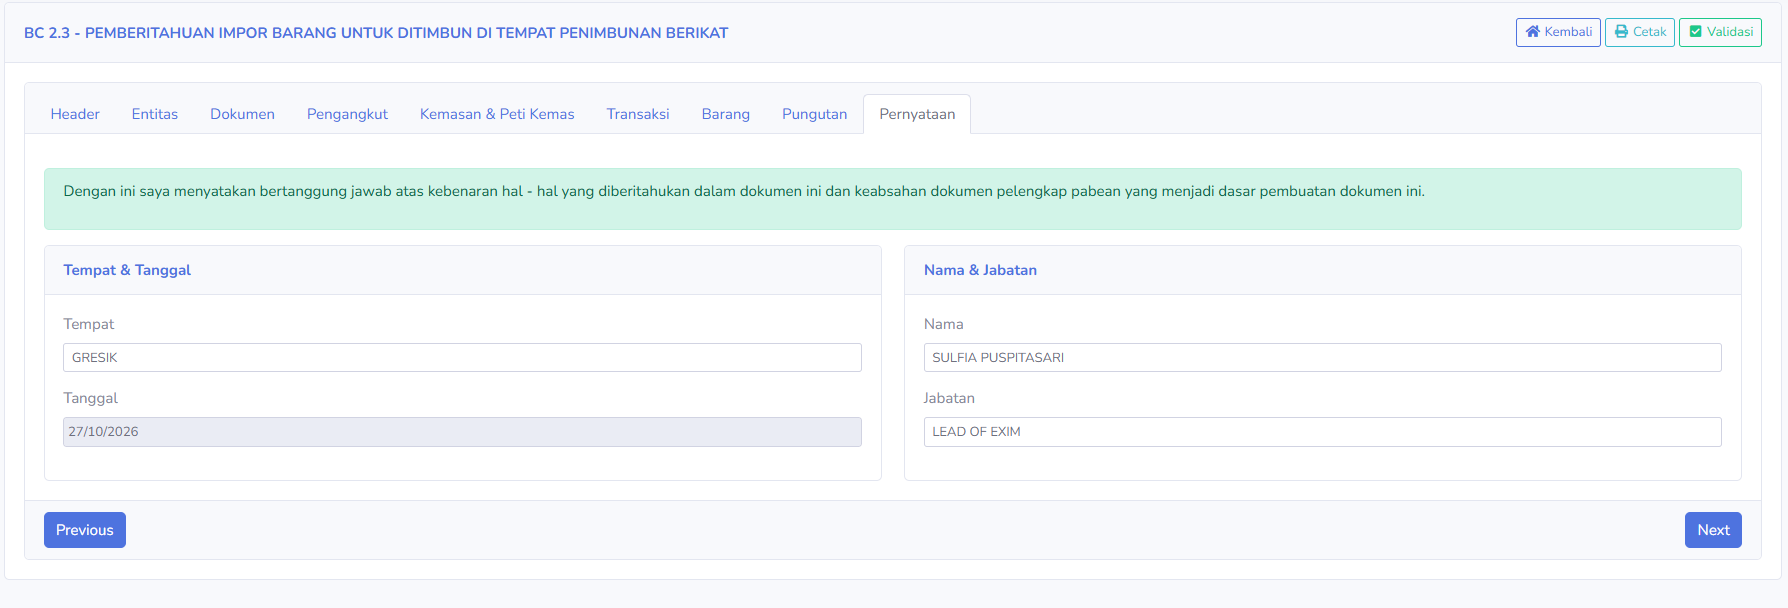
The Declaration tab is used to display and complete the declaration section for the person responsible for the document. The available sections include:
Place & Date
-
- Place
- Date
Name & Position
-
- Name
- Position
At the top, there is also a statement that the user is responsible for the accuracy of the document’s content and the validity of the supporting customs documents used as the basis for creating the document.
At the bottom of the page, the following buttons are available:
-
- Previous: Return to the previous tab.
- Next: Proceed to the next tab.
Instructions for Use
Note
- Ensure that the data on each tab is fully completed before validating.
- Fill in the entity data according to valid supporting documents.
- Complete the attached documents before sending the document.
- Ensure that the transportation, transaction, and goods data match the source document.
- Use the Upload Excel feature if you are entering goods data in bulk.
- Double-check the Levies section before validating the document.
- Ensure that the name, title, location, and date on the Statement tab are correct.
- Use the Push to CEISA menu only after the data is accurate and complete.
- Ensure that the submission results and official CEISA response are double-checked after the Push process.
BC 2.3 PJT
Customs Documents Module Guide
Module Location:
CEISA > Customs Documents > BC 2.3
How to Open
- Open Customs Documents.
- Select BC 2.3 PJT.
- The system will attempt to open the relevant page.
Page Display
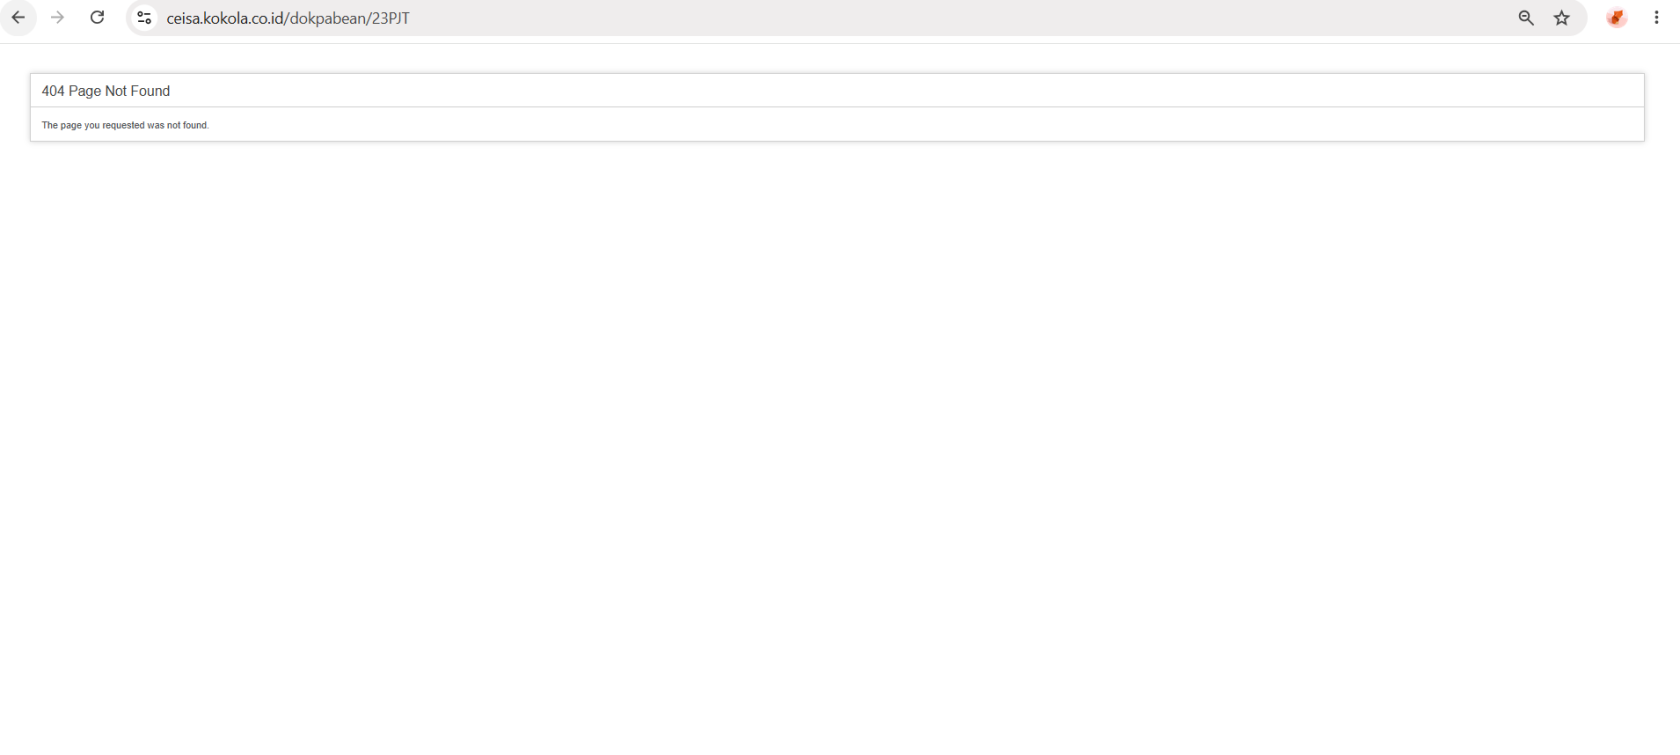
The BC 2.3 PJT page displays:
404 Page Not Found
This means the page cannot currently be found by the application.
Explanation of Conditions
- The “404 Page Not Found” message is different from the “no data available” condition.
- 404 Page Not Found: The page or route is not available.
- No data available in table: The page is available, but there is no data.
Usage Steps
If the page is available:
- Open BC 2.3 PJT.
- Select a time period.
- Search for the Application Number.
- Check the status.
- Retrieve the response if necessary.
- Proceed with the process according to the selected action.
Note
If the 404 error persists, contact the application administrator or IT team to check the BC 2.3 PJT page route.
BC 2.5
Customs Documents Module Guide
Module Location:
CEISA > Customs Documents > BC 2.5
How to Access
- Log in to the CEISA Kokola application.
- Select the Customs Documents menu.
- Click the BC 2.5 submenu.
- The system displays the Document List page.
Page Display
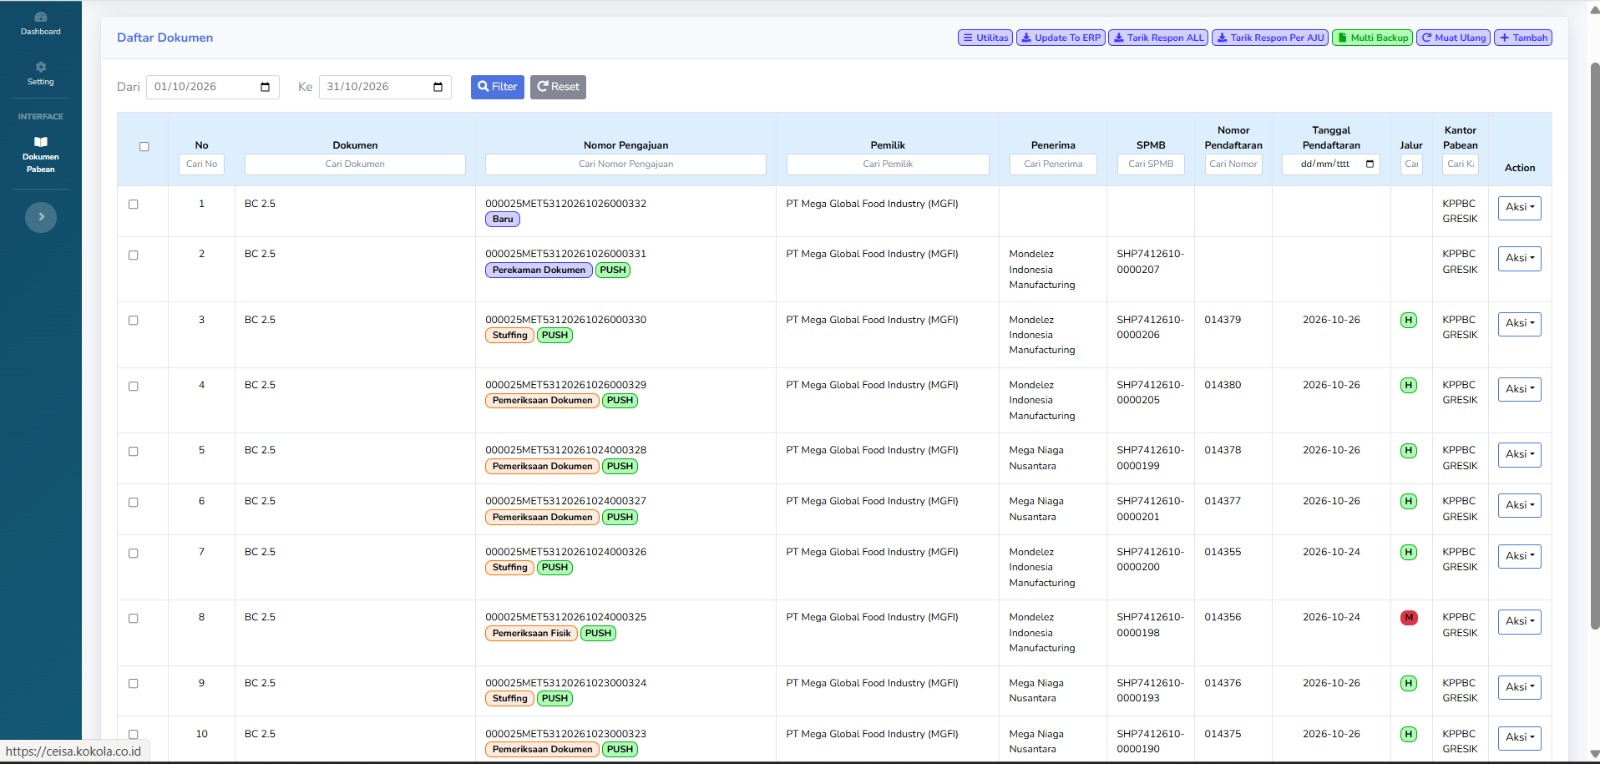
The main page displays a list of BC 2.5 document submissions for goods release activities from the TPB. Each row displays document information, such as submission number, owner, recipient, SPMB, registration number, registration date, route, customs office, and processing status. The page layout consists of a period filter, a document table, a search column, utility buttons, and an action menu.
Column Descriptions
Available columns include:
- Checkbox: Select one or more documents for actions that support bulk selection.
- No: Displays the document’s sequential number in the list.
- Document: Displays the type of customs document, namely BC 2.5.
- Submission Number: Displays the AJU number as the document submission identifier.
- Owner: Displays the name of the company or party owning the goods.
- Recipient: Displays the name of the company or party receiving the goods.
- SPMB: Displays the SPMB reference number related to the goods release transaction. The abbreviation and source of this number must be aligned with the Kokola system.
- Registration Number: Displays the document’s registration number from the customs process.
- Registration Date: Displays the document’s registration date.
- Channel: Displays the indicator for the customs service or supervision channel.
- Customs Office: Displays the Customs Office handling the document.
- Action: Displays options for further actions regarding the document.
Button Descriptions
- Filter: Displays documents based on the selected date range.
- Reset: Restores search settings to their default state.
- Utilities: Opens a menu of additional features for document management.
- Update to ERP: Updates or synchronizes document data with the company’s ERP system.
- Retrieve ALL Responses: Retrieves or updates customs responses for a number of documents.
- Retrieve Response by AJU: Retrieves or updates responses based on a specific application number.
- Multi Backup: Backs up multiple documents according to the application’s features.
- Reload: Refreshes the document list view.
- Add: Opens the process for creating a new BC 2.5 document.
- Actions: Displays additional actions for the selected document.
Status and Process Explanation
In the Application Number column, there are several indicators that show the document processing stages:
- New: Indicates that the document is in the initial stage or has just been created.
- Document Entry: Indicates that the document is in the data entry stage.
- Document Review: Indicates the document review or investigation stage.
- Physical Inspection: Indicates the stage related to the physical inspection of goods.
- Stuffing: Indicates the stage of loading or arranging goods into a transport vehicle.
- PUSH: An application indicator believed to be related to the data transmission or synchronization process.
In the Lane column, the following indicators are displayed:
- H (Green): Believed to indicate the Green Lane, which is a service lane that generally does not require routine physical inspection, except under certain conditions.
- M (Red): Believed to indicate the Red Lane, which is a service lane that requires physical inspection in accordance with customs regulations.
Note: Statuses such as New, Stuffing, PUSH, and Document Inspection are labels displayed in the CEISA Kokola application. The technical meaning of each status must be aligned with the processes implemented in the system.
Table Navigation Explanation
At the bottom of the document list, the following navigation features are available:
- Show Entries: Sets the number of documents displayed on each page.
- Previous: Go to the previous page of the list.
- Next: Go to the next page of the list.
- Showing Entries: Displays the number of documents currently shown and the total number of available documents.
- Horizontal Scrollbar: Scroll the table view to see columns that are not visible on the screen.
Explanation of the Document Edit Page
When a user selects the Edit action on a BC 2.5 document, the system displays the document details page.
This page is used to view, complete, and update data regarding the issuance of goods from the TPB.
At the top of the page are the following buttons:
- Back: Return to the previous page.
- Print: Prints the document.
- Validate: Runs a check on the completeness and accuracy of the data through the application.
- Show History: Displays the history recorded for the document.
In addition, there are nine navigation tabs: Header, Entity, Document, Carrier, Packaging & Containers, Transaction, Goods, Levies, and Statement.
At the bottom of the page, there are Previous and Next buttons for navigating between tabs.
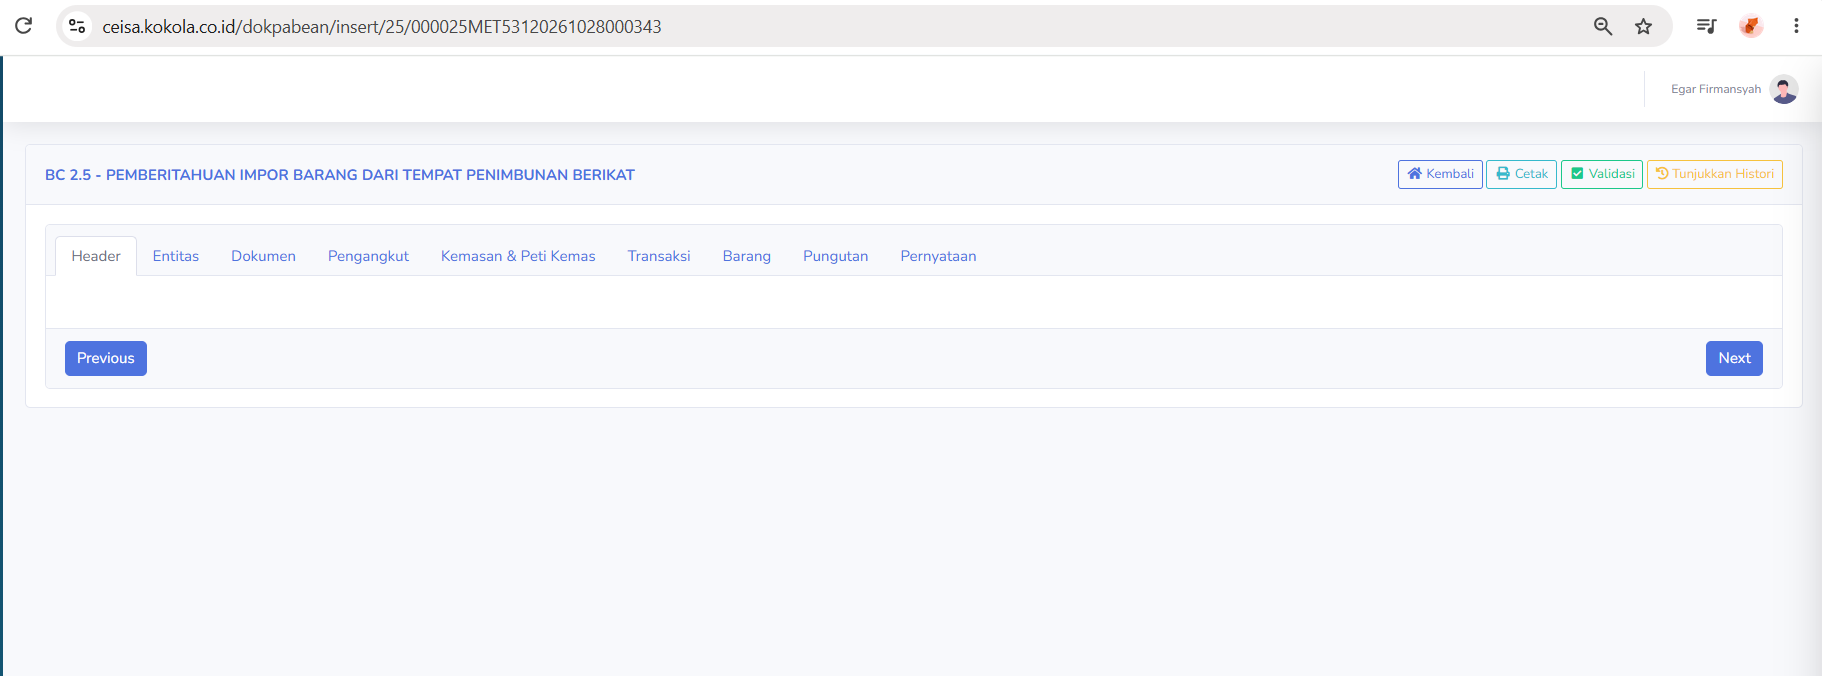
- Header Tab Description
In the provided screenshot, the header section does not yet display any columns or submission information. What is visible are the navigation menu and document management buttons. Therefore, the details of the header tab cannot be determined from this image.
- Entity Tab Description

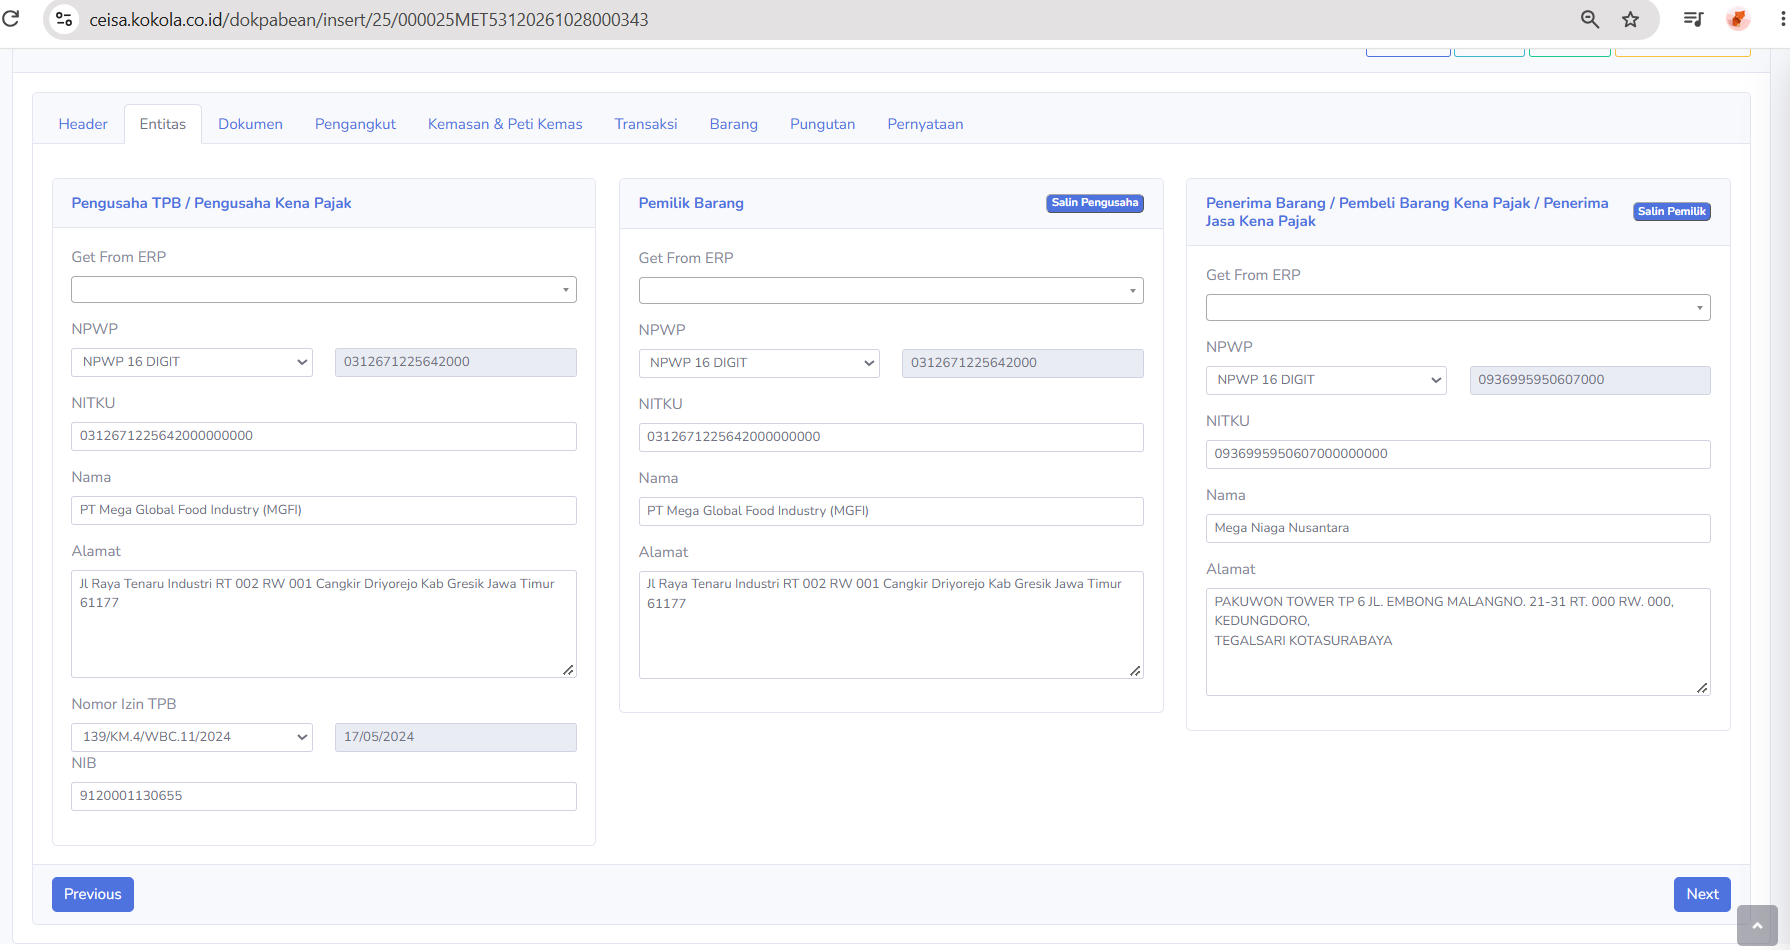
The Entity tab is used to manage the identities of parties involved in the issuance of goods.
There are three main sections.
TPB Business Owner / Taxable Business Owner
-
Get From ERP: Retrieves or selects company data references from the ERP.
-
NPWP: Displays the company’s Taxpayer Identification Number.
-
NITKU: Displays the Business Activity Location Identification Number.
-
Name: Displays the name of the TPB operator.
-
Address: Displays the company’s address.
-
TPB License Number: Displays the TPB facility license number.
-
License Date: Displays the date the license was issued.
-
NIB: Displays the Business Identification Number.
Goods Owner
-
Get From ERP: Retrieves the goods owner's information from the ERP system.
-
NPWP: Displays the goods owner's NPWP
-
NITKU: Displays the business location's identification number.
-
Name: Displays the name of the company that owns the goods
-
Address: Dsiplays the address of the owner of the goods
-
Copy Business Owner: Copies the TPB Business Owner's identity to the Owner of Goods section if both are the same paerty.
Recipient of Goods / Purchaser of Taxable Goods / Recipient of Taxable Services
-
Get From ERP: Retrieves recipient information from the ERP
-
NPWP: Displays the recipient's NPWP
-
NITKU: Displays the recipient's business location ID
-
Name: Displays the recipient company's name
-
Address: Display the recipient's address.
-
Copy Business Owner: Copies the Goods Owner's information to the arecipient section if both parties are the same.
This tab helps ensure that the data for the business owner, owner, and recipient matches the transaction documents.
-
Get From ERP: Retrieves the goods owner's information from the ERP.
-
NPWP: Displays the goods owner's NPWP.
-
NITKU: Displays the business location's identification number.
-
Name: Displays the name of the company that owns the goods
-
Address: Displays the address of the goods owner
-
Copy Business Owner: Copies the TPB business owner's identity to the Goods owner section if both are the same party
Recipient of Goods / Purchaser of Taxable Goods / Recipient of Taxable Services
-
Get From ERP: Retrieves recipient information from the ERP.
-
NPWP: Displays the recipient's NPWP.
-
NITKU: Displays the recipients business Location ID.
-
Name: Displays the recipients company's name
-
Address: Displays the recipients address
-
Copy Business Owner: Copies the Goods Owner's information to the recipient section if both patiesare the same
This tab helps ensure that the data for the business owner, owner, and recipient matches the transaction documents.
-
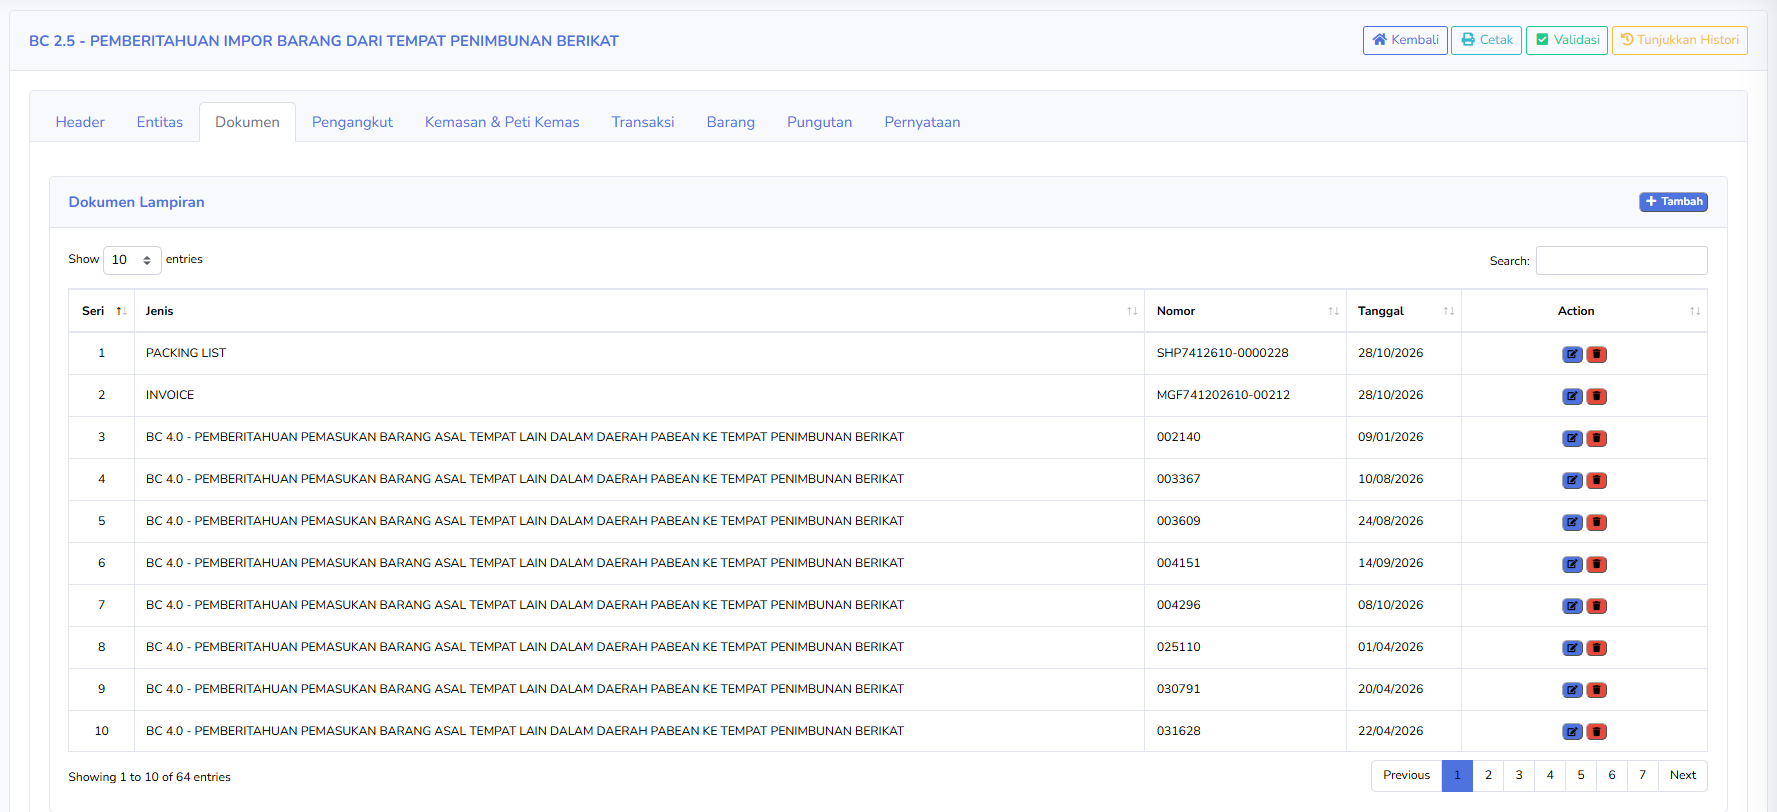
- Document Tab Description

The Documents tab is used to manage the list of supporting documents or reference documents related to the BC 2.5 submission.
The available columns include:
-
Series: Displays the document's serial number
-
Type: Dsiplays the type of attached document.
-
Number: Displays the document's identification number.
-
Date: Displays the document's date.
-
Action: Displays options to edit or delete data.
Example of a document shown in the image:
-
PACKING LIST: A document containing details of the packaging yang memuat rincian kemasan dan barang.
-
INVOICE: A transaction or sales document for goods.
-
BC 4.0: A notification for document for the receipt of goods originating form TLDDP to TPB, used as a reference.
Available button :
-
Add: Adds a new attached document
-
Edit: Modifies the information in an attached documents
-
Delete: Deleted the seleced attached document.
-
Search: Searches for documents based on keywords.
-
Show Entries: Sets the number of documents displayed.
-
Previous / Next: Navigate between pages of the attachedment list.
The screenshot shows 64 attachedment entries, with 10 entries displayed on the first page.
Note: BC 4.0 references can be used to trace the origin of goods in BC 2.5 transactions. However, each document’s reference must be matched to the corresponding goods
-
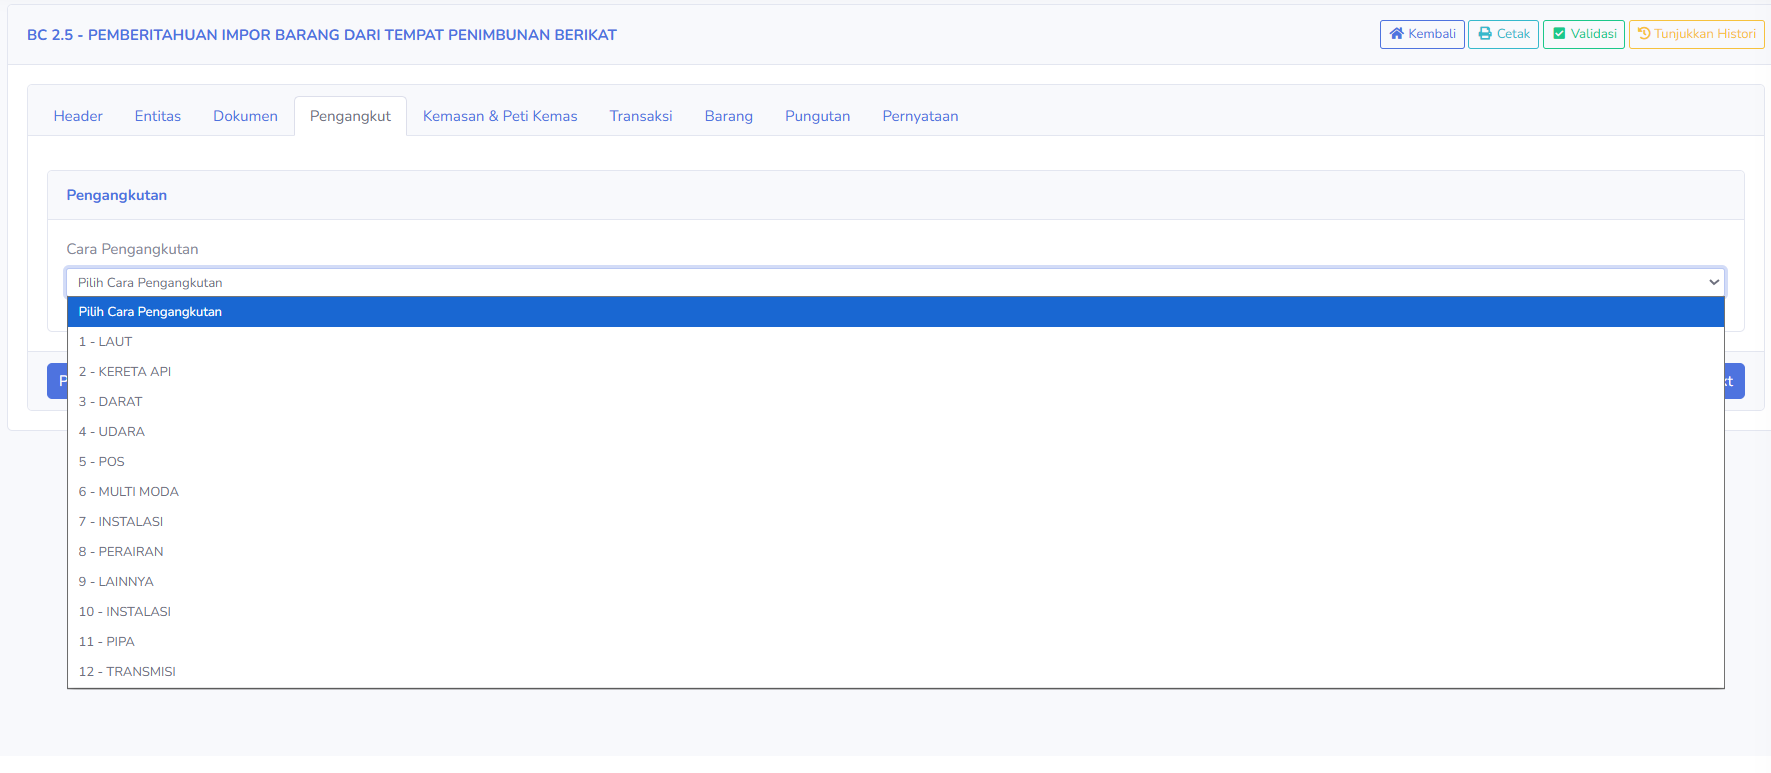
- Carrier Tab Description

The “Carrier” tab is used to specify the mode of transportation for goods to be released from the TPB.
Available sections:
Mode of Transportation
Displays options for the type of mode or method of transportation, namely:
-
1 - SEA Transportation by sea
-
2 - RAIL: Transportation by rail
-
3 - LAND: Transportation by land
-
4 - WILD: Transportation by air
-
5 - POSTAL: Transportation via postal service
-
6 - MULTIMODA: Transportation using a combination of modes
-
7 - FACILITY: A category for transportation or distributionvia a facility
-
8 - WATER Transportation via waterways
-
9 -OTHER: used for other type of transportation
-
10 - FASCILITY: Other facility categories as listed in the application.
-
11 - PIPELINE: Distribution via a pipeline network.
-
12 - TRANSMISI: Dsitribution via transmission facilities.
Users must select the transportation type that corresponds to the method used in the transaction.
Note: The screenshot shows two codes both labeled “Installation.” The differences between these codes must be verified in the application reference before use.
-
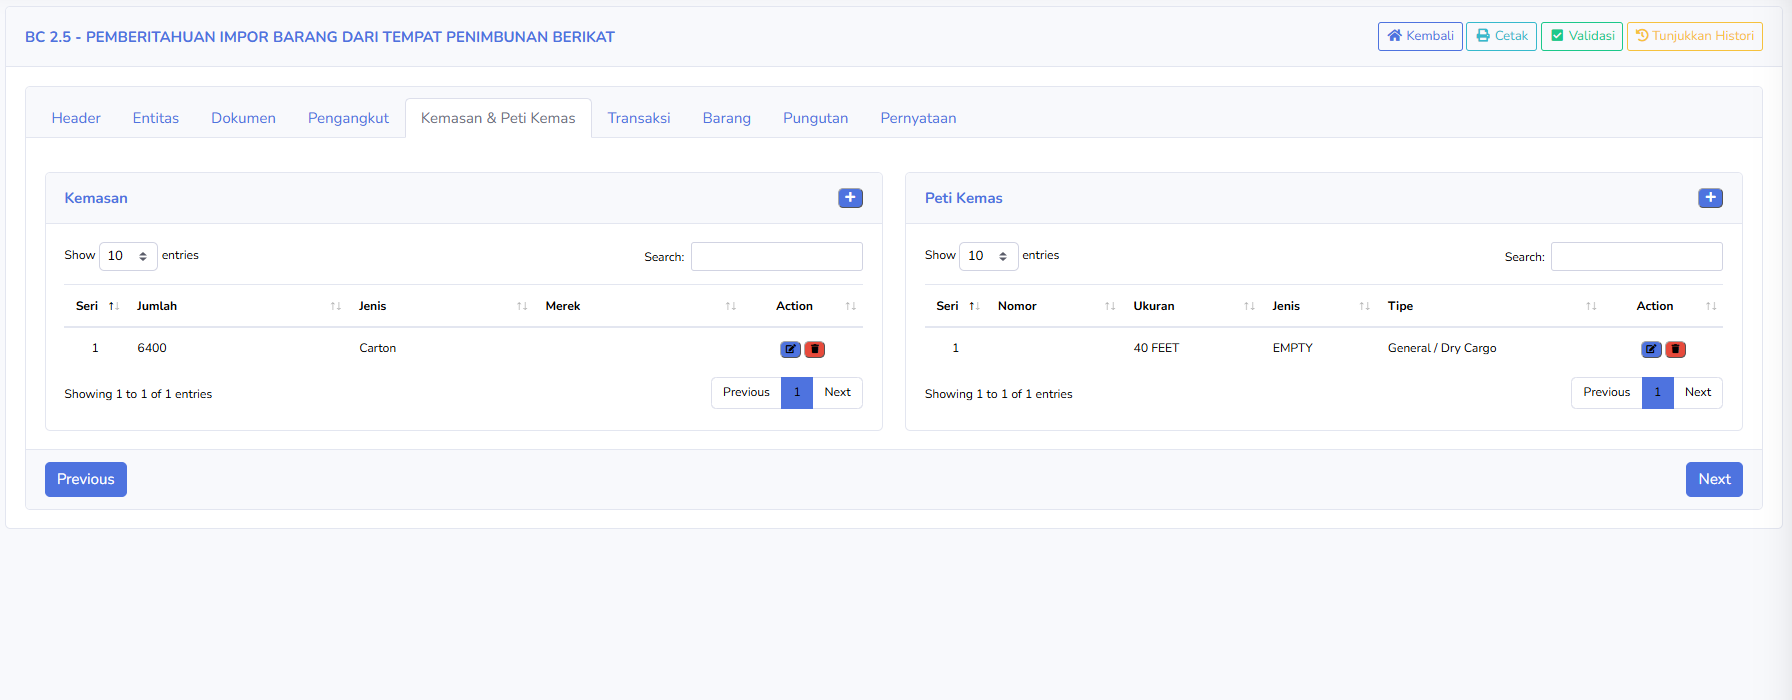
- Packaging & Container Tab Description

The Packaging & Containers tab is used to record the quantity, type, and identification of the packaging and containers for goods.
There are two main sections.
Packaging
-
Series: Displays the sequential number of package
-
Quantity: Displays the number of package of goods
-
Type: Displays the type of packaging, such as carton
-
brand: Display the brand or mark on the packaging, if available
-
Action: used to edit or delete packaging data.
The screenshot shows an example of 6,400 packages of the “Carton” type.
Container
-
Series: Displays the sequential number of container.
-
Number: Displays the container's identification number, if available
-
Size: Displays the container's size, for example 40 FEET.
-
Type: Menampilkan kategori peti kemas sebagaimana tercatat pada sistem.
-
Type: Displays the container's type, for example, general/ Dry cargo
-
Action: Used edit or delete container data
The screenshot shows the “EMPTY” category. This value is the data recorded in the application and must still be verified for consistency with the actual condition and shipping documents.
The Add (+) button in each section is used to add a new package or container.
-
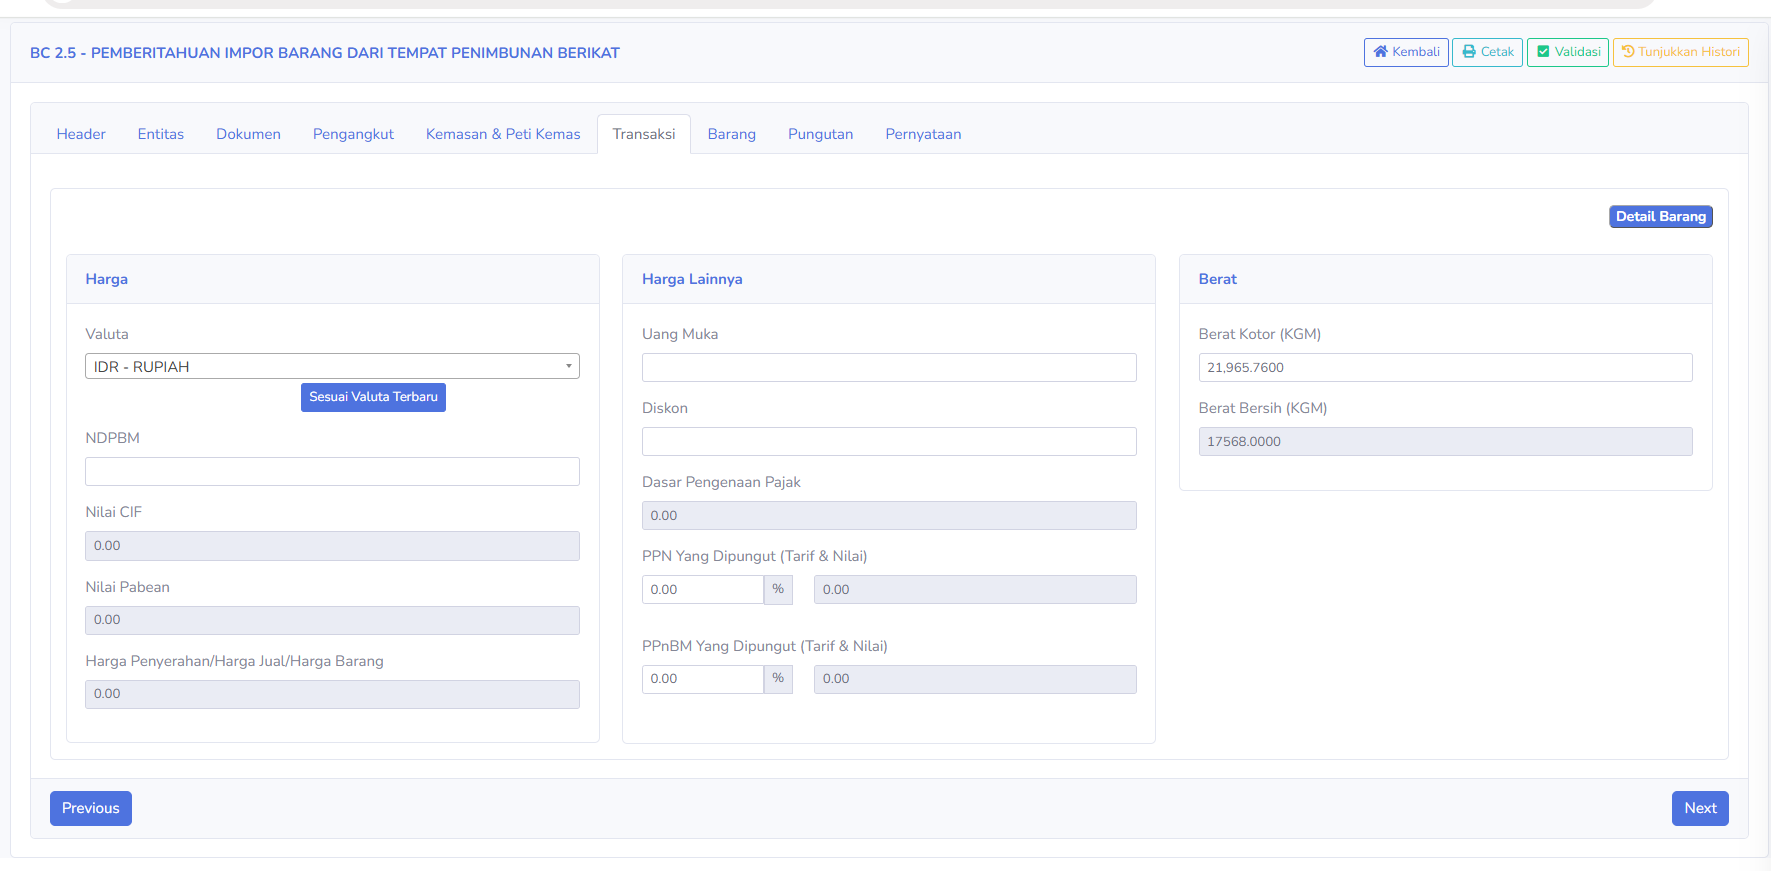
- Transaction Tab Description

The Transactions tab is used to manage information regarding transaction values, taxes, and the weight of goods.
There are three main sections.
Price
-
Currency: Displays the transaction currency, for example IDR-Rupiah
-
NDPBM: Displays the base value for import duty calculation, if applicable.
-
CIF Value: Displays the value based on the cost, insurance and freight components, if used.
- Custom Value: Displays the value used in customs calculation in accordance with regulations.
-
Delivery Price/Selling Price/Goods Price: Displays the transaction value for the delivery or sales of goods.
Available buttons:
- Update to Latest Exchange Rate: Used to update the exchange rate reference used by the application. Users must verify the applicable exchange rate and date.
Other Prices
-
Down payment: Display the down payment amount, if any.
-
Discount: Display the transcastion discount
-
Tax base: Displays the value used as the basis for tax calculation.
-
VAT Collected (Rate & Amount): Displays the rate and amount of Value-Added Tax colledted.
-
Luxury goods sales tax collated (Rate & Amount): Dispaly the rate and amount of luxury goods sales tax, if applicable
Weight
-
Gross Weiht : Displays the weight of the items, including
-
Net Weight (KGM): Displays the weight of the items without pacakging
Note: A value of 0.00 on the form does not always indicate that a transaction has no payment obligation. This value may also indicate that the data has not yet been entered or calculated.
-
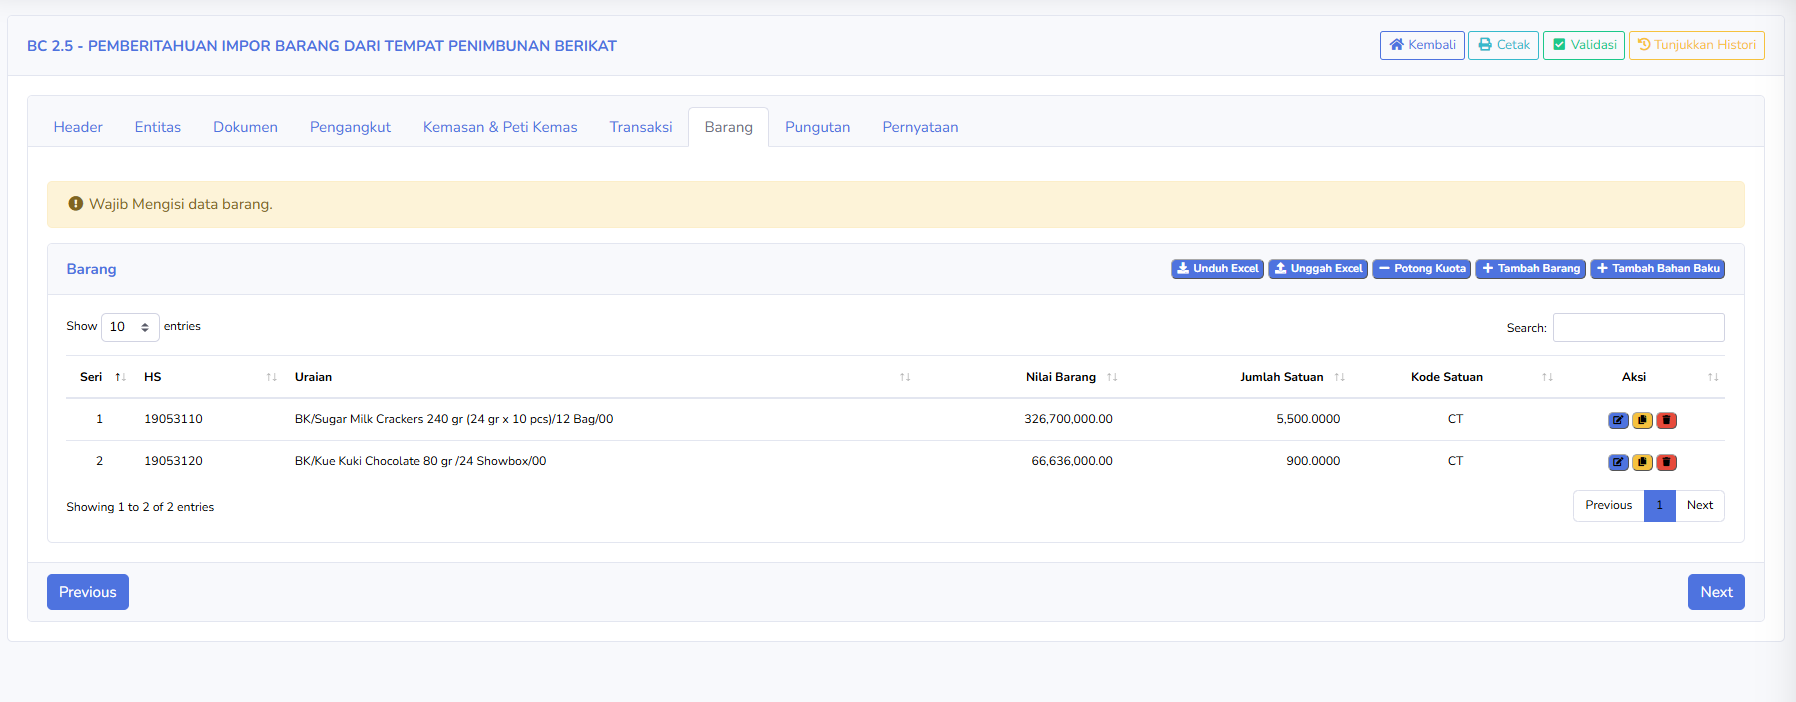
- Goods Tab Description

The Goods tab is used to manage the details of goods listed in the BC 2.5 document.
The available columns include:
-
Series: Displays the serial number of the goods
-
HS: Displays the harmonized system code or tariff classification of the goods.
-
Description: Displays the name, specifications, or description of the goods
-
Goods value: Displays the value of each item.
-
Quantity: Displays the quantity of the item based on the unit of measure used.
-
Unit Code: Displays the unit code for the item, for example CT.
-
Action: Displays icons to edit, copy or delete item data according to the application's functions.
Available buttons:
-
Download Excel: Downloads the data or excel format provided by the application
-
Upload Excel: Uploads a list of items via an excel file
-
Quota Deduction: runs processes related to quota managements or deduction in accordance with system regulation
-
Add Item: Adds details for a new item.
-
Add Raw Material: Adds raw material data associated with the item
The screenshot shows two rows of item data with different HS codes.
At the top of the page, there is also a notification:
Item data must be filled out.
This notification indicates that the user needs to verify the completeness of the item data, even though the table already displays data rows.
Note: Before submitting a request, ensure that the HS code, description, value, quantity, unit code, and raw material details match the transaction and inventory documents.
-
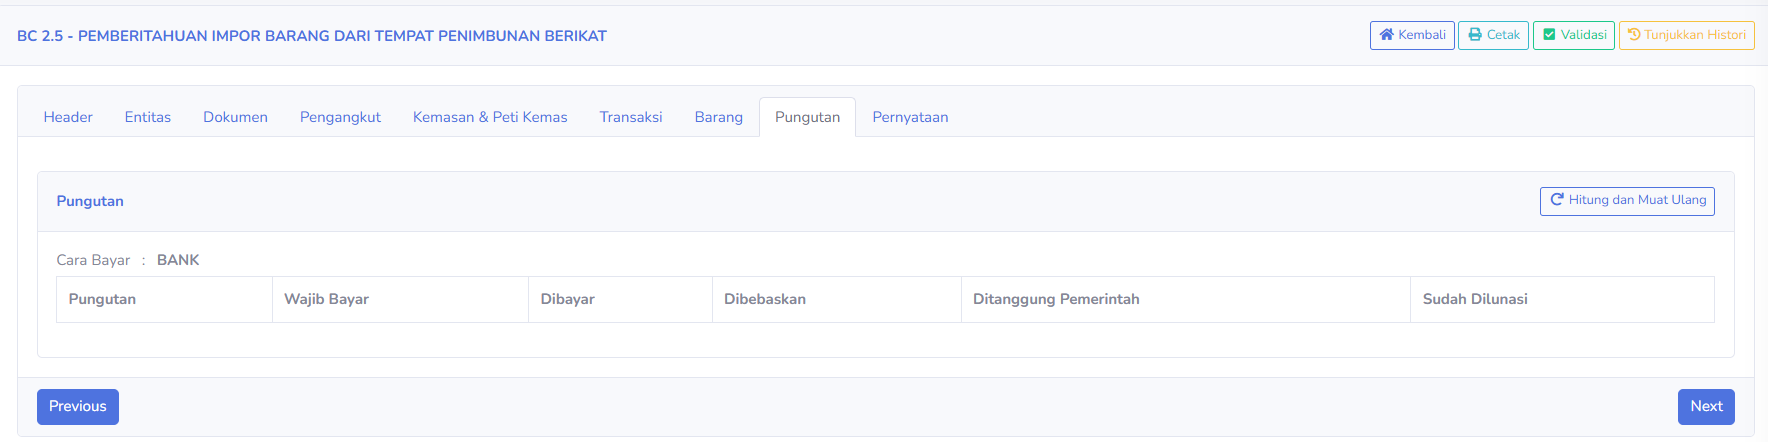
- Levies Tab Description

Tab Pungutan digunakan untuk menampilkan dan menghitung kewajiban pungutan kepabeanan serta perpajakan yang berkaitan dengan dokumen BC 2.5.
Pada screenshot terlihat Cara Bayar: BANK.
Bagian yang tersedia meliputi:
-
Pungutan: Menampilkan jenis pungutan yang dihitung.
-
Wajib Bayar: Menampilkan nilai kewajiban pembayaran.
-
Dibayar: Menampilkan nilai pungutan yang dibayarkan.
-
Dibebaskan: Menampilkan nilai pungutan yang memperoleh fasilitas pembebasan.
-
Ditanggung Pemerintah: Menampilkan nilai pungutan yang memperoleh perlakuan ditanggung pemerintah apabila berlaku.
-
Sudah Dilunasi: Menampilkan nilai pungutan yang tercatat telah dilunasi.
Tombol yang tersedia:
- Hitung dan Muat Ulang: Menghitung kembali data pungutan dan memperbarui tampilan hasil perhitungan.
Tab ini digunakan untuk memeriksa kewajiban pungutan sebelum melanjutkan proses dokumen.
Pengguna perlu memastikan bahwa nilai transaksi, data barang, dasar pengenaan pajak, dan fasilitas yang digunakan sudah sesuai.
-
- Statement Tab Description
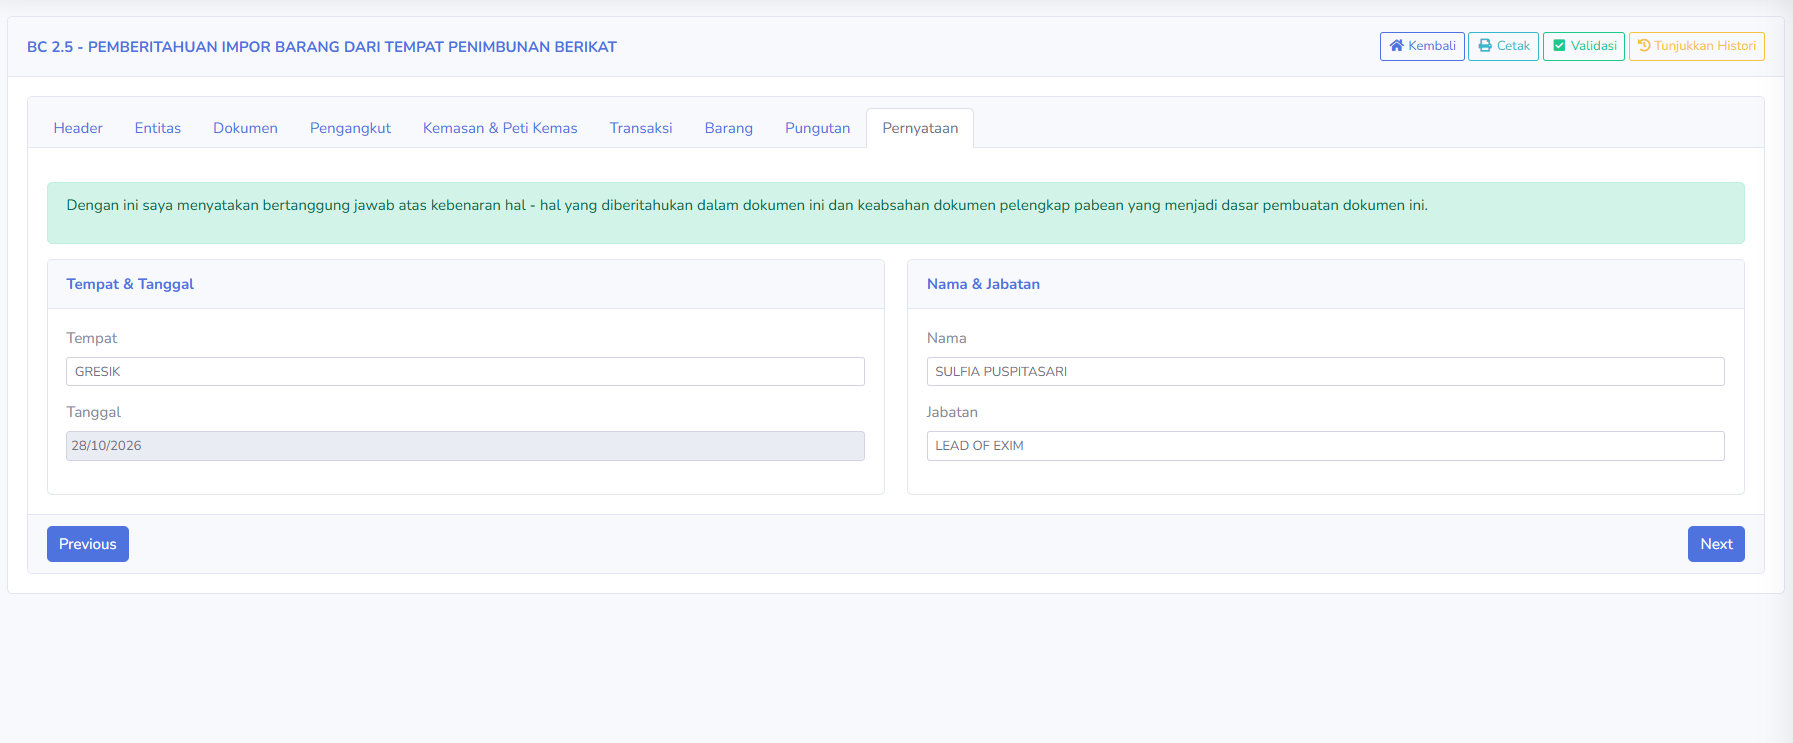
The Declaration tab is used to complete the information regarding the person responsible for the BC 2.5 document.
At the top is a declaration of responsibility for the accuracy of the reported data and the validity of the customs supporting documents.
The available sections include:
Place & Date
- Place: Displays the location where the declaration was prepared or signed
- Date: Displays the date of document's declaration
Name & Position
- Name: Display the name of person reponsible for the document
- Position: Display the person's position within the company
Users must ensure that the name, position, place, and date match the information of the party authorized to sign the document.
Steps for Using BC 2.5
Notes
- Make sure the search period matches the document you want to check.
- Use the Application Number to make it easier to search for specific documents.
- Check the data for the TPB Business Owner, Goods Owner, and Recipient before submitting your application.
- Make sure the supporting documents match the goods transaction.
- Use the “Copy Business Owner” or “Copy Goods Owner” feature only if the identities of both parties are the same.
- Check the HS code, description, value, quantity, and unit code for each item.
- Use the “Upload Excel” feature to help enter data for a large number of items.
- Check the raw material data and reference documents before processing the quota deduction.
- Ensure that the transaction value and the calculated duty amount match.
- Check the name, title, location, and date on the “Declaration” tab.
- Use the Validate button to check the completeness of the documents.
- Application validation does not necessarily mean the documents have been accepted or approved by Customs.
- The Green or Red Lane indicator does not necessarily mean the goods release process is complete.
- Check the official response from CEISA after the documents have been submitted.
- Use internal features such as Update to ERP, Quota Deduction, and Show History in accordance with company procedures.
BC 2.6.1
Customs Documents Module Guide
Module Location:
CEISA > Customs Documents > BC 2.6.1
Purpose
The BC 2.6.1 form is used for the temporary release of imported goods and/or goods originating from elsewhere within the customs territory from a Bonded Warehouse (TPB) to Another Location Within the Customs Territory (TLDDP). This document is used when goods are temporarily released from the TPB and may subsequently be re-entered into the TPB via the BC 2.6.2 form.
How to Open
- Log in to the CEISA app.
- Select the Customs Documents menu.
- Click the BC 2.6.1 submenu.
- The system displays the Document List page.
Page Display
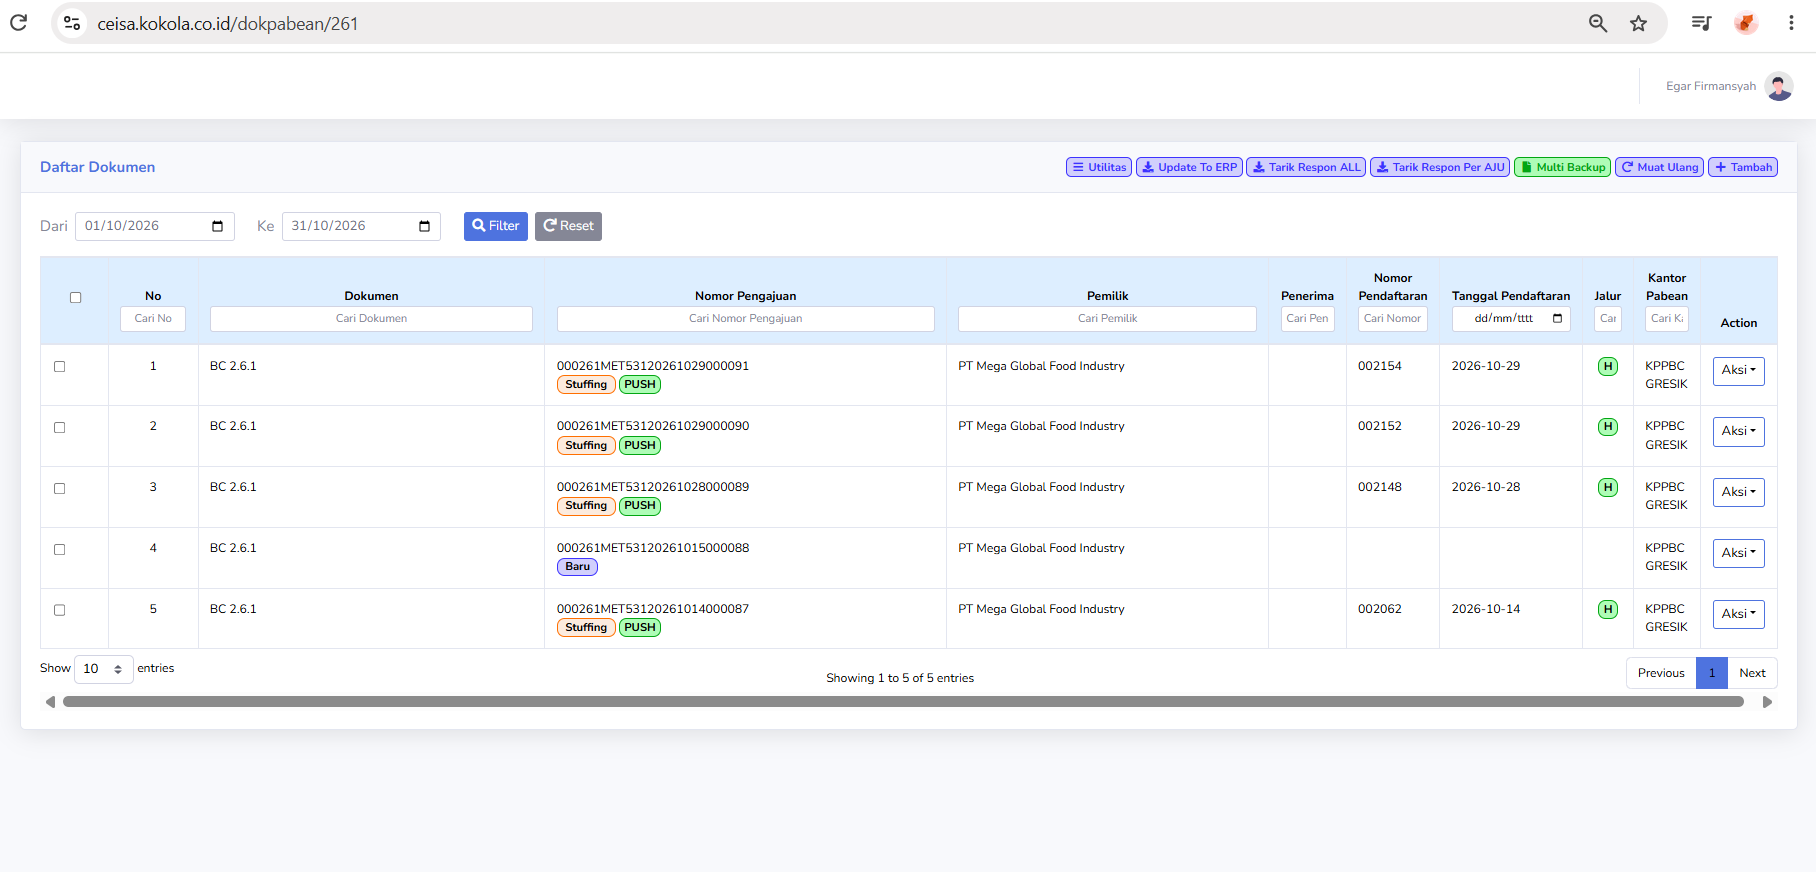
The main page displays a list of BC 2.6.1 documents created within a specific time period. At the top, there are date filters, utility buttons, a synchronization button, a response retrieval button, and a button to add a new document.
Each row in the table displays key document information, such as document type, submission number, owner, recipient, registration number, registration date, route, customs office, and an “Actions” button.
Column Descriptions
The columns available on the document list page include:
- Checkbox: Used to select specific documents if the system supports bulk selection.
- No.: Displays the sequential number of the data in the table.
- Document: Displays the document type, namely BC 2.6.1.
- Submission Number: Displays the identification number of the document submission.
- Owner: Displays the name of the company or party owning the goods.
- Recipient: Displays the party receiving the goods.
- Registration Number: Displays the document’s registration number from the customs system.
- Registration Date: Displays the document’s registration date.
- Channel: Displays the service or inspection channel for the document.
- Customs Office: Displays the Customs and Excise office handling the document.
- Action: Displays a button to initiate further actions on the document.
The table header also includes individual search columns, allowing users to search for data by document, application number, owner, recipient, registration number, or customs office.
Button Descriptions on the List Page.
- Filter: Displays documents based on the selected period.
- Reset: Resets the filter to its default settings.
- Utilities: Opens additional features available in the module.
- Update to ERP: Used to update or synchronize document data with the ERP system.
- Retrieve ALL Responses: Retrieves or updates customs responses for all relevant documents.
- Retrieve Response by AJU: Retrieves responses based on a specific application number.
- Multi Backup: Backs up multiple documents at once.
- Reload: Refreshes the document list view.
- Add: Creates a new BC 2.6.1 document.
- Actions: Opens options for further actions on the document.
Status and Workflow Explanations
In the Application Number column, the system may display process status labels, such as:
- New: Indicates that the document is still in the initial stage or has just been created.
- Stuffing: Indicates that the document is in a specific process stage according to the application workflow.
- PUSH: Indicates that data is being sent or synchronized within the application.
In the “Path” column, the system displays service path indicators, for example:
- H: Generally indicates the Green Path.
- Other paths may appear depending on the customs system’s response.
Note: Status names such as New, Stuffing, and PUSH are labels that appear in the CEISA Kokola application. Their detailed operational meanings must be aligned with business processes and official system responses.
Table Navigation Explanation
At the bottom of the table, you’ll find the following features:
- Show entries: Sets the number of data rows displayed.
- Previous: Go to the previous page.
- Next: Go to the next page.
- Showing x to y of z entries: Displays the number of data entries currently shown.
- Horizontal scrollbar: Used to scroll the table if not all columns are visible on the screen.
Document Edit Page
When a user opens a document using the Action button, the system displays the BC 2.6.1 document details or edit page. At the top of the edit page are the following buttons:
- Back: Return to the previous page.
- Print: Print the document.
- Validate: Checks the completeness and accuracy of the document data.
- Show History: Displays the process history or document history.
The edit page contains several tabs, namely:
- Header

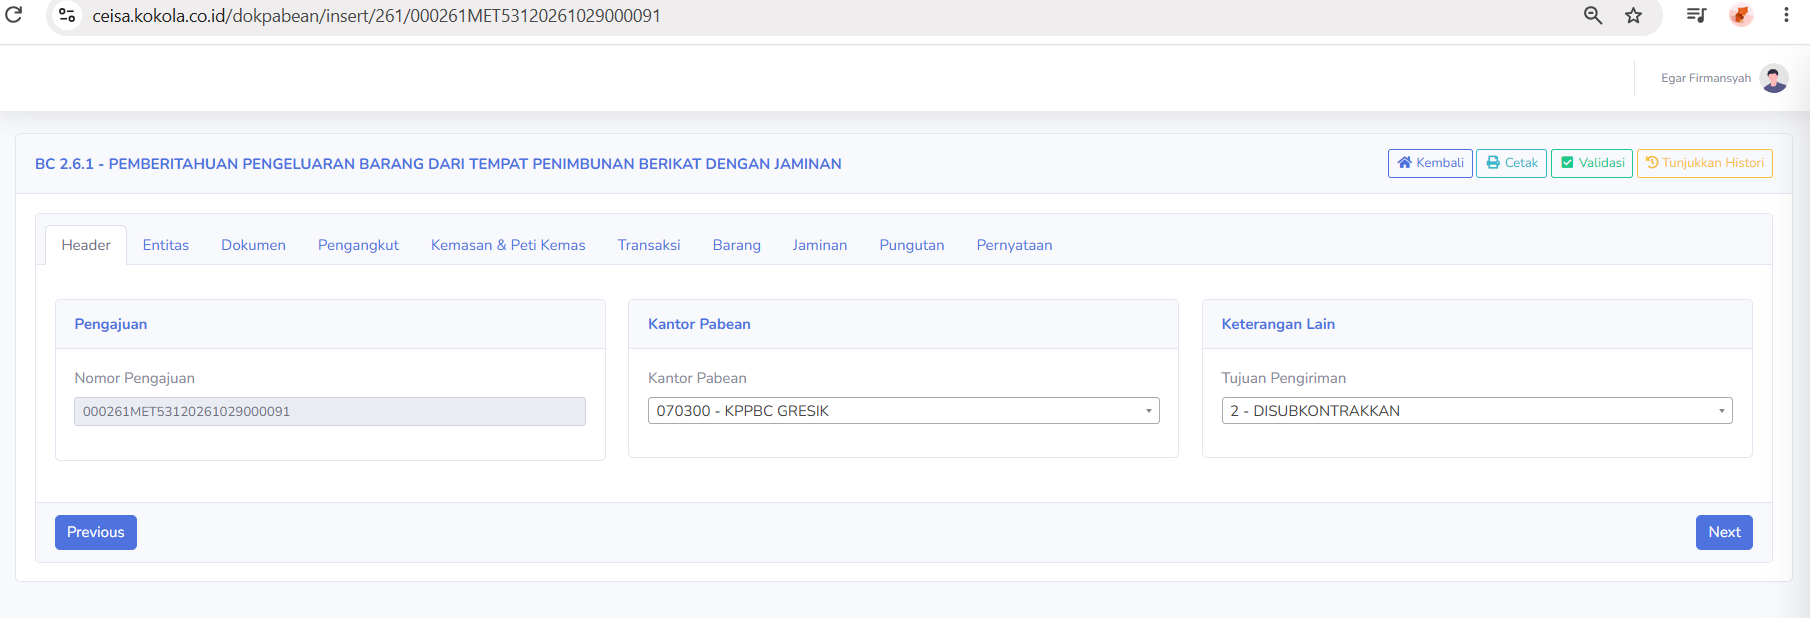
The Header tab is used to display general data regarding BC 2.6.1 document submissions.
The available sections include:
-
Submission
Submission Number: Displays the document submission identification number.
Customs Office
Customs Office: Displays the Customs and Excise office where the document was registered.
-
Additional Information
Shipment Purpose: Displays the purpose of the temporary release of goods, such as subcontracting or other purposes as required by the transaction.
This tab serves as a basic summary of the document, which will be continued on the next tab.
-
- Entity

Tab Entitas digunakan untuk mengisi dan menampilkan data pihak-pihak yang terkait dalam transaksi pengeluaran sementara barang. Terdapat tiga bagian utama:
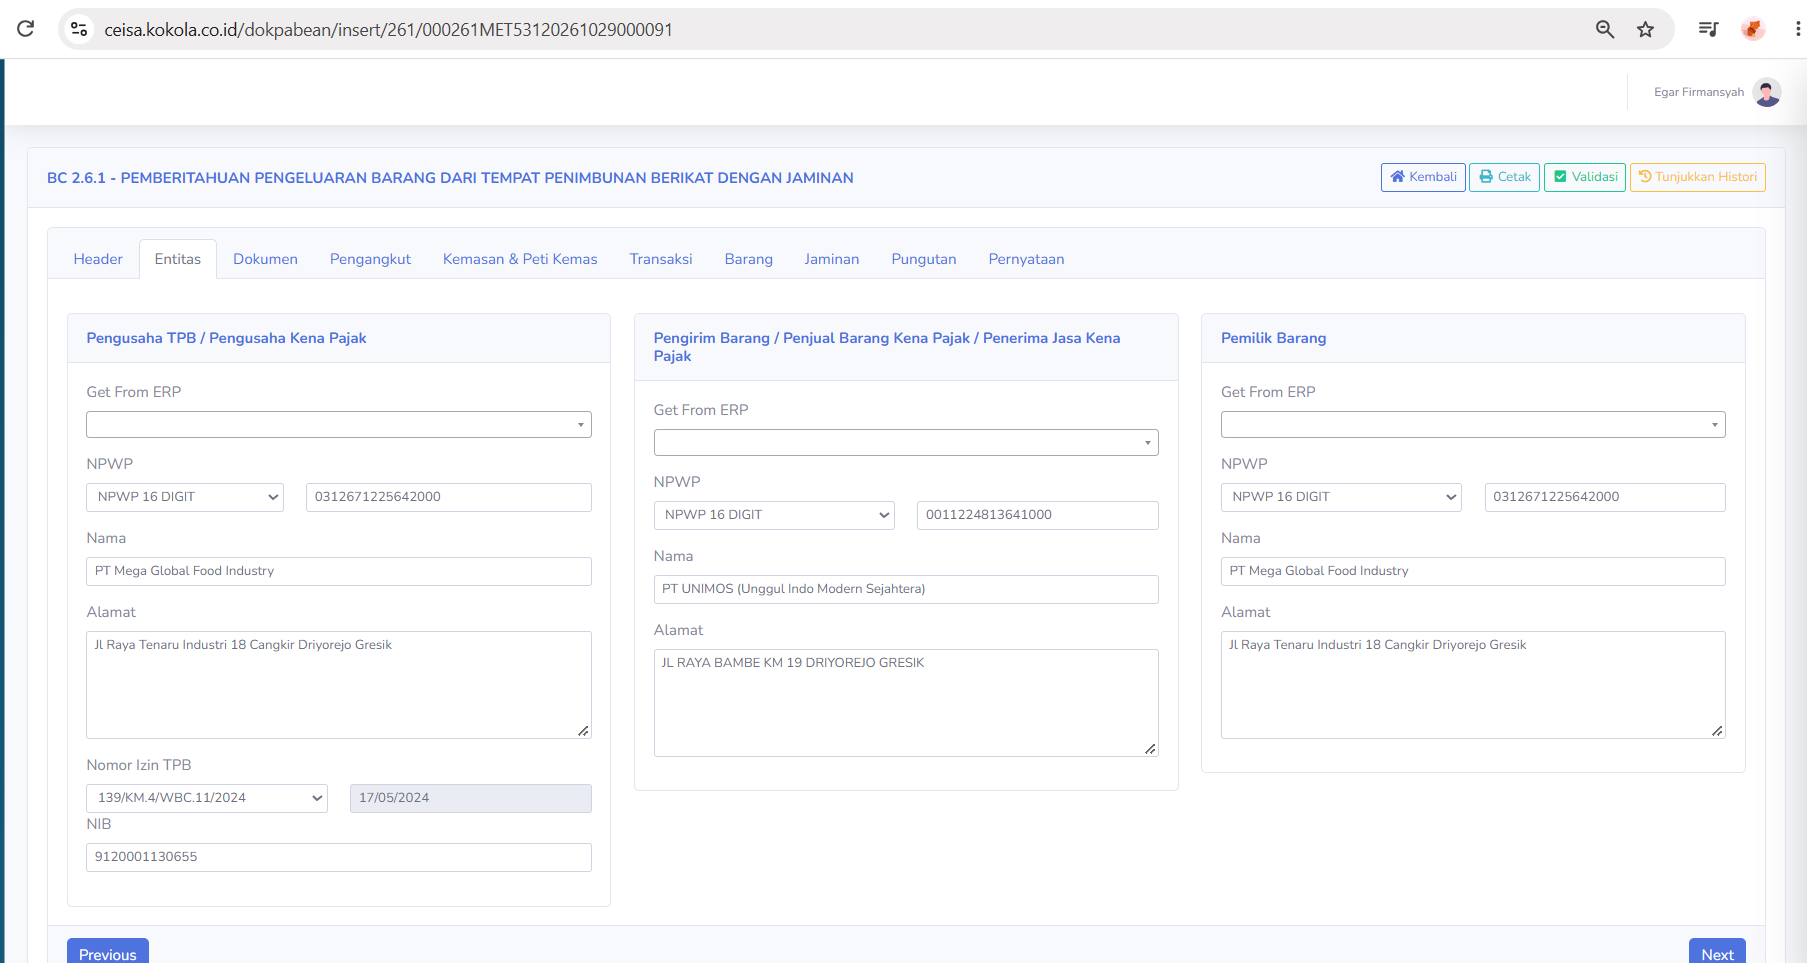
- TPB Business Owner / Taxable Business Owner
Available columns include:
-
Get From ERP
- NPWP
- Name
- Address
- TPB License Number
- Permit Date
- NIB
This section is used to display the identity of the TPB managing company.
-
- Shipper / Seller of Taxable Goods / Recipient of Taxable Services
The available fields include:
- Get From ERP
- Tax ID Number (NPWP)
- Name
- Address
This section is used to enter information about the shipper or the party involved in the shipment of goods.
- Item Owner
Available fields include:- Get From ERP
- Tax ID Number
- Name
- Address
This section is used to record the owner of goods that have been temporarily released.
- Document

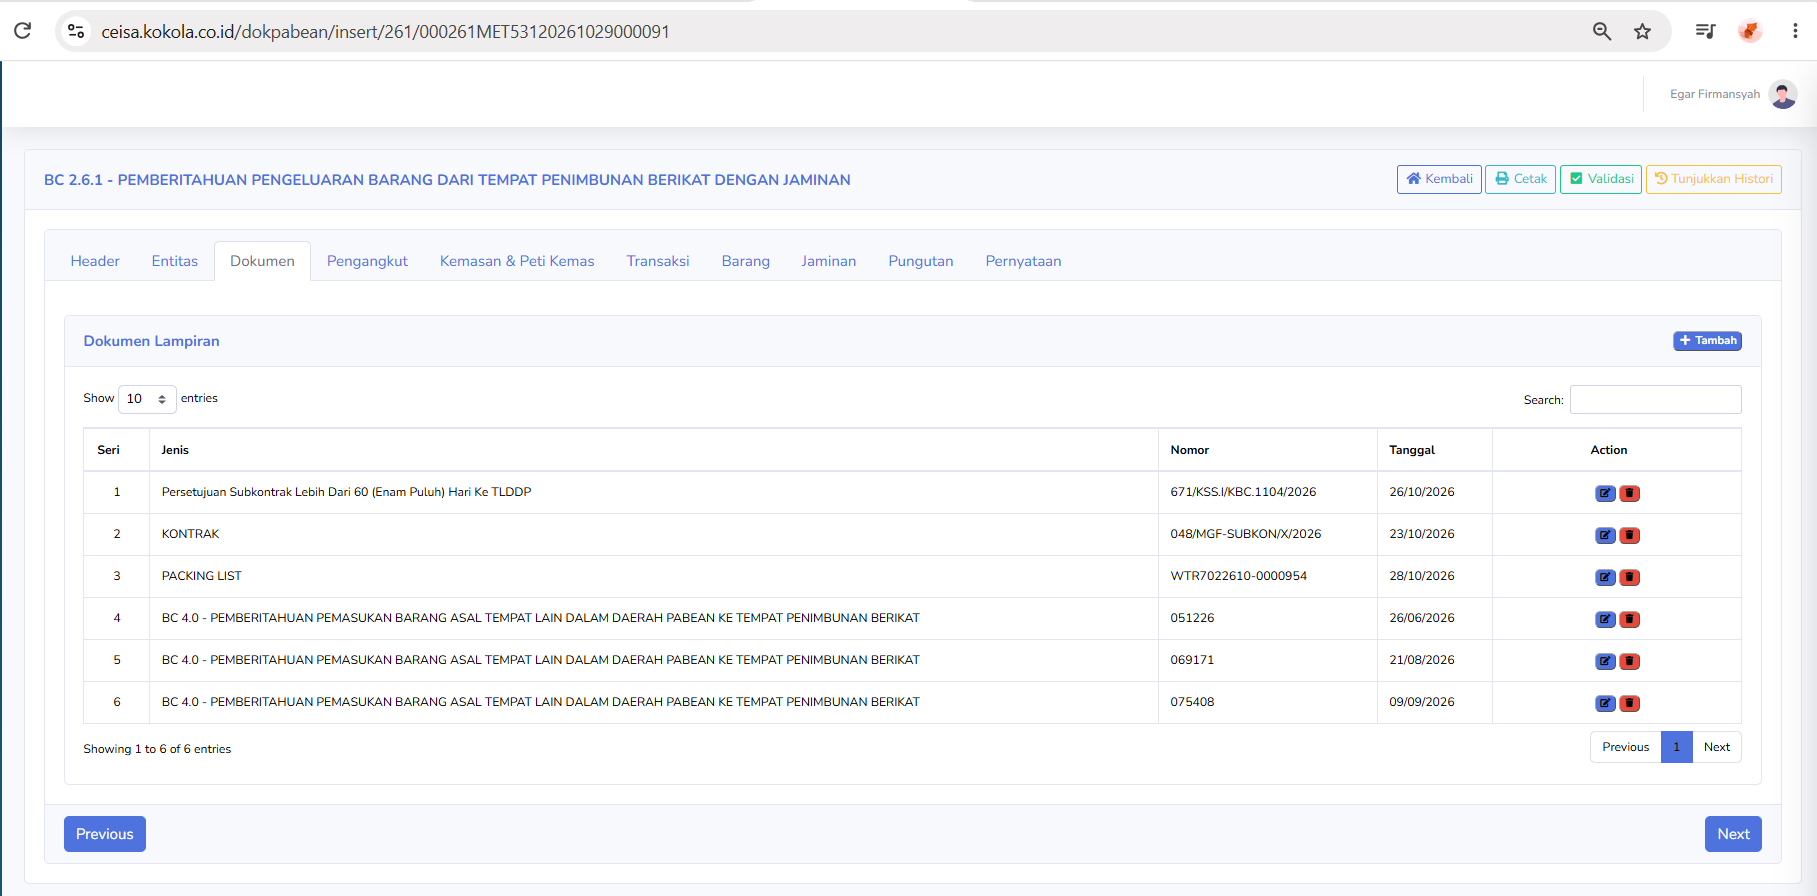
The Documents tab is used to manage attached documents or supplementary customs documents that support the BC 2.6.1 submission.
Available columns include:
- Series
- Type
- Number
- Date
- Action
Examples of documents shown in the screenshot include:
-
Approval of Subcontracts Exceeding 60 (Sixty) Days to TLDDP
- Contract
- Packing List
-
BC 4.0 - Notification of Import of Goods Originating from Another Location Within the Customs Area into a Bonded Warehouse
Available buttons:
- Add : a new attached document
-
Edit Icon: Modifies attachment data.
-
Delete Icon: Deletes attachment data.
- Search : Search for a specific attachment.
- Show entries : Adjust the number of records displayed in the table.
This tab is used to verify that the supporting documents for temporary export are complete.
- Carrier

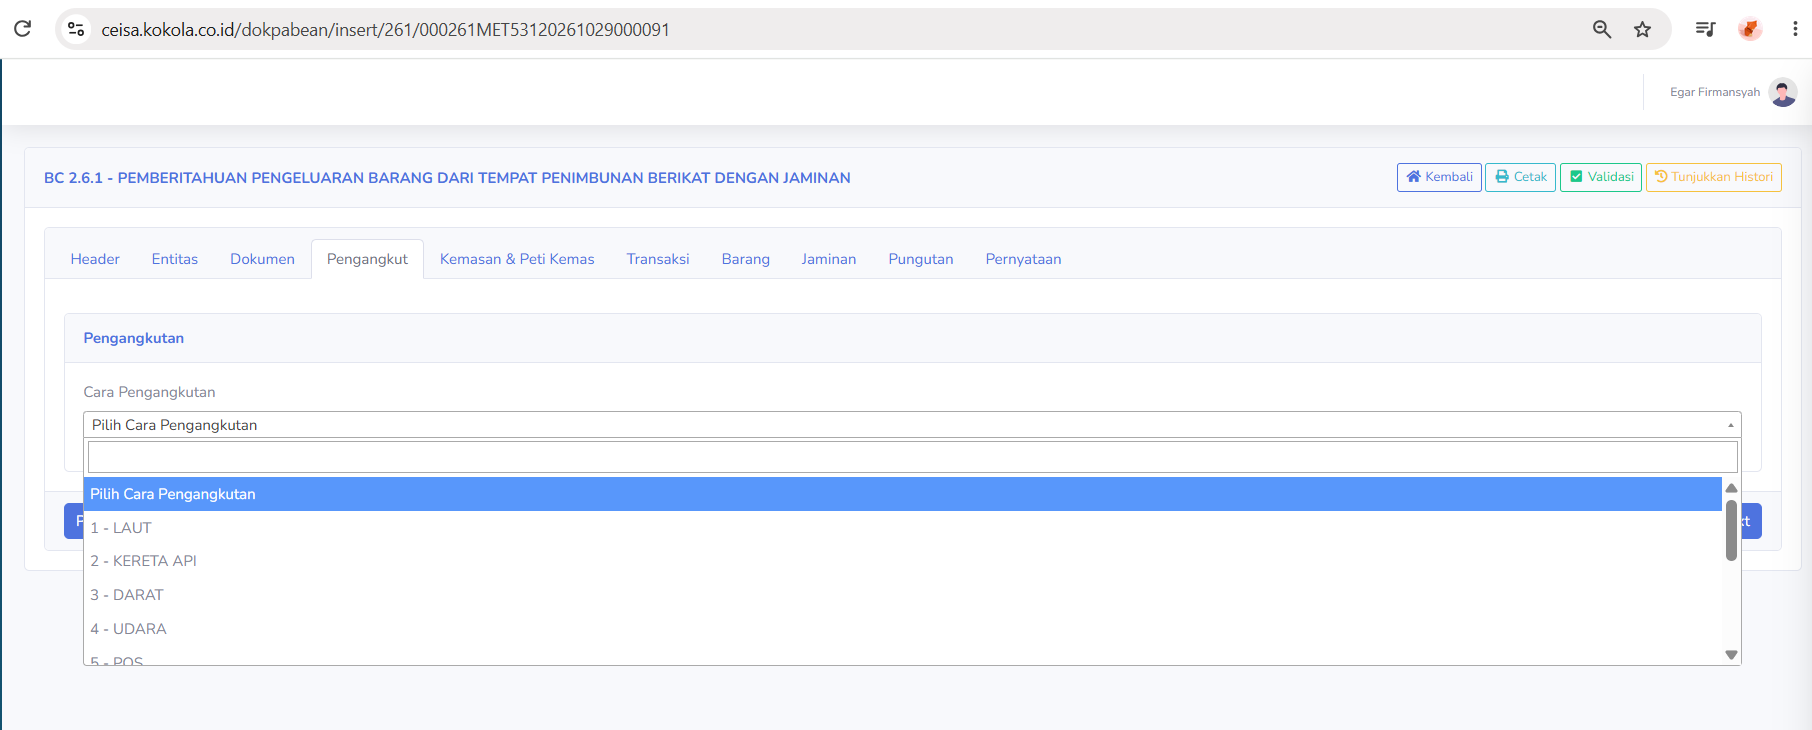
The Shipping tab is used to specify the method of shipping goods.
Available sections include:
Shipping MethodThis dropdown displays several options, such as:
- 1 - SEA
- 2 -RAIL
- 3 - ROAD
- 4 - AIR
- 5 - MAIL
-
and other options as listed in the system.
Users select the shipping method based on the mode of transportation used during the temporary release of goods.
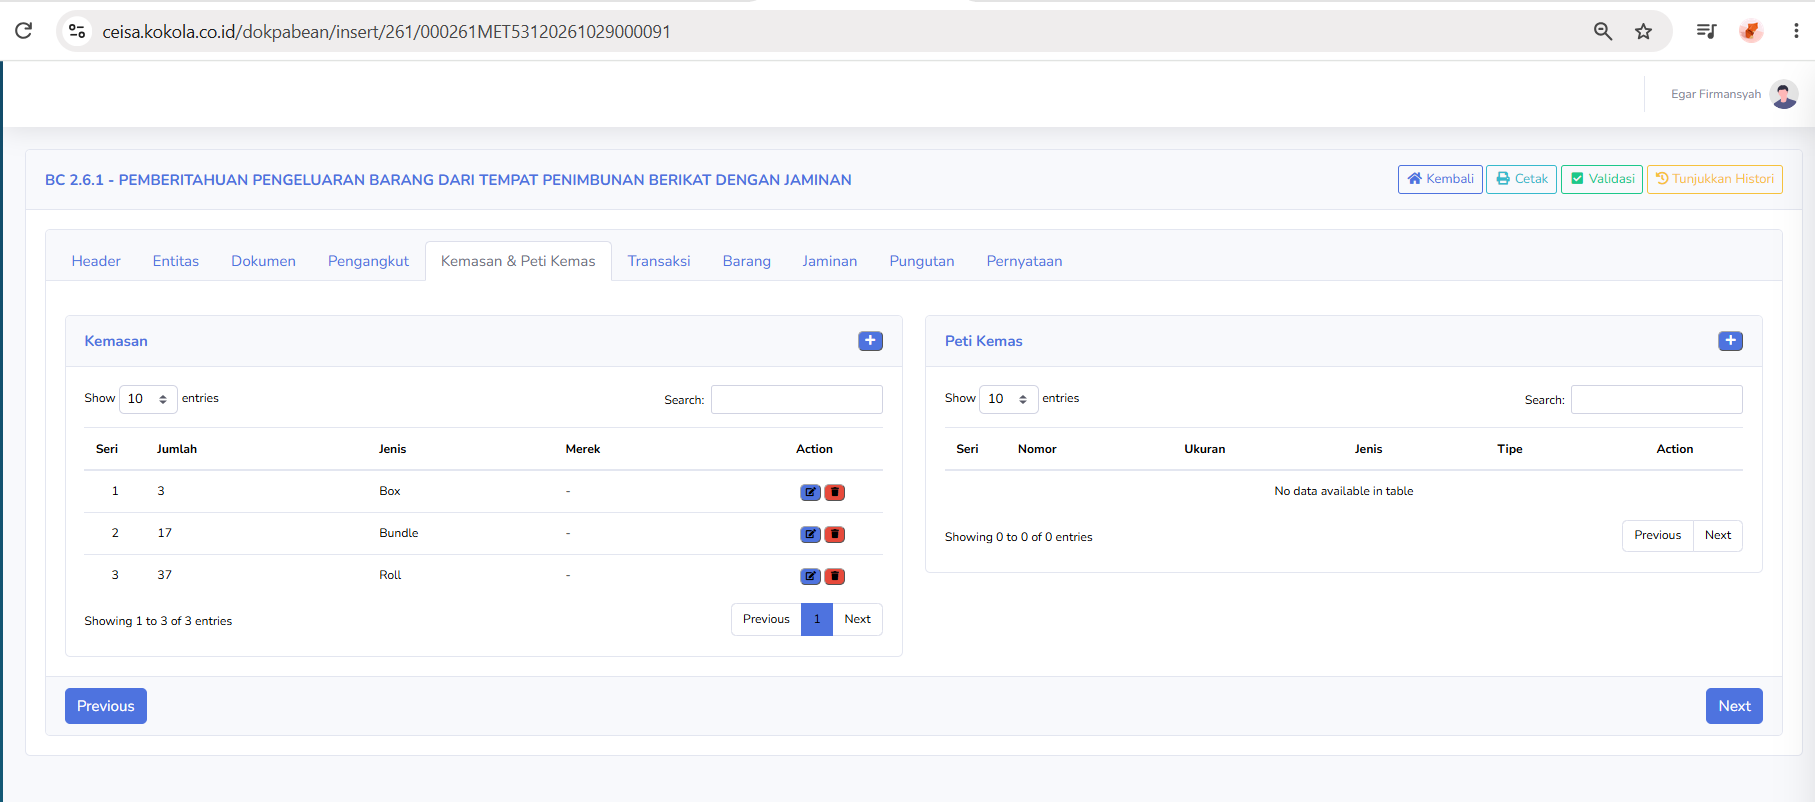
- Packaging & Containers

The Packaging & Containers tab is used to record data on product packaging and containers.
There are two main sections:
Packaging
Available columns:
- Series
- Quantity
- Type
- Brand
- Action
The screenshot shows an example of packaging data:
- Box
- Bundle
- Roll
The Add (+) button is used to add new packaging data.
Container
Available columns:
- Series
- Number
- Size
- Type
- Class
- Action
In the screenshot, this section displays the message “No data available in table,” which means no container data has been entered yet.
This tab is used to record the packaging types of items being shipped.
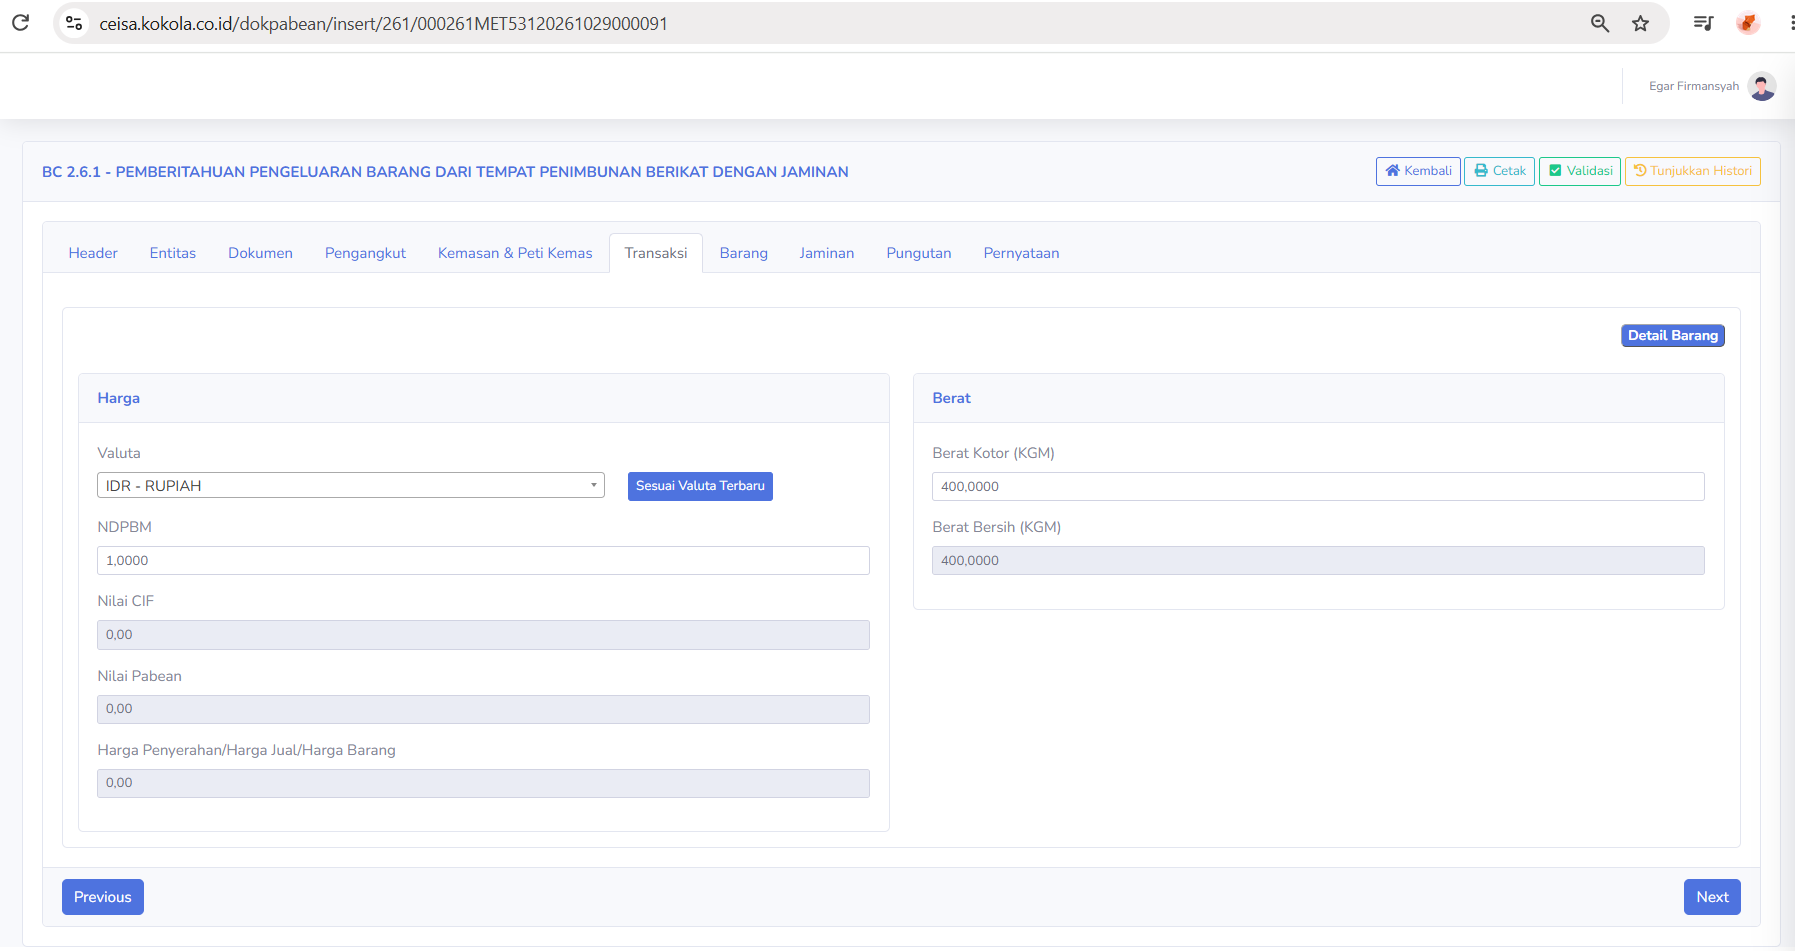
- Transaction

The Transactions tab is used to enter transaction value and item weight data.
Available fields include:
Price
- Currency
- NDPBM
- CIF Value
- Customs value
- Delivery Price / Selling Price / Item Price
Button:
-
Update to Latest Exchange Rate: used to adjust the exchange rate or currency value used
Weight
- Gross Weight (KGM)
- Net Weight (KGM)
There is also a “Item Details” button to view details of the items associated with the transaction.
This tab helps users ensure that the value and weight of the goods match the transaction documents.
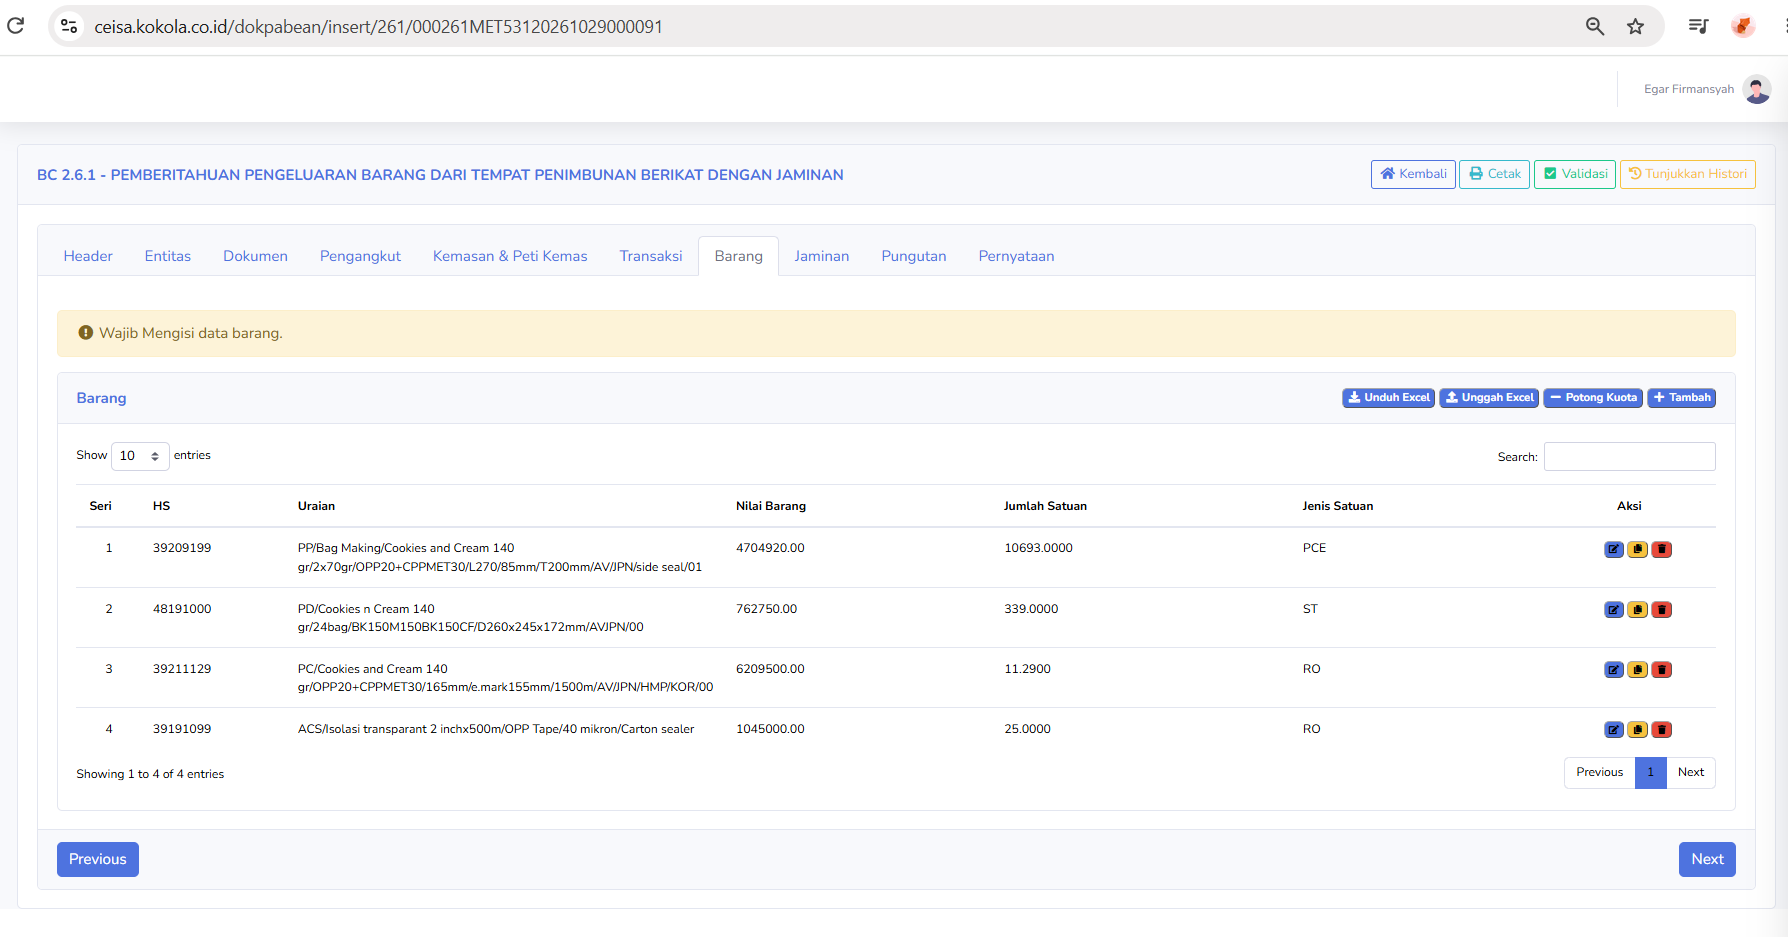
- Collateral

The Items tab is used to manage details of items temporarily removed from the TPB.
The columns in the items table include:
- Series
- HS
- Description
- Item Value
- Quantity
- Unit Type
- Action
The buttons available on this tab include:
- Download Excel : Download the item template or data in excel format
- Upload Excel :Upload item data via an excel file
- Deduct Quota: Runs quota-related processes as required by the system
- Add: Add a new items
A notification may also appear at the top:
-
Item data must be filled in.
This notification indicates that item data must be completed or reviewed before proceeding to the next step.
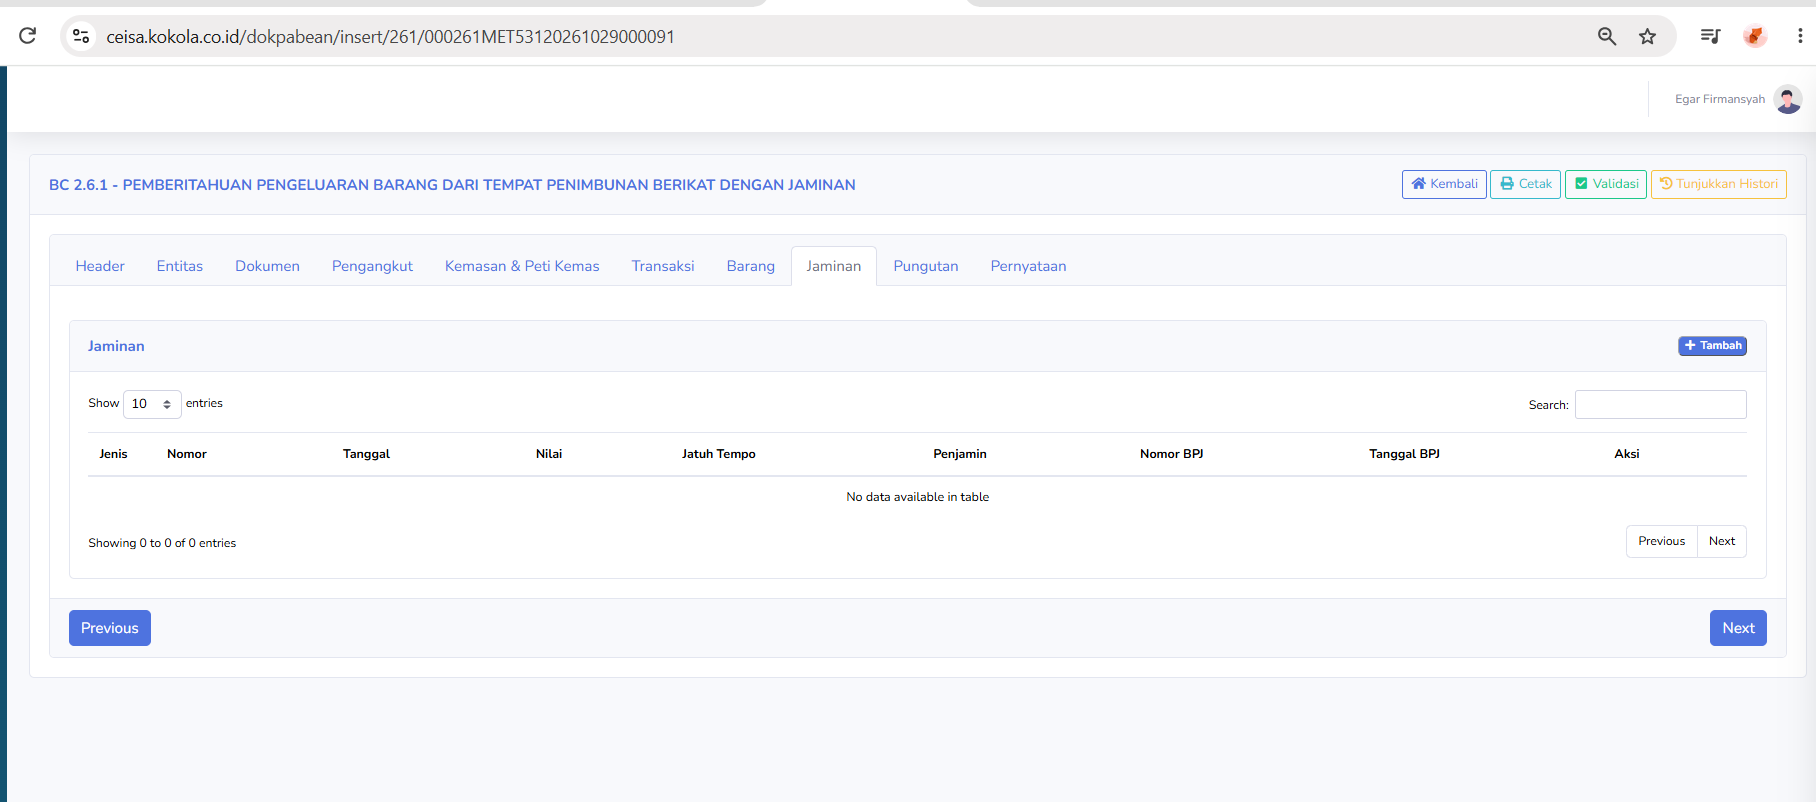
- levy

The Collateral tab is used to record collateral data related to the temporary release of goods from the TPB.
The columns available in the collateral table include:
- Type
- Number
- Date
- Value
- Due Date
- Guanrantor
- BPJ Number
- BPJ Date
- Action
Available buttons:
-
Add: Adds new collateral data.
In the screenshot, the table is still empty and displays “No data available in table.”
This tab is used when a transaction requires the entry of collateral data in accordance with regulations.
- Fees

The Fees tab is used to display or calculate fees related to BC 2.6.1 documents.
Available columns include:
- Fees
-
Guaranteed
Available buttons:
-
Calculate and Reload: Used to recalculate fees and refresh the table display.
In the screenshot, the table is still empty and displays “No data available in table.”
This tab is used to view the amounts of fees guaranteed in provisional expenditure transactions.
- Statement

The Declaration tab is used to complete the declaration by the person responsible for the document.
At the top, there is a statement that the user is responsible for the accuracy of the document’s content and the validity of the supporting customs documents on which the document is based.
The available sections include:
Place & Date
- Place
- Date
Name & Position
- Name
- Position
This tab must be completed with the information of the authorized official or responsible party.
At the bottom of the page, the following buttons are also available:
- Previous: Go to the previous tab.
- Next :Vo to the next tab.
Instructions for Use
Notes
- BC 2.6.1 is used for the temporary export of goods from a bonded warehouse to another location within the customs territory.
- This document is paired with BC 2.6.2, which is the document for the re-entry of goods previously exported under temporary export to the bonded warehouse.
- According to the official filing instructions, each BC 2.6.1 declaration is intended for a single transaction involving the release of goods under bond, but may include more than one type of goods.
- Ensure that entity data, attached documents, goods details, and declaration data are fully completed before validating the form.
- Use data from valid supporting documents to avoid errors in filling out the form.
- If the system displays a notification that goods data is required, double-check the Goods tab.
- Data on the Security and Levies tabs must be adjusted according to the transaction and applicable regulations.
- The use of features such as “Update to ERP,” “Retrieve Response,” and “Multi Backup” must follow the company’s internal procedures.
BC 2.6.2
Customs Documents Module Guide
Module Location:
CEISA > Customs Documents > BC 2.6.2
The BC 2.6.2 form is used to manage notification documents for the re-entry of goods that were previously temporarily released from a Bonded Warehouse (TPB) to Another Location Within the Customs Territory (TLDDP) using the BC 2.6.1 form. This document is used to record the process of returning goods to the BW after they were previously temporarily released, for example, for subcontracting activities or other activities approved in accordance with customs regulations.
BC 2.6.2 is a document related to BC 2.6.1, which is the document for the temporary release of goods from a Bonded Warehouse with a guarantee. Through this menu, users can view a list of submissions, search for documents, check registration information, monitor the status of goods re-entry, update customs responses, and manage document data via the Edit page.
How to Access
- Log in to the CEISA Kokola application.
- Select the Customs Documents menu.
- Click the BC 2.6.2 submenu.
- The system displays the Document List page.
Page Display
The main page displays a list of BC 2.6.2 document submissions used for re-importing goods into a Temporary Storage Facility (TPB). Each row displays information such as document type, submission number, shipper, registration number, registration date, route, customs office, and document processing status. At the top, there are period filters, document management buttons, and a button to create a new submission.
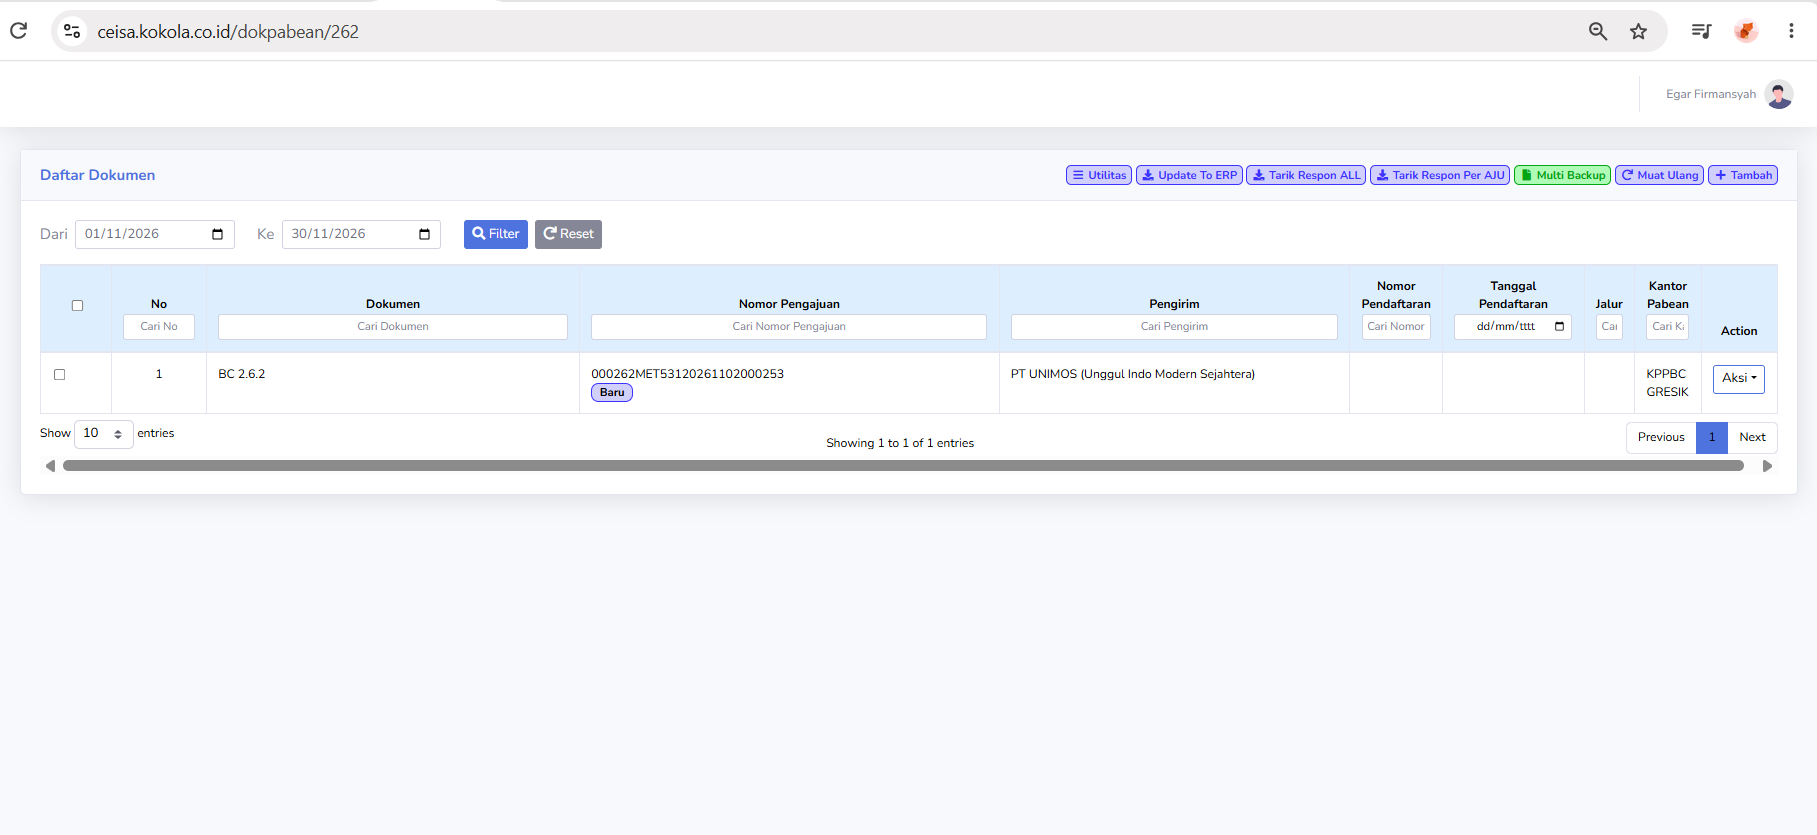
At the top, you’ll find a date range filter, document management buttons, and a button to create a new submission.
Column Descriptions
The available columns include:
-
Checkbox: Used to selected one or more documents when bulk actions are avsilable
-
No: Displays the document's sequential number in the list.
-
Document: Displays the type of customs documnet, namely BC 2.62.
-
Submission Number: Displays the AJU number as the document submission identifier
-
Sender: Display the name of the company or party sending the goods
-
Registration Number: Displays the document registration number issue through the customs process
-
Registration Date: Displays the date the document was registered
-
Channel: Displays the customs service or supervision channel indicator, if available.
-
Customs Office: Display the customs and excise office handling the document.
-
Action: Displays option for further action regarding the selected documents.
Additionally, a search field is available to help users find documents based on the application number, sender, or other information.
Button Descriptions
-
Filter: Displays documents based on teh seleted date range
-
Reset: restores the filter settings to their default state
-
Utilies: Opens a menu of additional fuctions for documen management
-
Update To ERP: Used to update or synchronize document data with the company's ERP system
-
Retrieve ALL Responses: Used to retrieve or update customs responses for a number of documents.
-
Retrieve Response by AJU: Use to retrieve responses baes on a spesific submissin name
-
Multi Backup: Used to back up multiple document at once
-
Reload: Refreshes the document list view
-
Add: Used to create a new BC. 2.6.2 documents submission
-
Action: Opens a menu of action for the selected document
Status and Path Explanation
In the Application Number column, there is an indicator showing the document processing stage. The status shown in the screenshot is:
Other statuses that may be related to the process of submitting and re-entering goods include:
-
Gate In TPB: Related to the recording of goods entry activities through the TPB gate
-
Data Receipt: Relates to the system;s receipt of document data
-
PUSH: An application indicator believed to be related to the data transmission or synchronization process.
In the “Route” column, the system may display indicators for customs service routes, such as the Green Lane or Red Lane, once the route assignment is available.
Note: In the screenshot, the document still has a “New” status, while the Registration Number, Registration Date, and Lane fields are not yet filled in. This indicates that this information is not yet available in the list. The actual status should be verified through the details or an official response from CEISA.
Table Navigation Explanation
The following features are available at the bottom of the page:
-
Show Entries: Sets the number of documents displayed on each page
-
Previous: Go to the previous list page
-
Next: Go to the next list page
-
Showing Entries: Displays the number of documents currently shown and the total number of documents.
-
Scrollbar Horizontal: Scroll the table view to see columns that are not visible on the screen
Document Edit Page
When a user opens a document via the Actions > Edit menu, the system displays the BC 2.6.2 document details page. This page is used to view, complete, and update information regarding the return of goods that were previously temporarily removed from the TPB.
At the top of the Edit page, the following buttons are available:
-
Back: return to the previous page
-
Print: Print the BC 2.6.2 document
-
Validate: Check the completeness accuracyof the document data through the application.
-
Show History: Display the recorded history of changes or activities for the document
The Edit page consists of ten navigation tabs:
-
Header
-
Entity
-
Document
-
Carrier
-
Packaging & Container
-
Transaction
-
Goods
-
Guarantee
-
Levies
-
Statement
At the bottom of each tab, there is a “Previous” button to return to the previous tab and a “Next” button to proceed to the next tab.
Header Tab Explanation
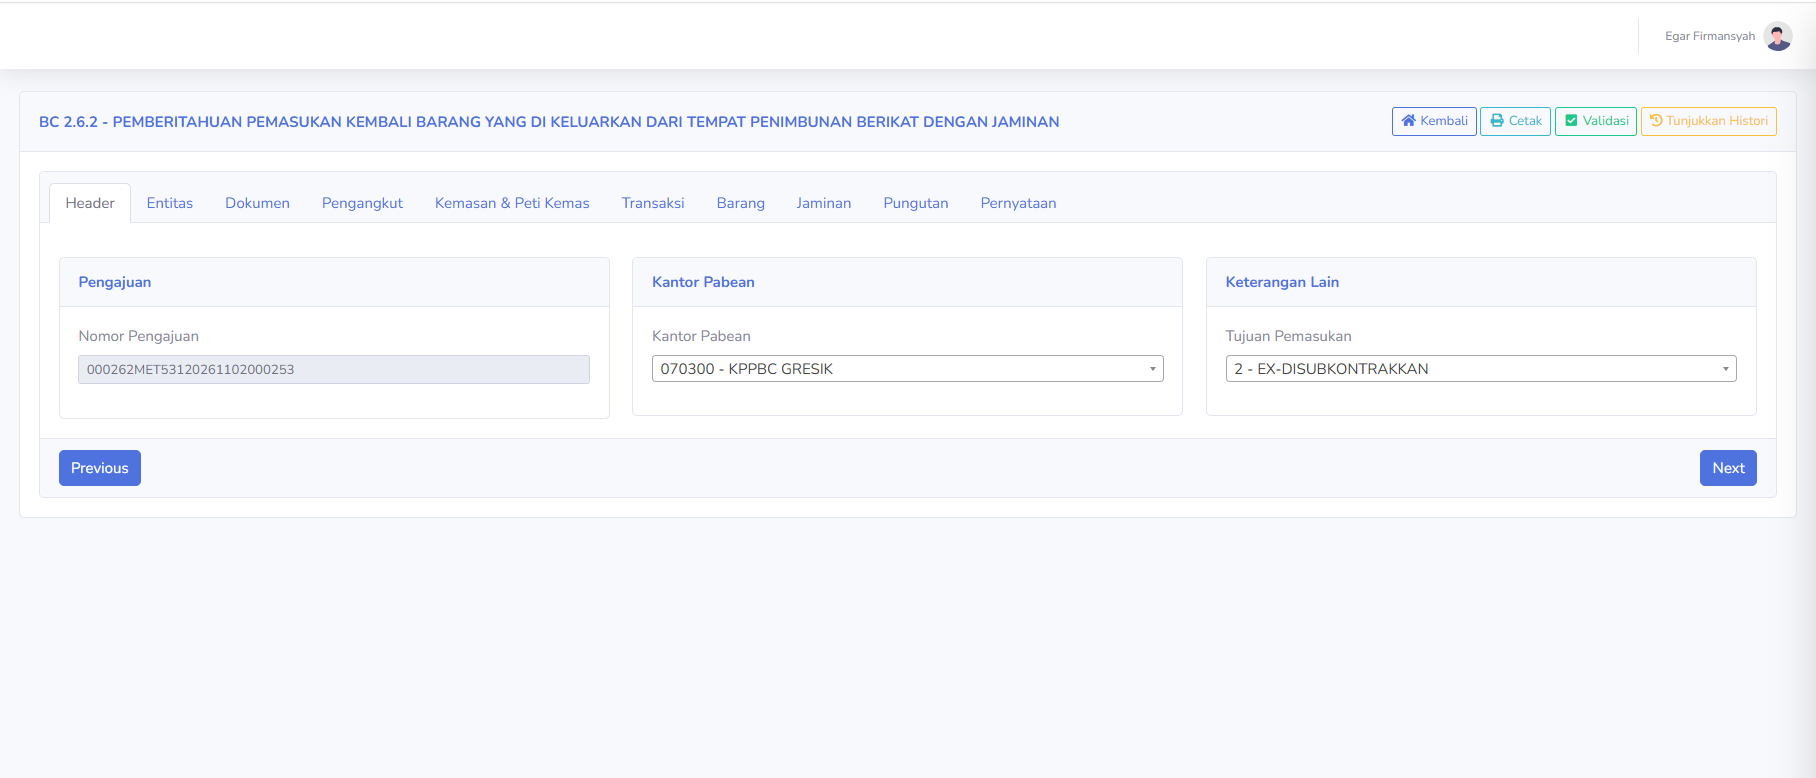
The Header tab is used to display and manage basic information about BC 2.6.2 document submissions. The available sections include:
Submission
-
Submission: Displays the identification number of the BC 2.6.2 document submission.
Customs Office
-
Customs Office: Displays the code and name of the customs office handling the document.
Additional Information
-
Purpose of Re-entry: Displays the purpose of re-entering goods into the TPB
In the screenshot, the selected purpose of re-entry is:
2 - EX-DISUBKONTRAKKAN
This selection indicates that the re-entered goods are related to subcontracting activities previously conducted outside the TPB.
This tab is used to ensure that the declaration information, customs office, and purpose of re-entry are consistent with the transaction document.
Entity Tab Description
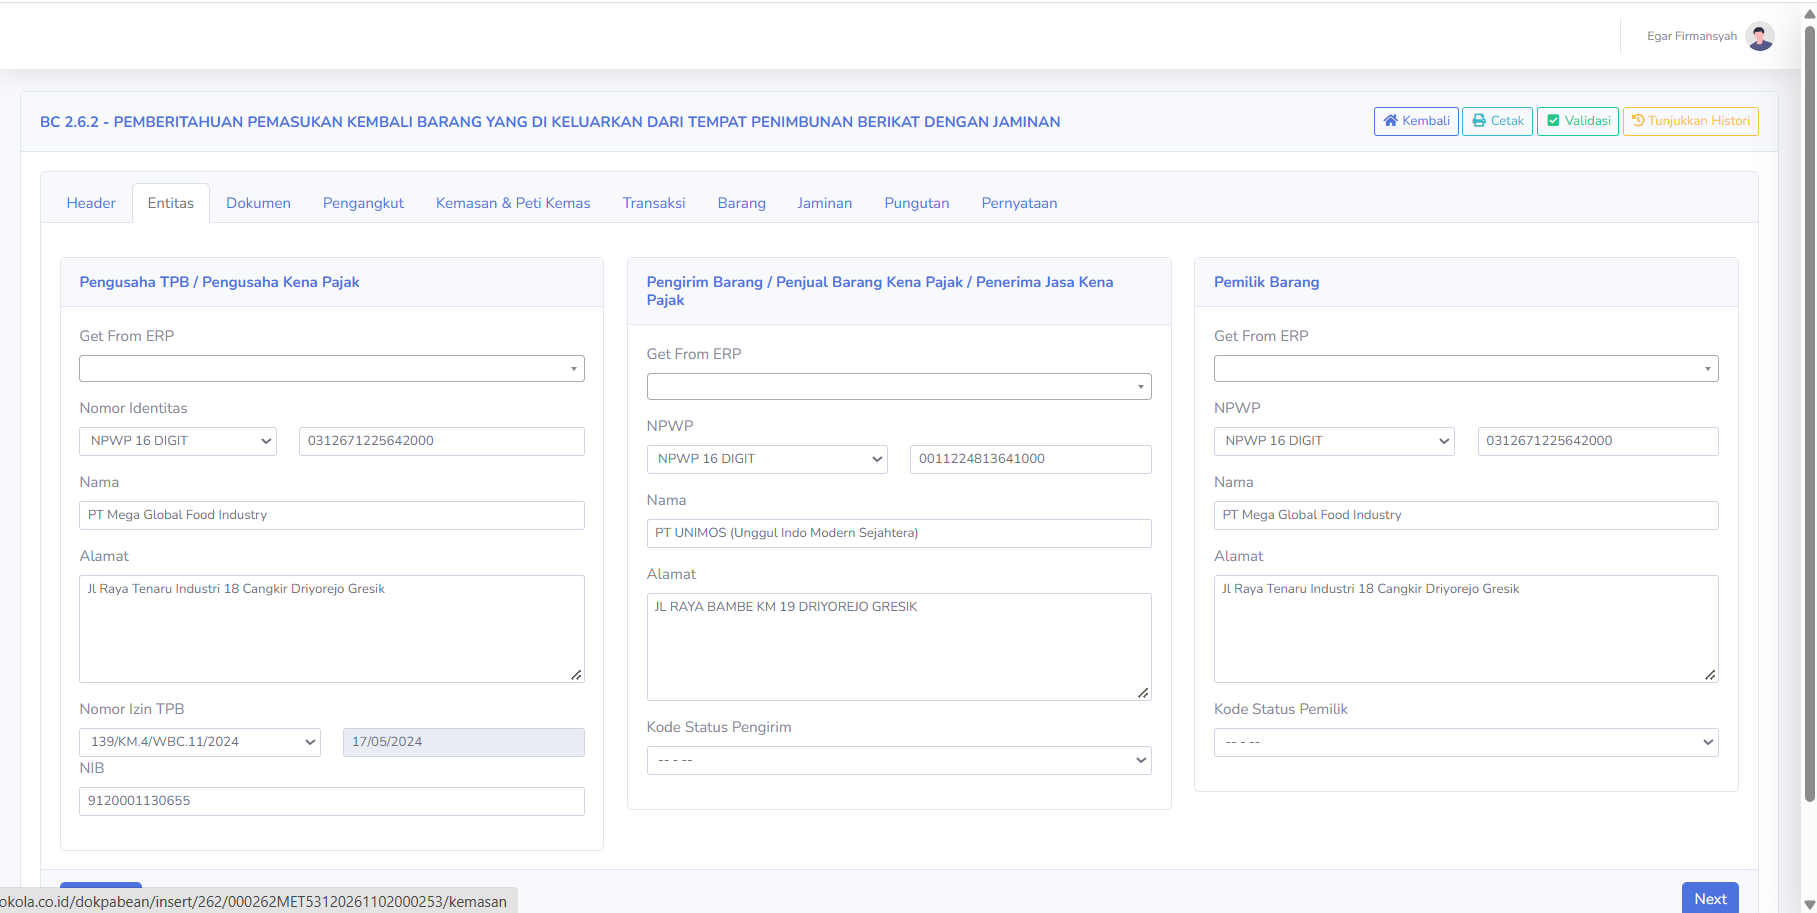
The Entity tab is used to enter and manage the identities of the parties involved in the process of re-importing goods into the TPB. There are three main sections:
TPB Operator / Taxable Business Entity
-
Get From ERP: Retrieves or selects company data from the ERP system
-
Identification Number: Displays the type and number of the company's identification, such as the NPWP.
-
Name: Displays the name of the TPB operator's company
-
Address: Displays the company's address
-
TPB Lincese Number: Displays the TPB facility license number.
-
Lincese Date: Displays the TPB license date.
-
NIB: Displays the business identification number (NIB)
Shipper / Seller of Taxable Goods / Recipient of Taxable Services
-
Get From ERP: Retrieve or select shipper data from the ERP system
-
NPWP: Displays the sender's Taxpayer Identifiction Number
-
Name: Dispalys the name of the comapny or the sender of the goods
-
Address: Displays the sender's address
-
Sender status Code: Displays the sender's status code options according to the application's reference.
Owner of the Goods
-
Get From ERP: retrieves the owner's information from the ERP system.
-
NPWP: Displays the owner's Tax ID Number.
-
Name: Displays the name of the company or party owning the goods.
-
Address: Displays the owner's address.
-
Owner status code: Displays a selection of owner status codes based on the application's reference
This tab is used to ensure that the identities of the TPB Operator, Shipper, and Owner of Goods match the submission data and supporting documents.
Document Tab Description
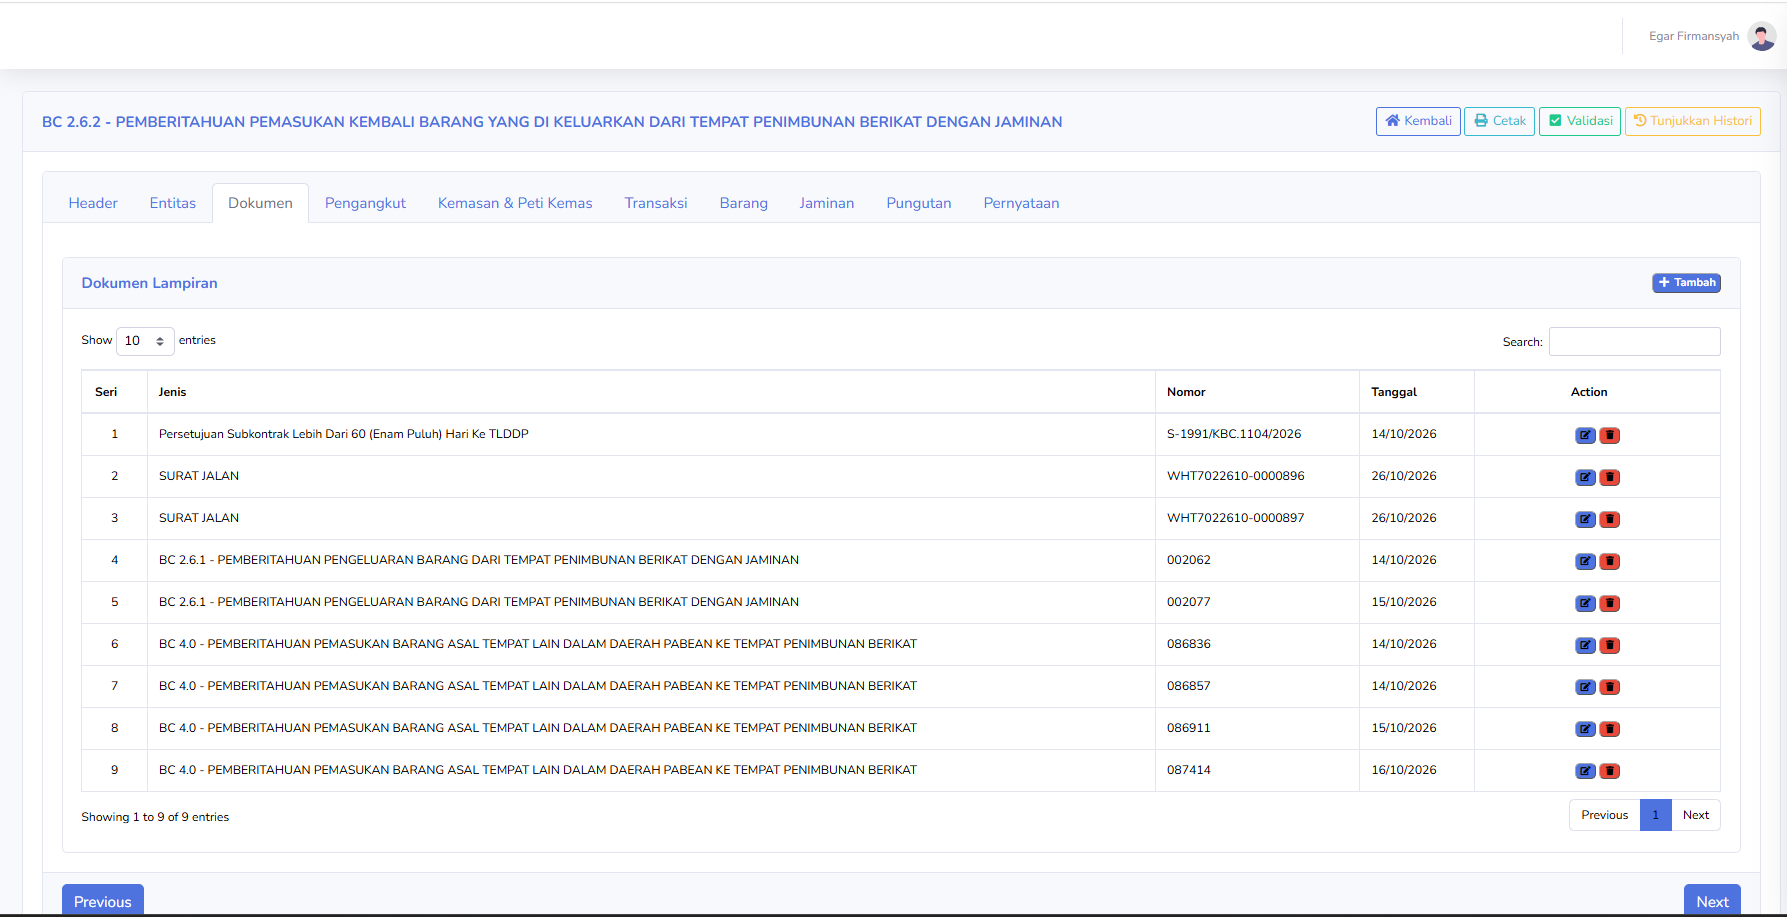
The Document tab is used to manage supporting documents for the process of returning goods to the TPB. The columns available in the table include:
-
Series: Displays the sequential number of the supporting document
-
Type: Display the type of supporting document.
-
Number: Displays the document identification number.
-
Date: Display the document's issuance date.
-
Action: Displays icons for editing or deleting document data
Examples of documents shown in the screenshot:
-
Approval of Subcontracts Exceeding 60 (Sixty) Days to TLDDP: An approval document related to subcontarcting activities.
-
Waybill: Supporting document for the transportation or shipment of goods.
-
BC 2.6.1: Document for the temporary release of goods from the TPB with a guarantee.
-
BC 4.0: Notification document for the entry of goods originating from the TLDDP into the TPB, listed as a reference.
-
Add: Add a new attached document
-
Edit: Modifies attachment data.
-
Delete: Deletes the selected attached document.
-
Search: Searches for the documents by keywords
-
Show Entries: Sets the number of documents displayed.
-
Previous / Next: Navigate between pages of the attchment list.
The screenshot shows nine recorded attached documents.
Note: Document BC 2.6.1 is an important reference for the return of goods that were previously temporarily released. Ensure that the application number, registration number, and details of the returned goods match those in the previous release document.
Carriage Tab Description
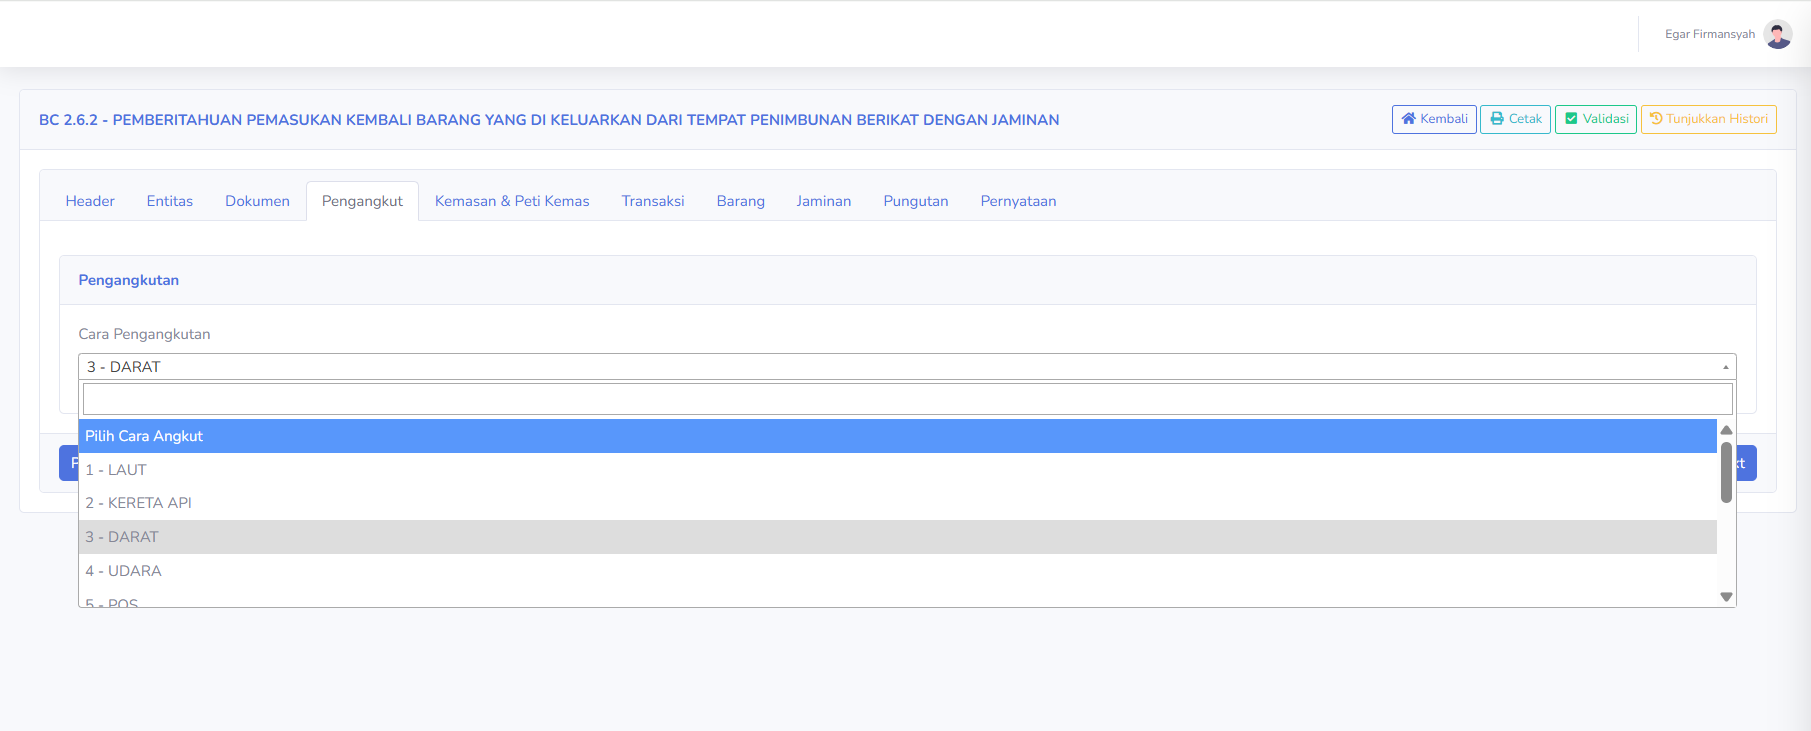
The Carriage tab is used to specify the method of transporting goods that are returned to the TPB. The available sections include:
Transportation Method
Displays options for the mode or method of transporting goods.
Some of the options displayed include:
-
1 - SEA: Transportation via SEA
-
2 - RAIL: Transportation via RAIL
-
3 - LAND: Transportation via LAND
-
4 - AIR: Transportation via AIR
-
5 - MAIL: Transportation via portal service.
In the screenshot, the selected mode of transportation is 3 - LAND.
Users must select the mode of transportation based on the means used in the process of re-importing the goods.
Explanation of the Packaging & Container Tab
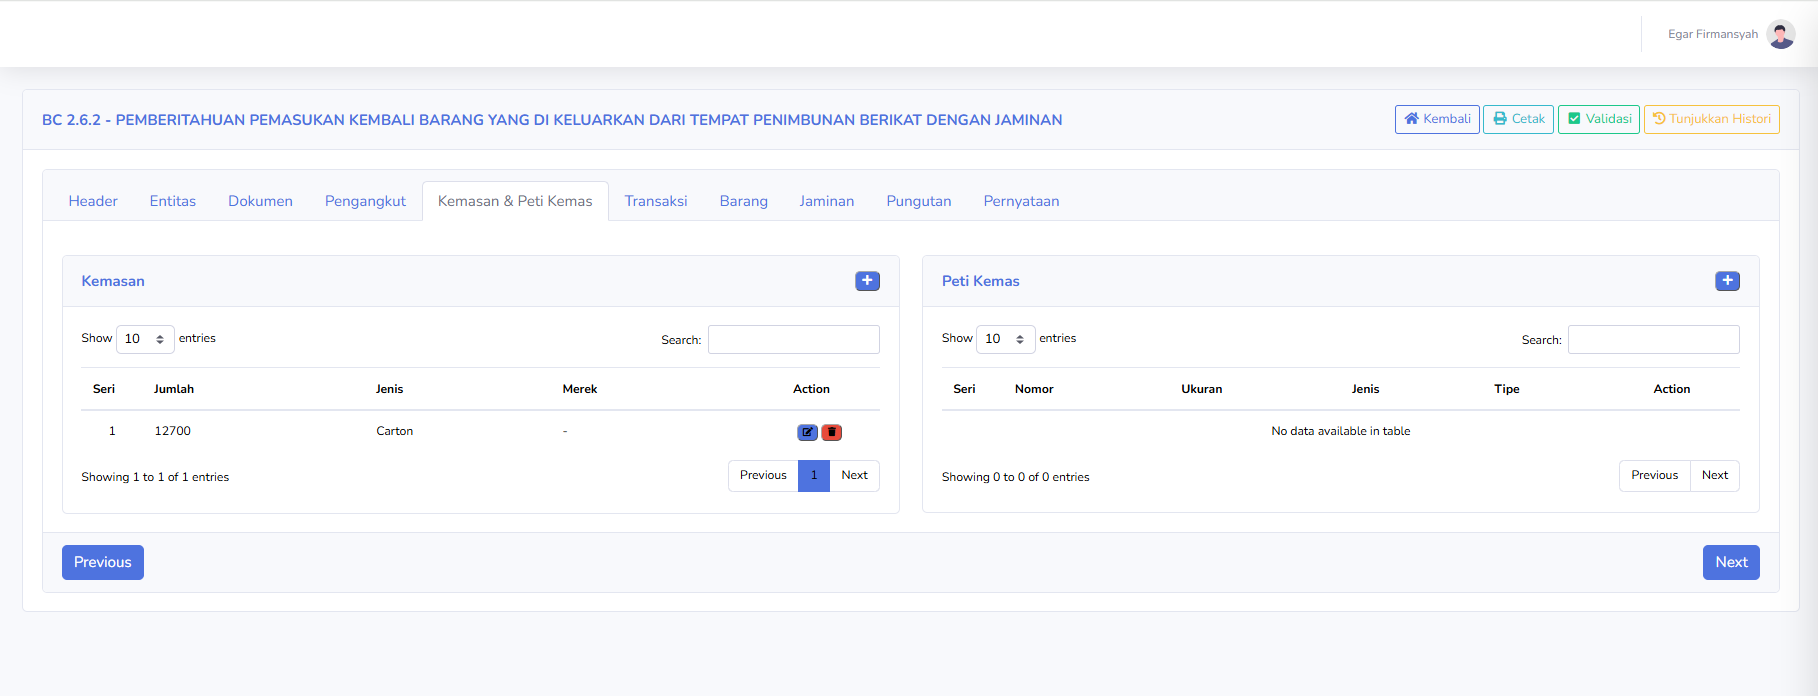
The Packaging & Container tab is used to record packaging and container information related to goods being returned to the TPB. There are two main sections:
Packaging
-
Series: Displays the sequential number of the package
-
Quantity: Displays the number of packages of goods
-
Type: Displays the packaging type.
-
Brand: Displays the brand or packaging label, if available.
-
Action: Displays options to edit or delete packaging data.
The screenshot shows an example of the data:
-
Quantity: 12.700
-
Type: Carton
Container
-
Series: Displays the container's serial number.
-
Number: Displays the shipping container's identification number.
-
Size: Displays the shipping of container's dimensions
-
Type: Displays the shipping container type.
-
Type: Displays the packaging type.
-
Action: Displays options to edit or delete packaging data.
In the screenshot, the Packaging table displays the message “No data available in table,” which means there is no packaging data recorded in that document yet.
Transaction Tab Description
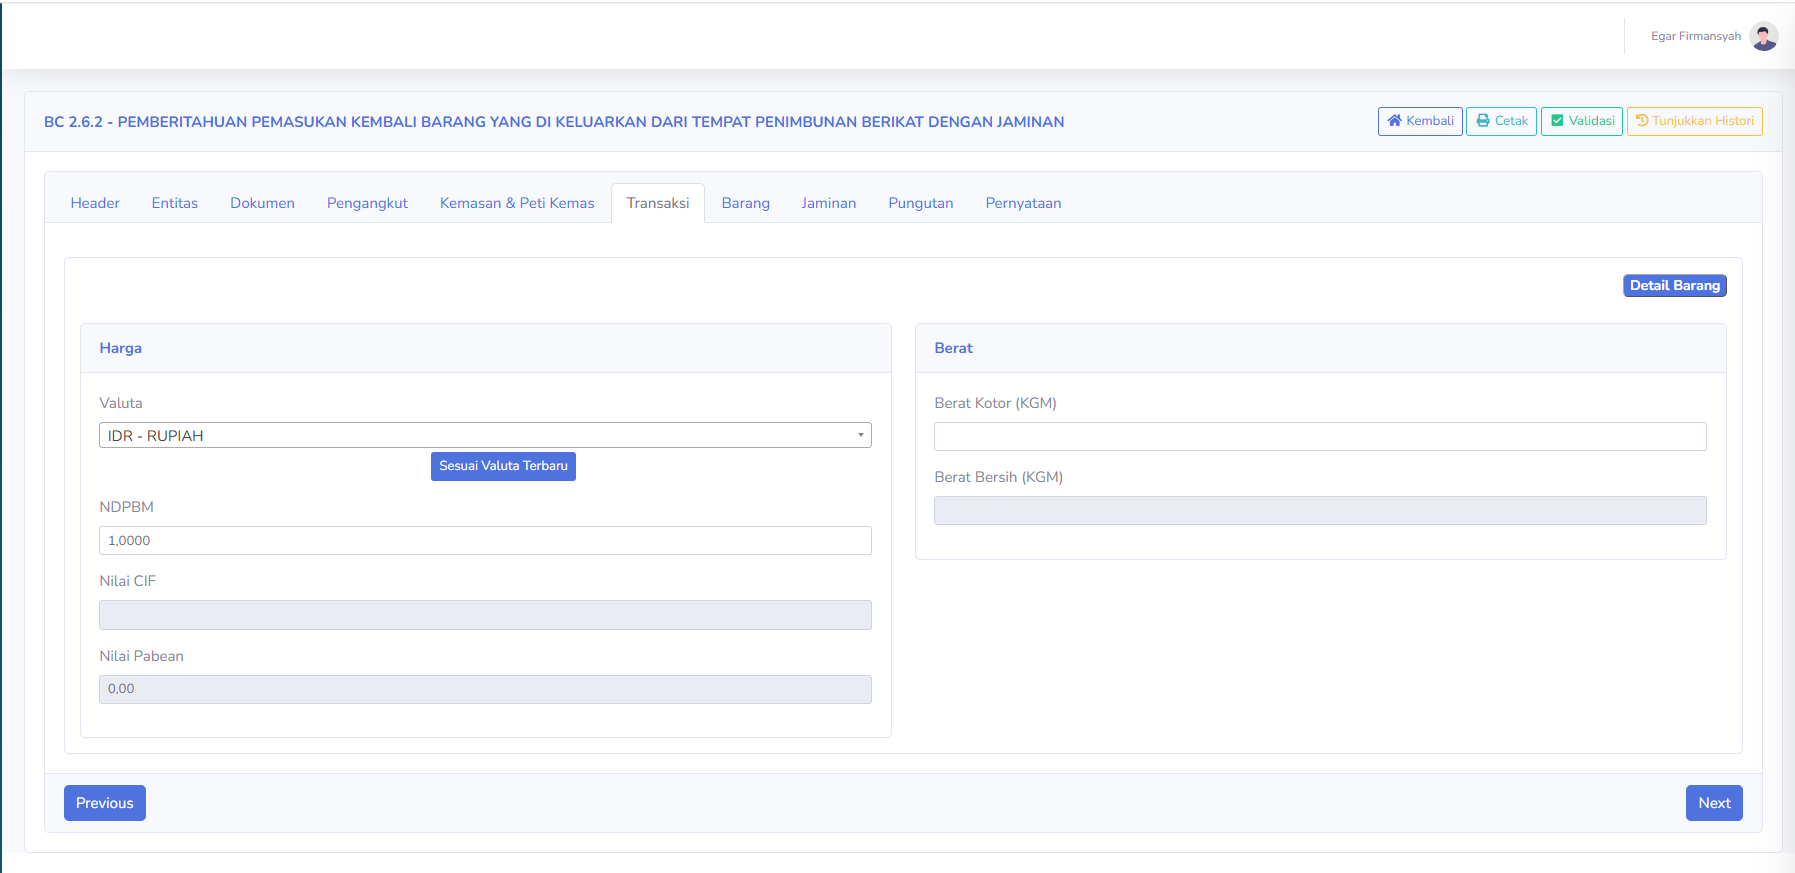
The Transaction tab is used to display and manage information regarding transaction values and the weight of goods re-entered into the TPB. There are two main sections:
Price
-
Currency: Displays the currency used in the transaction, for example IDR-Rupiah.
-
NDPBM: Displays the base value for Import Duty Calculation.
-
CIF Value: Displays the value of the goods based on the Cost, Insurance, and Freight components, if applicable.
-
Customs Value: Displays the value used for customs purpose in accordance with regulations.
-
Update to Latest Currency Rate: Used to update or adjust the currency value based on references avaible in application.
Weight
-
Gross Weight (KGM): Displays the weight of the goods, including packaging, as calculated.
-
Net Weight (KGM): Displays the weight of the goods without packaging.
Additionally, the following button is available:
-
Detail Items: Opens the item details associated with the document
Users must ensure that the transaction value and the weight of the goods match the supporting documents.
Item Tab Description
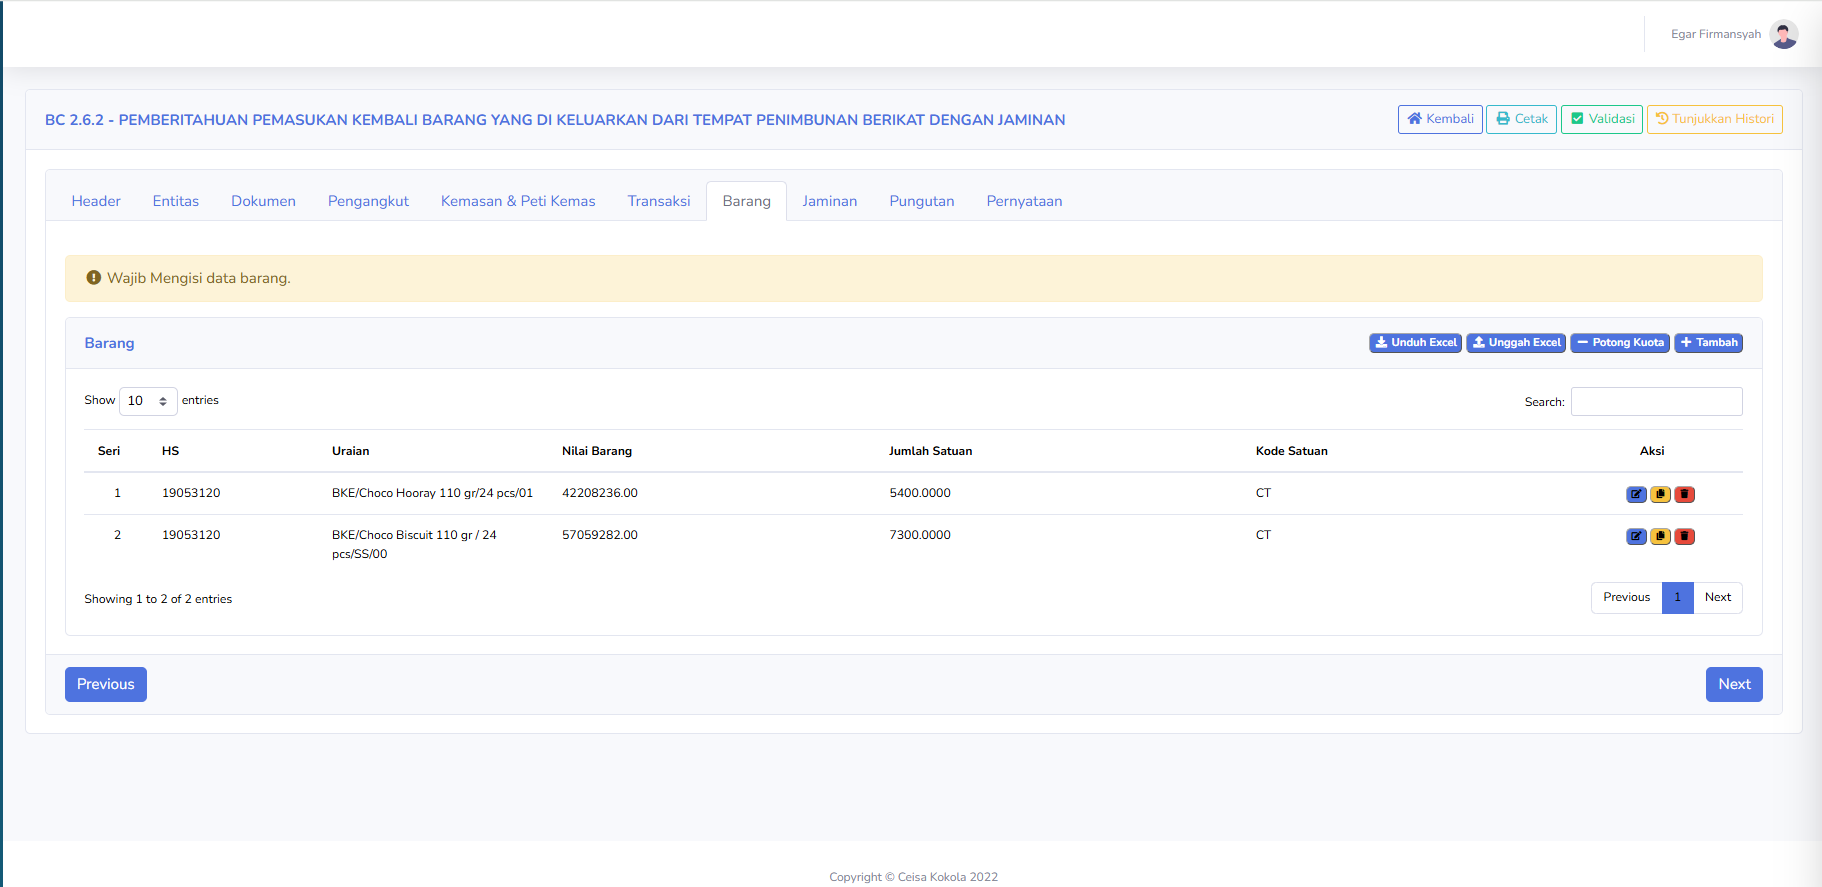
The Item tab is used to manage the list of items re-entered into the TPB. The available columns include:
-
Series: Dsiplays the item's serial number.
-
HS: Displays the Harmonized system code as the item's classification.
-
Description: Displays the name, Type, or description of the item.
-
Item Value: Menampilkan nilai setiap barang. Display the value of each item.
-
Quantity: Displays the quantity of items based on the unit od measure used.
-
Unit Code: Menampilkan kode satuan barang. Display the unit code for the item
-
Action: Display action options such as editing, copying, or deleting item data based on the application icons.
-
Download Excel: Download the data or excel format provided bythe app.
-
Upload Excel: Uploads product data via an excel file.
-
Quota Deduction: Runs features related to qouta management aacording to the system.
-
Add: Add a new product data.
Pada screenshot terlihat dua baris barang dengan kode HS yang sama, tetapi uraian dan jumlah satuannya berbeda.
Pada bagian atas juga terdapat notifikasi:
Wajib Mengisi data barang.
Notifikasi tersebut mengingatkan pengguna agar memastikan rincian barang telah diisi dengan lengkap dan sesuai.
Pengguna perlu mencocokkan uraian, jumlah, nilai, serta referensi barang dengan dokumen BC 2.6.1 yang digunakan saat pengeluaran sementara.
Penjelasan Tab Jaminan
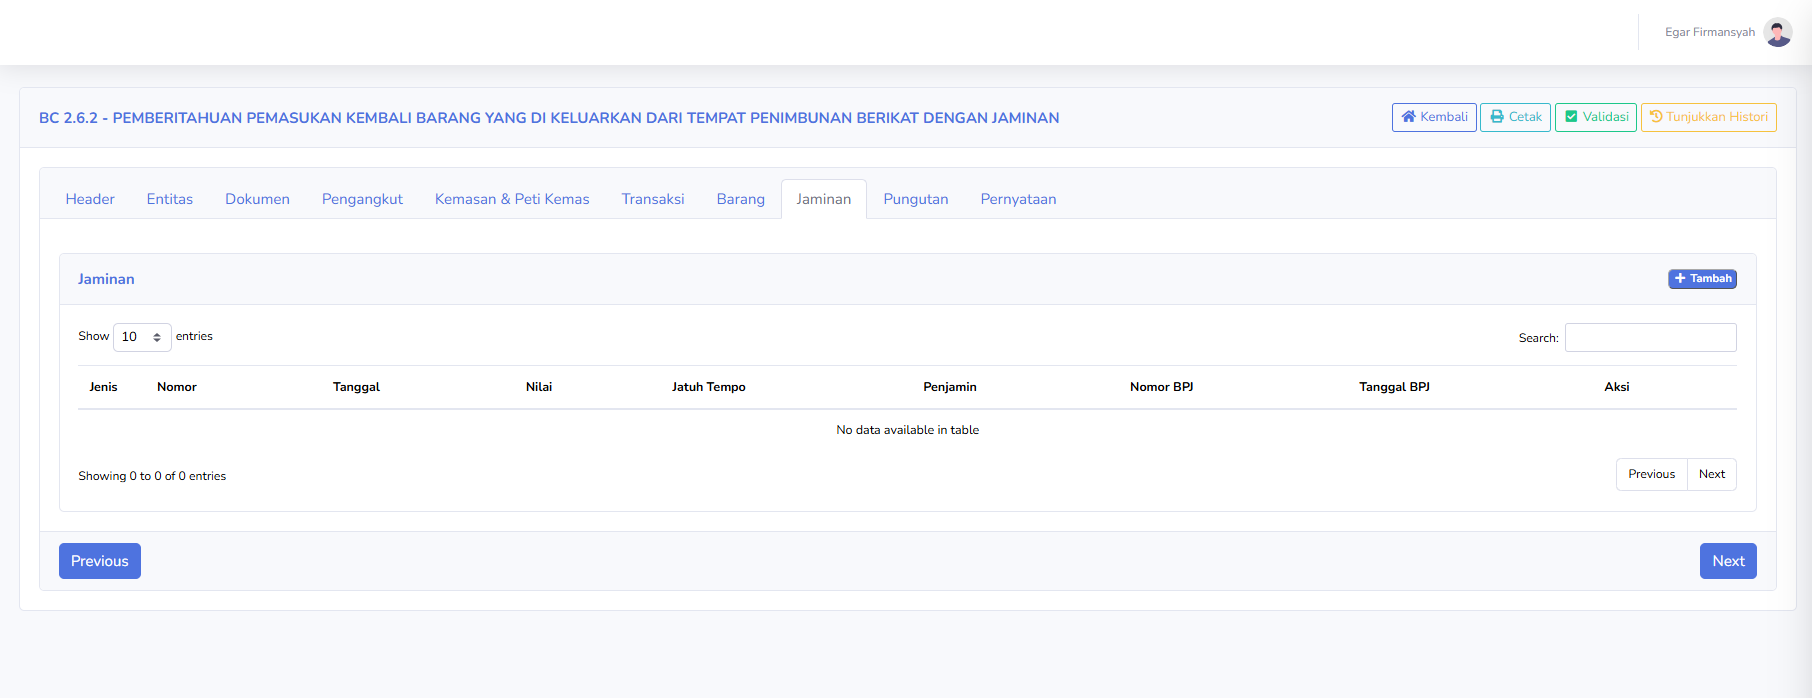
Tab Jaminan digunakan untuk mencatat informasi jaminan yang berkaitan dengan proses pemasukan kembali barang eks pengeluaran sementara. Kolom yang tersedia meliputi:
-
Jenis: Menampilkan jenis jaminan yang digunakan.
-
Nomor: Menampilkan nomor dokumen jaminan.
-
Tanggal: Menampilkan tanggal dokumen jaminan.
-
Nilai: Menampilkan nominal jaminan.
-
Jatuh Tempo: Menampilkan batas waktu berlaku atau jatuh tempo jaminan.
-
Penjamin: Menampilkan pihak yang memberikan jaminan.
-
Nomor BPJ: Menampilkan nomor Bukti Penerimaan Jaminan.
-
Tanggal BPJ: Menampilkan tanggal Bukti Penerimaan Jaminan.
-
Aksi: Menampilkan pilihan tindakan terhadap data jaminan.
Tombol yang tersedia:
-
Tambah: Menambahkan data jaminan baru.
Pada screenshot, tabel Jaminan masih kosong dan menampilkan keterangan No data available in table.
Tab ini membantu pengguna mengelola informasi jaminan yang terkait dengan dokumen pemasukan kembali barang.
Penjelasan Tab Pungutan
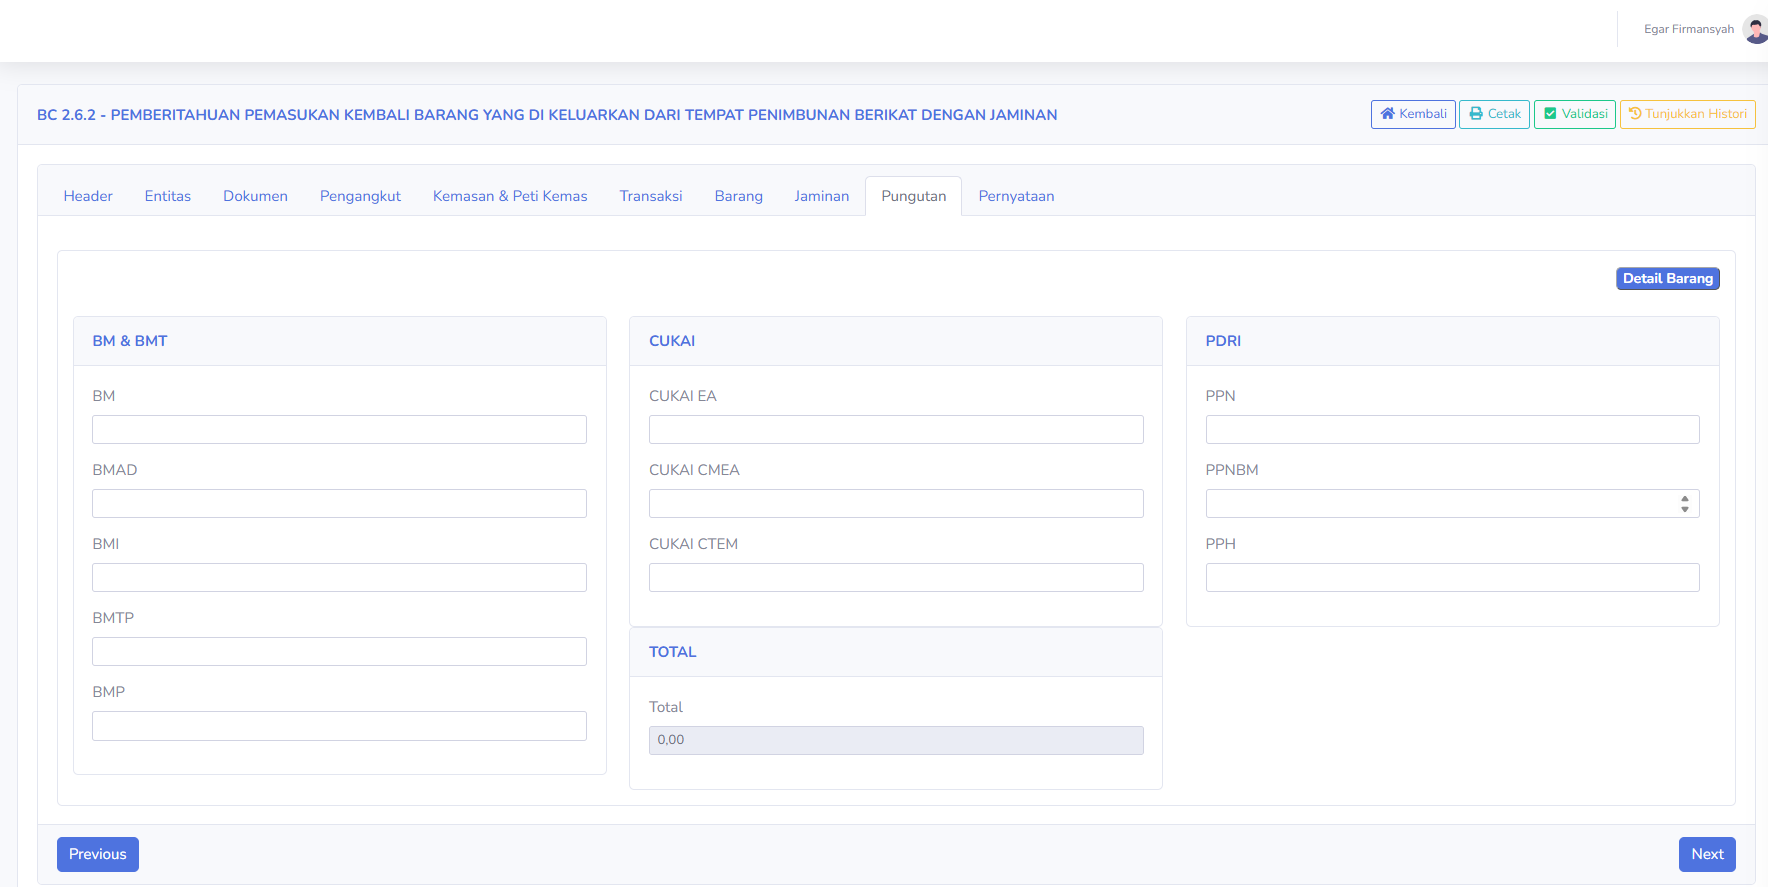
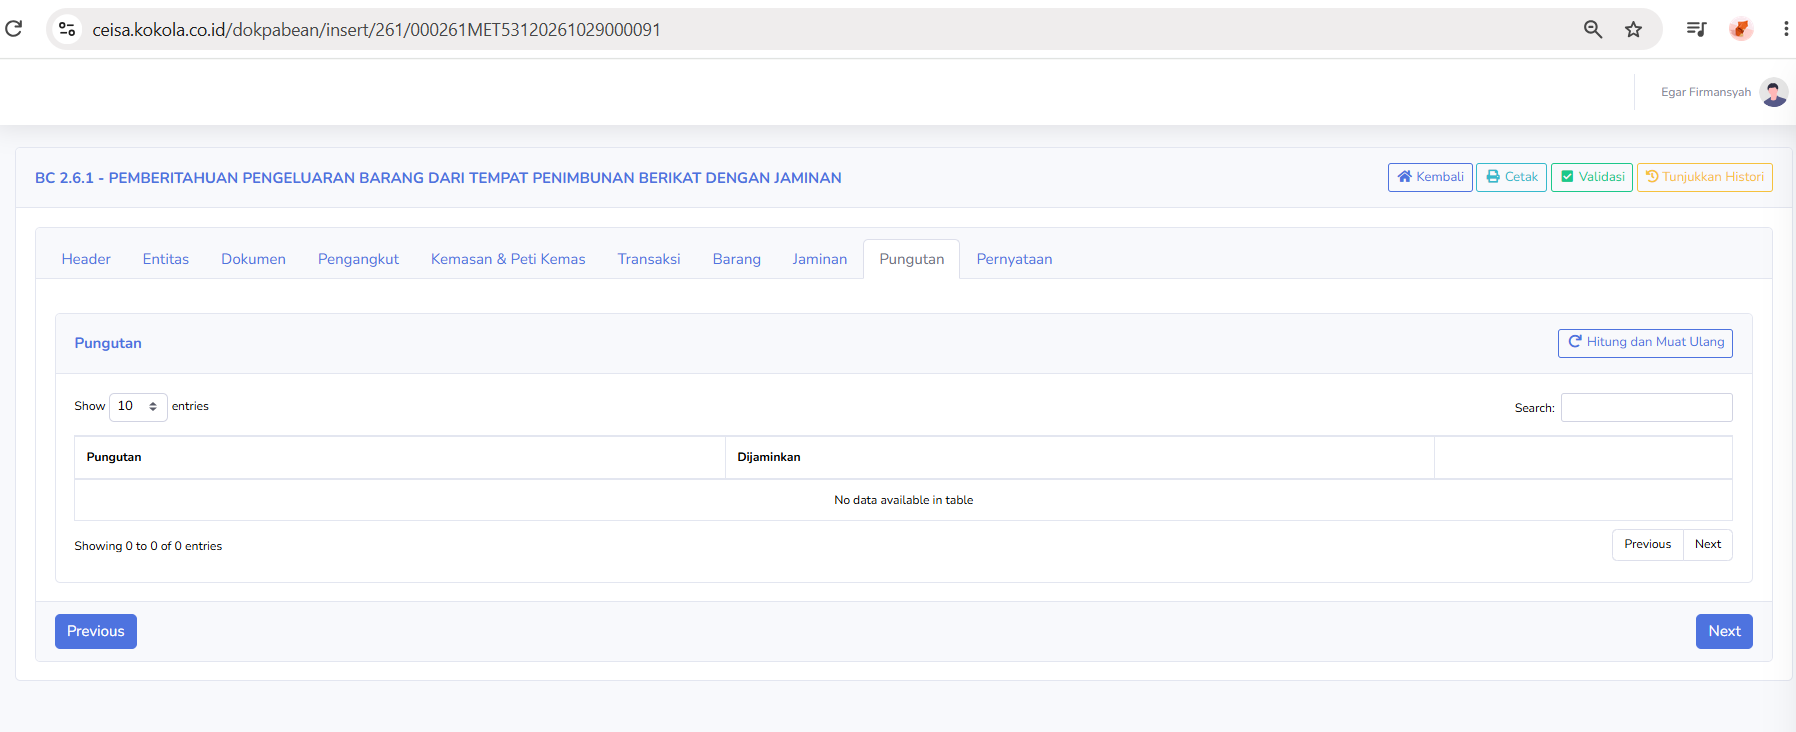
Tab Pungutan digunakan untuk menampilkan informasi komponen pungutan kepabeanan dan perpajakan yang berkaitan dengan dokumen BC 2.6.2. Bagian yang tersedia meliputi:
BM & BMT
-
BM: Bea Masuk.
-
BMAD: Bea Masuk Anti-Dumping.
-
BMI: Bea Masuk Imbalan.
-
BMTP: Bea Masuk Tindakan Pengamanan.
-
BMP: Bea Masuk Pembalasan.
CUKAI
-
Cukai EA: Komponen cukai etil alkohol.
-
Cukai CMEA: Komponen cukai minuman mengandung etil alkohol.
-
Cukai CTEM: Komponen cukai hasil tembakau.
PDRI
-
PPN: Pajak Pertambahan Nilai.
-
PPnBM: Pajak Penjualan atas Barang Mewah.
-
PPh: Pajak Penghasilan yang berkaitan dengan kegiatan impor apabila berlaku.
TOTAL
-
Total: Menampilkan jumlah hasil perhitungan komponen pungutan.
Selain itu, tersedia tombol Detail Barang untuk melihat informasi rincian barang.
Pada screenshot, nilai Total yang ditampilkan adalah 0,00. Nilai tersebut perlu diperiksa kembali berdasarkan status pengisian, perhitungan, dan ketentuan dokumen.
Penjelasan Tab Pernyataan
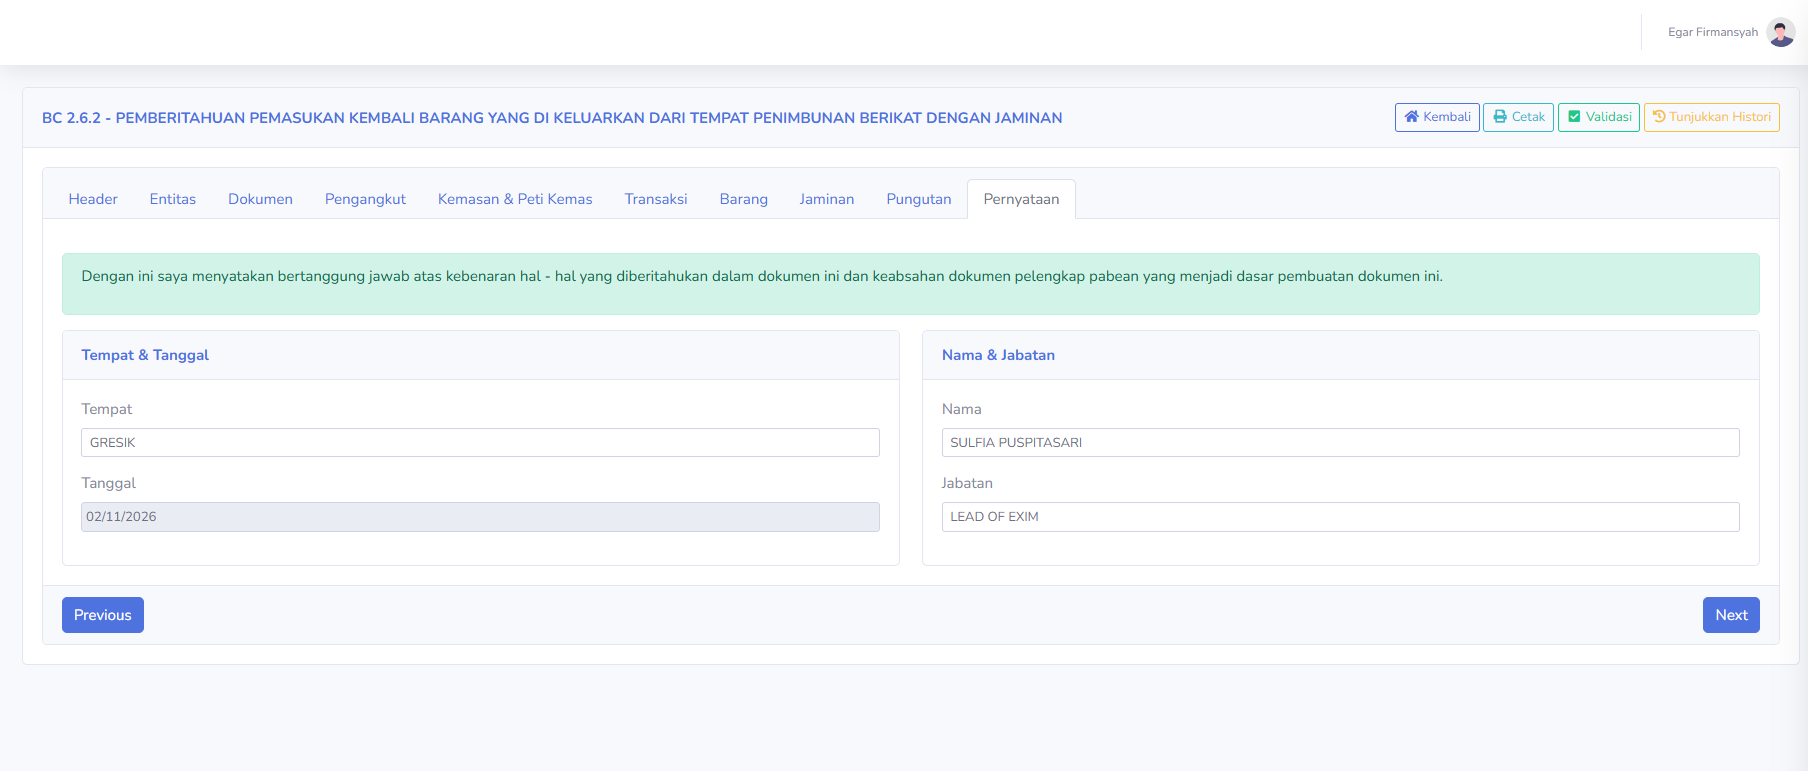
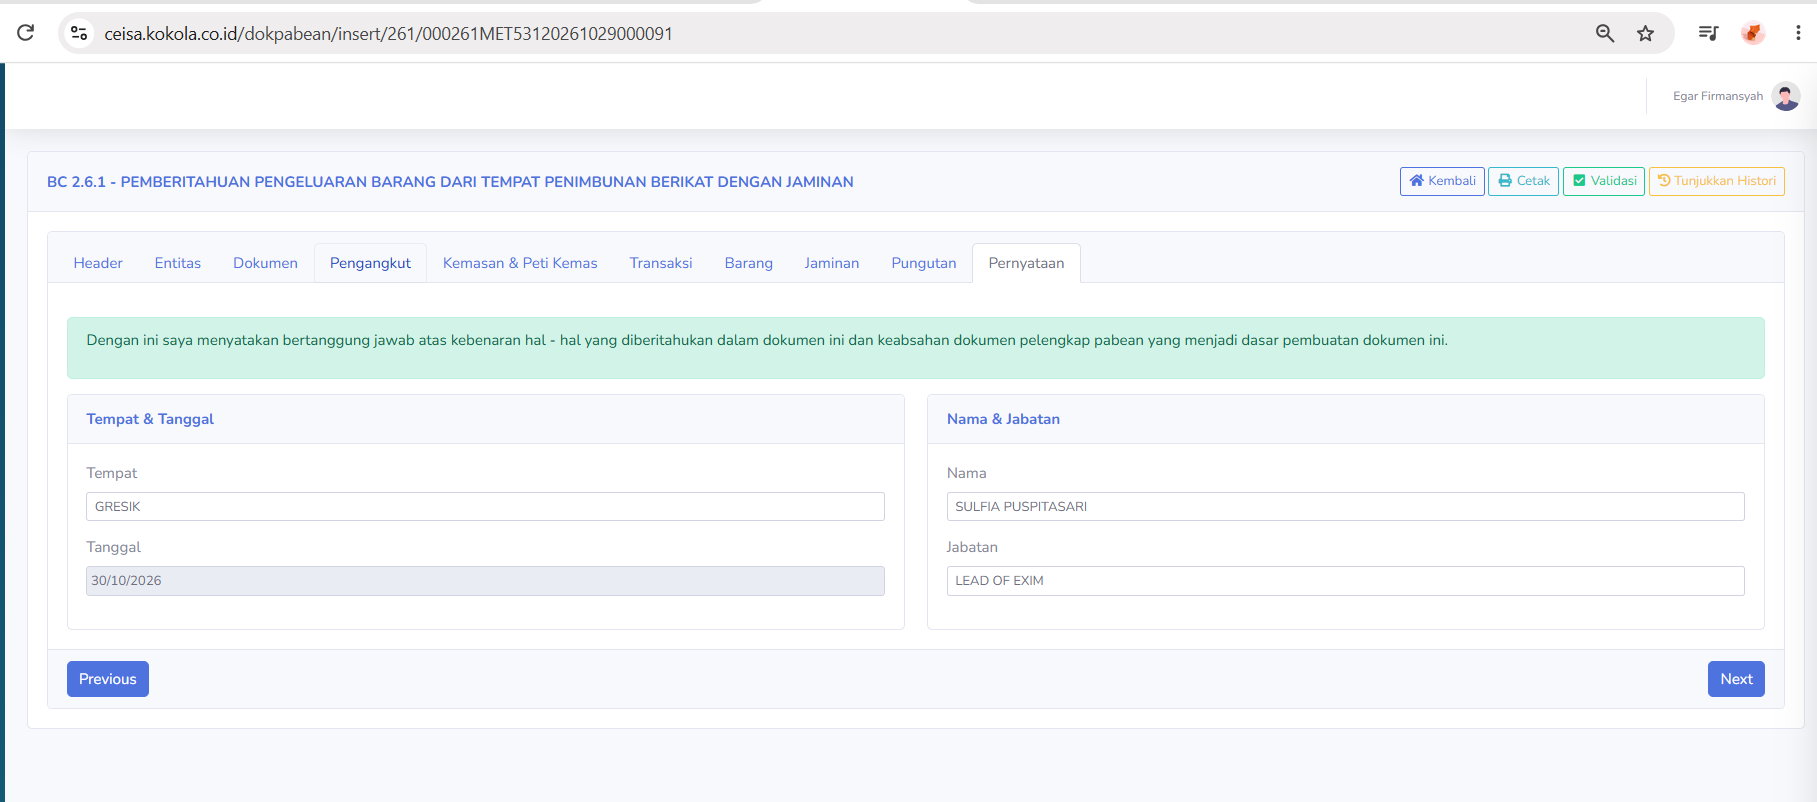
Tab Pernyataan digunakan untuk melengkapi informasi penanggung jawab dokumen BC 2.6.2. Pada bagian atas terdapat pernyataan tanggung jawab atas kebenaran data yang diberitahukan dan keabsahan dokumen pelengkap pabean.
Bagian yang tersedia meliputi:
Tempat & Tanggal
-
Tempat: Menampilkan lokasi pembuatan atau penandatanganan pernyataan.
-
Tanggal: Menampilkan tanggal pernyataan dokumen.
Nama & Jabatan
-
Nama: Menampilkan nama penanggung jawab dokumen.
-
Jabatan: Menampilkan jabatan penanggung jawab dalam perusahaan.
Pengguna perlu memastikan bahwa nama, jabatan, tempat, dan tanggal telah sesuai dengan data pihak yang berwenang.
Penjelasan Fitur Tunjukkan Histori
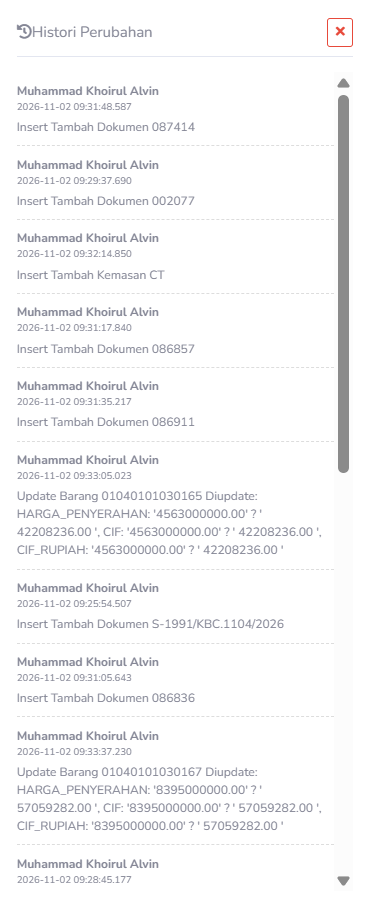
Fitur Tunjukkan Histori digunakan untuk menampilkan riwayat aktivitas atau perubahan data dokumen yang tercatat dalam sistem CEISA Kokola. Ketika tombol diklik, aplikasi menampilkan panel Histori Perubahan.
Informasi yang tersedia meliputi:
-
Nama Pengguna: Menampilkan pengguna yang melakukan aktivitas pada dokumen.
-
Tanggal dan Waktu: Menampilkan waktu aktivitas atau perubahan dilakukan.
-
Jenis Aktivitas: Menampilkan proses yang dilakukan, seperti penambahan dokumen, perubahan data barang, atau penambahan kemasan.
-
Detail Perubahan: Menampilkan informasi data yang ditambahkan atau diperbarui apabila dicatat oleh sistem.
Contoh aktivitas yang terlihat pada screenshot:
-
Insert Tambah Dokumen: Menunjukkan aktivitas penambahan dokumen lampiran.
-
Insert Tambah Kemasan: Menunjukkan aktivitas penambahan data kemasan.
-
Update Barang: Menunjukkan aktivitas perubahan informasi barang, termasuk nilai transaksi yang diperbarui.
Pada panel tersedia tombol X untuk menutup tampilan histori.
Fitur ini membantu pengguna melakukan penelusuran perubahan data, pemeriksaan aktivitas pengguna, dan pengecekan riwayat pengelolaan dokumen.
Catatan: Histori Perubahan pada aplikasi merupakan catatan aktivitas internal sistem. Tidak semua aktivitas yang tercatat di dalamnya merupakan respons resmi dari Bea Cukai.
Instructions for Use
Notes
- BC 2.6.2 is used for the re-entry of goods that were previously temporarily removed from the TPB.
- The BC 2.6.2 document is related to BC 2.6.1, which is used in the temporary removal process.
- Ensure that the BC 2.6.1 reference matches the goods being re-entered.
- Review the approval documents and supporting documents before submission.
- Use the Application Number to facilitate document retrieval.
- The Application Number and Registration Number serve different purposes.
- Ensure that the identities of the shipper, owner, and TPA operator are correct.
- Check the number of packages, item details, HS codes, value, and unit of measure.
- Ensure that the guarantee document has been included in accordance with transaction requirements.
- Any duty amounts that are left blank or show 0.00 must be checked before submission.
- Check the “Declaration” section to ensure the responsible party’s information is correct.
- The “New” status indicates that the document is in the initial stage based on the application indicators.
- Application validation does not automatically mean the document has received official approval from Customs.
- Ensure that a response from Customs has been received before concluding that the re-entry process is complete.
- Use the Change History feature to track document management activities.
- Use internal features such as “Update to ERP,” “Multi Backup,” and “Quota Deduction” in accordance with company procedures.
BC 2.7
Customs Documents Module Guide
Module Location:
CEISA > Customs Documents > BC 2.7
Page Display
The page displays a list of BC 2.7 submissions.

Column Descriptions
|
Submission Number |
Identification number for the transfer process. |
|
Sender |
Bonded Warehouse (TPB) or originating party. |
|
Recipient |
Bonded Warehouse (TPB) or destination party |
| Registration Number | Document registration number. |
| Registration Date | Date of the registration process. |
| Customs Office | Office overseeing the process. |
| Action | Action option. |
Usage Steps
- Specify the period.
- Search for documents.
- Check the status.
- Retrieve the response.
- Ensure the destination data is correct.
- Check the registration number.
- Perform the necessary actions.
BC 2.7 INBOUND
Customs Documents Module Guide
Module Location:
CEISA > Customs Documents > BC 2.7 INBOUND
The BC 2.7 Inbound menu is used to monitor the receipt/inbound of goods resulting from transfers between TPBs. This aligns with the nature of BC 2.7, which can be used for both inbound and outbound movements between TPBs.
Page Display
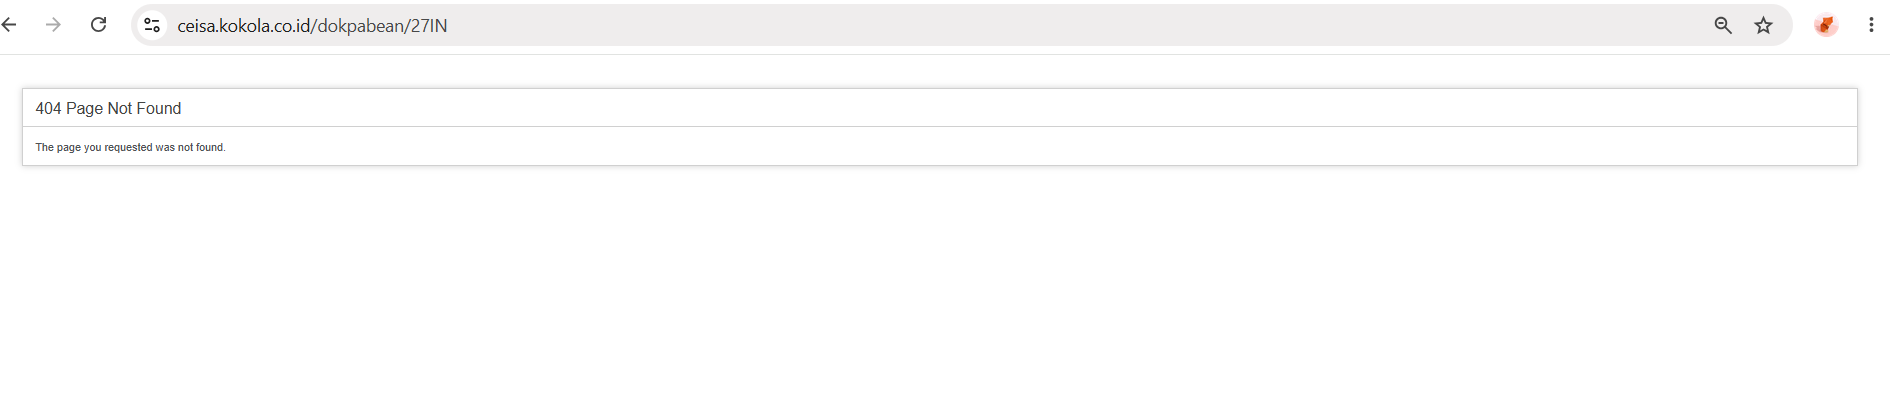
If the page is available, the system will display the BC 2.7 document from the receiving side. In your screenshot, one of the addresses related to the inbound movement shows a 404 Page Not Found error.
Usage Steps
Note
If the page displays a 404 error, the issue must be investigated by the application management team.
BC 2.8
Customs Documents Module Guide
Module Location:
CEISA > Customs Documents > BC 2.8
Page Display
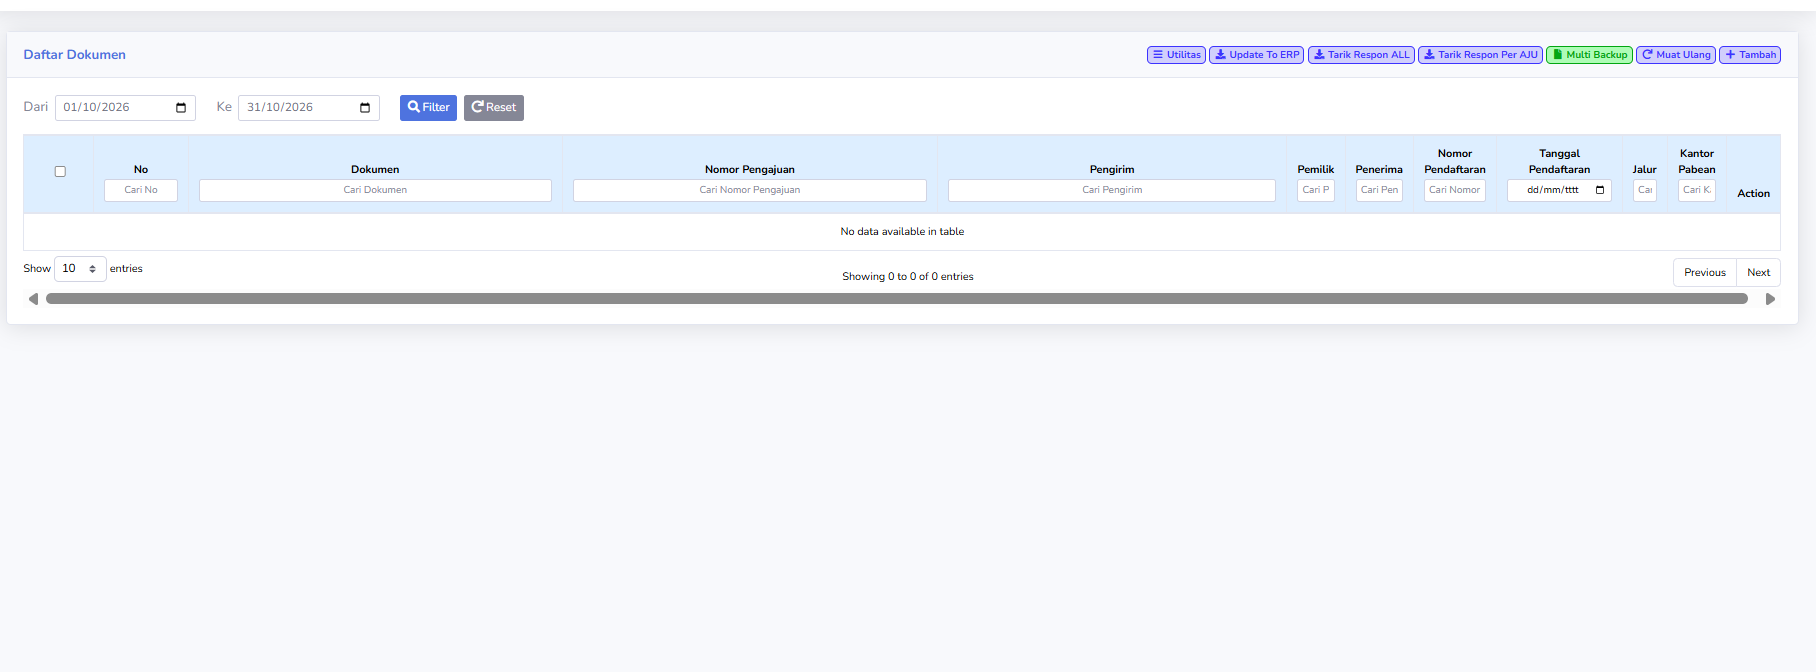
The page displays a list of BC 2.8 submissions if data is available.
Column Descriptions
Generally includes:
- Submission Number
- Sender
- Owner
- Recipient
- Registration Number
- Registration Date
- Route
- Customs Office
- Action
Usage Steps
- Select a date range.
- Click Filter.
- Search for an application.
- Check the status.
- Retrieve the response.
- Check the registration number and date.
- Take action if necessary.
BC 3.0
Customs Documents Module Guide
Module Location:
CEISA > Customs Documents > BC 3.0
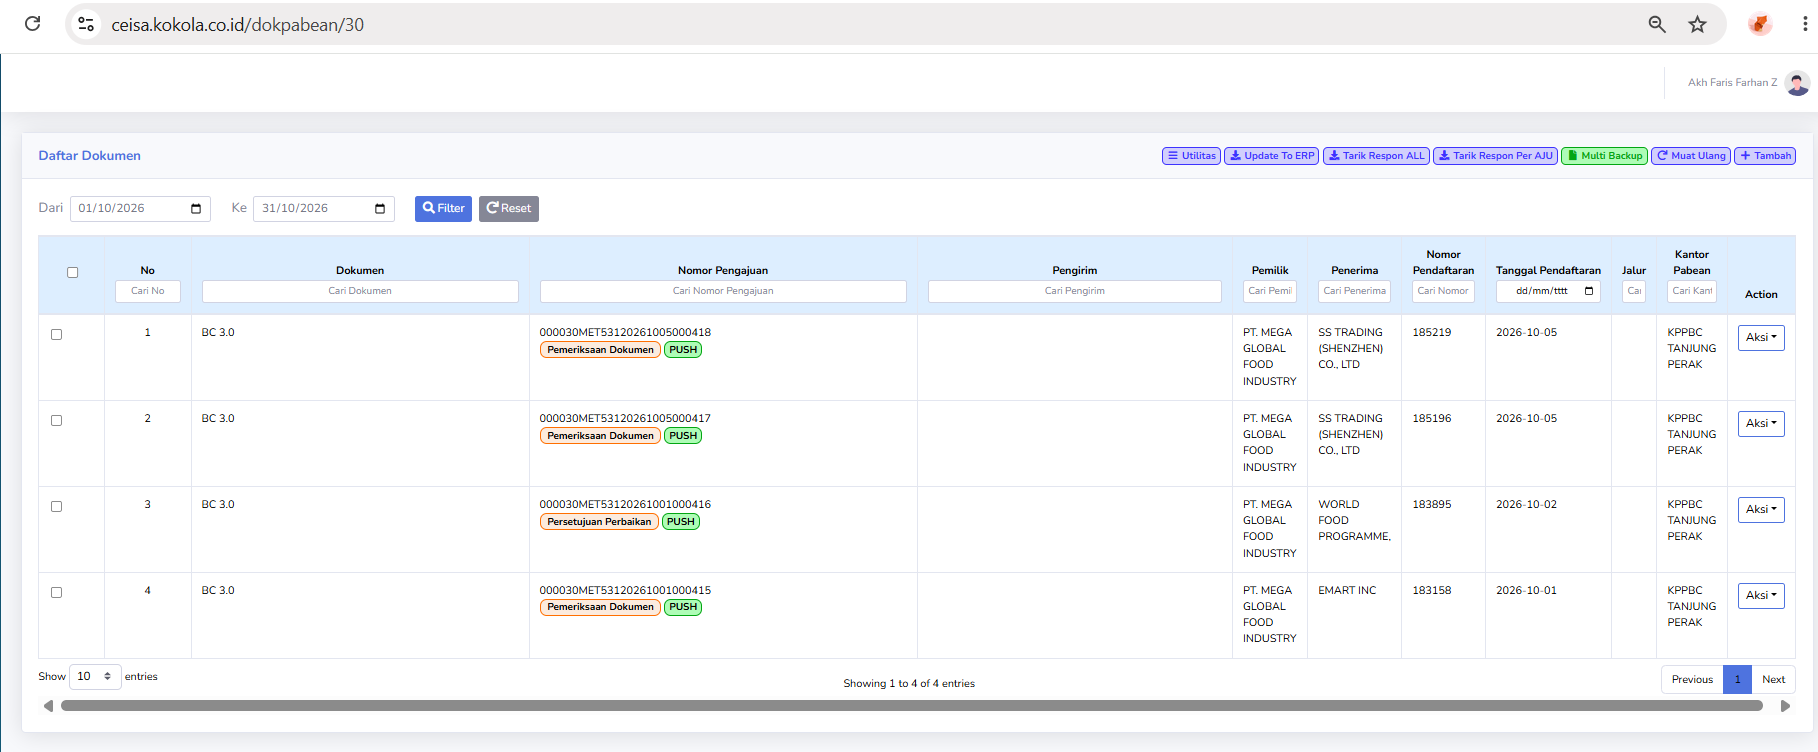
Page Display
The BC 3.0 customs document page can display:
-
Application Number
-
Sender
-
Owner
-
Recipient
-
Registration Number
-
Registration Date
-
Route
-
Customs Office
-
Action
Status Description
Visible statuses include:
- Document Review
- The document is currently under review.
- Correction Approval
- Document corrections have entered the approval process.
PUSH
Data is undergoing synchronization/transmission.
Usage Steps
-
Open BC 3.0.
-
Specify the export period.
-
Search for the Application Number.
-
Check the status.
-
Retrieve the CEISA response.
-
Check the Registration Number.
-
Ensure the sender/recipient data is correct.
-
Perform an “Update to ERP” if necessary.
-
Run the process via “Action.”
BC 3.3
Customs Documents Module Guide
Module Location :
CEISA > Dokumen Pabean > BC 3.3
Page Layout
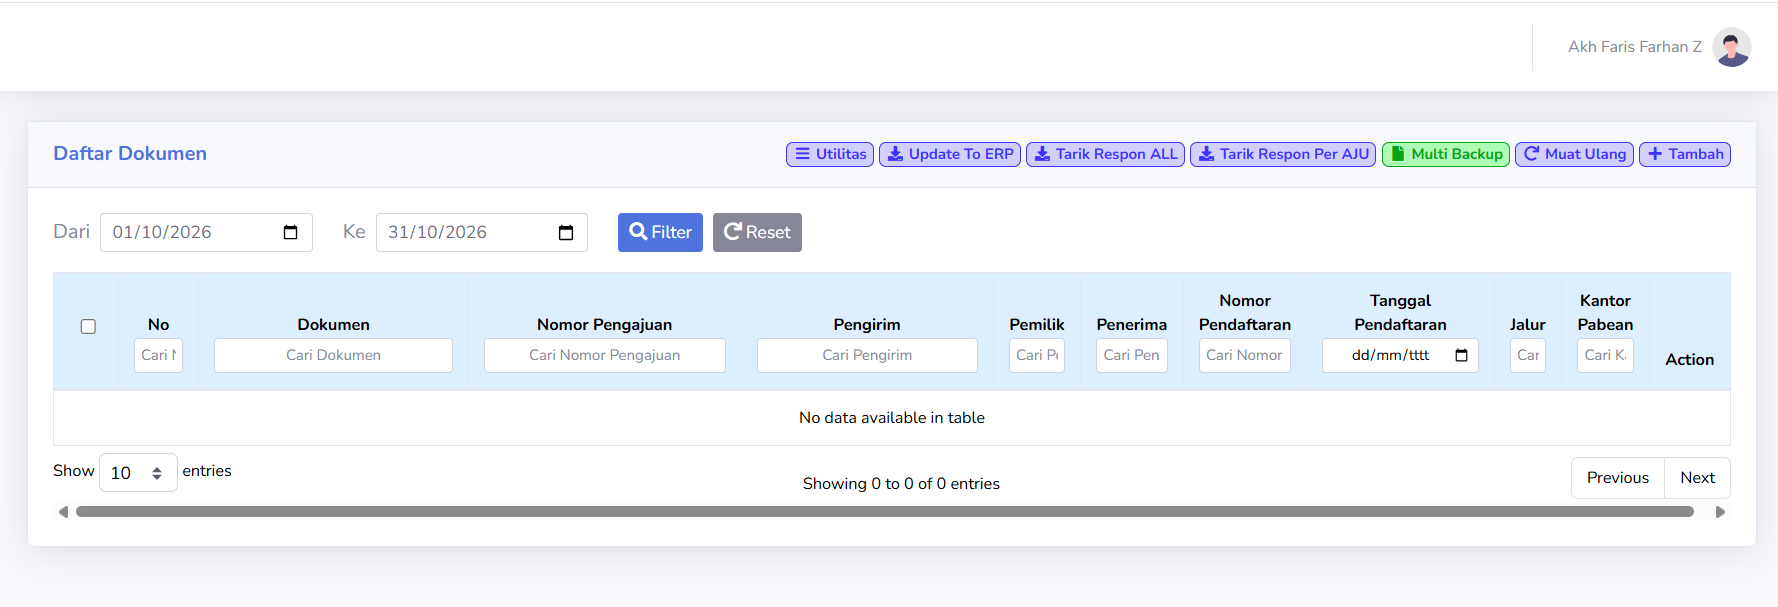
The page uses a Document List view, similar to other BC menus. On the BC 3.3 customs document page, there is no data for the selected period.
Usage Steps
- Open BC 3.3.
- Select a period.
- Click Filter.
- Search for the Application Number, if available.
- Retrieve the results.
- Check the export status.
- Ensure that the registration number is available.
No Data Condition
If the table displays:
No data available in table
change the search period or click Reset.
BC 4.0
Customs Documents Module Guide
Module Location:
CEISA > Customs Documents > BC 4.0
Page Display
Displays a list of submissions for goods entering the TPB.
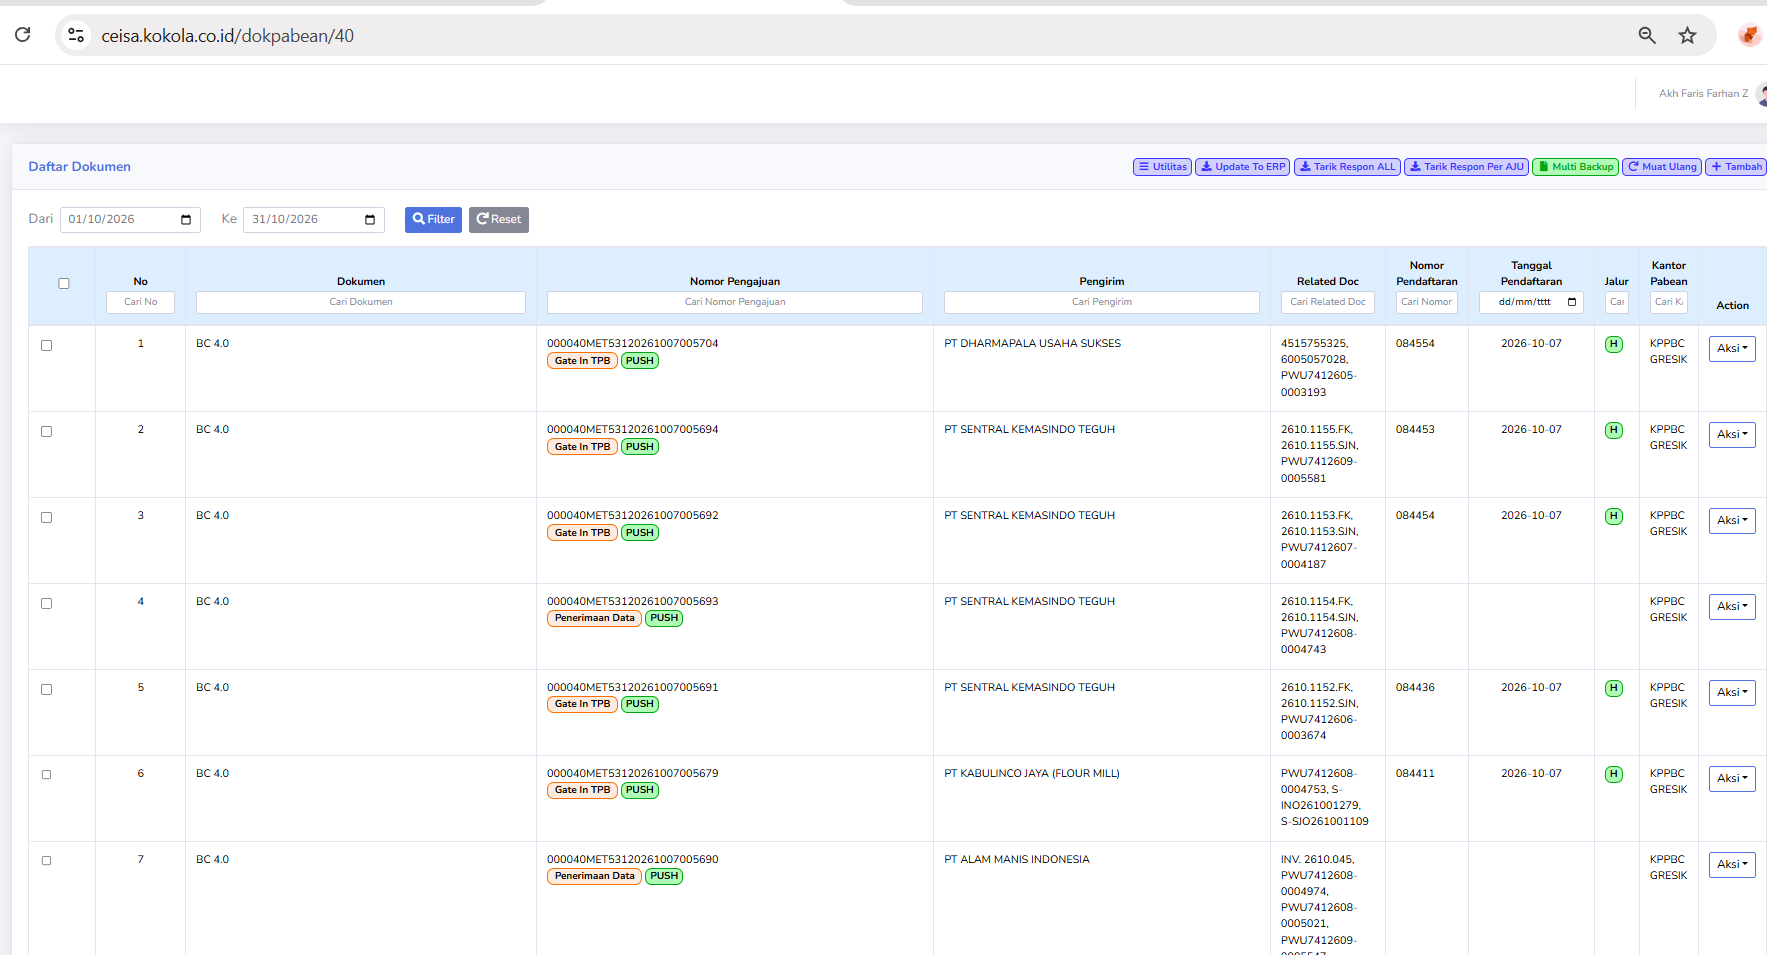
Column Descriptions
The available columns include:
- No.: Displays the document’s sequential number in the list.
- Document: Displays the type of customs document, namely BC 4.0.
- Submission Number: Displays the AJU number as the document submission identifier.
- Sender: Displays the name of the company or party sending the goods.
- Related Doc: Displays the reference document number related to the submission, such as an invoice or shipping document.
- Registration Number: Displays the document registration number assigned through the customs process.
- Registration Date: Displays the date the document was registered.
- Lane: Displays the customs service lane indicator, such as Green Lane or Red Lane.
- Customs Office: Displays the Customs Office handling the document.
- Action: Displays options for further actions on the selected document.
Button Descriptions
- Utilities: Opens a menu of additional features for document management.
- Update to ERP: Used to update or synchronize document data with the company’s ERP system.
- Retrieve ALL Responses: Used to retrieve or update customs responses for a number of documents.
- Retrieve Response by AJU: Used to retrieve responses based on a specific submission number.
- Multi Backup: Used to back up multiple documents at once.
- Reload: Refreshes the document list view.
- Add: Used to create a new BC 4.0 document submission.
- Filter: Displays documents based on the selected date range.
- Reset: Restores the search filter to its default settings.
Explanation of Status and Channels
The document list includes several indicators that help users monitor the submission process:
- Gate In TPB: Relates to the process of recording the entry of goods through the Bonded Warehouse gate.
- PUSH: An application indicator believed to be related to the data transmission or synchronization process.
- H (Green): Presumably indicates the Green Lane, which is a goods entry lane that generally does not require routine physical inspections, except under certain conditions.
- Red Lane: A service lane that requires further supervision or inspection in accordance with customs regulations.
Note: The H and PUSH codes in the application must be aligned with the system’s status definitions. The lane status also does not always indicate that the entire goods import process has been completed.
Usage Steps
Notes
- Make sure the search period matches the document you want to check.
- The Application Number and Registration Number serve different purposes.
- A single BC 4.0 document can have multiple reference documents.
- Check the customs response to confirm the document processing results.
- Ensure that the data to be synchronized to the ERP is correct.
- Use the Action menu as needed for document management.
BC 4.1
Customs Documents Module Guide
Module Location:
CEISA > Customs Documents > BC 4.1
Page Display
The BC 4.1 page displays:
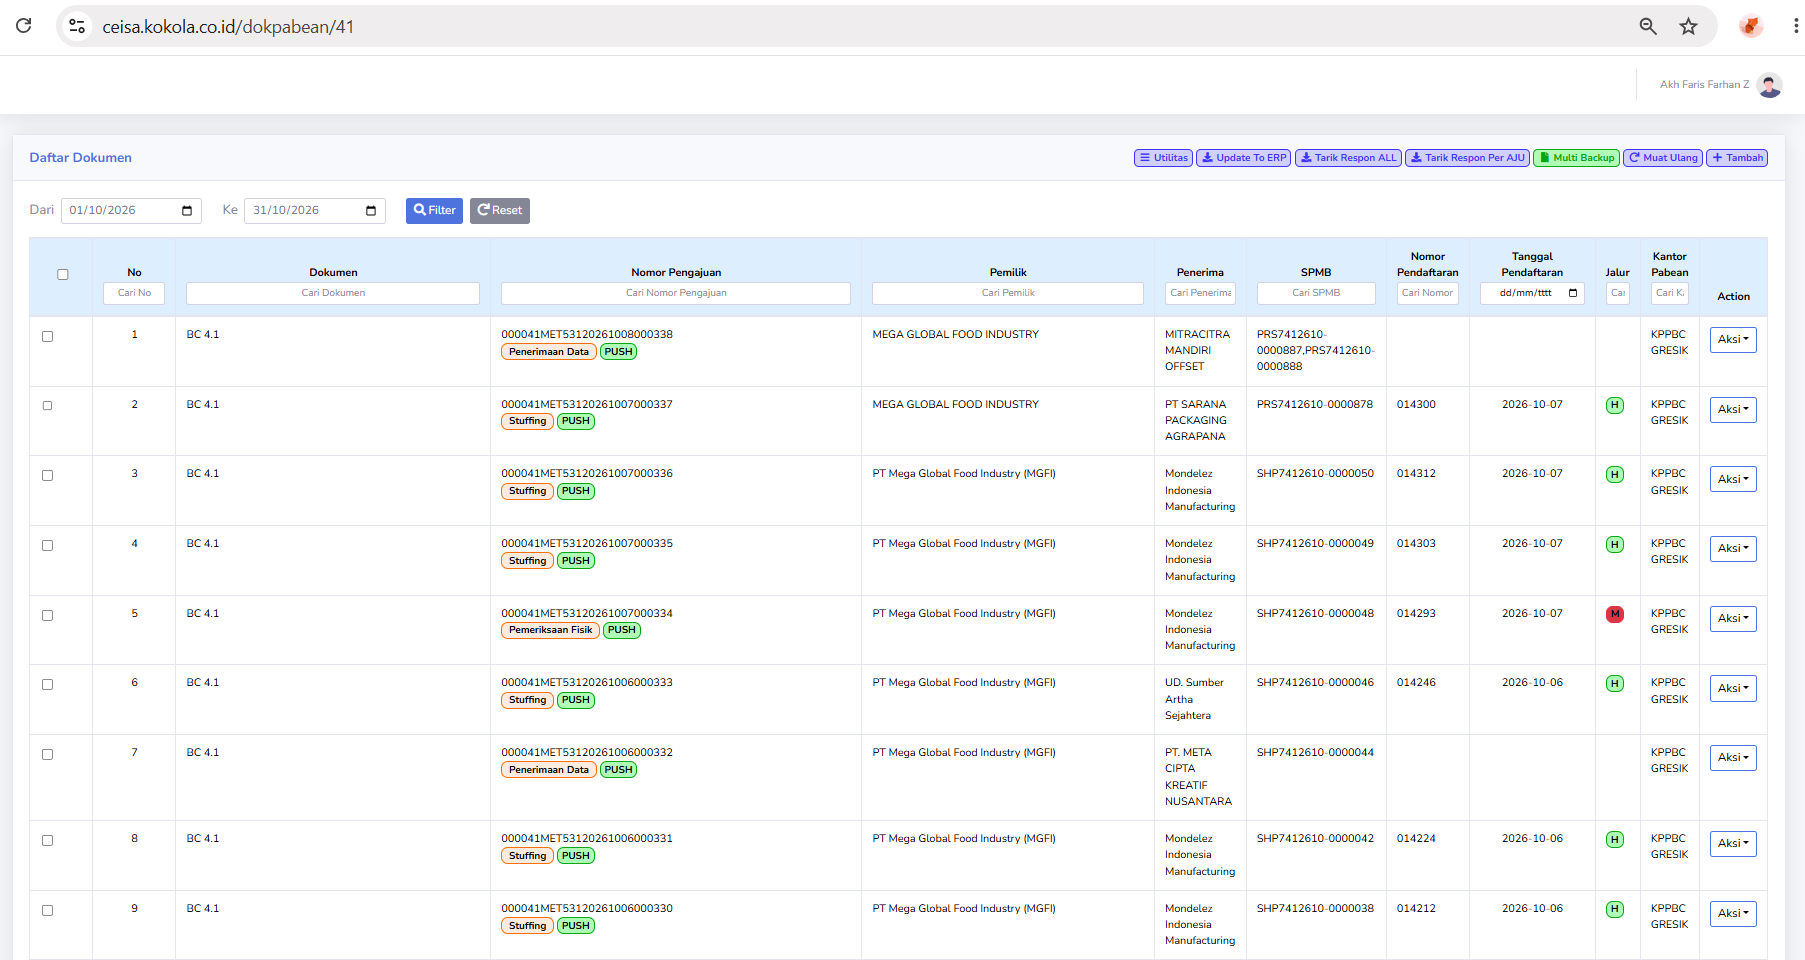
- Declaration Number
- Owner
- Recipient
- SPMB
- Registration Number
- Registration Date
- Route
- Customs Office
- Action
Status Description
Statuses appear as follows:
- Data Received: Indicates that data has been received at this stage of the process.
- Stuffing: Indicates the process of loading goods.
- PUSH: Indicates the data transmission/synchronization process.
Usage Steps
- Open BC 4.1.
- Select a period.
- Search for a submission.
- Check the owner and consignee.
- Check the status.
- Retrieve the latest response.
- Ensure that the SPMB, Registration Number, and date are available if the process has reached that stage.
- Click Action if there are further steps.
BC 4.2
Customs Documents Module Guide
Module Location:
CEISA > Customs Documents > BC 4.2
Page Display
If the page is available, the system will display the BC 4.2 Document List.
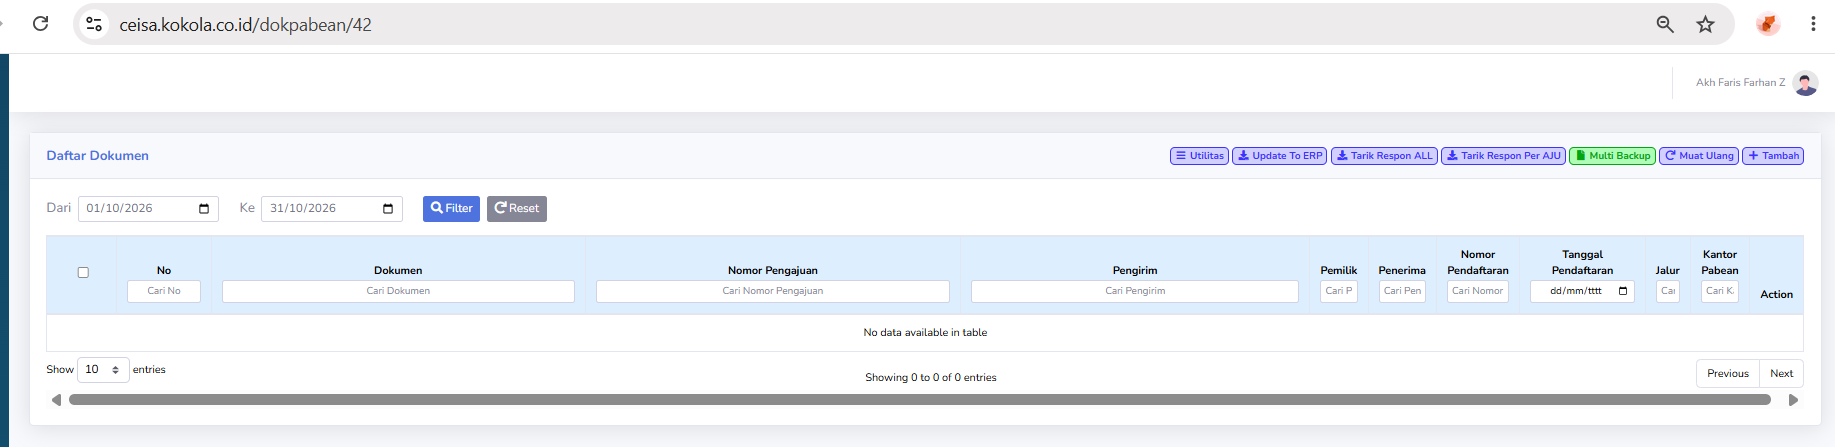
Usage Steps
- Select BC 4.2.
- Specify the period.
- Click Filter.
- Search for the Application Number.
- Review the available data.
- Retrieve the response if necessary.
- Execute the Action according to the available process.
Notes
For the final version of the manual, the section on the BC 4.2 function should be adjusted once sample documents or explanations from operational users are available.
Master SKEP
Customs Documents Module Guide
Module Location:
CEISA > Customs Documents > SKEP Master
Page Display
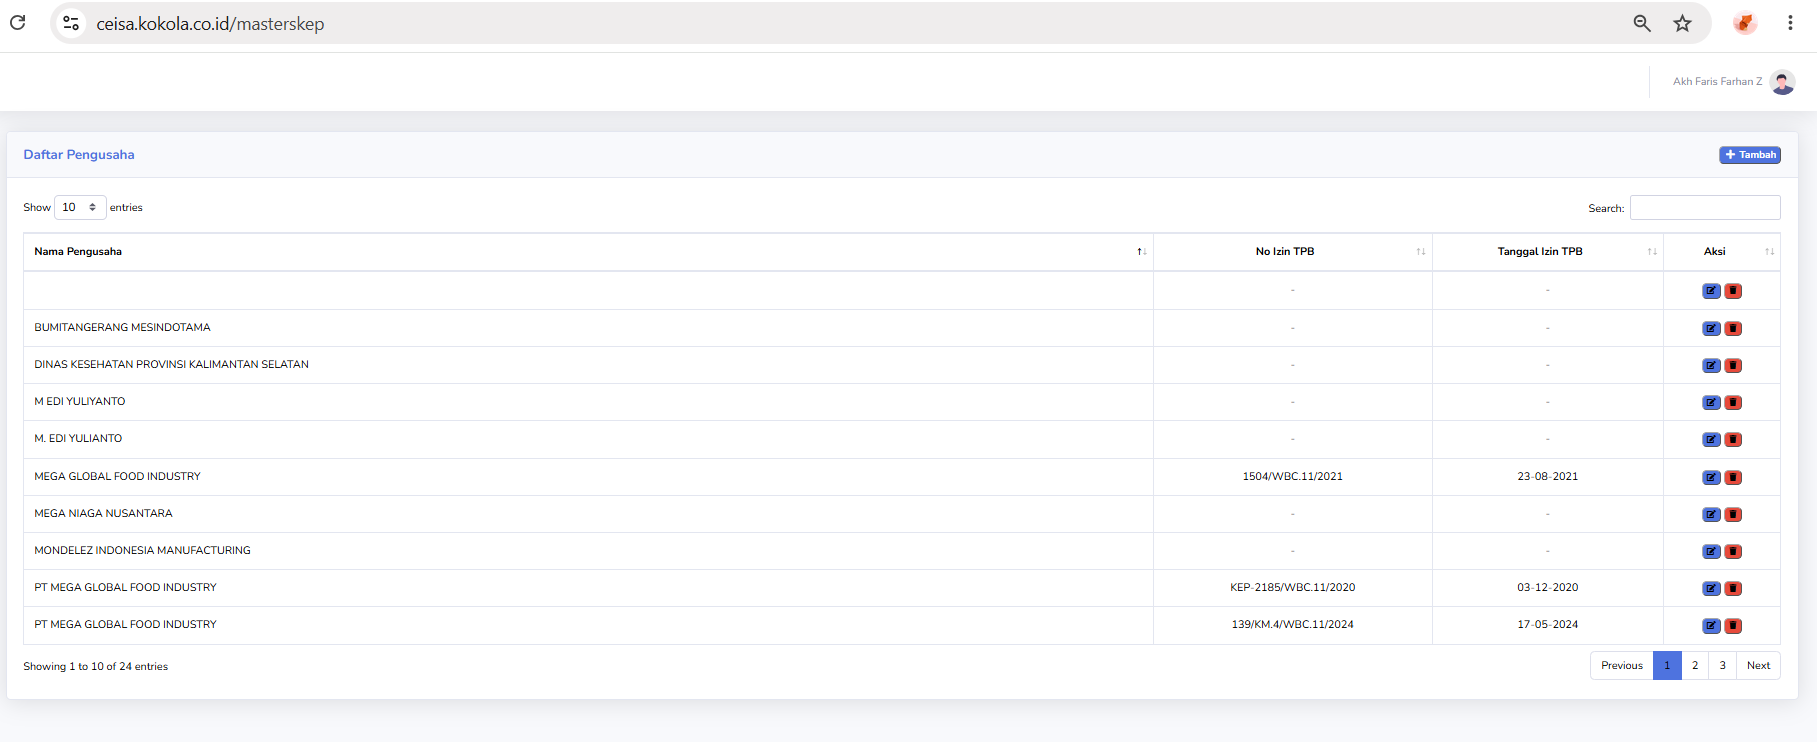
The display may include:
- List of SKEPs.
- SKEP Number.
- SKEP Date.
- Facility Type.
- Validity Period.
- Other related information.
- Column details should be adjusted to match the actual SKEP Master page.
Usage Steps
- Open the SKEP Master.
- Search for the required SKEP.
- Verify the SKEP number and information.
- Add or modify data if the user has access rights.
- Save changes.
Notes
Changes to the SKEP Master should be made by authorized users, as this data may serve as a reference for customs document processing.