Access Requisition - ENGLISH
DASHBOARD
Access Requisition Module Guide
Module Location:
Access Requisition > Dashboard
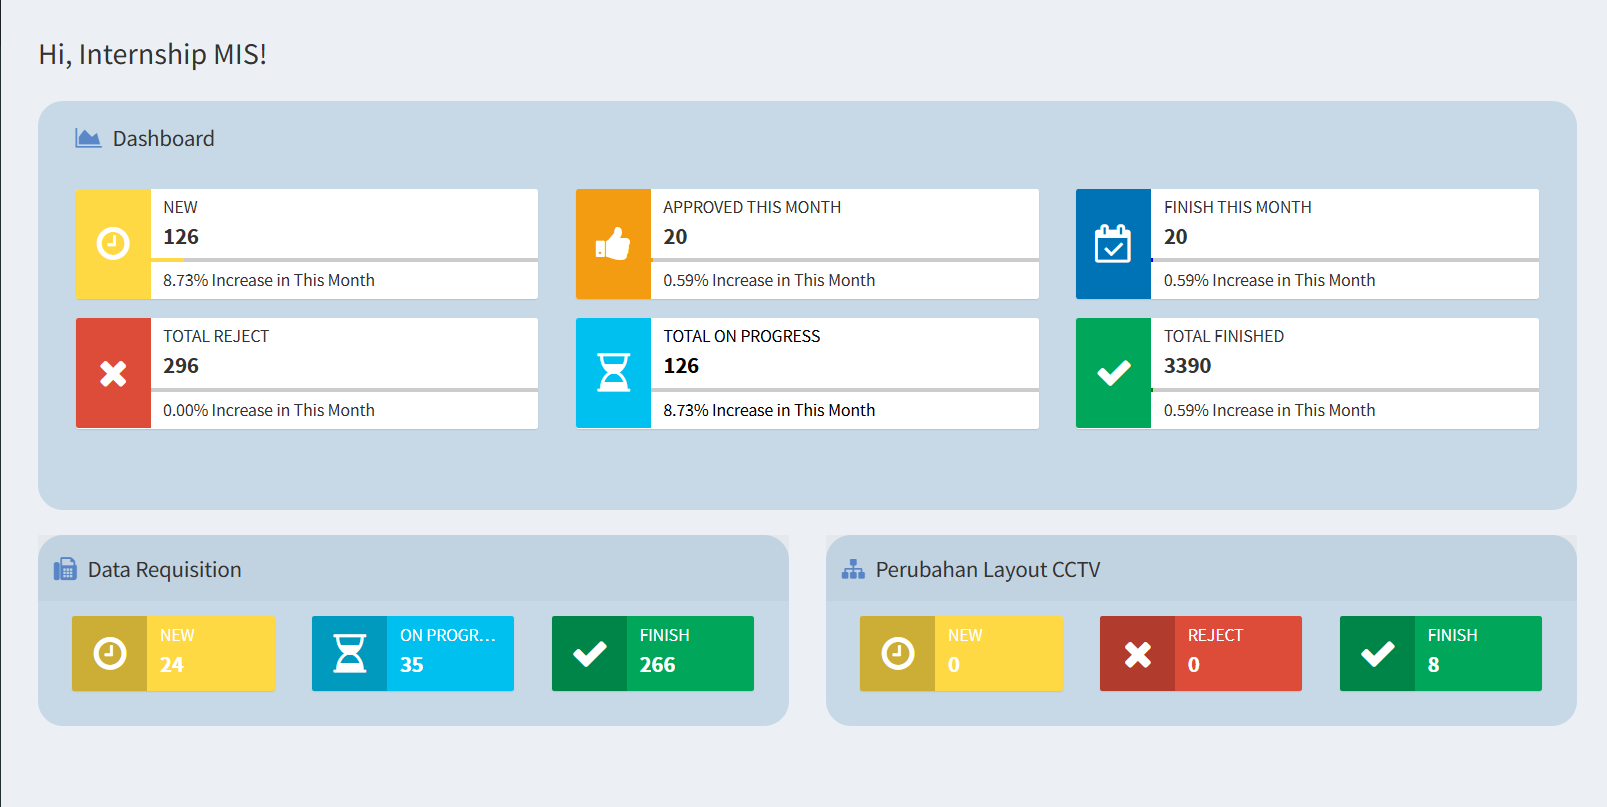
The Dashboard is the main page in Access Requisition used to view a summary of information and the status of requests recorded in the system. Through this page, users can monitor the number of requests based on their status such as New, Approved, In Progress, Rejected, and Completed as well as view a summary of data for the various types of requests available in Access Requisition.
1. Purpose
The Dashboard page provides an overview of the status of requests in the Access Requisition system. The information on this page helps users track the number of new requests, requests currently being processed, and requests that have been approved, rejected, or completed. The Dashboard also displays a summary by request type, making it easier for users to monitor the data.
2. Main View
The Dashboard page contains several sections that display a summary of application data.
The dashboard page shown above displays a summary of application data, consisting of:
-
Application Status Summary
|
Information |
Description |
|
New |
Displays the number of new applications recorded in this system that are still in the “New” status. |
|
Approved This Month |
Displays the number of applications that have been approved this month. |
|
Finish This Month |
Displays the number of applications that have been completed this month. |
|
Total Reject |
Displays the total number of applications with a “Reject” status. |
|
Total On Progress |
Displays the number of applications still in progress. |
|
Total Finished |
Displays the total number of applications that have been fully processed. |
Some information also includes a “Increase This Month” percentage. This information serves as an indicator of data growth displayed by the system for the current month.
- Sample Display
The Dashboard example above shows the following information: These figures are based on the data stored in the system and may change depending on the status of the applications.
-
- New: 126 requests
- Approved This Month: 20 requests
- Finished This Month: 20 requests
- Total Rejected: 296 requests
- Total In Progress: 126 requests
- Total Completed: 3,390 requests
- New: 126 requests
-
Request Data
The Requisition Data section is used to display a summary of the status of requisitions in the Requisition Data category.
| Status | Description |
| New | Displays the number of Requisition Data entries that are still in the “New” status. |
| On Progress | Displays the number of Requisition Data entries currently being processed. |
| Finish | Displays the number of Requisition Data entries that have been fully processed. |
In the dashboard example, the following figures are shown:
New: 24, On Progress: 35, and Finished: 266.
This information makes it easy for users to check the status of Data Requisitions without having to open each request individually.
3. CCTV Layout Changes
The CCTV Layout Changes section displays a summary of the status of requests related to CCTV layout changes. The available information includes:
|
Status |
Description |
|
New |
Displays the number of CCTV Layout Change requests that are still in the “New” status. |
|
On Progress |
Displays the number of CCTV Layout Change requests that have been rejected. |
|
Finish |
Displays the number of CCTV Layout Change requests that have been fully processed. |
In the dashboard example, the following values are displayed:
New: 0, Reject: 0, and Finish: 8.
The data counts will be updated based on the request statuses in the system.
4. Navigation Menu
On the left side of the page is a navigation menu used to access features in Access Requisition. The available menus include Dashboard, Requests, Approvals, Checklist, MIS, and Guide Book. Some menus have submenus that can be displayed by clicking the menu or the arrow icon.
5. Tips & Important Notes
-
Use the Dashboard to view the general status of a request before opening its details.
-
The data on the Dashboard reflects the requests and status changes recorded in the system.
-
The “New” status indicates a request that is still in the initial stage.
-
The “On Progress” status indicates a request that is currently being processed.
-
The “Reject” status indicates an application that has been rejected.
-
The “Finish/Finished” status indicates an application that has been fully processed.
- To view information or perform further actions on an application, use the relevant menu items in the sidebar
APPLICATION
ATMI
Access Requisition Module Guide
Module Location:
Access Requisition > Requisition ATMI
The ATMI (Access to Information Media Transfer) request is used to create requests related to access to information media transfer through the Access Requisition system. This page allows you to create a new ATMI request, view the list of requests currently displayed in the system, and view the history of previously submitted ATMI requests.
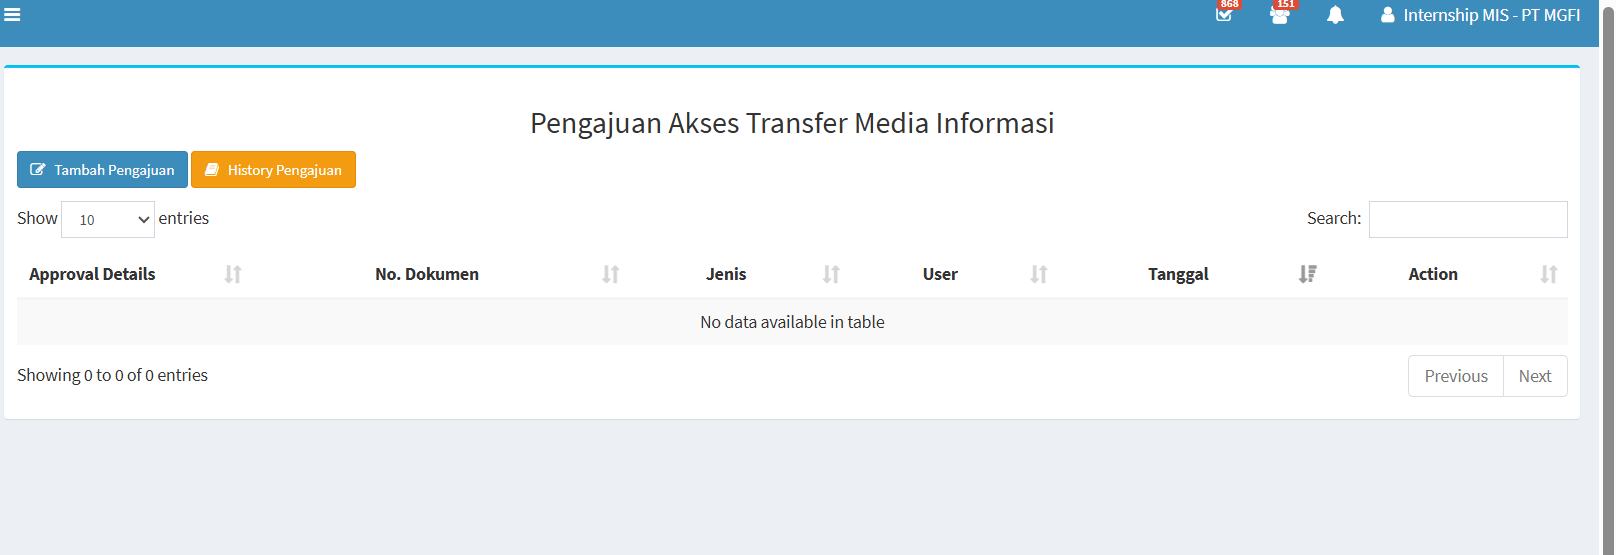
This page contains several main functions: Add Application, Application History, the application list table, the search feature, and settings for the number of records displayed.
|
Section |
Description |
|---|---|
|
Tambah Pengajuan |
Used to create a new ATMI application. |
|
Application History |
Used to view the history of previously submitted ATMI applications. |
|
Show Entries |
Used to specify the number of records displayed in the table. |
|
Search |
Used to search for specific data in the application list. |
|
Approval Details |
Displays information related to the application approval process or details. |
|
Dokumen No. |
Displays the ATMI application document number. |
|
Type |
Displays the type of application submitted. |
|
User |
Displays the user associated with the application. |
|
Date |
Displays the date the application was created or recorded in the system. |
|
Action |
Displays the actions available for the application data. |
|
Previous / Next |
Used to navigate to the previous or next page of data if there is more than one page of data. |
-
Add Request
To create a new ATMI request:
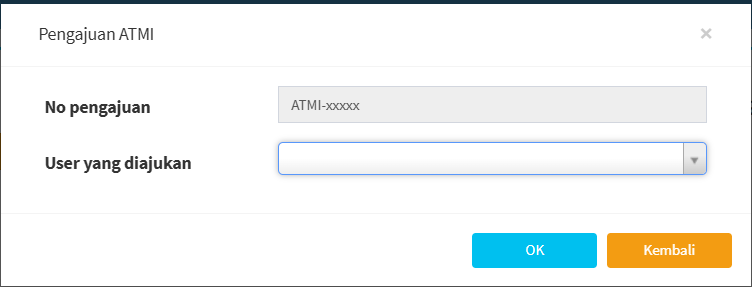
- First, click “Add Request.” Once you click the button, the ATMI request form will appear.

- On the ATMI request form, there is a “Request No.” field.
The application number is displayed in the following format:
ATMI-xxxxx - In the “User Being Applied For” field, click the available options and then select the user for whom you want to create the ATMI application.
- Make sure the selected user is correct before clicking the “OK” button.
-
Request History

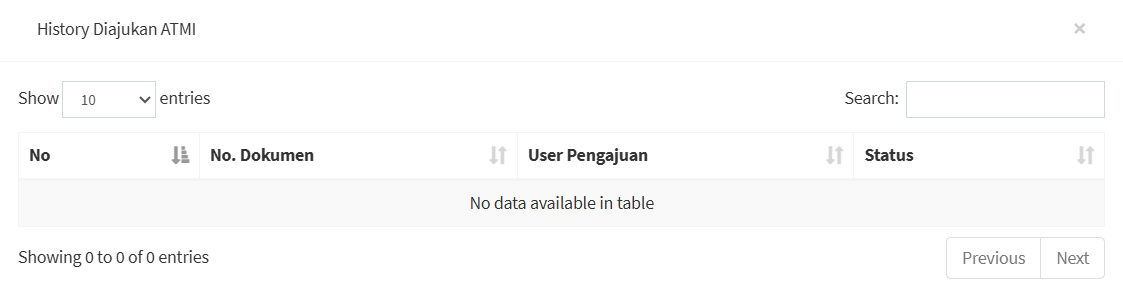
The Request History menu is used to view the history of ATMI requests. To view the request history, click the Request History button on the ATMI main page. The system will display the ATMI Request History page or pop-up.
APPLICATION ACCESS
Access Requisition Module Guide
Module Location:
Access Requisition > Requisition > Application Access
The Application Access Request feature is used to submit requests for access to applications available on the company’s system. Users can specify the applications for which access is requested and the users who require that access. Available applications are grouped by type such as ERP and non-ERP so users can select applications based on their needs.
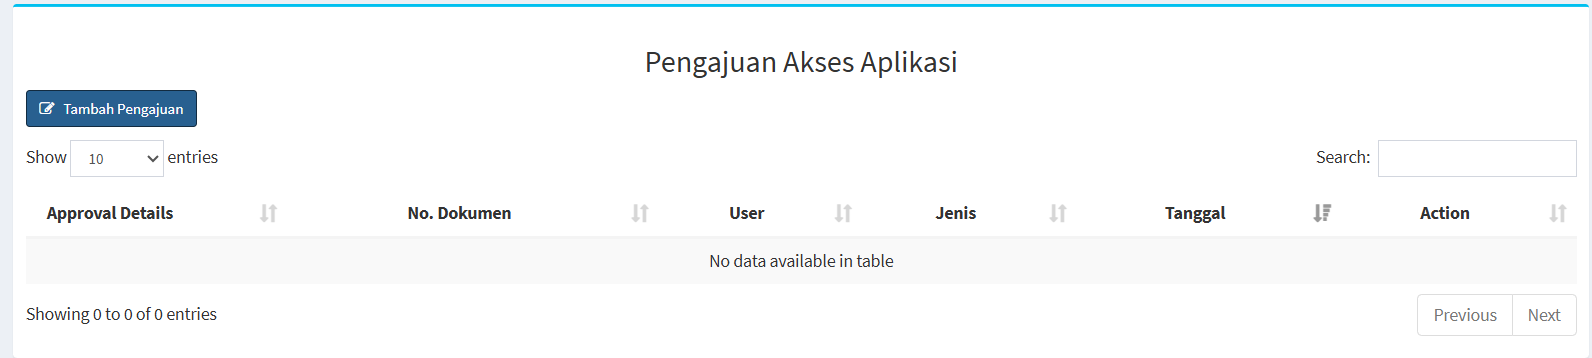
The main page features an “Add Request” button, a table listing requests, a search feature, and settings to adjust the number of records displayed.
-
Column Descriptions:
Section Description Add Request
Used to create a new application access request.
Show Entries Used to set the number of records displayed in the table.
Search Used to search for specific request data.
Approval Details Displays information regarding the approval process or details of the request.
Dokumen No. Displays the document number of the application access request.
User Displays the user associated with the application access request. Type Displays the type of application requested. Date Displays the date the request was created or recorded in the system. Action Displays the actions that can be performed on the request data. Previous / Next Used to navigate to the previous or next page of data. -
Application Access Requests
Here are the steps to submit an application access request:
-
First, click the “Add Request” button. Once clicked, the application access request form will appear.

-
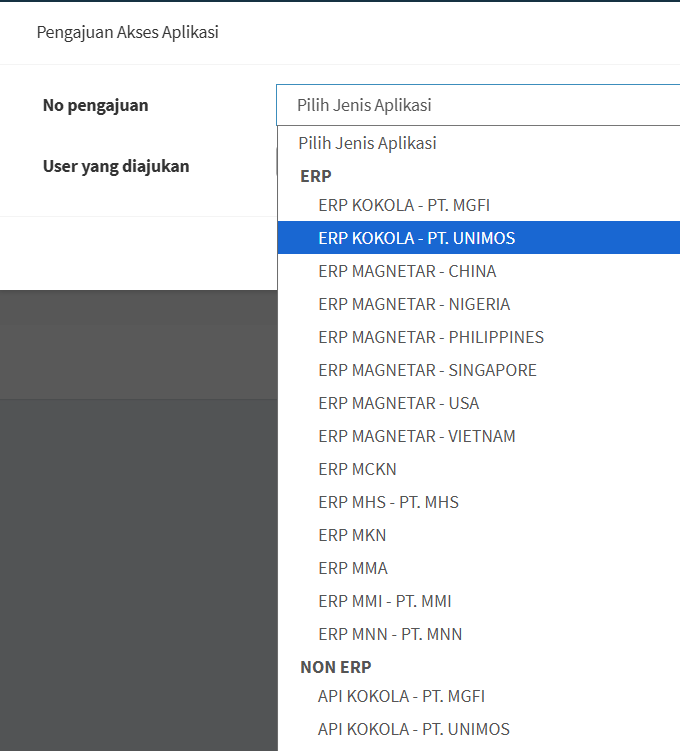
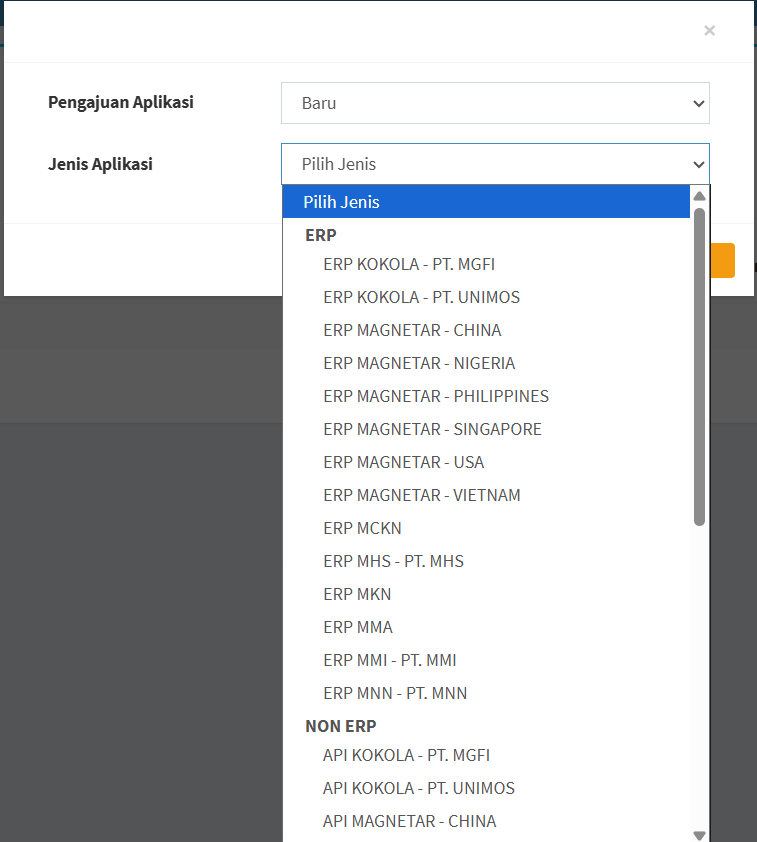
On the request form, open the “Application Type” dropdown menu. The system will display a list of available applications, grouped by application category. This view contains two main groups, namely:
Type
Description
ERP
Berisi pilihan aplikasi ERP yang tersedia pada beberapa perusahaan atau unit.
NON ERP
Berisi pilihan aplikasi selain ERP yang tersedia pada sistem.
-
In the “Requested User” field, select the user who needs access to the application. Make sure the user matches the request you are creating.
- Make sure all fields are filled out before clicking the “OK” button.
APPLICATION CHANGES
Access Requisition Module Guide
Module Location:
Access Requisition > Requisition > Application Change
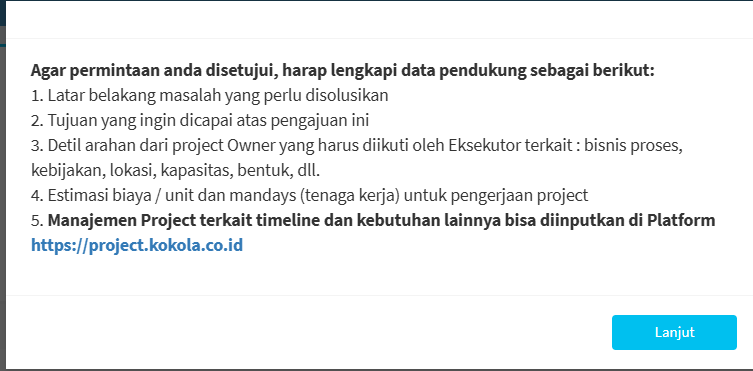
The Application Change Menu is used to submit requests related to application requirements, including requests for new applications or changes, based on the options available in the system. Before submitting a request, users must prepare supporting information that explains the requirements, objectives, project guidelines, and implementation needs so that the request can be understood and processed by the relevant parties.
-
Main View
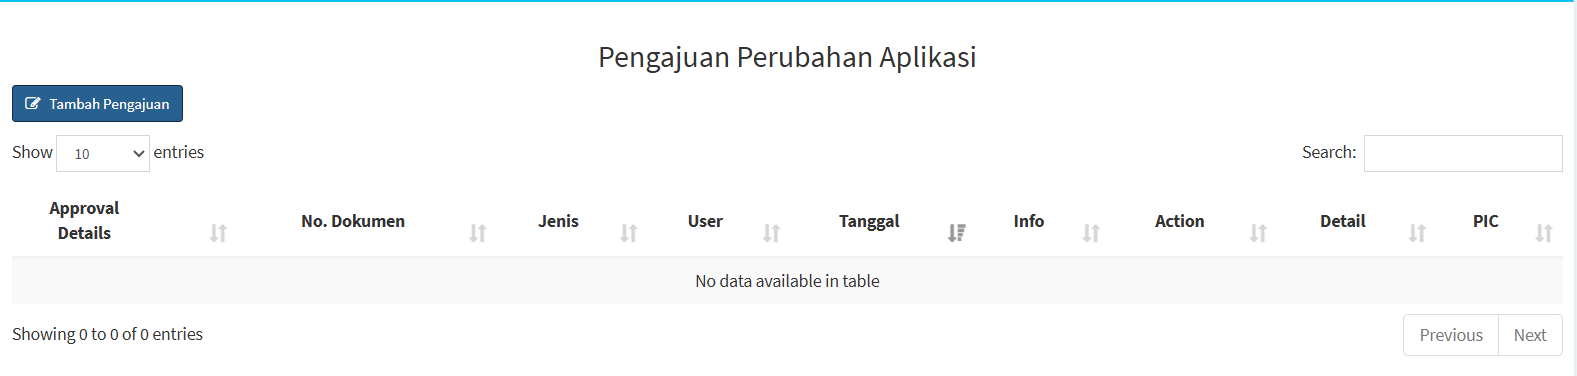
The Application Change Request page is used to view a list of requests that have been submitted and to create new requests. This page features an “Add Request” button, a table listing requests, a search feature, and settings to adjust the number of records displayed.
-
Screen Description
| Section | Description |
|---|---|
| Add Submission | Used to create a new Application Change submission. |
| Show Entries | Used to specify the number of records displayed in the table. |
| Search | Used to search for submissions based on specific keywords. |
| Approval Details | Displays information about the approval process or details of the submission. |
| Dokumen No. | Displays the submission document number. |
| Type | Displays the type of application or submission selected. |
| User | Displays the user associated with the application. |
| Date | Displays the date the application was created or recorded in the system. |
| Info | Displays information regarding the status of the application. |
| Action | Displays the actions that can be taken on the application. |
| Detail | Used to view detailed information about the application, if available. |
| PIC | Displays the PIC associated with the application process, if specified. |
-
Submitting an Application Change Request
To create a new request, click the button:
“Add Request”
Before proceeding to the application selection form, the system will display information regarding the supporting documents that need to be prepared.

-
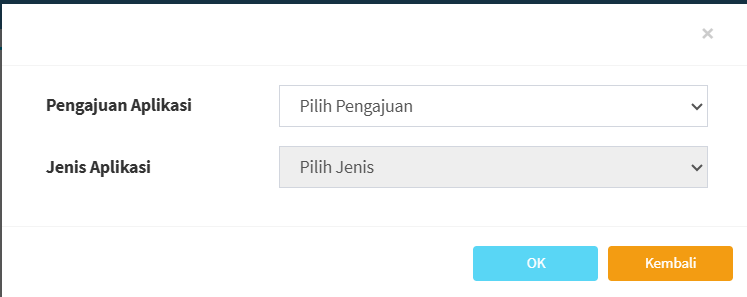
Selecting an Application Request
After the Next button is selected, the system displays the application form.

The form contains two main fields:
Field
Description
Application Submission
Used to specify the type of application submission to be made.
Application Type
Used to specify the application associated with the submission.
OK
Used to continue the process after a selection has been made.
Back
Used to go back or cancel the process at that stage.
X
Used to close the form.
-
Used to close the form.
In the Application Submission field, select the type of submission that best suits your needs. In the example screenshot, the option selected is:
“New”
This means that the submission being created is a new application submission, as per the options available in the system.
-
Selecting the Submission Type
After selecting “Submit Application,” choose an application from the “Application Type” field. Applications in the system are grouped by category, such as:

- Selecting the Appropriate Application
-
Ensure that the selected application aligns with:
company → system/application → submission requirements
-
Pay attention to the company name in the application options, as the same application may be available for multiple companies or different units.
For example:
ERP KOKOLA - PT. MGFI
is different from:
ERP KOKOLA - PT. UNIMOS
even though both use ERP KOKOL
-
- Continuing the Submission Process
After selecting the Application Submission and Application Type, click the button:
“OK”
The system will proceed to the next step based on the selected application type and submission.
If the user does not wish to continue, click:
“Back”
WORKING PERMIT
Access Requisition Module Guide
Module Location:
Access Requisition > Requisition > Working Permit
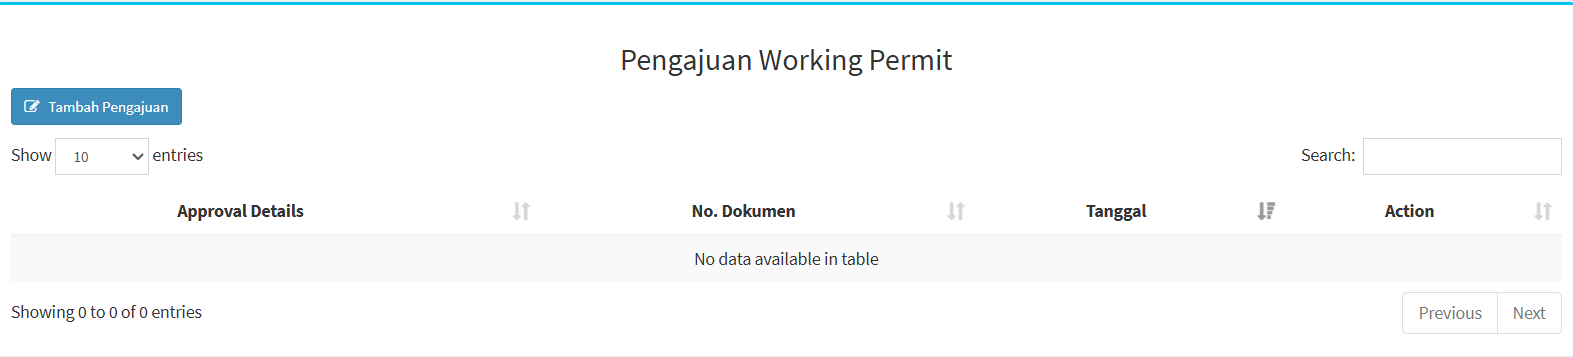
On the Working Permit Application page, you can view a list of Working Permit applications that have been created. The main page features an Add Application button, a table listing the applications, a search feature, and settings to adjust the number of records displayed.
| Section | Description |
|---|---|
|
Add Application |
Used to create a new Working Permit application. |
| Show Entries |
Used to set the number of records displayed in the table. |
| Search | Used to search for specific application data. |
| Approval Details | Displays information regarding the application approval process. |
| Dokumen No. | Displays the Working Permit document number. |
| Date | Displays the application date or the date recorded on the document. |
| Action | Displays the actions available for that application. |
| Previous / Next | Used to navigate between pages if there is more than one page of data. |
Some columns include sorting icons that can be used to sort the data. If there are no applications to display, the system will display the message “No data available in table.”
-
Working Permit Application


-
First, click the “Add Application” button. Once clicked, the work permit application form will appear.
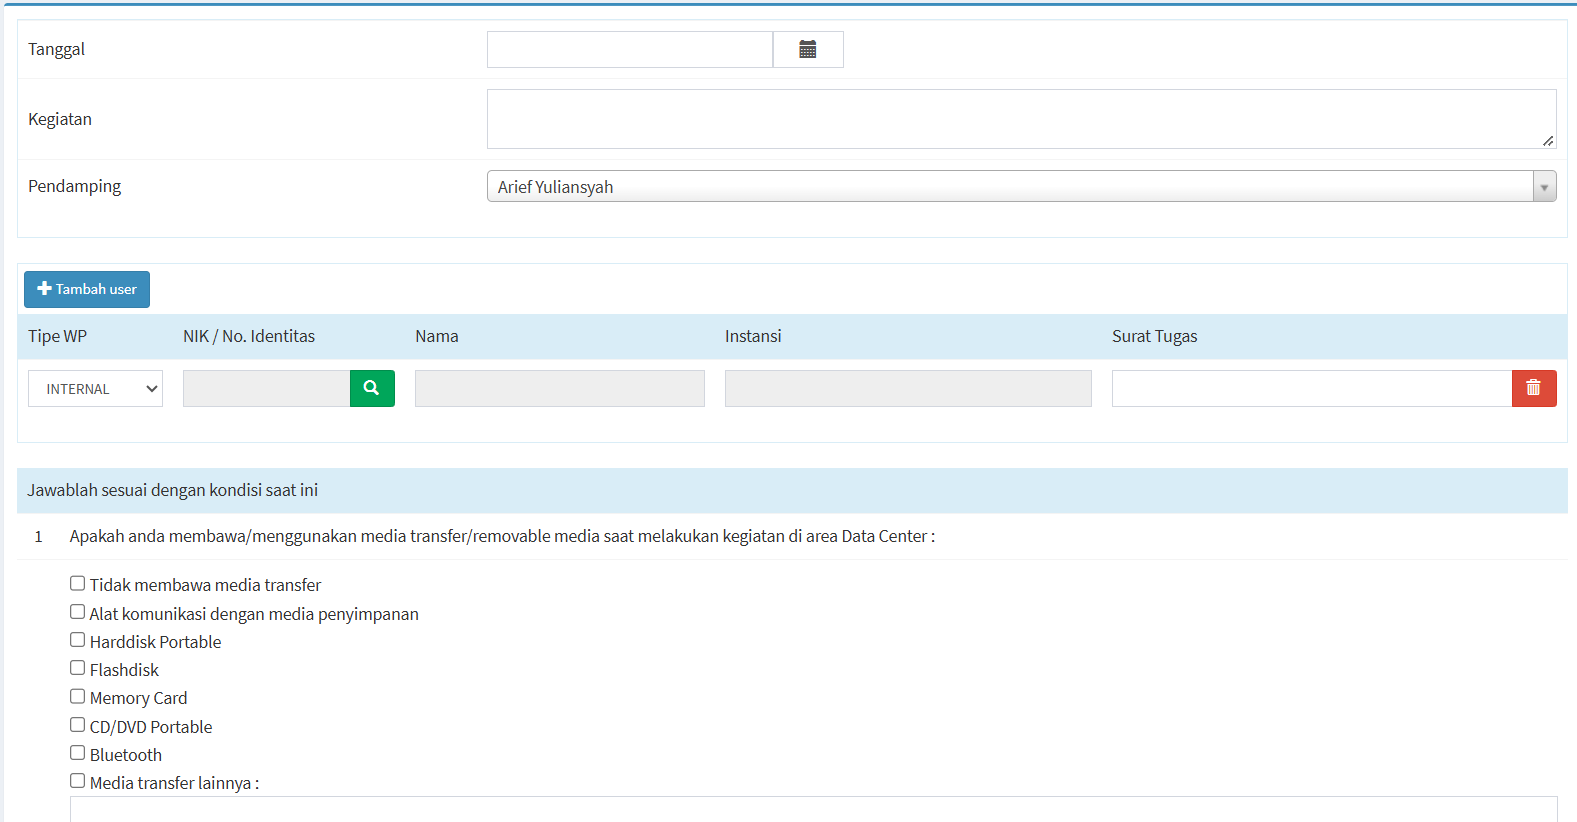
- After clicking the “Add Application” button, a form will appear that you must complete. At the beginning of the form, you must provide information regarding the activity to be carried out.
Field
Description
Date
Used to specify the date the activity will take place.
Activity
Used to describe the activity or work to be performed in the Data Center area.
Supervisor
Used to select the person who will supervise the activity.
-
Next, fill out the form to add a user, which consists of several fields.
Field
Description
WP Type
Used to specify the type of Work Permit, such as INTERNAL.
NIK / No. Identitas
Used to enter the user’s NIK or ID number.
Name
Displays or is used to enter the user’s name.
Organization
Used to list the user’s organization or company.
Assignment Letter
Used to list or attach assignment letter information if necessary.
Search Icon
Used to search based on the entered NIK or ID number.
Delete Icon
Used to delete user data from the application.
-
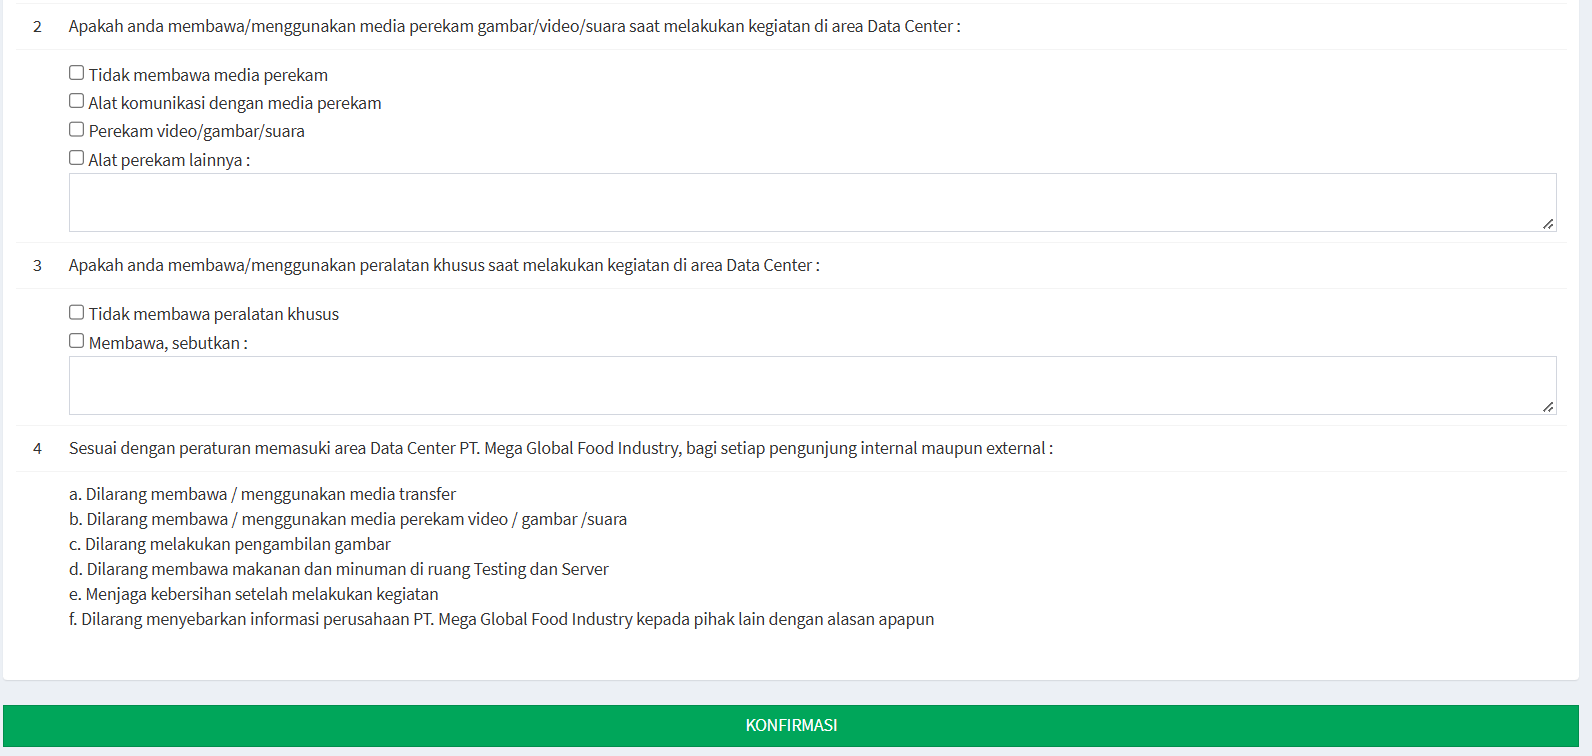
And finally, information regarding the conditions of the activity: After the activity and user data have been completed, there are several questions that need to be answered based on the conditions at the time the activity takes place. This section is used to provide information about items, devices, or equipment that will be brought or used while in the Data Center area.
-
Transfer Media / Removable Media: The first question concerns the use of transfer media or removable media during activities in the Data Center area.
-
Recording Media: The next question concerns media that can be used to record images, video, or audio.
- Specialized Equipment: Users must also provide information regarding the use of specialized equipment during the activity.
-
-
-
Rules for Entering the Data Center Area
At the end of the form, you’ll find information regarding the rules that must be observed when entering the PT. Mega Global Food Industry Data Center area, for both internal and external visitors. The rules listed in the system include:
-
Do not bring or use data storage devices
-
Do not bring or use video, image, or audio recording devices
-
Taking photographs is prohibited
-
Bringing food and beverages into the Testing and Server rooms is prohibited
-
Maintain cleanliness after completing activities
-
Disclosing PT. Mega Global Food Industry’s confidential information to third parties for any reason is prohibited
-
DATA REQUISITION
Access Requisition Module Guide
Module Location:
Access Requisition > Requisition > Data Requisition
The Data Requisition menu is used to submit data requests through the Access Requisition system. Through this menu, you can create data requests by providing a description of the required data, as well as view a list of Data Requisition requests that have been created in the system.
- Main View

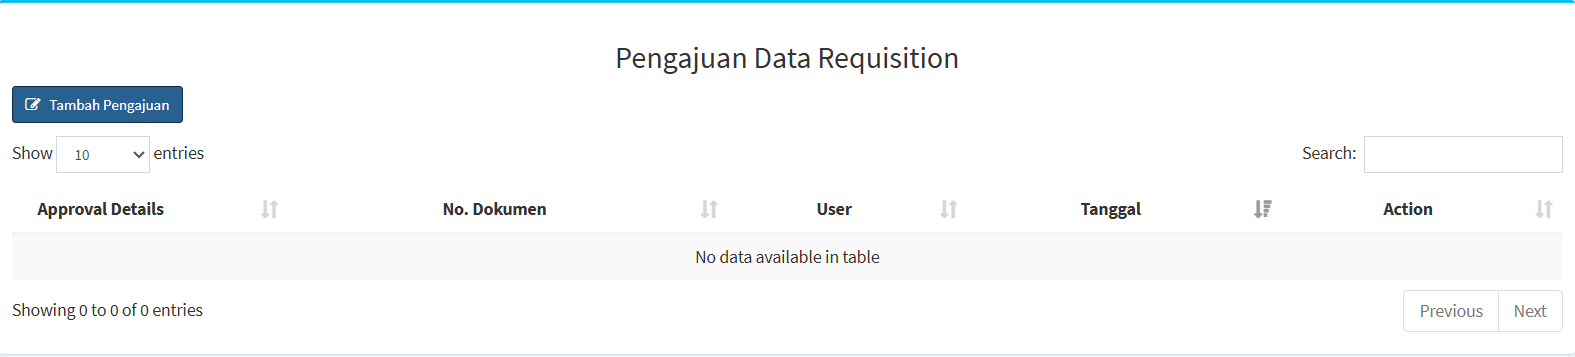
On the Data Requisition Request page, you can view a list of data requests available in the system. This page features several key functions, including the Add Request button, a list of requests, a search feature, and settings to adjust the number of records displayed.
- Screen Description
Section Description Add Request Used to create a new Data Requisition request. Show Entries Used to set the number of records displayed in the table. Search Used to search for specific request data. Approval Details Displays information about the request approval process or details. Dokumen No. Displays the document number of the Data Requisition request. User Displays the user associated with the request. Date Displays the date the request was created or recorded in the system. Action Displays the actions available for the request data. Previous / Next Used to navigate to the previous or next page of data. -
data requisition request
-
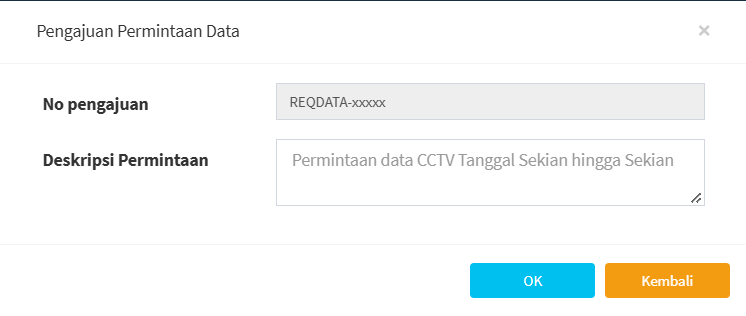
First, click the “Add Submission” button. Once clicked, the data requisition submission form will appear.
- After clicking the “Add Submission” button, the data requisition form will appear, which must be completed. The required information includes:

-
Submission No.: The identification number for the data requisition submission.
- Request Description: Used to explain the data required in the request.
-
-
APPROVAL
Approval Module Guide
Module Location:
Access Requisition > Approval
-
Main View

This page displays a “list of requests awaiting approval” that will enter the approval process. It features a table listing the requests along with several features to help users view and search for data.
-
Screen Description
Section Description Show Entries Used to specify the number of application records displayed per page. Search Used to search for application records based on specific keywords. Approval Details Displays information or details regarding the approval process for an application. Dokumen No. Displays the document number for each application. Type Displays the type of application submitted. User Displays the user associated with the submission. Date Displays the date the submission was created or recorded in the system. Action Displays the actions available for processing the submission. Previous / Next Used to navigate to the previous or next page of data. -
Tips & Important Notes
-
Ensure that the request to be processed matches the Document No. and User listed.
-
Check the Request Type before initiating the approval process.
-
Use Approval Details to view information about the request’s approval process.
-
Use the Search feature to find specific requests more quickly.
-
Use Show Entries to adjust the number of records displayed.
-
Make sure you’ve reviewed the request details before taking any action in the “Action” section.
- If the message “No data available in table” appears, it means there are no requests to display or process on that page.
-

CHECKLIST
CCTV
Checklist Module Guide
Module Location:
Access Requisition > Checklist > CCTV
-
CCTV Checklist Main Screen
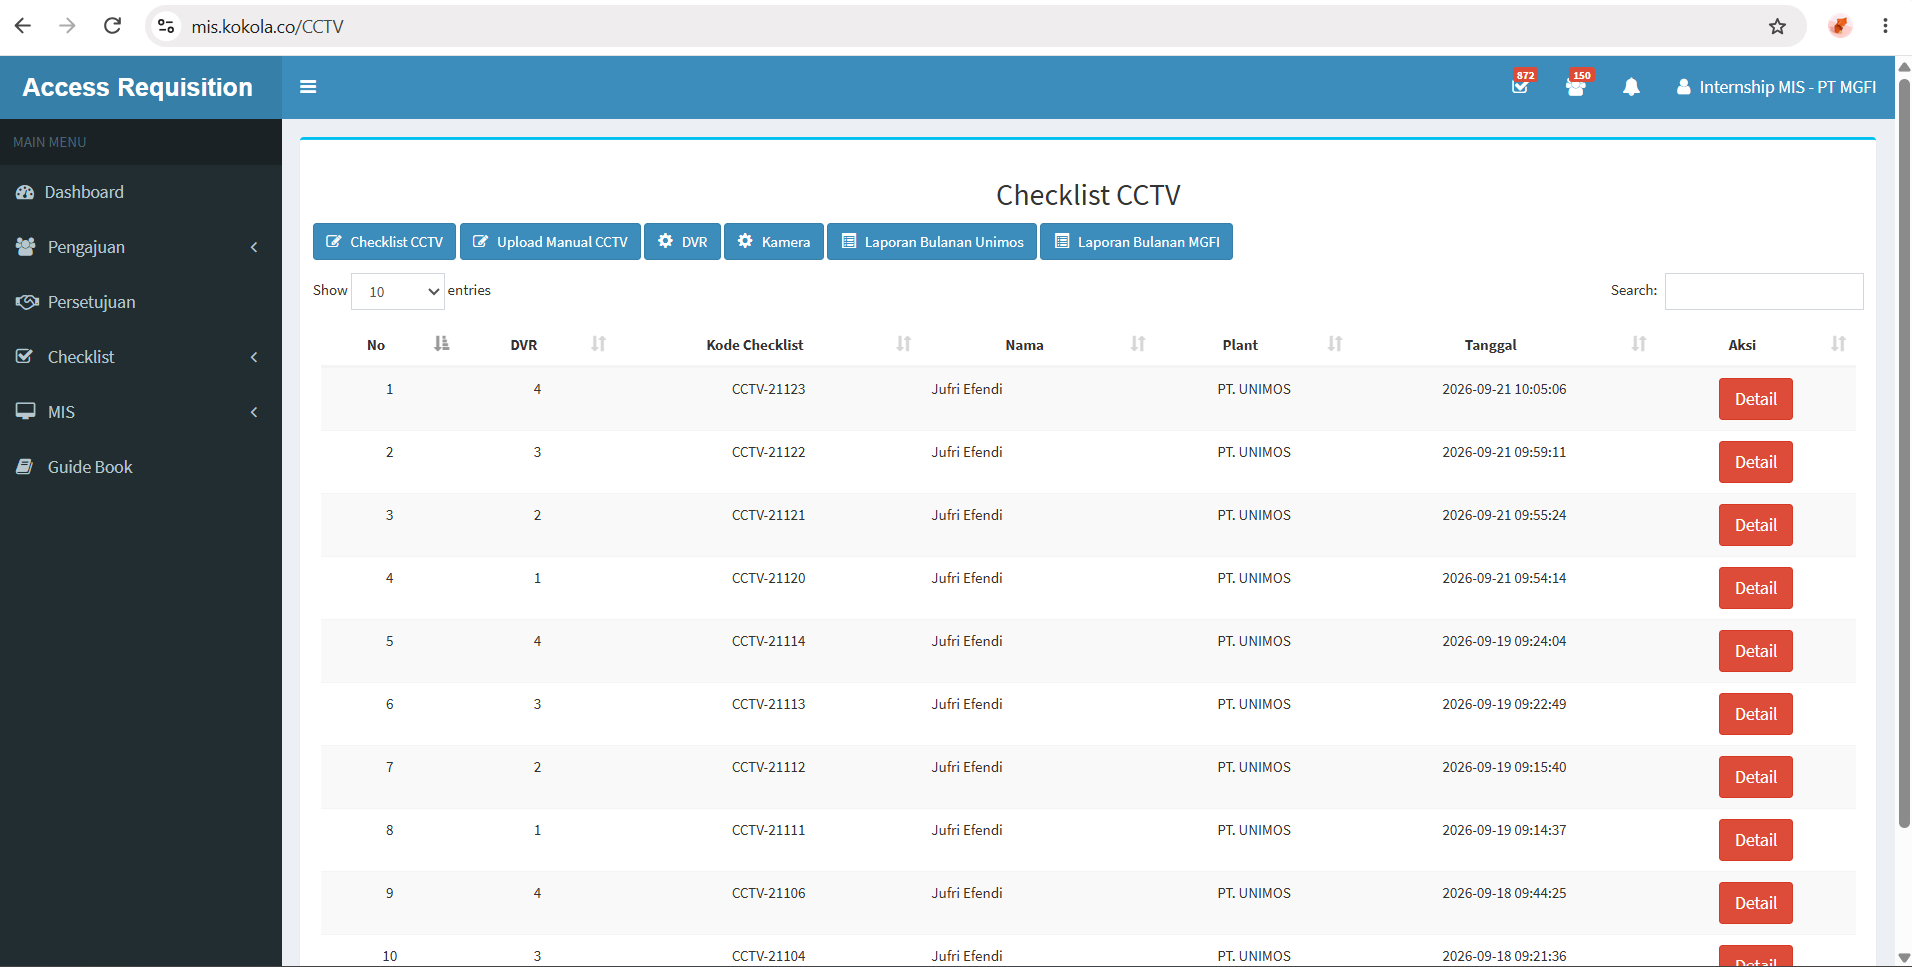
The CCTV Checklist menu is used to periodically record and monitor the condition of CCTV devices through the Access Requisition system.

The main page contains several functions used to perform checklists and manage CCTV devices, namely:
Feature
Description
CCTV Checklist
Used to fill out the CCTV condition checklist.
Manual CCTV Upload
Used to access the CCTV data/manual upload function available in the system.
DVR
Used to manage DVR data.
Camera
Used to manage CCTV camera data.
Unimos Monthly Report
Used to view the monthly CCTV checklist report for the PT. UNIMOS plant.
MGFI Monthly Report
Used to view the monthly CCTV checklist report for the PT. MGFI plant.
CCTV Checklist Table Description
The CCTV Checklist Table displays the following information:
Coloum
Description No
Displays the sequential number of the checklist entry.
DVR
Displays the number or ID of the DVR being checked.
Checklist Code
Displays the unique code for the CCTV checklist.
Name
Displays the name of the user who performed the checklist.
Plant
Displays the plant or company where the CCTV device is located.
Date
Displays the date and time the checklist was performed.
Action
Displays the actions that can be taken on the checklist data.
Detail
Used to view the details of the completed CCTV checklist.
-
Filling Out the CCTV Checklist
-
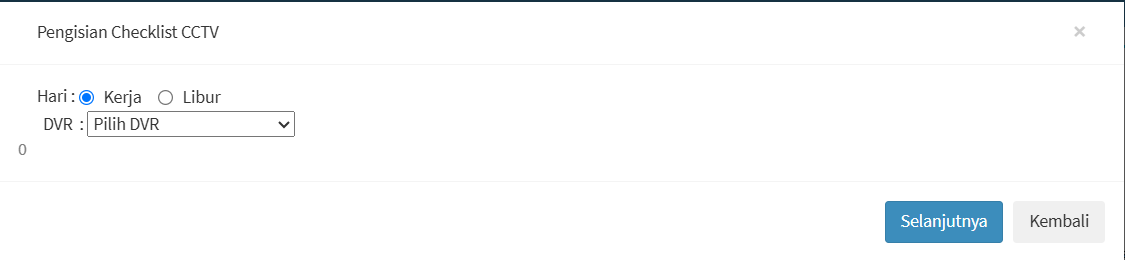
Step 1 – Click “CCTV Checklist”
On the main page, click the “CCTV Checklist” button. The system will display the CCTV Checklist Form.image.png

-
Step 2 – Select the Day Type
In the “Day” section, select the day type when the checklist is performed. The available options are:
Option
description
Work day
Used when the checklist is performed on a workday.
Holiday
Used when the checklist is completed on a holiday.
-
Step 3 – Select a DVR
In the DVR field, select the DVR to be inspected. The field will display the DVRs available in the system. Ensure the selected DVR matches the device and location to be inspected.
-
Step 4 - Click Next
After selecting the day type and DVR, click the Next button to continue filling out the checklist. The form includes the following buttons:
Button Description Next Used to proceed to the next step in filling out the CCTV checklist.
Back Used to return to the previous step or cancel the process.
X Used to close the form.
-
-
DVR Management
The DVR menu is used to add and manage DVR data used in the CCTV Checklist system. To open this page, click the DVR button on the CCTV Checklist page. The system will display the Add DVR form.
- Adding a DVR
In the Add DVR section, fill in the information for the DVR you want to register.
Field Description DVR No Used to enter the DVR number or ID.
Area Used to specify the area where the DVR is located.
IP Address Used to enter the DVR’s IP address.
Port Used to enter the port used by the DVR.
DVR Username Used to enter the DVR username. DVR Password Used to enter the DVR password DVR ID Used to enter the DVR ID. Get DVR ID Used to retrieve the DVR ID via a system function. Status Used to specify whether the DVR status is Active or Inactive. Save Used to save the entered DVR data. - DVR List
At the bottom of the page is a table listing the DVRs available in the system. The information displayed includes:
Coloum Description No Sequential number of the DVR data.
DVR Name or identifier of the DVR
Plant The plant where the DVR is used.
Status Displays the DVR status, such as Active or Inactive. Action Displays the actions that can be performed on the DVR data. Edit Used to modify the saved DVR information.
- Adding a DVR
-
Camera Management
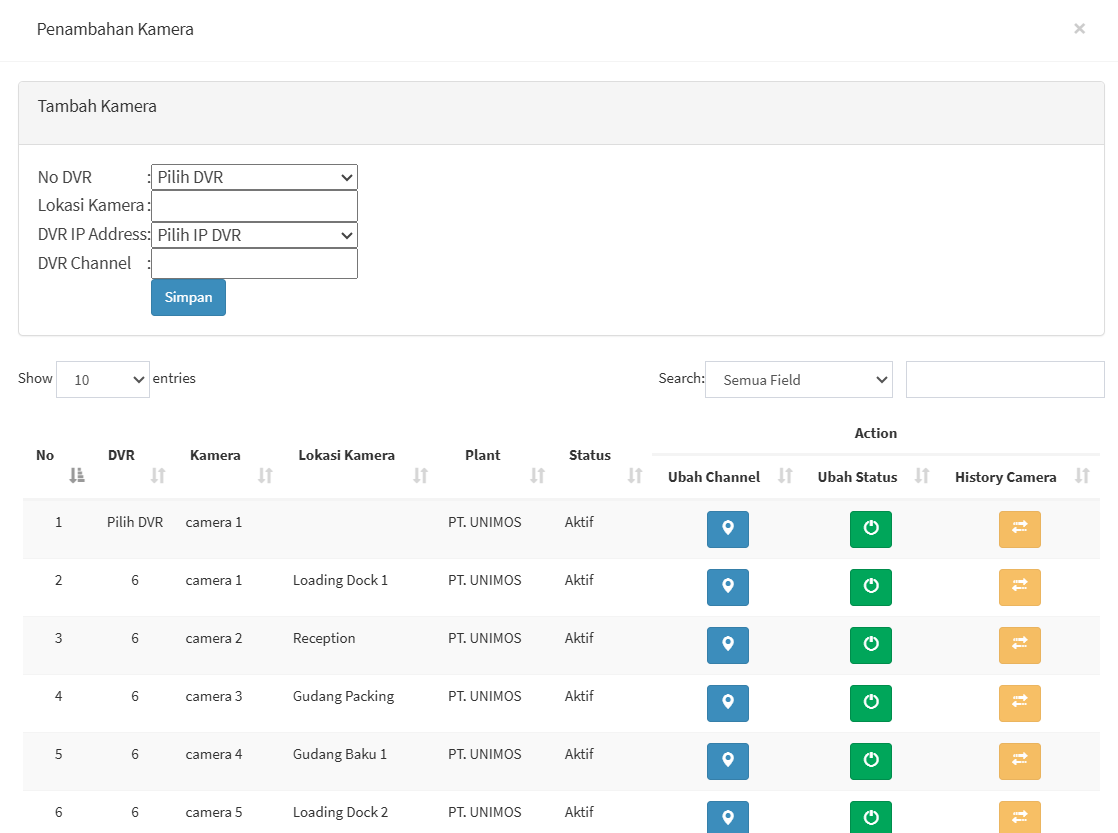
The Camera menu is used to add and manage CCTV cameras connected to the DVR. Click the camera button on the CCTV checklist main page. The system will display the camera addition page.

- Adding a Camera
In the Add Camera section, fill in the following information:
Field
Description
DVR No
Used to select the DVR to which the camera is connected.
Camera Location
Used to enter the camera’s installation location.
DVR IP Address
Used to select the IP address of the DVR being used.
DVR Channel
Used to enter the DVR channel used by the camer
Save
Used to save the camera data.
Used to enter the DVR channel used by the camera.
- Camera List
At the bottom of the page is a list of CCTV cameras that have been registered in the system. The information displayed includes:
Coloum
Description
No
The camera’s serial number.
DVR
The DVR to which the camera is connected.
Camera
Camera name or number.
Camera Location
Displays the camera’s installation location.
Plant
Displays the plant where the camera is used.
Status
Displays the camera’s status.
Action
Displays the actions that can be performed on the camera.
- Adding a Camera
-
Unimos Monthly Report
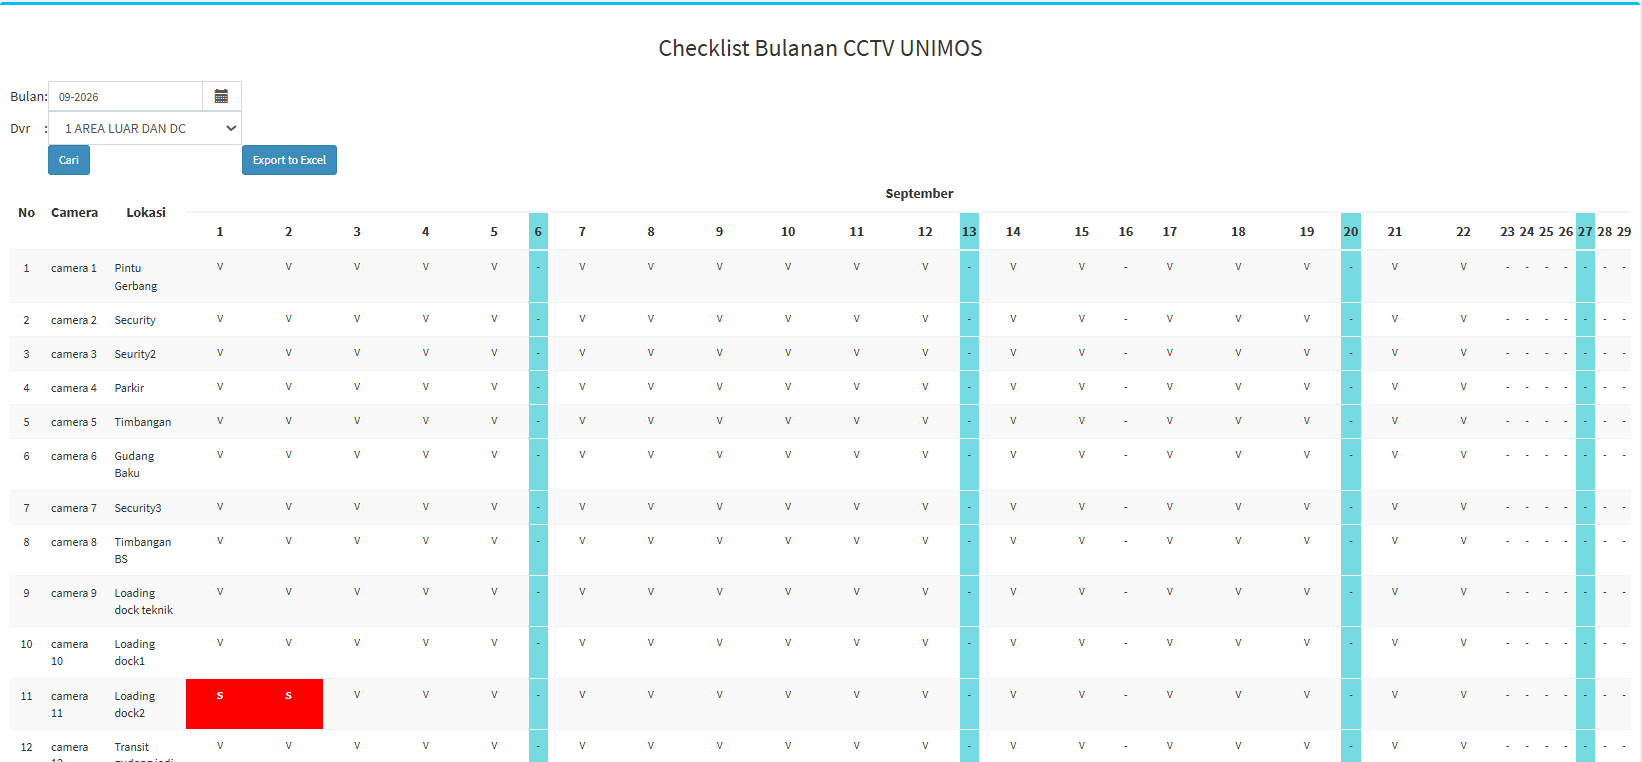
The Unimos Monthly Report menu is used to view the results of the monthly CCTV checklist at the PT. UNIMOS plant. Click the Unimos Monthly Report button on the CCTV Checklist page. The system will display the Unimos Monthly CCTV Checklist page.

-
Viewing the Report
At the top of the page, there are several options:
Field / Button
Description
Month
Used to select the month for which you want to view the checklist report.
DVR
Used to select the DVR to be included in the report.
Search
Used to display the report based on the selected Month and DVR.
Export to Excel
Used to export the checklist report to an Excel file.
-
CCTV Checklist Status
The monthly report includes several codes to indicate the camera’s status.
Code
Description
V
Visible: The camera is displaying an image.
S
Signal Lost: The camera has lost its signal.
C
Camera Lost: The camera is not detected or has lost its connection.
N
Not Recorded: Camera footage is unavailable or was not recorded.
In addition to the camera status codes, the report also includes special markers for:
-
Sundays
-
Holidays
These markers help users distinguish between workdays and Sundays or holidays in the monthly report. -
-
-
MGFI Monthly Report
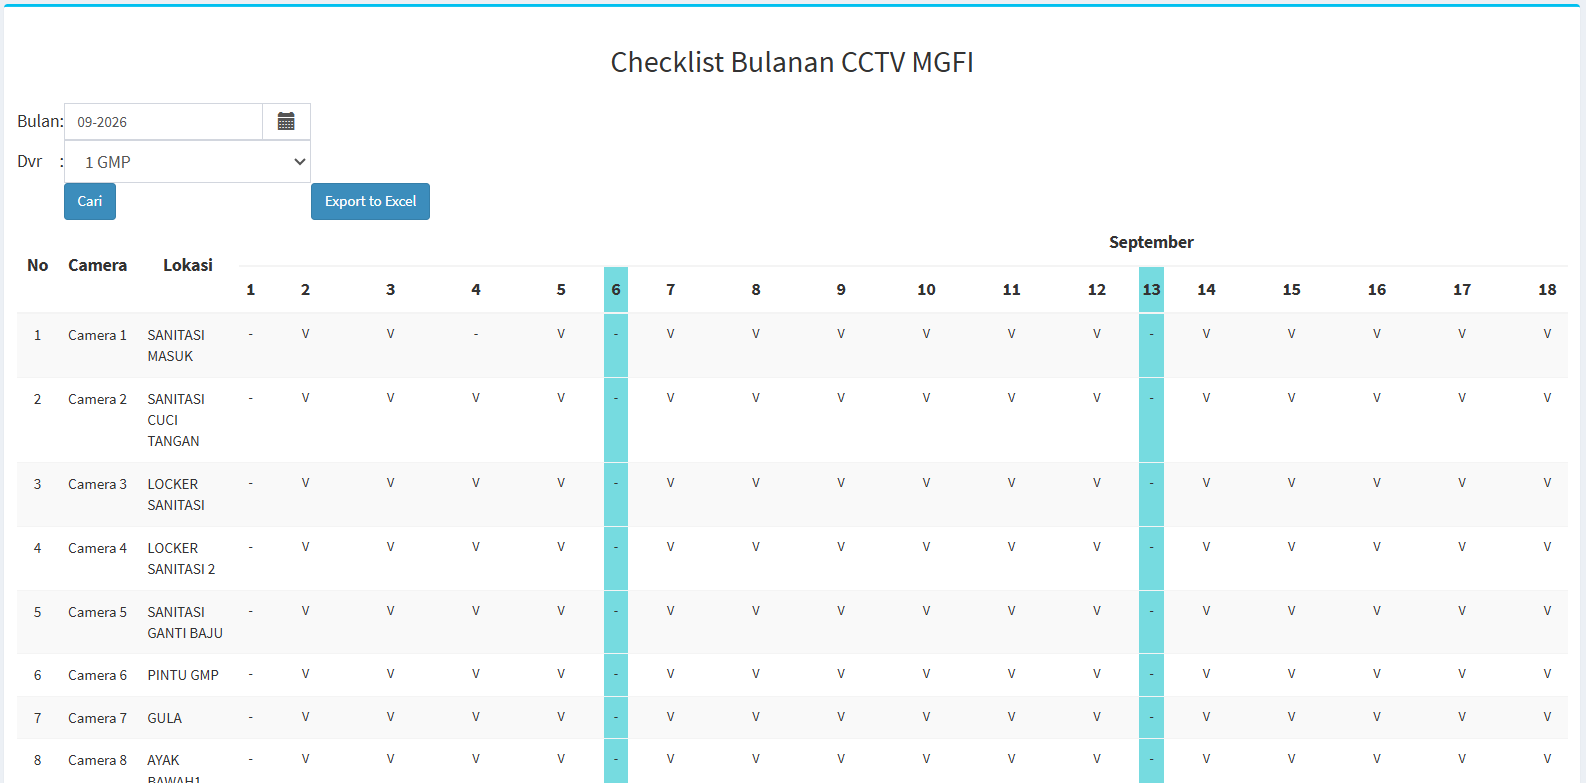
The MGFI Monthly Report menu is used to view the monthly CCTV checklist report for the PT. MGFI plant. Click the MGFI Monthly Report button. The system will display the MGFI Monthly CCTV Checklist page. This page also includes an Export to Excel button for exporting the report.

Reading the MGFI Monthly
Report In the report table, the main information displayed includes:Coloum
Description
No
Camera serial number.
Camera
Displays the camera name or number.
Location
Displays the camera installation location.
Date 1–31
Displays the camera checklist results for each date in the selected month.
-
Tips & Important Notes
-
Make sure the selected DVR matches the location of the device being inspected.
-
Select “Work” or “Off” depending on the day’s status when the checklist is completed.
-
Ensure that DVR information such as IP Address, Port, Username, Password, and DVR ID is entered according to the device’s configuration.
-
Ensure that the Camera Location and DVR Channel match the actual installation conditions.
-
Use the “Active” or “Inactive” status according to the device’s current status.
-
Use “Camera History” if you need to view the history of camera changes.
-
Use “Monthly Report” to monitor the status of cameras on a day-to-day basis.
-
Pay attention to the codes V, S, C, and N in the report to determine the status of each camera.
-
Use “Export to Excel” if the report needs to be saved or processed further.
-
Use the “Search” and “Show Entries” features to facilitate searching and managing large amounts of data.
TOWER
Checklist Module Guide
Module Location:
Access Requisition > Checklist > Tower
-
Tower Main View
The Tower Checklist menu is used to record and monitor the results of periodic tower condition inspections through the Access Requisition system. This page can be used to perform tower checklists, view a list of checklists that have been created, monitor the status of approvals and documents, and view annual tower preventive maintenance reports based on the UNIMOS or MGFI plant.
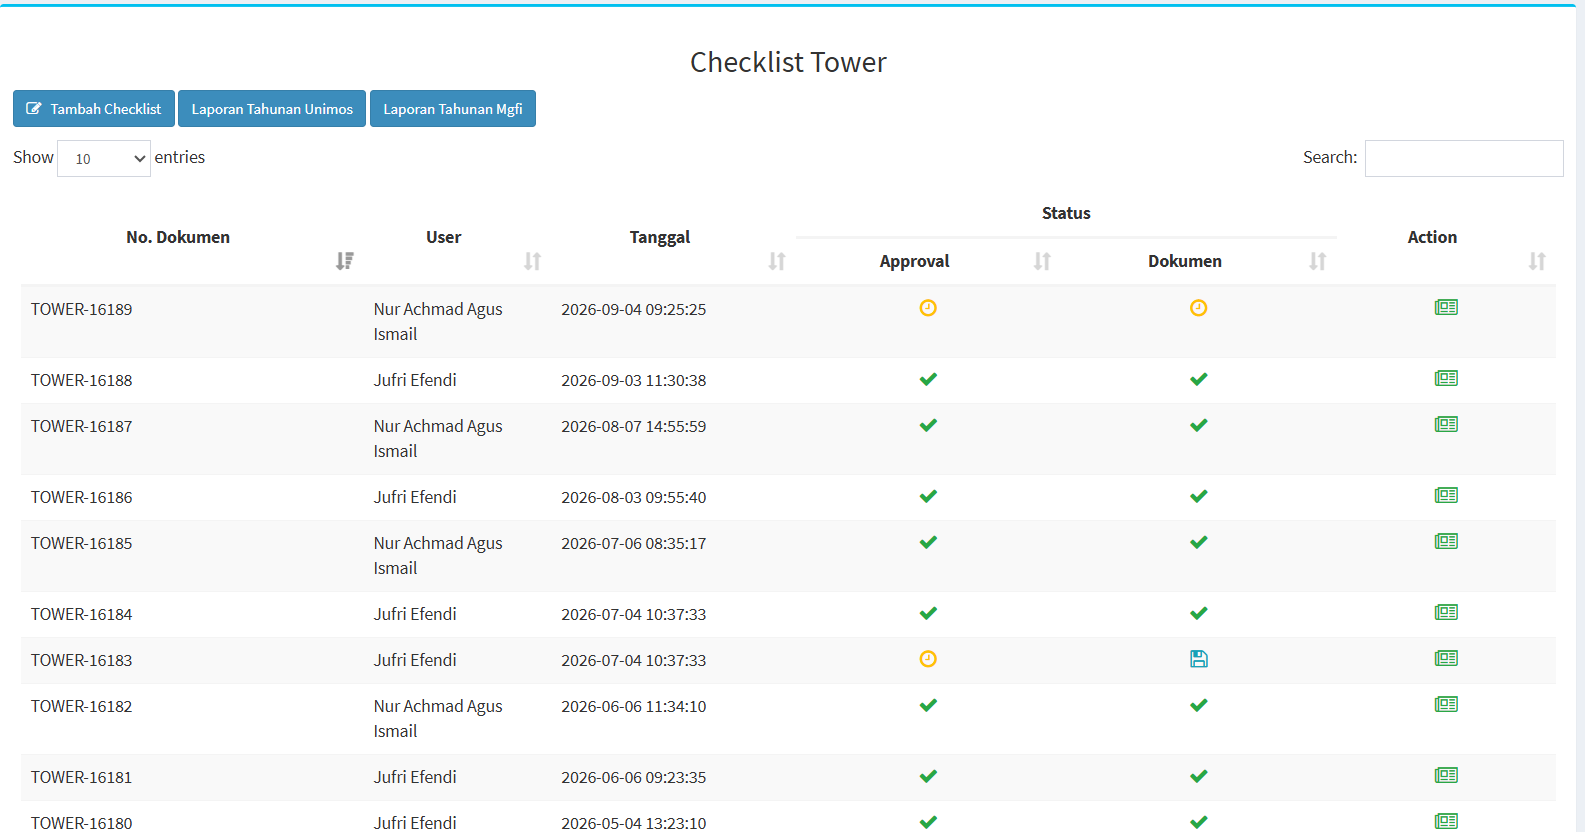
The following features are available on this Tower Main Page:
| Feature | Description |
|---|---|
| Add Checklist |
Used to create a new tower inspection checklist. |
| Unimos Annual Report | Used to view the annual tower preventive maintenance report for the UNIMOS plant. |
| Mgfi Annual Report | Used to view the annual tower preventive maintenance report for the MGFI plant. |
| Show Entries | Used to specify the number of records displayed in the table. |
| Search | Used to search for specific checklist data. |
- Tower Checklist List
The main page displays a table showing tower checklist data that has been recorded in the system.
Coloum Description Dokumen No. Displays the document number of the tower checklist.
User Displays the name of the user who performed or created the checklist.
Date Displays the date and time the checklist was recorded in the system.
Status Approval Displays the status of the checklist approval process.
Status Dokumen Displays the status of the checklist document.
Action Displays the actions that can be taken on the checklist data.
Checklist Status
-
Checklist Status
In the Status column, the system displays the Approval and Document statuses in the form of icons. The interface includes several types of icons, including:
-
A green checkmark icon, indicating that the related step has been completed or processed (approved).
-
A yellow/orange icon, indicating that the related step is still in progress (pending).
- A blue icon in the Document column indicates that the document is available.
Since statuses may change as the checklist and approval processes progress, users should review both columns to determine the document’s current status. -
- Add Checklist
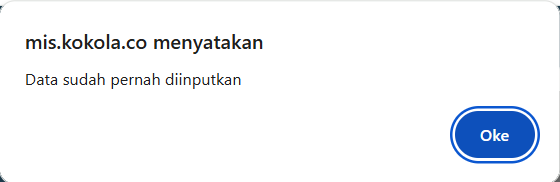
To create a new Tower checklist, click the Add Checklist button on the main page. The system will check the available checklist data. If a checklist for that condition or period has already been created, the system will display a notification:
Click the OK button to close the notification. This notification is designed to prevent users from creating the same checklist more than once.
-
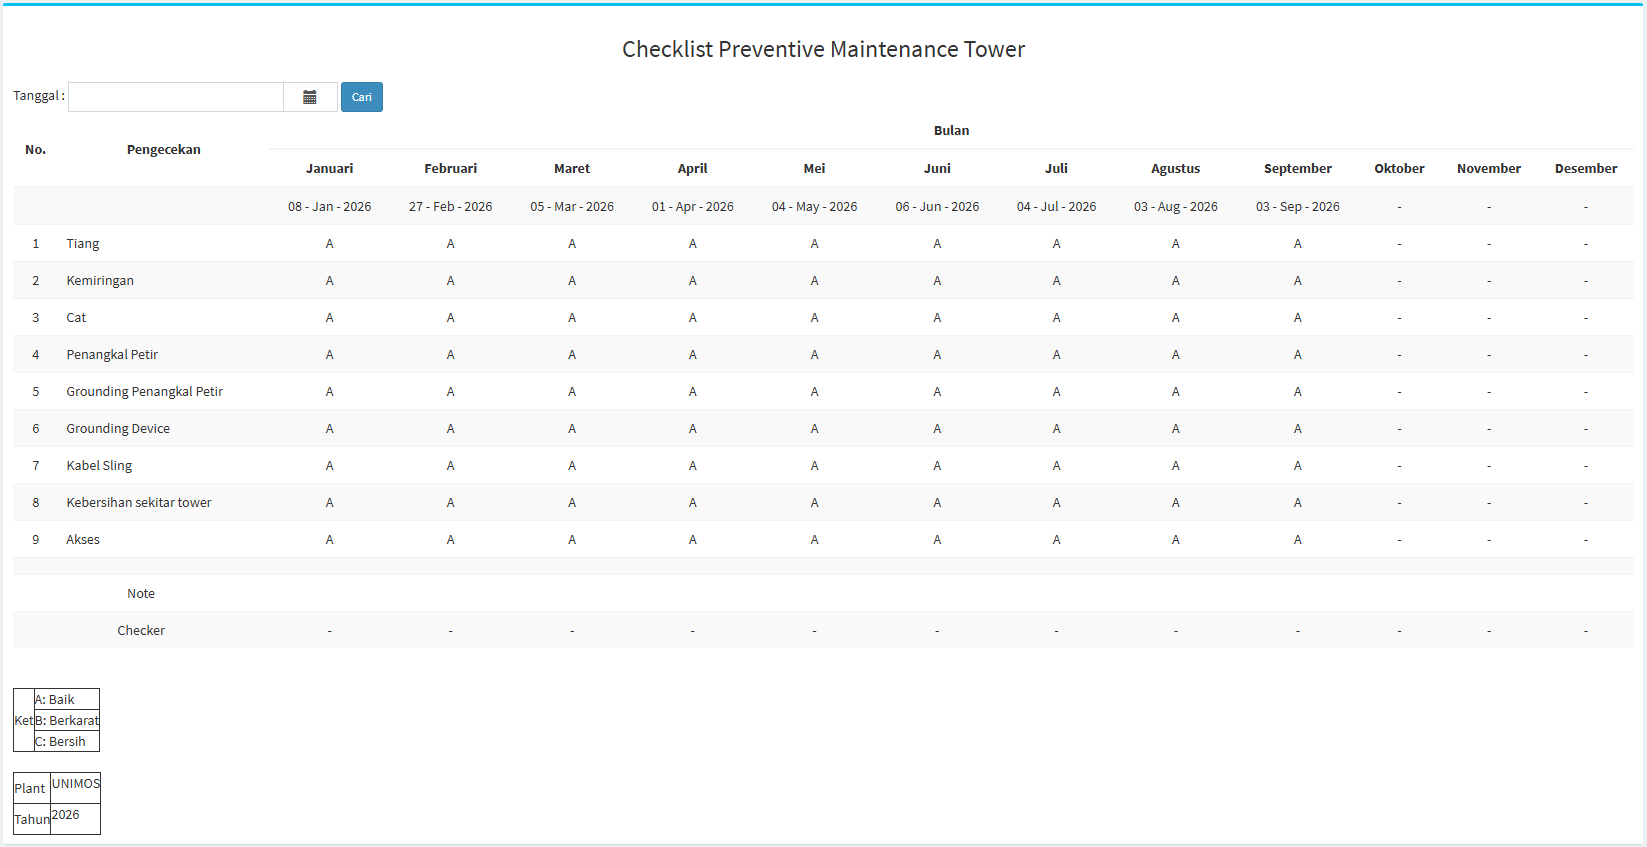
UNIMOS Annual Report
To view the tower inspection checklist report for the UNIMOS plant, click the “UNIMOS Annual Report” button. The report displays the results of tower inspections over the course of one year, organized by month from January through December. The system will display the following page:

-
Tower Inspection Data
The annual report displays several parts of the tower that are inspected periodically, including:
No. Inspection
Description 1 Pole
Displays the results of the inspection of the tower pole’s condition.
2 Tilt
Displays the results of the inspection of the tower’s condition or tilt.
3 Paint
Displays the results of the inspection of the tower’s paint condition.
4 Lightning Rod
Displays the results of the inspection of the lightning rod.
5 Lightning Rod Grounding Displays the results of the grounding inspection for the lightning rod. 6 Grounding Device Displays the results of the grounding device inspection. 7 Sling Cable Displays the results of the sling cable condition inspection. 8 Cleanliness Around the Tower Displays the results of the cleanliness inspection of the area around the tower. 9 Access Displays the results of the inspection of access to or around the tower.
Each inspection result is displayed by month so that users can monitor changes in the tower’s condition over the course of a year. The date the checklist was completed can also be displayed at the top of each month. - Checklist Results Description
At the bottom of the report, there is an explanation for interpreting the inspection results. These codes are used in the table to indicate the inspection results for each part of the tower for the relevant month.
Code Description A Good B Rusted C Clean
-
-
MGFI Annual Report
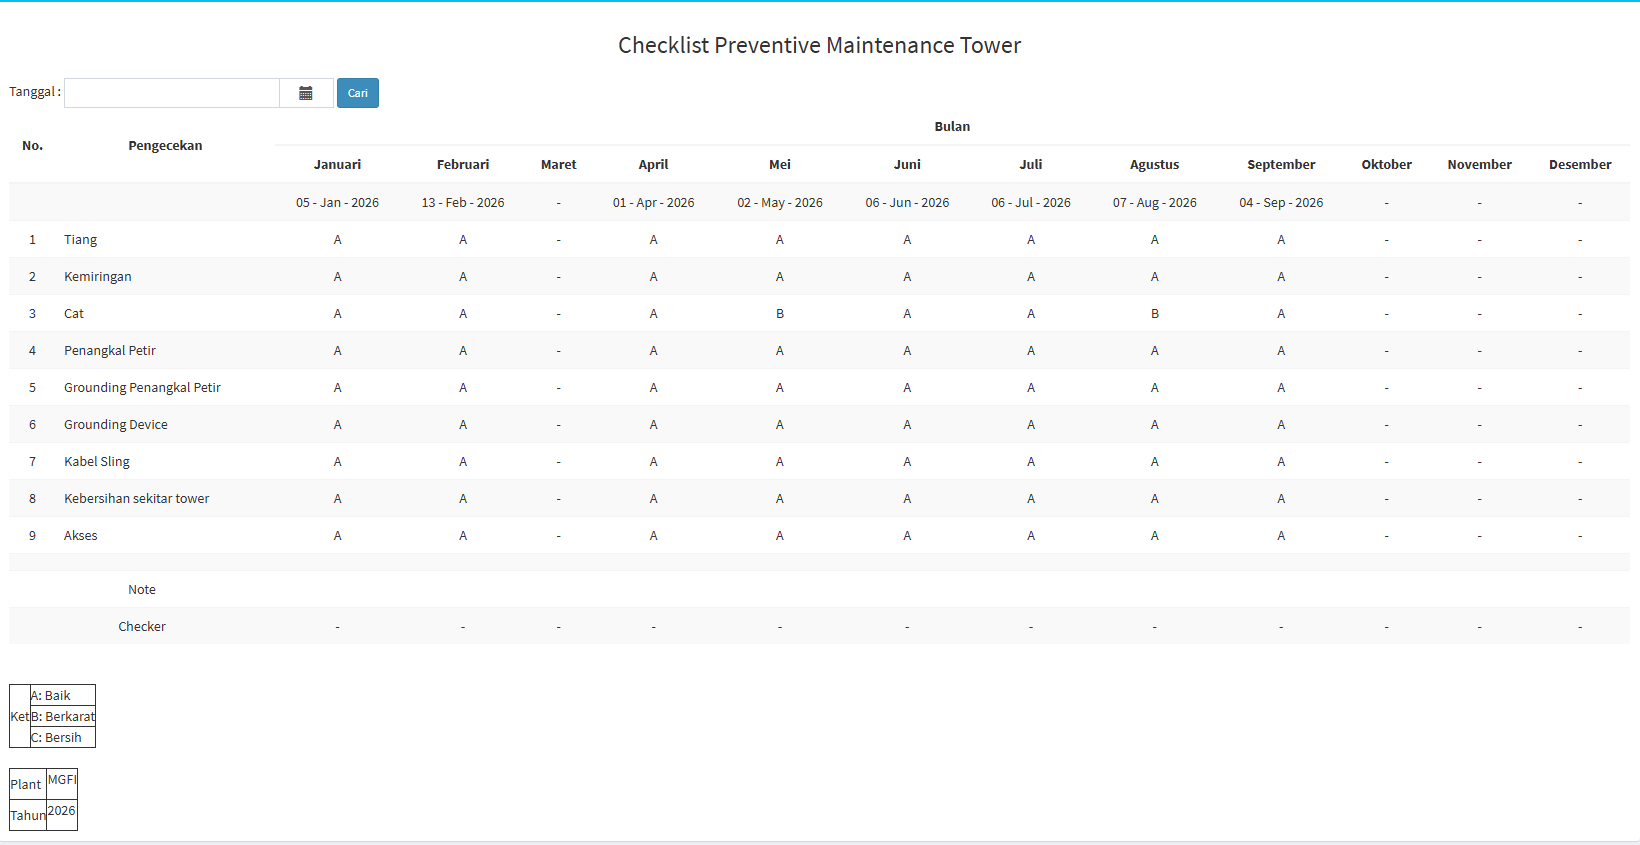
The system will display the Tower Preventive Maintenance Checklist page for the MGFI plant. The structure of the MGFI report is essentially the same as that of the UNIMOS report. The structure of the MGFI report is essentially the same as that of the UNIMOS report. Data is displayed by month from January through December. The system will display:

Differences Between UNIMOS and MGFI Reports
The main difference lies in the plant that serves as the data source.
Report Plant UNIMOS Annual Report
UNIMOS MGFI Annual Report
MGFI
Viewing Tower Condition History
Annual reports can be used to compare the condition of tower components from month to month. For example, in the MGFI report, the condition of a particular part may show different results in a given month. Users can view these changes directly in the component row and the corresponding month column. If a month does not yet have a checklist result, the table will display a “-” symbol. With this view, tower condition can be monitored periodically throughout the year.
-
Tips & Important Notes
-
Use “Add Checklist” to create a new tower inspection record.
-
If the message “Data has already been entered” appears, it means the relevant checklist data is already available in the system, so there is no need to create the same data again.
-
Check the Document No. to ensure the checklist you open matches the required data.
-
Check the Approval Status and Document Status to track the progress of the checklist process.
-
Use “Search” to find specific checklist data more quickly.
-
Use “Show Entries” to adjust the number of records displayed.
-
Use the Unimos Annual Report or the Mgfi Annual Report depending on the plant you wish to inspect.
-
Note the checklist dates for each month when reviewing the annual report.
-
Use the inspection result codes according to the descriptions provided in the report.
-
A “-” indicates that no checklist values or information are displayed for that period.
-
Make sure the Plant and Year at the bottom of the report are correct before using the report data.
-
DATA CENTER
Checklist Module Guide
Module Location:
Access Requisition > Checklist > Data Center
-
Data Center Checklist Main View
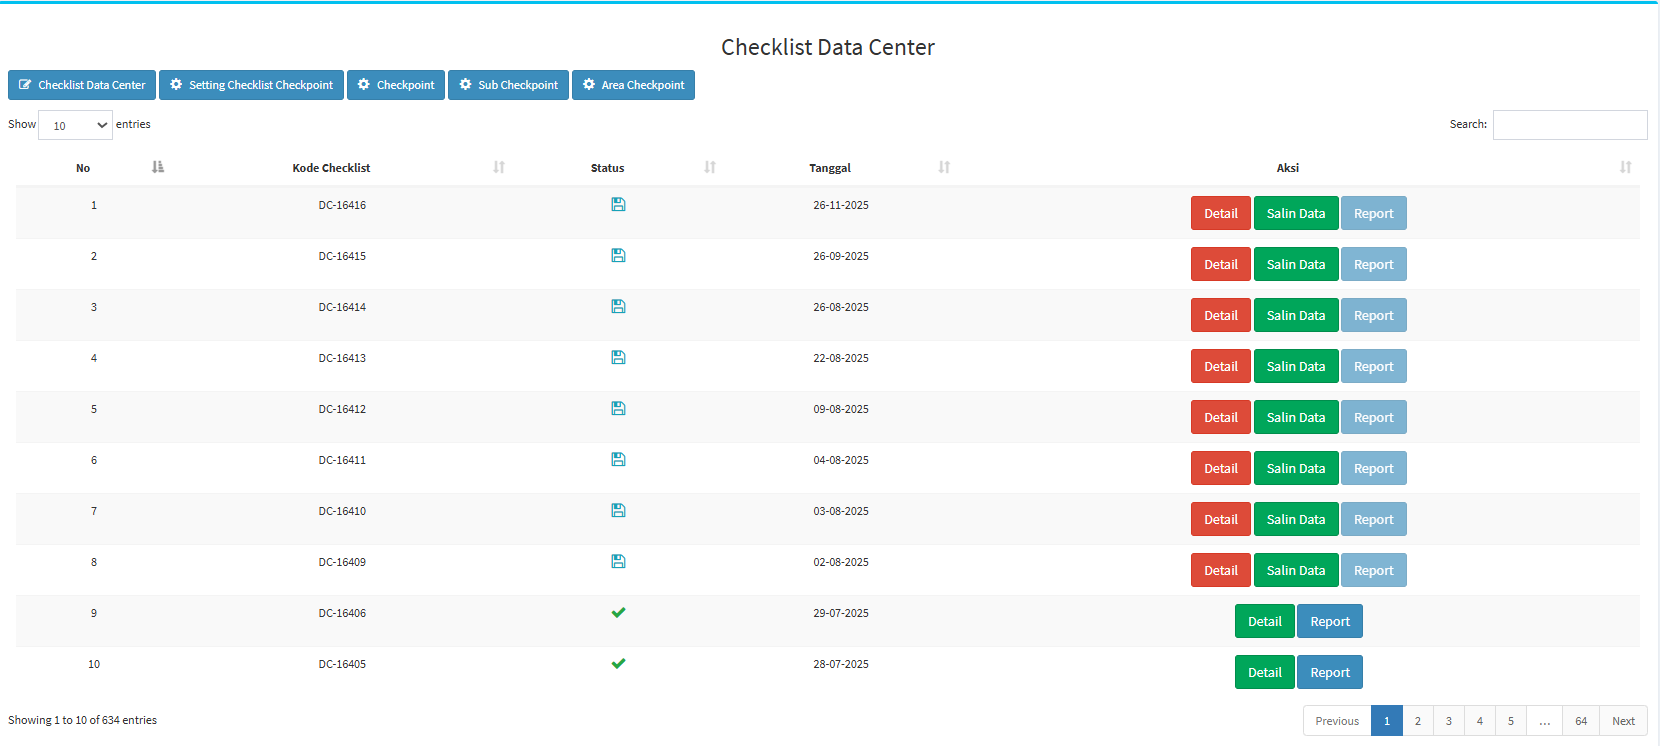
The Data Center Checklist menu is used to record and monitor the results of periodic inspections of the data center’s condition through the Access Requisition system. In addition to performing checklists, this page provides settings for inspection components-such as Checkpoints, Sub-Checkpoints, and Checkpoint Areas-as well as configurations for the relationships between checkpoints. Users can also view checklist details, copy checklist data, and generate reports from saved data.
Data Center Checklist List
The main page features a table displaying the Data Center checklists that have been recorded in the system.
Table Description
| Coloum | Description |
|---|---|
| No |
Displays the sequential number of the data. |
| Checklist Code |
Displays the identification code for the Data Center checklist. |
| Status |
Displays the checklist status as an icon.
|
| Date |
Displays the date the checklist was created or executed. |
| Action |
Displays the actions that can be taken on the checklist. |
At the top of the page, there are also several key features:
| Feature | Description |
|---|---|
| Data Center Checklist |
Used to create or run a Data Center checklist. |
| Checklist Checkpoint Setting |
Used to configure the relationships between Checkpoints, Sub-Checkpoints, and Checkpoint Areas used in the checklist. |
| Checkpoint | Used to add and manage master Checkpoints. |
| Sub Checkpoint | Used to add and manage Sub-Checkpoints for each Checkpoint. |
| Area Checkpoint | Used to add and manage areas used in a Checkpoint. |
| Show Entries | Used to specify the number of records displayed in the table. |
| Search | Used to search for specific checklist data. |
-
Data Center Checklist List
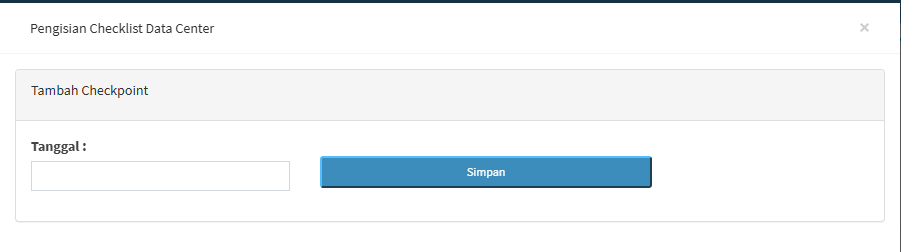
On this page, you can create a new Data Center checklist by clicking the “Data Center Checklist” button. The system will display the Data Center Checklist form. On the initial screen, you’ll see the “Add Checkpoint” section with a date field.

-
Step 1 – Set the date
Fill in the Date field with the date the Data Center checklist will be performed. Make sure the selected date matches the time of the inspection.
-
Step 2 - Click Save
After the date has been set, click the Save button.
Field / button Description Date Used to set the date for the Data Center checklist. Save Used to save or continue creating the checklist based on the selected date. X Used to close the form.
-
-
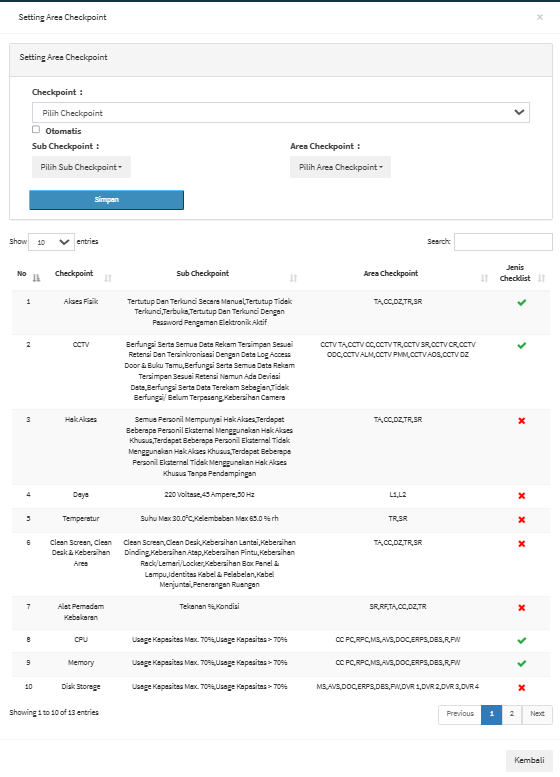
Data Center Checklist Settings
The Checkpoint Settings menu is used to configure the items to be used in the Data Center checklist.

This section contains the following fields:
Field Description Checkpoint Used to specify the Checkpoint to be configured.
Automatic
Used to enable automatic configuration when needed.
Sub Checkpoint Used to select the Sub-Checkpoint associated with the Checkpoint.
Area Checkpoint Used to select the Checkpoint Area related to the inspection.
Save Used to save the configuration.
At the bottom of the page is a table of the configurations that have been created.
Coloum Description No Sequence number of the configuration.
Checkpoint Displays the Checkpoint being used.
Sub Checkpoint Displays the related Sub-Checkpoints.
Area Checkpoint Displays the areas used in the inspection. Checklist Type Displays the conditions or types of checklist configurations in the form of indicators.
Examples of Checkpoints visible in the system include: Physical Access, CCTV, Access Rights, Power, Temperature, Clean Screen/Clean Desk & Area Cleanliness, Fire Extinguishers, CPU, Memory, and Disk Storage. -
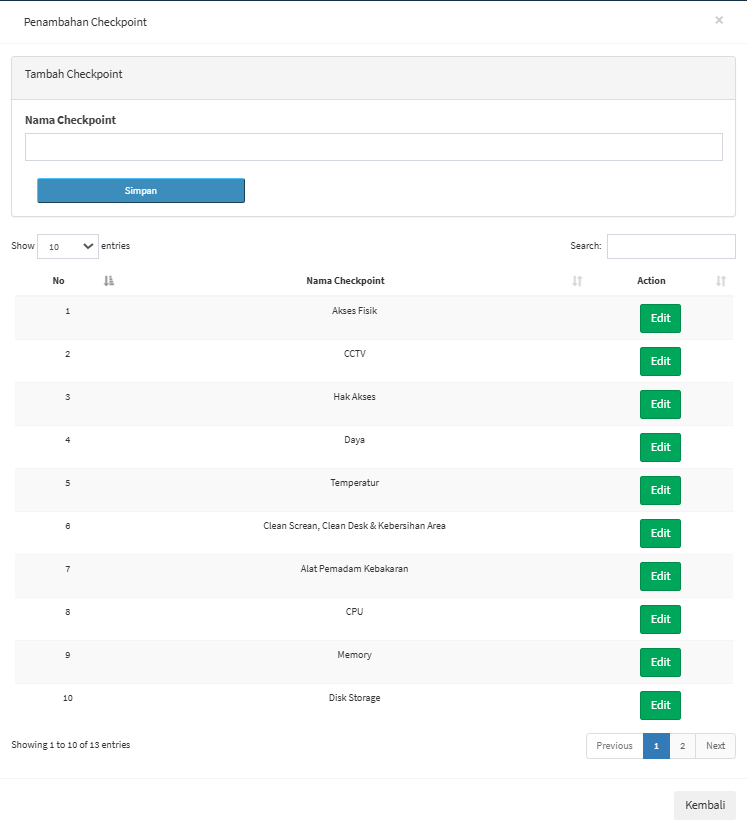
Checkpoint
The Checkpoint menu is used to create and manage the main categories of inspections used in the Data Center Checklist process. Checkpoints serve as the foundation or main groups of inspection items. Each Checkpoint can have several Sub-Checkpoints as detailed inspection items and can be applied to one or more Checkpoint Areas.

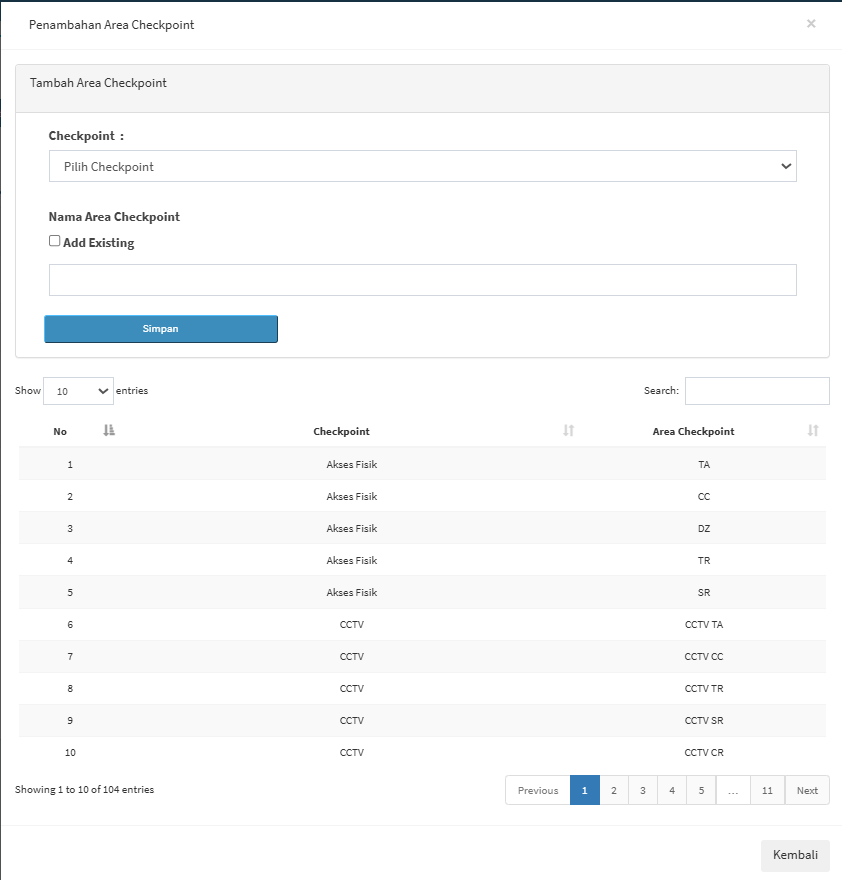
Adding a Checkpoint Area
This page contains a form for adding a new Checkpoint and a table displaying existing Checkpoin
Field Description Checkpoint Used to select the Checkpoint to which a Checkpoint Area will be assigned. Add Existing Used if you want to use existing area data. Checkpoint Area Name
Used to enter the name or code of the inspection area.
Save Used to save the Checkpoint Area.
Field Descriptions
Field / Button Keterangan Checkpoint Name Used to enter the name of the main Data Center inspection category.
Save Used to save the new Checkpoint to the system.
Back Used to return to the previous page.
-
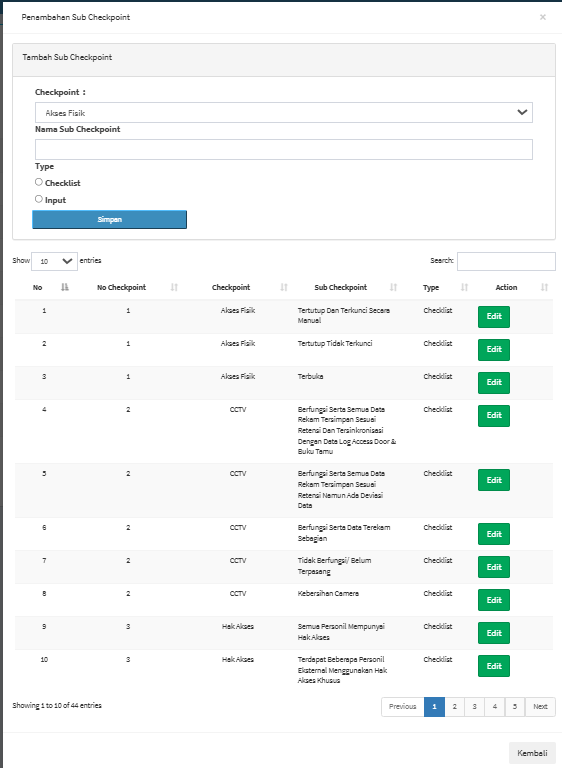
Sub Checkpoint
The Sub-Checkpoint menu is used to create and manage the inspection details of a checkpoint in the Data Center Checklist. If a checkpoint is the main inspection category, then a sub-checkpoint is a more specific point or condition inspected within that category.

Adding a Sub-Checkpoint
On this page, you can create a new sub-checkpoint by filling in the following information:
Field Description Checkpoint Used to specify the parent Checkpoint of the Sub-Checkpoint. Sub Checkpoint Name Used to enter the name or description of the inspection. Type – Checklist Used if the Sub-Checkpoint consists of a list of conditions. Type – Input Used if the Sub-Checkpoint requires data input from the user. Save Used to save the Sub-Checkpoint. Example of Sub-Checkpoints
For example, under the Physical Access Checkpoint, there are Sub-Checkpoints such as:
-
Closed and manually locked.
-
Closed but not locked.
-
Open.
Meanwhile, under the CCTV Checkpoint, Sub-Checkpoints may include conditions regarding camera functionality, data retention, time synchronization, or camera cleanliness. With this structure, a single Checkpoint can have multiple inspection items.List of Sub-Checkpoints
The table contains the following information:
Coloum Description No Data sequence number.
Checkpoint No Displays the checkpoint number or ID. Checkpoint Displays the parent checkpoint. Sub Checkpoint Displays inspection details. Type Displays the sub-checkpoint type, such as Checklist or Input. Action Displays the action taken on the data. Edit Used to modify sub-checkpoint data. -
-
Area Checkpoint
The Checkpoint Area menu is used to specify the area or location associated with a checkpoint. The system will display the page for adding a checkpoint area.

Adding a Sub-Checkpoint
To create a new sub-checkpoint, fill in the following information:
Field
Description
Checkpoint
Used to specify the parent checkpoint of the sub-checkpoint.
Sub Checkpoint Name
Used to enter the name or description of the inspection.
Type – Checklist
Used if the Sub-Checkpoint consists of a list of conditions or a checklist.
Type – Input
Used if the Sub-Checkpoint requires data input from the user.
Save
Used to save the Sub-Checkpoint.
Examples of Sub-Checkpoints
For example, the Physical Access Checkpoint includes sub-checkpoints such as:
-
Closed and manually locked.
-
Closed but unlocked.
-
Open.
Meanwhile, in the CCTV Checkpoint, sub-checkpoints may include conditions related to camera functionality, data retention, time synchronization, and camera cleanliness.
With this structure, a single checkpoint can have multiple inspection items. Relationship Between Checkpoints, Sub-Checkpoints, and Checkpoint Areas. In the Data Center Checklist, these three components have interrelated functionsComponent
Function
Checkpoint
Defines the main category being inspected.
Sub-Checkpoint
Defines the details or inspection items of a Checkpoint.
Area Checkpoint
Defines the location or area where the inspection is conducted.
Checkpoint Setting Checklist
Links Checkpoints, Sub-Checkpoints, and Checkpoint Areas so they can be used in the checklist.
-
Tips & Important Notes
-
Make sure checkpoints are created according to the required inspection categories.
-
Use sub-checkpoints to describe inspection items in greater detail.
-
Select the Checklist or Input type based on the required data format.
-
Ensure that the Checkpoint Area matches the inspection location.
-
Use the Checklist Checkpoint Settings to link Checkpoints, Sub-Checkpoints, and Checkpoint Areas before using them in a checklist.
-
Double-check the date before saving the Data Center Checklist.
-
Use Details to view saved checklist data.
-
Use Copy Data only for checklists that contain data you wish to reuse.
-
Use Report to open checklist reports.
-
Use Search to find data more quickly.
-
Use Edit to update Checkpoint or Sub-Checkpoint masters as needed.
- Avoid creating masters with the same name if that data already exists in the system.
MIS
SUBMISSION LIST
MIS Module Guide
Module Location:
Go to Requisition > MIS > Submission List
The Submission List menu is used to view and monitor submissions received by the MIS. Through this page, you can filter data by period, status, and submission type, as well as view detailed information, processing progress, and available actions for each submission.
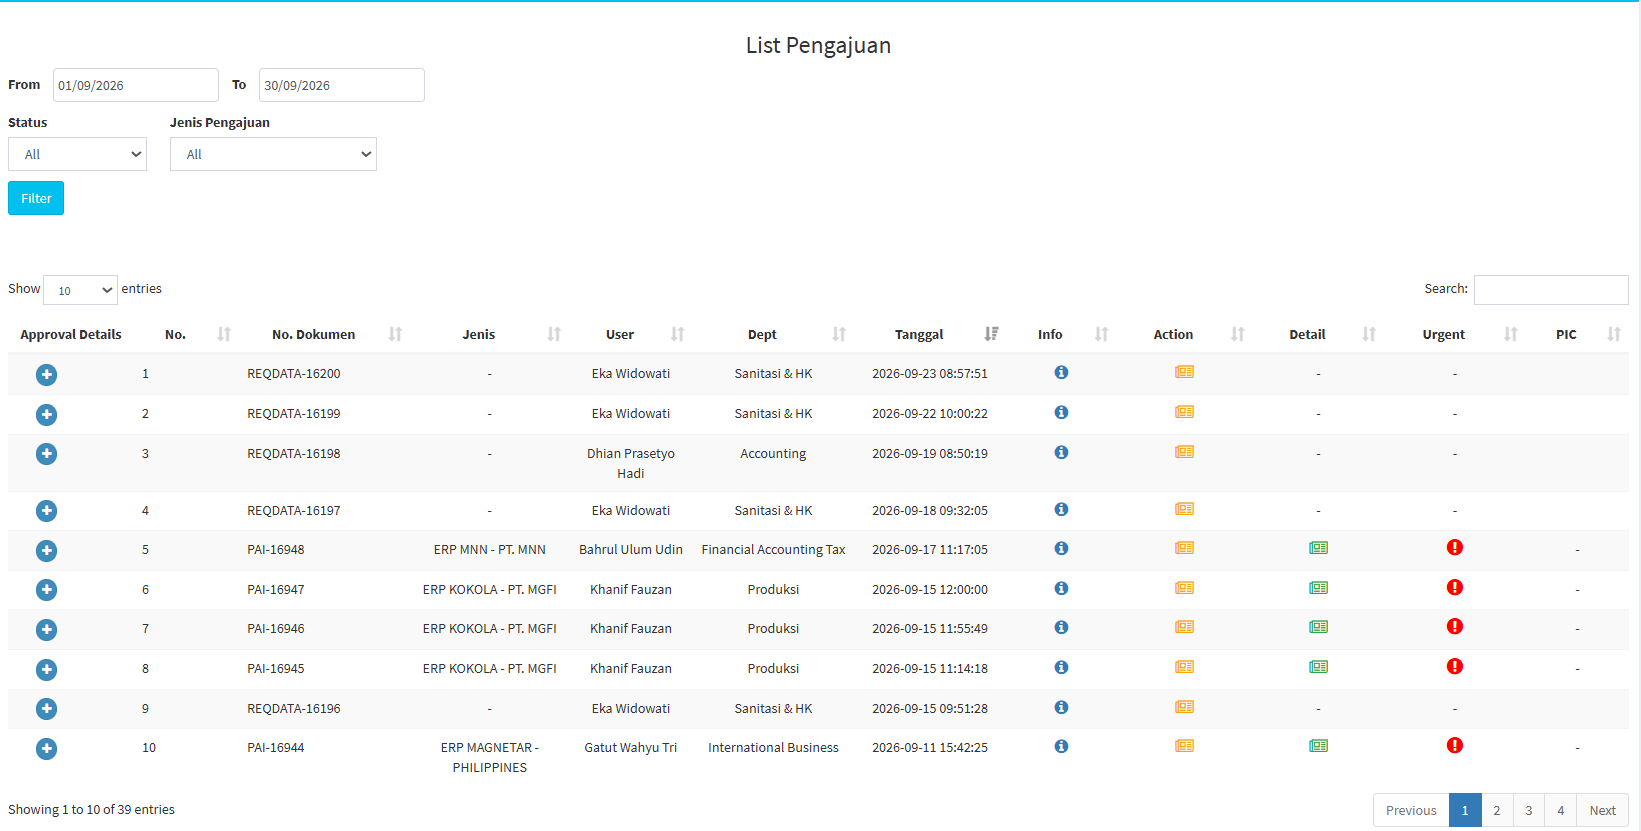
Application List Filters
At the top of the page, there are several filters used to narrow down the data.
| Section | Description |
|---|---|
| From |
Used to specify the start date of the application period. |
| To | Used to specify the end date of the application period. |
| Status | Used to filter data based on application status. |
|
Application Typ |
Used to filter data based on application type. |
| Filter | Used to display data based on the selected parameters. |
| Search | Used to search for data based on specific keywords. |
| Show Entries | Used to specify the number of records displayed per page. |
How to Use the Filter
- Set the start date in the From field.
- Set the end date in the To field.
- Select a Status if needed.
- Select an Application Type.
- Click Filter.
- The system will display the corresponding data
If you select All, the system will display all data in that category.
Submission List Table
| Coloum | Description |
|---|---|
| Approval Details | Used to view approval process details. |
| No. | Displays the sequential number of the record. |
| Dokumen No. | Displays the submission identification number. |
| Type | Displays the type of application or submission. |
| User | Displays the user associated with the submission. |
| Dept | Displays the user’s department. |
| Date | Displays the date and time of the submission. |
| Info | Displays the application status information. |
| Action | Used to open application information via “View Description.” |
| Detail | Used to view the processing progress via “View Details.” |
| Urgent | Used to mark an application as urgent. |
| PIC | Displays the PIC handling the application, if available. |
Icon Explanations
| Icon | Description |
|---|---|
| Blue Icon – Info | Used to open “View Description.” |
| Yellow Icon – Action | Used to open “View Description.” |
| Green Icon – Detail | Used to open “View Detail.” |
| Red Ikon – Urgent | Used to set the request as urgent. |
View Description
The View Description feature is used to view more detailed information about a submission. To open it:
- Select an entry on the Submission List page.
-
Click the yellow icon in the Action column.
-
The system will display the application details page.
-
For Application Change requests, the system displays the following page
Application Information
On the left side of the page is information about the user and the approval process. This information may include:
- User name
- NIK
- Rol
- Department
- Submission ID
- Process date
- Approver
- Approval process status
Visible approval stages may include:
- Proposer
- Change Approval
- Module PIC
- Work Approval
- MIS
If the process is not yet complete, the system may display the status “Pending.”
Results Tab
The Results tab displays key information about the request.
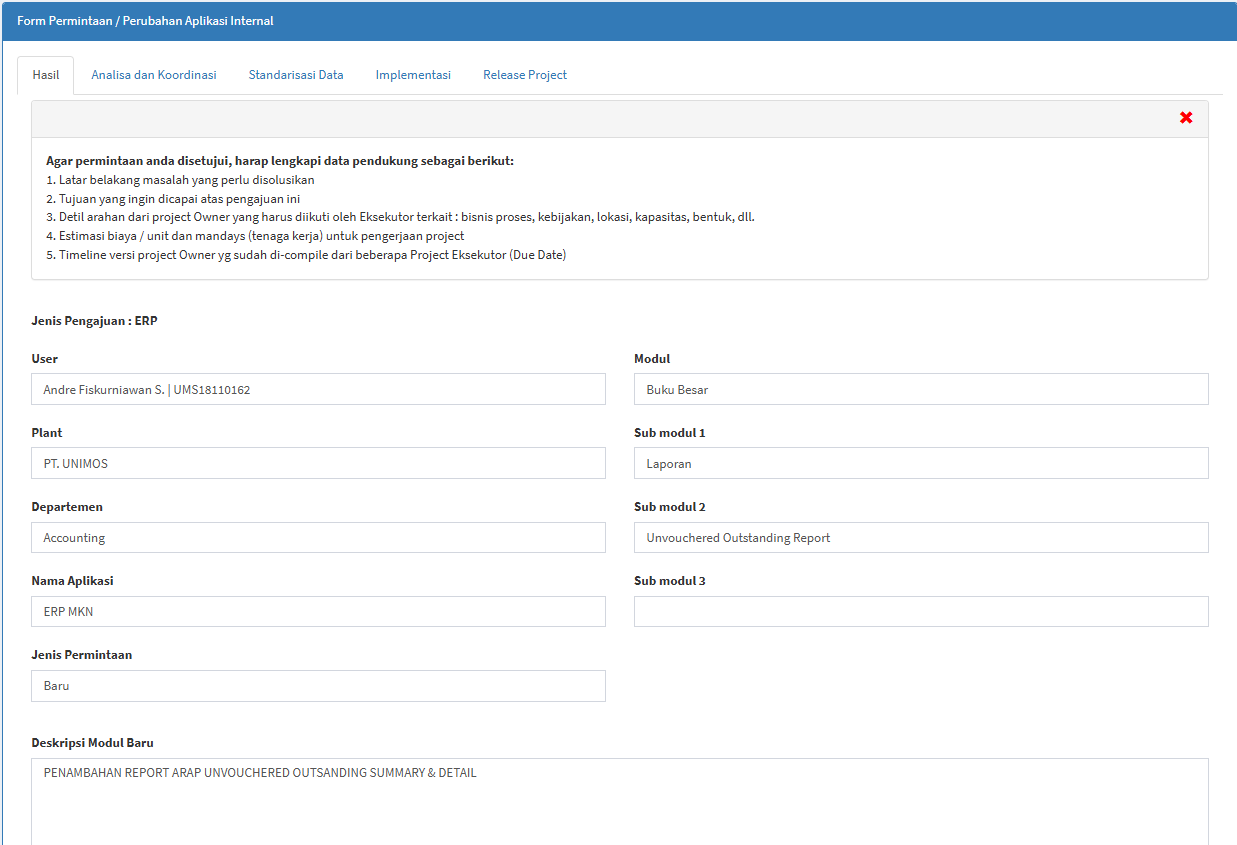
Available fields include:
| Field | Description |
|---|---|
|
Request Type |
Displays the type of request. |
| User |
Displays the user associated with the request. |
| Plant |
Displays the plant/company. |
| Departement |
Displays the user’s department. |
| Application Name | Displays the submitted application. |
| Request Type | Displays the type of request. |
| Module | Displays the main module. |
| Submodules 1–3 | Displays submodules, if available. |
|
New Module Description |
Displays an explanation of the need for changes or a new module. |
Analysis and Coordination
The Analysis and Coordination tab is used to record the initial project planning.
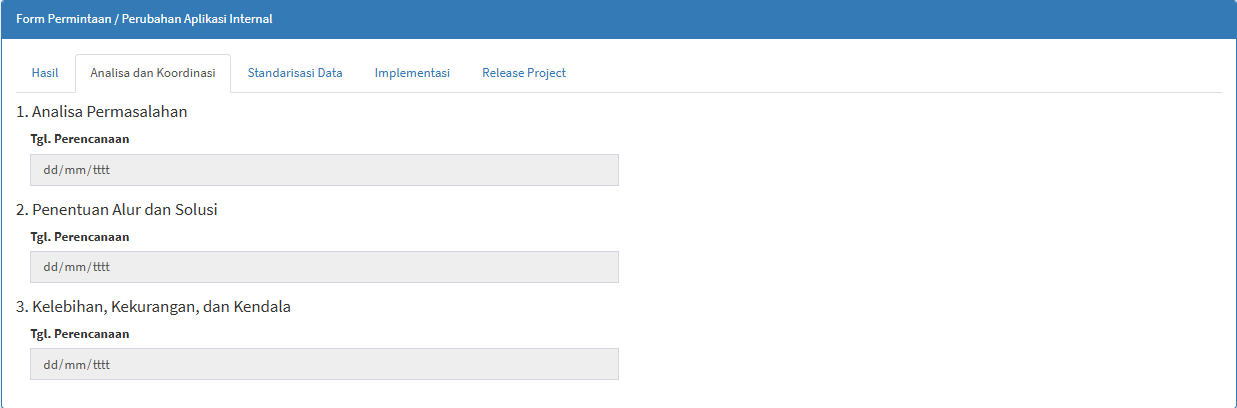
Available Phases:
| Phase | Description |
|---|---|
|
Problem Analysis |
The phase of analyzing the problems that form the basis of the proposal. |
|
Determination of Workflow and Solutions |
The phase of determining the workflow and solutions to be used. |
| Advantages, Disadvantages, and Constraints | The stage for evaluating the conditions and constraints of the planned solution. |
| Planning Dates | Used to determine the planned dates for each activity. |
Data Standardization
The Data Standardization tab is used to display plans related to data readiness.
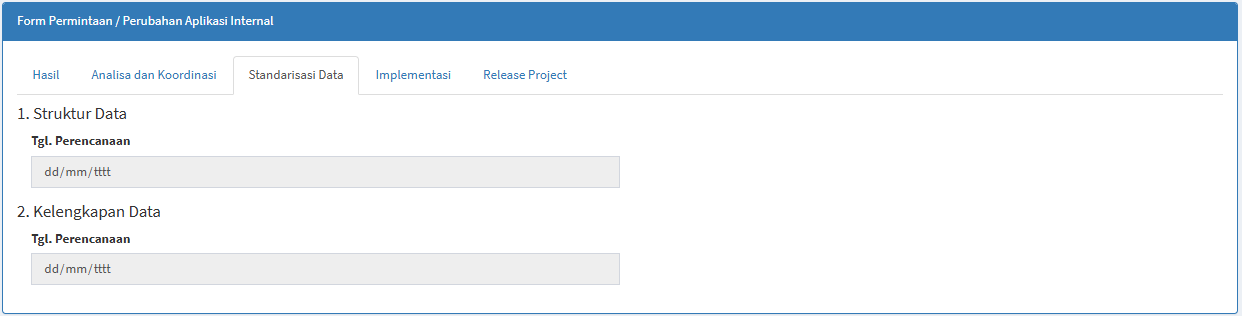
Available stages:
| Phase | Description |
|---|---|
|
Data Structure |
Used for planning related to data structure. |
|
Data Completeness |
Used for planning data completeness checks. |
|
Planning Date |
Used to determine the implementation schedule. |
Implementation
The Implementation tab is used to display the development and testing phases.
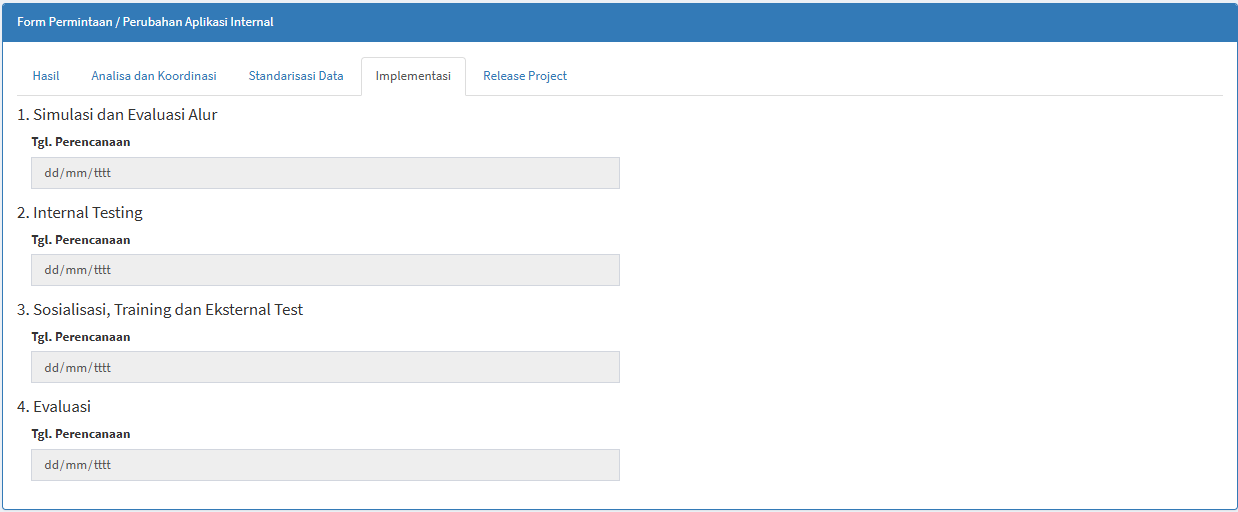
Available phases:
| Phase | Description |
|---|---|
|
Workflow Simulation and Evaluation |
The phase for simulating and evaluating the process workflow. |
| Internal Testing | The internal testing phase. |
| Sosialisasi, Training dan Eksternal Test | The outreach, training, and external testing phase. |
| Evaluation | The phase for evaluating the implementation results. |
| Planning Dates | Used to set the planned dates for each phase. |
Project Release
The Project Release tab is used to display the final stages before the project is made available to users.
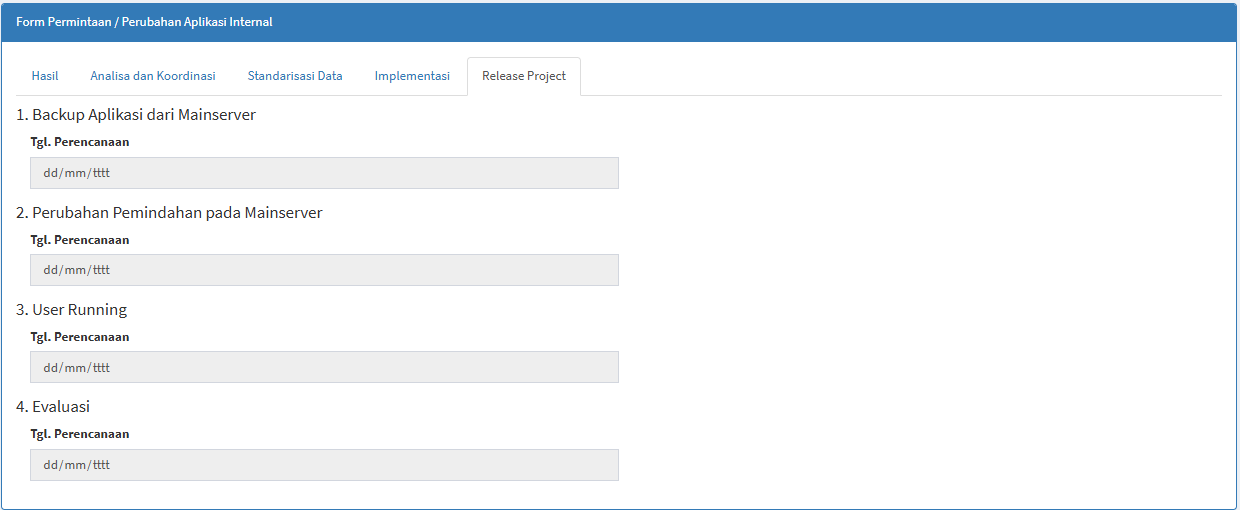
| Phase | Description |
|---|---|
|
Application Backup from Main Server |
The stage for preparing the application backup. |
|
Changes and Migration to Main Server |
The stage for making changes or migrating to the Main Server. |
| User Running |
The stage when users begin using the application. |
|
Evaluation |
The evaluation stage following the release. |
|
Planning Date |
Used to determine the schedule for each stage. |
View Details
The View Details feature is used to view the progress of a project.
Click the green icon in the Details column.
The system will display the following page:
Executor Project Timeline
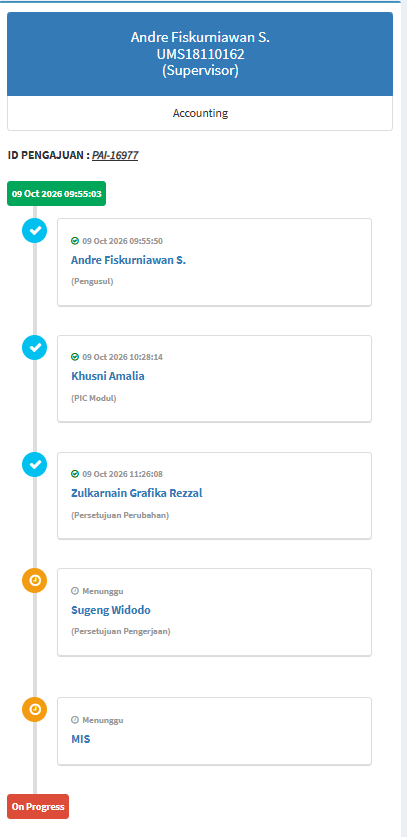
Available information:
| Section | Description |
|---|---|
| Type |
Displays the application or project type. |
| Submission No. | Displays the submission number. |
| Module | Displays the related modules and submodules. |
| Description | Displays the requirements description. |
| Projects | Displays the project phases. |
| Indicator | Displays the achievement indicator. |
| Achievement Percentage | Displays the progress percentage. |
| PIC | Displays the PIC, if available. |
Indicator
| Value | Description |
|---|---|
| 0 | No Progress Yet |
| 5 | In Progress |
| 10 |
Completed |
API LIST
MIS Module Guide
Module Location:
Access Requisition > MIS > List API
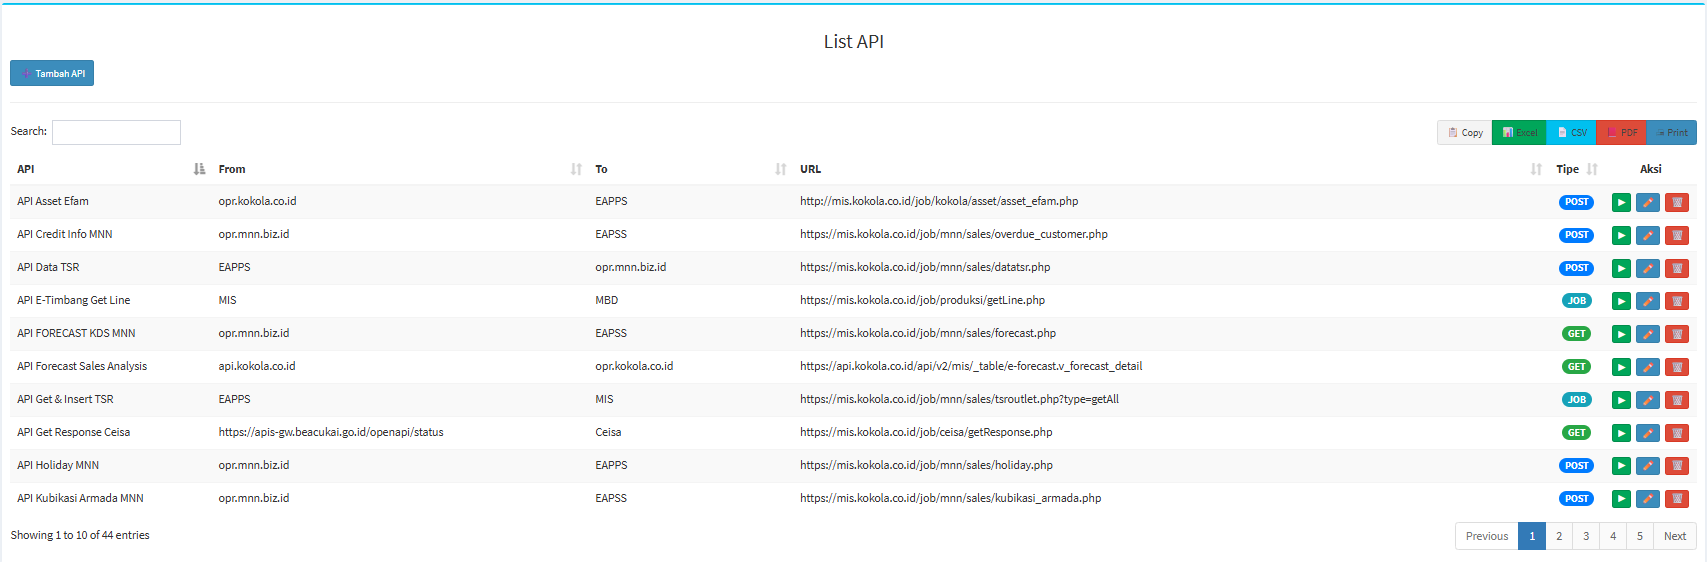
Screen Description
| Section |
Description |
|---|---|
| Add API |
Used to open the API addition form. |
| Search |
Used to search for APIs. |
| Copy |
Used to copy table data. |
| Excel | Used to export to Excel. |
| CSV | Used to export to CSV. |
| Used to export to PDF. | |
| Used to print the API list. |
API List Table
| Coloum | Description |
|---|---|
| API | API Name. |
| From | Source system/application. |
| To | Destination system/application. |
| URL | API endpoint address. |
| Type |
API process type. |
| Action |
Available actions. |
API Types
- GET: Used to retrieve data from the destination system/server.
- POST: Used to send to be processed by the server
- JOB: Used as an internal MIS system type for specific processes/jobs.
Adding an API
Add API
The system will display the Add API form.
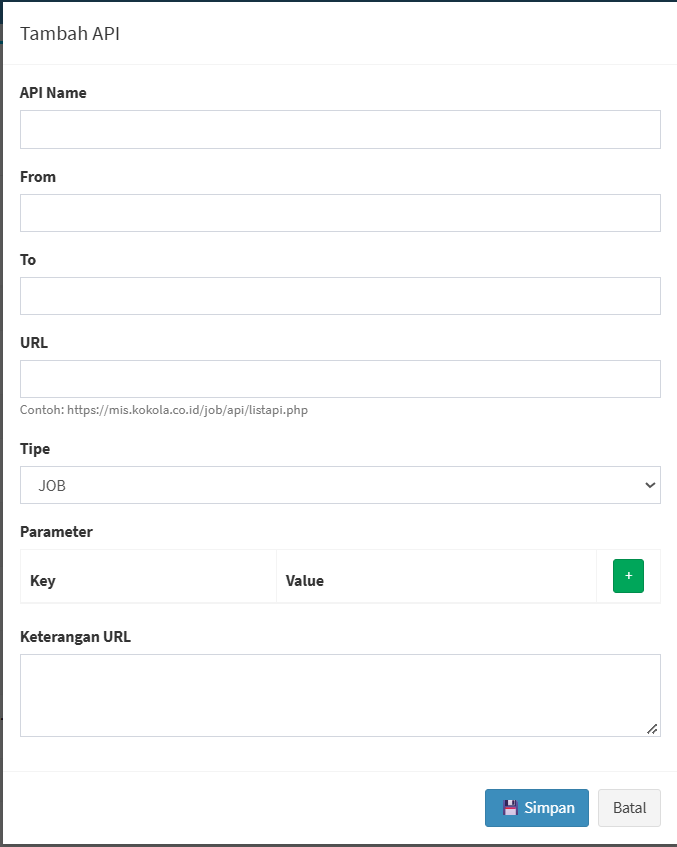
| Field | Description |
|---|---|
| API Name | API Name. |
| From |
Source system/application. |
| To | Destination system/application. |
| URL | API Endpoint. |
| Type | Specifies GET, POST, JOB, or other available options. |
| Parameter Key | Parameter value. |
| Parameter Value | Parameter value. |
| + | Add a parameter. |
| URL Description | Provides additional information about the API. |
| Save | Saves the API data. |
| Back | Cancels the addition. |
ESA UPDATE FORM
MIS Module Guide
Module Location:
Access Requisition > MIS > ESA Update Form
The ESA Update Form menu is used to retrieve specific data via the ESA Data Update form.
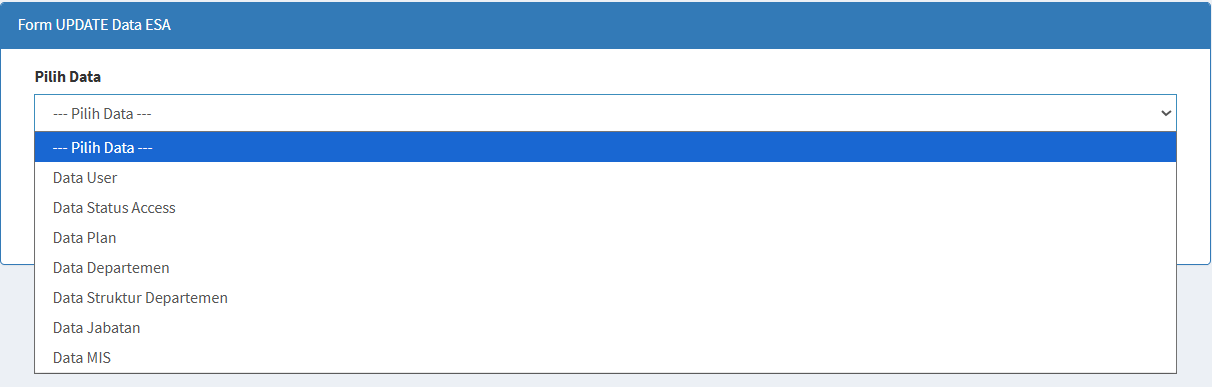
The page contains:
| Section | Description |
|---|---|
|
Select Data |
Used to select the type of data to be retrieved. |
| Get Data |
Used to run the data retrieval process based on the selection. |
For some data types, the system may display additional fields.
For example, when selecting “User Data,” the system displays:
Enter NIK (If Required)
The NIK can be used to retrieve data for a specific user.
The following rule applies:
A maximum of 1 NIK
APPROVAL SETTINGS
MIS Module Guide
Module Location:
Go to Requisition > MIS > Approval Settings
The system will display the Application Change Request page, which contains a list of approval configurations.
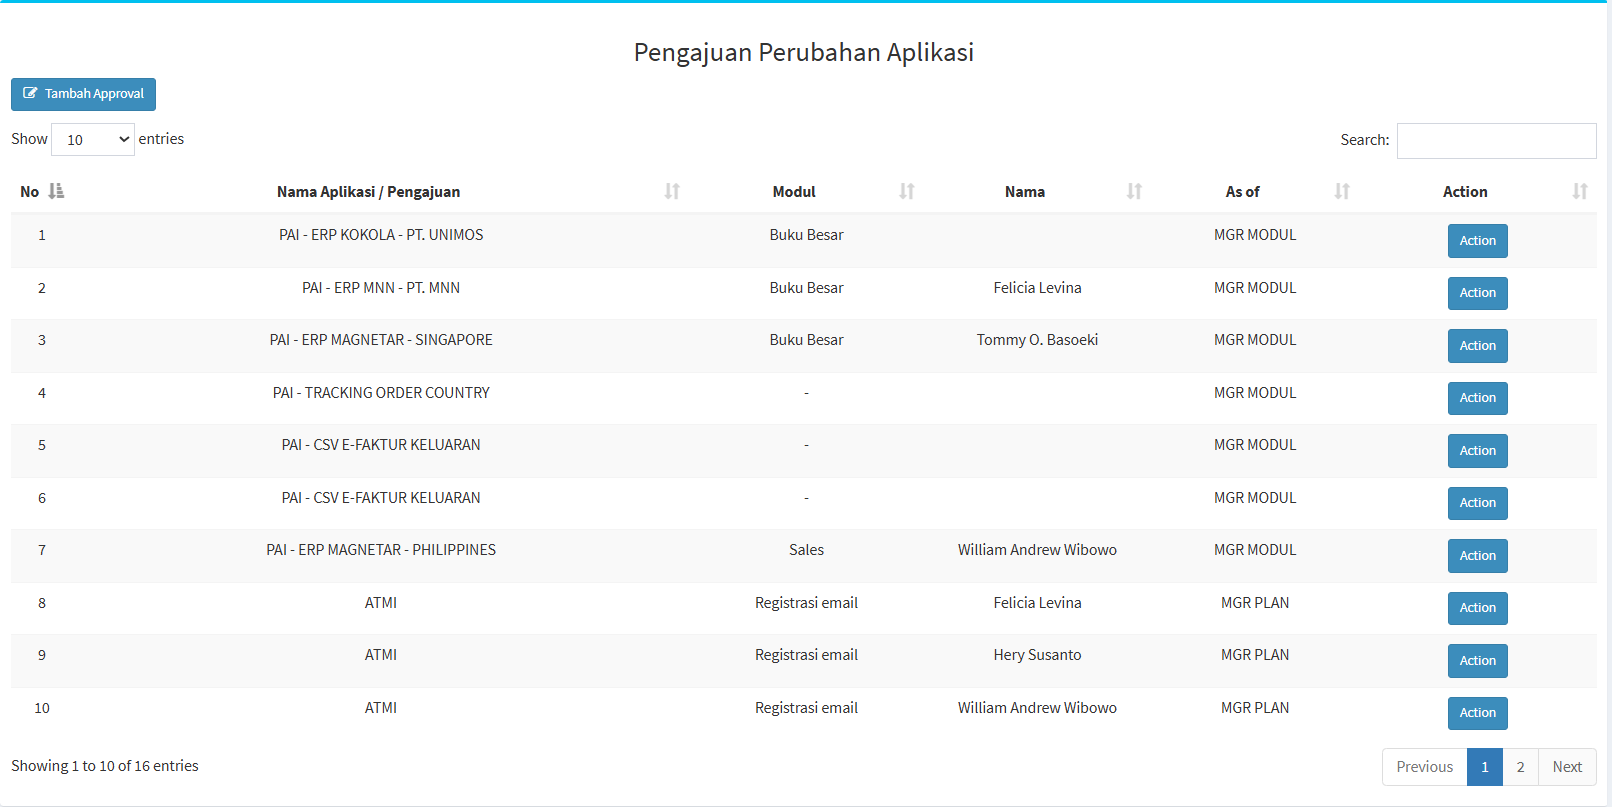
Table Description
| Coloum | Description |
|---|---|
| No |
Sequence number of the data. |
|
Application Name / Request |
Displays the application or type of request. |
| Module |
Displays the module related to the approval. |
| Name |
Displays the name of the party/PIC. |
| As of |
Displays the party’s position or role in the approval process. |
| Action |
Displays the action taken on the configuration. |
The “Show Entries” feature is used to set the number of records displayed, while “Search” is used to find specific configurations.
Adding an Approval
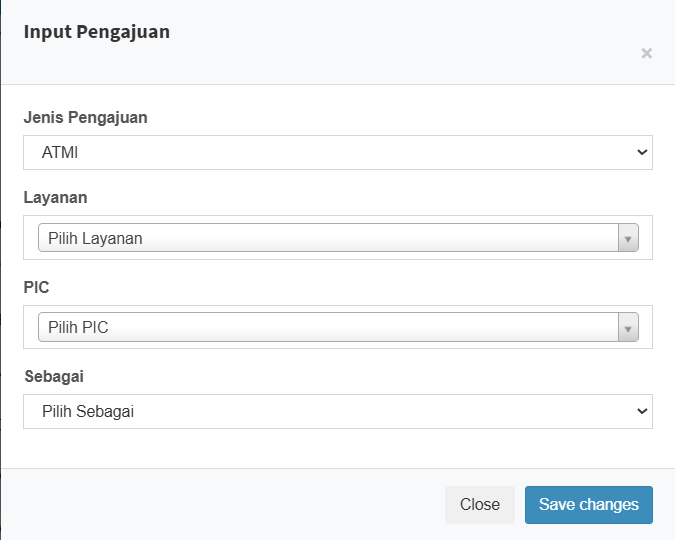
| Field | Description |
|---|---|
|
Request Type |
Used to select the type of request to be configured. |
|
Service |
Used to select the associated service. |
| PIC |
Used to specify the PIC. |
|
As |
Used to specify the PIC’s role in the approval process. |
| Close |
Closes the form without saving. |
| Save changes |
Saves the approval configuration. |
Usage Steps
- Select the Request Type.
- Select the Service.
- Specify the PIC.
- Select a role in the “As” field.
- Review your selections.
- Click “Save changes.”
GUIDE BOOK
MIS Module Guide
Module Location:
Access Requisition > Guide Book

-
Guide Book Contents
-
Application Changes
The Application Changes section explains the process for submitting changes and creating new applications. According to the procedures outlined in this document, users must specify the module for which the request is being submitted, provide a description of the changes, explain the benefits or opportunities, estimate the completion time, and attach supporting documents if necessary. The document also explains the functions of the buttons:
-
Save: Used to save the submission so that the data can still be updated.
-
Confirm: Used to proceed with the submission to the approval process.
- Cancel: Used to cancel the submission.
-
-
Access to Media Information Transfer (ATMI)
The ATMI section explains the process for submitting requests for information media transfer access. Users can create new requests and view their request history. Users can also specify which users to include in the request, including submitting a request for themselves.
On the ATMI form, users select the type of media information access required and fill out the request details. The document explains that more than one type of request can be selected as needed. Once confirmed, the request enters the approval process and can then be processed by the MIS team once approval is complete.
-
ERP/Application Access
The ERP section explains the process for requesting access to ERP application modules and submodules. Users can select either the main module or specific submodules. If all submodules within a single module are required, the document states that users can select the main module. If only certain access rights are needed, users can select specific submodules.
During this process, users can choose access types such as “Delete” and “Read” depending on the module being requested. After the request is saved and confirmed, the process is forwarded to the designated person in charge (PIC) for approval related to that module.
-
Work Permit
The Working Permit section explains the process for requesting activity permits. Users must fill in information such as:
-
the activity to be performed,
-
the accompanying person,
-
user data,
-
user type (Internal or External),
- and details of the required equipment.
If more than one person participates in the activity, the document explains that there is a function to add user data.
After the application is confirmed, the Working Permit will enter the approval process. The document also explains that after receiving CISO approval, users can view the details and QR code for permit verification purposes.
-
-
CCTV Layout & Direction Changes
The Guide Book also explains the process for submitting requests for changes to CCTV layout and direction. Users must specify the Plant and the Type of Request.
The types of requests described include:
-
Changes to CCTV Layout
-
Addition of CCTV Locations
For layout changes, the required information includes the CCTV location, details of the change, reason for the change, notes, and supporting documents. For adding CCTV points, users must provide the location of the new CCTV point, notes, and supporting documents.
-
-
Approval Information in the Guidebook
The Guide Book also explains the approval process. The document states that detailed application information and the approval history can be viewed after the application is submitted. The document uses the following indicators:
-
A blue checkmark icon indicates that the request has been approved.
-
An orange icon indicates that the request is still pending approval.
Once all necessary approvals have been granted, the request can be processed by the MIS team according to the type of request. -
-
Terms in the Guidebook
The document also lists several terms used in the Access Requisition process.
Term DEfiniton PAI Internal Application Change
ATMI Information Media Transfer Access
REQDATA Request Data MIS Management Information System CISO Chief Information Security Officer ERP Enterprise Resource Planning PIC Person In Charge CCTV Closed Circuit Television NIK Employee ID Number
-
How to Use the Guidebook
To use the Guide Book:
-
Select the Guide Book menu in the Access Requisition sidebar.
-
The system will open the Access Requisition Completion Work Instructions document.
-
Find the section that corresponds to the type of request you wish to submit.
-
Use the document as a reference to understand the information you need to prepare and the approval workflow.
-
Return to the Access Requisition menu to submit your request using the appropriate feature.
-
-
Tips & Important Notes
-
Use the Guide Book as a reference when you need an explanation of the Access Requisition process and requirements.
-
Make sure the type of request you are reviewing matches the task you need to perform.
-
Pay attention to the information regarding supporting documents, PIC approval, and confirmation steps before submitting your request.
-
Some screens, terms, and system addresses in the Guide Book are based on documents effective as of September 17, 2020, so there may be differences from the current Access Requisition interface.
-
If there are differences between the Guide Book interface and the current system, use the features available in the current version of Access Requisition and follow the procedures in effect at your company.
-